Dell™ Technology Guide
Page 142
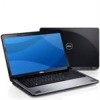
...computer, see Maintaining Your Computer for the First Time Power Meter icon The first time you use the AC adapter to connect your computer to an electrical outlet in maximum performance mode (see "Dell™ ControlPoint Power Manager" on how you use your computer, use your laptop computer. The life...USB devices • Using high-brightness display settings, 3D screen savers, or other power- For best results, operate the computer with the AC adapter until the battery is used . You may need to a CD or DVD. Using Your Laptop Computer for ways to adjust optimize your computer performance...
...computer, see Maintaining Your Computer for the First Time Power Meter icon The first time you use the AC adapter to connect your computer to an electrical outlet in maximum performance mode (see "Dell™ ControlPoint Power Manager" on how you use your computer, use your laptop computer. The life...USB devices • Using high-brightness display settings, 3D screen savers, or other power- For best results, operate the computer with the AC adapter until the battery is used . You may need to a CD or DVD. Using Your Laptop Computer for ways to adjust optimize your computer performance...
Dell™ Technology Guide
Page 143
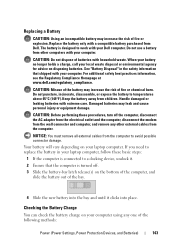
... or environmental agency for advice on your computer. Keep the battery away from Dell. CAUTION: Before performing these basic steps: 1 If the computer is turned off the computer, disconnect the AC adapter from the electrical outlet and the computer, disconnect the modem from the computer ... may increase the risk of fire or explosion. For additional safety best practices information, see the Regulatory Compliance Homepage at www.dell.com/regulatory_compliance. Replacing a Battery CAUTION: Using an incompatible battery may increase the risk of fire or chemical burn. Replace the...
... or environmental agency for advice on your computer. Keep the battery away from Dell. CAUTION: Before performing these basic steps: 1 If the computer is turned off the computer, disconnect the AC adapter from the electrical outlet and the computer, disconnect the modem from the computer ... may increase the risk of fire or explosion. For additional safety best practices information, see the Regulatory Compliance Homepage at www.dell.com/regulatory_compliance. Replacing a Battery CAUTION: Using an incompatible battery may increase the risk of fire or chemical burn. Replace the...
Dell™ Technology Guide
Page 145
... Microsoft Windows Power Options to optimize your computer's power usage (see "Setting Power Options" on your work immediately after a low-battery warning. If necessary, the AC adapter then charges the battery and maintains the battery charge. If the battery runs completely out of the following: • Connect the computer to the combined...
... Microsoft Windows Power Options to optimize your computer's power usage (see "Setting Power Options" on your work immediately after a low-battery warning. If necessary, the AC adapter then charges the battery and maintains the battery charge. If the battery runs completely out of the following: • Connect the computer to the combined...
Dell™ Technology Guide
Page 146
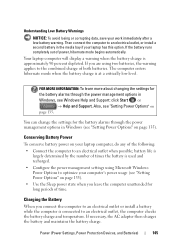
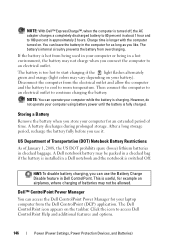
...long storage period, recharge the battery fully before you use the Battery Charge Disable feature in Dell ControlPoint. NOTE: With Dell™ ExpressCharge™, when the computer is turned off, the AC adapter charges a completely discharged battery to 80 percent in about 1 hour and to start charging if... and the battery to cool to continue charging the battery. HINT: To disable battery charging, you connect the computer to access Dell ControlPoint Help and additional features and options. 146 Power (Power Settings, Power Protection Devices, and Batteries) Click the icon to an...
...long storage period, recharge the battery fully before you use the Battery Charge Disable feature in Dell ControlPoint. NOTE: With Dell™ ExpressCharge™, when the computer is turned off, the AC adapter charges a completely discharged battery to 80 percent in about 1 hour and to start charging if... and the battery to cool to continue charging the battery. HINT: To disable battery charging, you connect the computer to access Dell ControlPoint Help and additional features and options. 146 Power (Power Settings, Power Protection Devices, and Batteries) Click the icon to an...
Dell™ Technology Guide
Page 278
...F2 TO RUN THE SETUP UTILITY. Ensure that require a 130-W or greater AC adapter. If the problem persists, replace the CMOS battery. Enter the system setup program and correct the date or time (see "Running the Dell Diagnostics" on page 308). STRIKE THE F3 KEY (BEFORE THE F1 OR F2..., OR THE COMPUTER IS NOT PROPERLY CONNECTED TO THE DOCKING STATION. YOU SHOULD UNDOCK, REDOCK, ATTACH THE POWER ADAPTER, OR PLUG IN THE POWER CORD. PLEASE CONNECT A DELL XXX-W AC ADAPTER OR GREATER FOR BEST SYSTEM PERFORMANCE. THE COMPUTER IS DOCKED AND ONLY BATTERY POWER IS DETECTED. STRIKE THE F1 ...
...F2 TO RUN THE SETUP UTILITY. Ensure that require a 130-W or greater AC adapter. If the problem persists, replace the CMOS battery. Enter the system setup program and correct the date or time (see "Running the Dell Diagnostics" on page 308). STRIKE THE F3 KEY (BEFORE THE F1 OR F2..., OR THE COMPUTER IS NOT PROPERLY CONNECTED TO THE DOCKING STATION. YOU SHOULD UNDOCK, REDOCK, ATTACH THE POWER ADAPTER, OR PLUG IN THE POWER CORD. PLEASE CONNECT A DELL XXX-W AC ADAPTER OR GREATER FOR BEST SYSTEM PERFORMANCE. THE COMPUTER IS DOCKED AND ONLY BATTERY POWER IS DETECTED. STRIKE THE F1 ...

Dell™ Technology Guide
Page 279
... YOUR DATA AND REPLACE YOUR HARD DRIVE BY CALLING YOUR SUPPORT DESK OR D E L L. - PLEASE CONNECT A DELL XXX-W AC ADAPTER OR GREATER FOR BEST PERFORMANCE. Connect the correct AC adapter to the computer or docking station. BATTERY IS CRITICALLY LOW. YOUR POWER ADAPTER DOES NOT SUPPLY ENOUGH POWER TO RUN THE ATTACHED DOCKING STATION. STRIKE T H E F 1 K E Y T O S H U T D O W N . - Connect the...
... YOUR DATA AND REPLACE YOUR HARD DRIVE BY CALLING YOUR SUPPORT DESK OR D E L L. - PLEASE CONNECT A DELL XXX-W AC ADAPTER OR GREATER FOR BEST PERFORMANCE. Connect the correct AC adapter to the computer or docking station. BATTERY IS CRITICALLY LOW. YOUR POWER ADAPTER DOES NOT SUPPLY ENOUGH POWER TO RUN THE ATTACHED DOCKING STATION. STRIKE T H E F 1 K E Y T O S H U T D O W N . - Connect the...
Dell™ Technology Guide
Page 280
...O D E # M 1 0 0 4 . - OR 4 In the search results, select the option that best describes the problem. Contact Dell for your computer (see the documentation for assistance (see "Running the Dell Diagnostics" on page 337). ***PROCESSOR SSDT DATA NOT FOUND*** OPERATING SYSTEM POWER MANAGEMENT FOR MULTI CORE PROCESSORS WILL BE DISABLED..., OR OBSTRUCTING THE AIR FLOW FROM THE SYSTEM FAN VENTS. EITHER UNDOCK OR INSERT AN APPROPRIATE ADAPTER. The AC adapter may be installed incorrectly, or the AC adapter or docking station may be defective. STRIKE THE F3 KEY TO CLEAR THE UL COUNTER, ANY ...
...O D E # M 1 0 0 4 . - OR 4 In the search results, select the option that best describes the problem. Contact Dell for your computer (see the documentation for assistance (see "Running the Dell Diagnostics" on page 337). ***PROCESSOR SSDT DATA NOT FOUND*** OPERATING SYSTEM POWER MANAGEMENT FOR MULTI CORE PROCESSORS WILL BE DISABLED..., OR OBSTRUCTING THE AIR FLOW FROM THE SYSTEM FAN VENTS. EITHER UNDOCK OR INSERT AN APPROPRIATE ADAPTER. The AC adapter may be installed incorrectly, or the AC adapter or docking station may be defective. STRIKE THE F3 KEY TO CLEAR THE UL COUNTER, ANY ...
Dell™ Technology Guide
Page 339
...is designed to enable technologies such as Native Command Queuing (NCQ) and hot plug. battery operating time - basic input/output system - A AC - advanced configuration and power interface - A dedicated graphics port that serves as system setup. 339 ambient light sensor - B battery life span...or utility) that allows system memory to identify, quarantine, and/or delete viruses from your particular computer. Unless you plug the AC adapter power cable in this Glossary are provided for informational purposes only and may or may not describe features included with your computer. ...
...is designed to enable technologies such as Native Command Queuing (NCQ) and hot plug. battery operating time - basic input/output system - A AC - advanced configuration and power interface - A dedicated graphics port that serves as system setup. 339 ambient light sensor - B battery life span...or utility) that allows system memory to identify, quarantine, and/or delete viruses from your particular computer. Unless you plug the AC adapter power cable in this Glossary are provided for informational purposes only and may or may not describe features included with your computer. ...
Setup Guide
Page 5
Contents Setting Up Your Studio Laptop 5 Before Setting Up Your Computer 5 Connect the AC Adapter 6 Connect the Network Cable (Optional 7 Press the Power Button 8 Set Up Microsoft Windows 9 Install the SIM (Optional 10 Enable or Disable Wireless (Optional 12 Connect to the Internet (Optional 14 Using Your Studio Laptop 18 Right Side Features 18...
Contents Setting Up Your Studio Laptop 5 Before Setting Up Your Computer 5 Connect the AC Adapter 6 Connect the Network Cable (Optional 7 Press the Power Button 8 Set Up Microsoft Windows 9 Install the SIM (Optional 10 Enable or Disable Wireless (Optional 12 Connect to the Internet (Optional 14 Using Your Studio Laptop 18 Right Side Features 18...

Setup Guide
Page 8
... on when you turn on power. NOTE: Use only Dell AC adapter family PA-3E, PA-10, and PA-12 with electrical outlets worldwide. NOTE: Connect the power cord to your computer. 6 Setting Up Your Studio Laptop Connect the AC Adapter Connect the AC adapter to the computer and then plug it into a wall outlet or surge protector...
... on when you turn on power. NOTE: Use only Dell AC adapter family PA-3E, PA-10, and PA-12 with electrical outlets worldwide. NOTE: Connect the power cord to your computer. 6 Setting Up Your Studio Laptop Connect the AC Adapter Connect the AC adapter to the computer and then plug it into a wall outlet or surge protector...

Setup Guide
Page 22
...discs. Ensure that the side with the label facing upwards and gently push the disc into the slot. Place the disc in the AC adapter or save and close your open documents and applications. 20 the battery charge is critically low and you will automatically pull the disc .... Using Your Studio Laptop 4 Optical drive - the battery charge is low and the battery is low. • Blinking amber - The light indicates the following states when the computer is turned off. • Solid amber - the battery is adequately charged or the computer is powered by the AC adapter : •...
...discs. Ensure that the side with the label facing upwards and gently push the disc into the slot. Place the disc in the AC adapter or save and close your open documents and applications. 20 the battery charge is critically low and you will automatically pull the disc .... Using Your Studio Laptop 4 Optical drive - the battery charge is low and the battery is low. • Blinking amber - The light indicates the following states when the computer is turned off. • Solid amber - the battery is adequately charged or the computer is powered by the AC adapter : •...
Setup Guide
Page 23
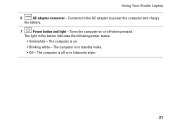
The computer is off when pressed. The computer is in standby mode. • Off - Connects to the AC adapter to power the computer and charge the battery. 7 Power button and light - Using Your Studio Laptop 6 AC adapter connector - Turns the computer on . • Blinking white - The light in hibernate state. 21 The computer is on or off or in the button indicates the following power states: • Solid white -
The computer is off when pressed. The computer is in standby mode. • Off - Connects to the AC adapter to power the computer and charge the battery. 7 Power button and light - Using Your Studio Laptop 6 AC adapter connector - Turns the computer on . • Blinking white - The light in hibernate state. 21 The computer is on or off or in the button indicates the following power states: • Solid white -

Setup Guide
Page 41
... release latch to the side. 3. To replace the battery: Slide the battery into place. 39 Do not use a battery purchased from Dell. WARNING: Before removing the battery, shut down the computer and turn it clicks into the battery bay, until it over. 2. Slide the... battery away from other computers. This computer should only use batteries from the battery bay. Using Your Studio Laptop WARNING: Using an incompatible battery may increase the risk of fire or explosion. To remove the battery: 1. Shut down the computer, and remove external cables (including the AC adapter).
... release latch to the side. 3. To replace the battery: Slide the battery into place. 39 Do not use a battery purchased from Dell. WARNING: Before removing the battery, shut down the computer and turn it clicks into the battery bay, until it over. 2. Slide the... battery away from other computers. This computer should only use batteries from the battery bay. Using Your Studio Laptop WARNING: Using an incompatible battery may increase the risk of fire or explosion. To remove the battery: 1. Shut down the computer, and remove external cables (including the AC adapter).

Setup Guide
Page 50
...responding - Press the power button until the computer turns off and then turn it back on properly. • Ensure that the light on the AC adapter is in standby mode. Some possible causes of interference are: • Power, keyboard, and mouse extension cables. • Too many devices ...connected to a power strip. • Multiple power strips connected to resume normal operation. If the AC adapter has a light, ensure that the electrical outlet is creating interference by testing it with another device, such as a lamp. • Check the...
...responding - Press the power button until the computer turns off and then turn it back on properly. • Ensure that the light on the AC adapter is in standby mode. Some possible causes of interference are: • Power, keyboard, and mouse extension cables. • Too many devices ...connected to a power strip. • Multiple power strips connected to resume normal operation. If the AC adapter has a light, ensure that the electrical outlet is creating interference by testing it with another device, such as a lamp. • Check the...

Setup Guide
Page 86
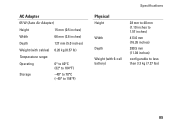
Specifications AC Adapter Input voltage Input current Input frequency Output power Output current 65 W 90 W Rated output voltage 100-240 VAC 1.5 A 50-60 Hz 65 W or 90 W 4.43 A (maximum at 4-second pulse) 3.34 A (continuous) 5.62 A (maximum at 4-second pulse) 4.62 A (continuous) 19.5 ± 1 VDC AC Adapter Dimensions: 90 W (E-Series) Height Width Depth Weight (with cables) 90 W (D-Series) Height Width Depth Weight (with cables) 16 mm (0.6 inches) 70 mm (2.8 inches) 147 mm (5.8 inches) 0.29 kg (0.64 lb) 34.2 mm (1.3 inches) 60.8 mm (2.3 inches) 153.4 mm (6.0 inches) 0.46 kg (1.01 lb) 84
Specifications AC Adapter Input voltage Input current Input frequency Output power Output current 65 W 90 W Rated output voltage 100-240 VAC 1.5 A 50-60 Hz 65 W or 90 W 4.43 A (maximum at 4-second pulse) 3.34 A (continuous) 5.62 A (maximum at 4-second pulse) 4.62 A (continuous) 19.5 ± 1 VDC AC Adapter Dimensions: 90 W (E-Series) Height Width Depth Weight (with cables) 90 W (D-Series) Height Width Depth Weight (with cables) 16 mm (0.6 inches) 70 mm (2.8 inches) 147 mm (5.8 inches) 0.29 kg (0.64 lb) 34.2 mm (1.3 inches) 60.8 mm (2.3 inches) 153.4 mm (6.0 inches) 0.46 kg (1.01 lb) 84
Setup Guide
Page 87
AC Adapter 65 W (Auto Air Adapter) Height 15 mm (0.5 inches) Width 66 mm (2.6 inches) Depth 127 mm (5.0 inches) Weight (with cables) 0.26 kg (0.57 lb) Temperature range: Operating 0° to 40°C (32° to 104°F) Storage -40° to 70°C (-40° to 158°F) Specifications Physical Height Width Depth Weight (with 6-cell battery) 28 mm to 40 mm (1.10 inches to 1.57 inches) 413.0 mm (16.26 inches) 280.5 mm (11.04 inches) configurable to less than 3.3 kg (7.27 lbs) 85
AC Adapter 65 W (Auto Air Adapter) Height 15 mm (0.5 inches) Width 66 mm (2.6 inches) Depth 127 mm (5.0 inches) Weight (with cables) 0.26 kg (0.57 lb) Temperature range: Operating 0° to 40°C (32° to 104°F) Storage -40° to 70°C (-40° to 158°F) Specifications Physical Height Width Depth Weight (with 6-cell battery) 28 mm to 40 mm (1.10 inches to 1.57 inches) 413.0 mm (16.26 inches) 280.5 mm (11.04 inches) configurable to less than 3.3 kg (7.27 lbs) 85


