User's Guide
Page 3
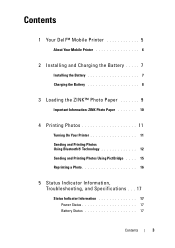
Contents 1 Your Dell™ Mobile Printer 5 About Your Mobile Printer 6 2 Installing and Charging the Battery . . . . . 7 Installing the Battery 7 Charging the Battery 8 3 Loading the ZINK™ Photo Paper 9 Important Information: ZINK Photo Paper 10 4 Printing Photos 11 Turning On Your Printer 11 Sending and Printing Photos Using Bluetooth® Technology 12 Sending and Printing Photos Using PictBridge . . . . 15 Reprinting a Photo 16 5 Status Indicator Information, Troubleshooting, and Specifications...
Contents 1 Your Dell™ Mobile Printer 5 About Your Mobile Printer 6 2 Installing and Charging the Battery . . . . . 7 Installing the Battery 7 Charging the Battery 8 3 Loading the ZINK™ Photo Paper 9 Important Information: ZINK Photo Paper 10 4 Printing Photos 11 Turning On Your Printer 11 Sending and Printing Photos Using Bluetooth® Technology 12 Sending and Printing Photos Using PictBridge . . . . 15 Reprinting a Photo 16 5 Status Indicator Information, Troubleshooting, and Specifications...
User's Guide
Page 5
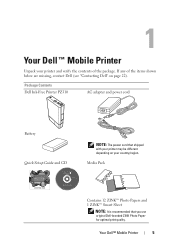
... power cord that you use original Dell-branded ZINK Photo Paper for optimal print quality. 1 Your Dell™ Mobile Printer Unpack your country/region. Package Contents Dell Ink-Free Printer PZ310 AC adapter and power cord Battery Quick Setup Guide and CD Dell™ Ink-Free Mobile Printer www.dell.com | support.dell.com Dell™ Ink-Free Mobile Printer PZ310 Contents: User's manual Product Information...
... power cord that you use original Dell-branded ZINK Photo Paper for optimal print quality. 1 Your Dell™ Mobile Printer Unpack your country/region. Package Contents Dell Ink-Free Printer PZ310 AC adapter and power cord Battery Quick Setup Guide and CD Dell™ Ink-Free Mobile Printer www.dell.com | support.dell.com Dell™ Ink-Free Mobile Printer PZ310 Contents: User's manual Product Information...
User's Guide
Page 6
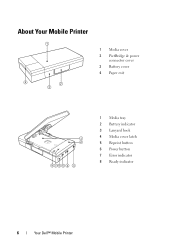
About Your Mobile Printer 1 4 2 3 1 Media cover 2 PictBridge & power connector cover 3 Battery cover 4 Paper exit 1 2 876 5 4 3 1 Media tray 2 Battery indicator 3 Lanyard hook 4 Media cover latch 5 Reprint button 6 Power button 7 Error indicator 8 Ready indicator 6 Your Dell™ Mobile Printer
About Your Mobile Printer 1 4 2 3 1 Media cover 2 PictBridge & power connector cover 3 Battery cover 4 Paper exit 1 2 876 5 4 3 1 Media tray 2 Battery indicator 3 Lanyard hook 4 Media cover latch 5 Reprint button 6 Power button 7 Error indicator 8 Ready indicator 6 Your Dell™ Mobile Printer
User's Guide
Page 7
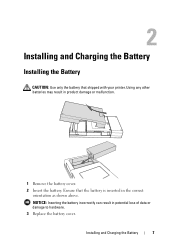
Installing and Charging the Battery 7 NOTICE: Inserting the battery incorrectly can result in product damage or malfunction. 1 Remove the battery cover. 2 Insert the battery. 2 Installing and Charging the Battery Installing the Battery CAUTION: Use only the battery that the battery is inserted in the correct orientation as shown above. Ensure that shipped with your printer. Using any other batteries may result in potential loss of data or damage to hardware. 3 Replace the battery cover.
Installing and Charging the Battery 7 NOTICE: Inserting the battery incorrectly can result in product damage or malfunction. 1 Remove the battery cover. 2 Insert the battery. 2 Installing and Charging the Battery Installing the Battery CAUTION: Use only the battery that the battery is inserted in the correct orientation as shown above. Ensure that shipped with your printer. Using any other batteries may result in potential loss of data or damage to hardware. 3 Replace the battery cover.
User's Guide
Page 8
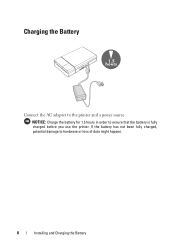
NOTICE: Charge the battery for 1.5 hours in order to the printer and a power source. Charging the Battery h1o.u5rs Connect the AC adapter to ensure that the battery is fully charged before you use the printer. If the battery has not been fully charged, potential damage to hardware or loss of data might happen. 8 Installing and Charging the Battery
NOTICE: Charge the battery for 1.5 hours in order to the printer and a power source. Charging the Battery h1o.u5rs Connect the AC adapter to ensure that the battery is fully charged before you use the printer. If the battery has not been fully charged, potential damage to hardware or loss of data might happen. 8 Installing and Charging the Battery
User's Guide
Page 17
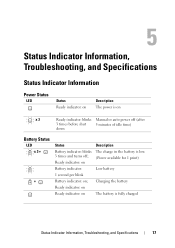
...x3 Ready indicator: blinks Manual or auto power off (after 3 times before shut 5 minutes of idle time) down Battery Status LED x3+ + Status Battery indicator: blinks 3 times and turns off; 5 Status Indicator Information, Troubleshooting, and Specifications Status Indicator Information Power Status LED...Status Ready indicator: on Description The power is on Description The charge in the battery is low. (Power available for 1 print) Low battery Charging the battery The battery is fully charged Status Indicator Information, Troubleshooting, and Specifications 17 Ready indicator: on...
...x3 Ready indicator: blinks Manual or auto power off (after 3 times before shut 5 minutes of idle time) down Battery Status LED x3+ + Status Battery indicator: blinks 3 times and turns off; 5 Status Indicator Information, Troubleshooting, and Specifications Status Indicator Information Power Status LED...Status Ready indicator: on Description The power is on Description The charge in the battery is low. (Power available for 1 print) Low battery Charging the battery The battery is fully charged Status Indicator Information, Troubleshooting, and Specifications 17 Ready indicator: on...

User's Guide
Page 19
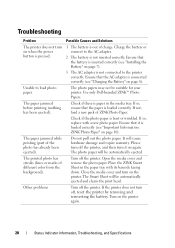
Page Count Status To know the count of pages printed using your printer: 1 Turn on the printer. 2 Press and hold the Reprint button for 7 to 8 seconds until the battery, error, and ready indicators start to blink. 3 The page count can be determined by correlating the status of the 3 LEDs with the table given below: LED 1 LED 2 LED 3 Page Count
Page Count Status To know the count of pages printed using your printer: 1 Turn on the printer. 2 Press and hold the Reprint button for 7 to 8 seconds until the battery, error, and ready indicators start to blink. 3 The page count can be determined by correlating the status of the 3 LEDs with the table given below: LED 1 LED 2 LED 3 Page Count
User's Guide
Page 20
... turn on the printer again. 20 Status Indicator Information, Troubleshooting, and Specifications Use only Dell-branded ZINK™ Photo Papers. Place the ZINK Smart Sheet in the media tray. If so, ensure that the AC adapter is connected correctly (see "Charging the Battery" on page 7). 3 The AC adapter is inserted correctly (see "Important Information: ZINK Photo Paper" on...
... turn on the printer again. 20 Status Indicator Information, Troubleshooting, and Specifications Use only Dell-branded ZINK™ Photo Papers. Place the ZINK Smart Sheet in the media tray. If so, ensure that the AC adapter is connected correctly (see "Charging the Battery" on page 7). 3 The AC adapter is inserted correctly (see "Important Information: ZINK Photo Paper" on...
User's Guide
Page 21
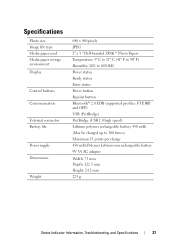
... Image file type Media paper used Media paper storage environment Display Control buttons Communication External connector Battery life Power supply Dimensions Weight 640 x 960 pixels JPEG 2'' x 3 '' Dell-branded ZINK™ Photo Papers Temperature: 5o C to 32o C (41o F to 90o F) Humidity: 20% to 80% RH Power status Ready status Error status Power button Reprint button...
... Image file type Media paper used Media paper storage environment Display Control buttons Communication External connector Battery life Power supply Dimensions Weight 640 x 960 pixels JPEG 2'' x 3 '' Dell-branded ZINK™ Photo Papers Temperature: 5o C to 32o C (41o F to 90o F) Humidity: 20% to 80% RH Power status Ready status Error status Power button Reprint button...