
Getting Started Guide
Page 5
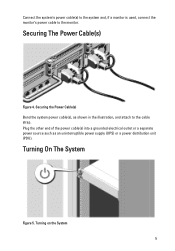
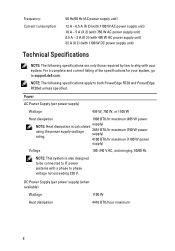
Turning On The System Figure 5. Connect the system's power cable(s) to the system and, if a monitor is used, connect the monitor's power cable to the cable strap. Plug the other end of the power cable(s) into a grounded electrical outlet or a separate power source such as shown in the illustration, and attach to the monitor. Securing The Power Cable(s) Figure 4. Securing the Power Cable(s) Bend the system power cable(s), as an uninterruptible power supply (UPS) or a power distribution unit (PDU). Turning on the System 5
Turning On The System Figure 5. Connect the system's power cable(s) to the system and, if a monitor is used, connect the monitor's power cable to the cable strap. Plug the other end of the power cable(s) into a grounded electrical outlet or a separate power source such as shown in the illustration, and attach to the monitor. Securing The Power Cable(s) Figure 4. Securing the Power Cable(s) Bend the system power cable(s), as an uninterruptible power supply (UPS) or a power distribution unit (PDU). Turning on the System 5

Getting Started Guide
Page 7
...for updates on the device described in compliance with 1100 W DC power supply unit) 7 de C.V. Paseo de la Reforma 2620 -11º Piso Col. NOM Information The following information is available online at support.dell.com/manuals. • The rack documentation included with your rack... configuring and managing your system. Model number: Supply voltage: E14S 100-240 V CA (with 495 W, 750 W, and 1100 W AC power supply unit) or -(48-60) V de CC (with the requirements of the official Mexican standards (NOM): Importer: Dell Inc. Obtaining Technical Assistance If you purchased with...
...for updates on the device described in compliance with 1100 W DC power supply unit) 7 de C.V. Paseo de la Reforma 2620 -11º Piso Col. NOM Information The following information is available online at support.dell.com/manuals. • The rack documentation included with your rack... configuring and managing your system. Model number: Supply voltage: E14S 100-240 V CA (with 495 W, 750 W, and 1100 W AC power supply unit) or -(48-60) V de CC (with the requirements of the official Mexican standards (NOM): Importer: Dell Inc. Obtaining Technical Assistance If you purchased with...
Getting Started Guide
Page 8
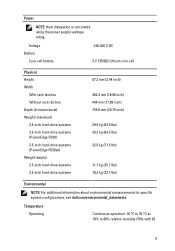
... PowerEdge R720 and PowerEdge R720xd unless specified. supply) 2891 BTU/hr maximum (750 W power supply) 4100 BTU/hr maximum (1100 W power supply) Voltage 100-240 V AC, autoranging, 50/60 Hz NOTE: This system is calculated using the power supply wattage rating. NOTE: The following specifications are only those required by law to ship with a phase to support.dell.com. DC Power Supply (per power supply...
... PowerEdge R720 and PowerEdge R720xd unless specified. supply) 2891 BTU/hr maximum (750 W power supply) 4100 BTU/hr maximum (1100 W power supply) Voltage 100-240 V AC, autoranging, 50/60 Hz NOTE: This system is calculated using the power supply wattage rating. NOTE: The following specifications are only those required by law to ship with a phase to support.dell.com. DC Power Supply (per power supply...
Getting Started Guide
Page 9
...Height Width With rack latches Without rack latches Depth (includes bezel) Weight (maximum) 2.5-inch hard-drive systems 3.5-inch hard-drive systems (PowerEdge R720) 3.5-inch hard-drive systems (PowerEdge R720xd) Weight (empty) 2.5-inch hard-drive systems 3.5-inch hard-drive systems 87.3 mm (3.44 inch) 482.4 mm (18.98...11.7 kg (25.7 lbs) 10.3 kg (22.7 lbs) Environmental NOTE: For additional information about environmental measurements for specific system configurations, see dell.com/environmental_datasheets. Power NOTE: Heat dissipation is calculated using the power supply wattage rating.
...Height Width With rack latches Without rack latches Depth (includes bezel) Weight (maximum) 2.5-inch hard-drive systems 3.5-inch hard-drive systems (PowerEdge R720) 3.5-inch hard-drive systems (PowerEdge R720xd) Weight (empty) 2.5-inch hard-drive systems 3.5-inch hard-drive systems 87.3 mm (3.44 inch) 482.4 mm (18.98...11.7 kg (25.7 lbs) 10.3 kg (22.7 lbs) Environmental NOTE: For additional information about environmental measurements for specific system configurations, see dell.com/environmental_datasheets. Power NOTE: Heat dissipation is calculated using the power supply wattage rating.

Owner's Manual
Page 5
... 78 Network Daughter Card...78 Removing The Network Daughter Card...78 Installing The Network Daughter Card...79 Processors...79 Removing A Processor...80 Installing A Processor...83 Power Supplies...84 Hot Spare Feature...85
... 78 Network Daughter Card...78 Removing The Network Daughter Card...78 Installing The Network Daughter Card...79 Processors...79 Removing A Processor...80 Installing A Processor...83 Power Supplies...84 Hot Spare Feature...85
Owner's Manual
Page 6
... The Power Supply Blank...91 System Battery...91 Replacing The System Battery...91 Hard-Drive Backplane...92 Removing The Hard-Drive Backplane...93 Installing The Hard-Drive Backplane...105 Removing The Optional Hard-Drive Backplane (Back 106 Installing The Optional Hard-Drive Backplane (Back 108 Control Panel...109 Removing The Control Panel (PowerEdge R720...
... The Power Supply Blank...91 System Battery...91 Replacing The System Battery...91 Hard-Drive Backplane...92 Removing The Hard-Drive Backplane...93 Installing The Hard-Drive Backplane...105 Removing The Optional Hard-Drive Backplane (Back 106 Installing The Optional Hard-Drive Backplane (Back 108 Control Panel...109 Removing The Control Panel (PowerEdge R720...
Owner's Manual
Page 9
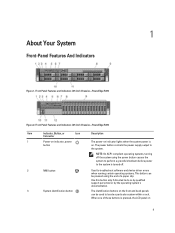
... Chassis)-PowerEdge R720 Item Indicator, Button, or Icon Description Connector 1 Power-on indicator, power button The power-on indicator lights when the system power is pressed, the LCD panel on the front and back panels can be used to the system. The identification buttons on 9 When one of a paper clip. The power button controls the power supply output to...
... Chassis)-PowerEdge R720 Item Indicator, Button, or Icon Description Connector 1 Power-on indicator, power button The power-on indicator lights when the system power is pressed, the LCD panel on the front and back panels can be used to the system. The identification buttons on 9 When one of a paper clip. The power button controls the power supply output to...
Owner's Manual
Page 11
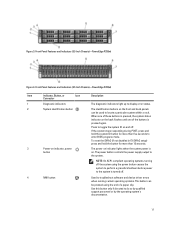
...on and off the system using the end of the buttons is pressed again. Front-Panel Features and Indicators (3.5 Inch Chassis)-PowerEdge R720xd Figure 4. Use this button only if directed to the system. Press to locate a particular system within a rack. ... 3. Front-Panel Features and Indicators (2.5 Inch Chassis)-PowerEdge R720xd Item Indicator, Button, or Icon Description Connector 1 Diagnostic indicators The diagnostic indicators light up to enter BIOS progress mode. The power button controls the power supply output to do so by qualified support personnel or by...
...on and off the system using the end of the buttons is pressed again. Front-Panel Features and Indicators (3.5 Inch Chassis)-PowerEdge R720xd Figure 4. Use this button only if directed to the system. Press to locate a particular system within a rack. ... 3. Front-Panel Features and Indicators (2.5 Inch Chassis)-PowerEdge R720xd Item Indicator, Button, or Icon Description Connector 1 Diagnostic indicators The diagnostic indicators light up to enter BIOS progress mode. The power button controls the power supply output to do so by qualified support personnel or by...

Owner's Manual
Page 14
... in good health, the indicator lights solid blue. The following section describes system conditions and possible corrective actions associated with the power supply, check the 14 Electrical indicator Condition The indicator blinks amber if the system experiences an electrical error (for Corrective Action See...Name Displays the name of the Setup menu. The indicator blinks amber if the system is on PowerEdge R720xd. If it into a working power source and press the power button. Invalid memory configurations can be configured in the Set home submenu of the system in standby...
... in good health, the indicator lights solid blue. The following section describes system conditions and possible corrective actions associated with the power supply, check the 14 Electrical indicator Condition The indicator blinks amber if the system experiences an electrical error (for Corrective Action See...Name Displays the name of the Setup menu. The indicator blinks amber if the system is on PowerEdge R720xd. If it into a working power source and press the power button. Invalid memory configurations can be configured in the Set home submenu of the system in standby...

Owner's Manual
Page 15
... persists, see Getting Help. See Getting Help. Update any required drivers for example, a temperature out of range, or a failed power supply or voltage regulator). Corrective Action Restart the system. Re-install the card. If the problem persists, see Getting Help. PCIe indicator ... indicator blinks amber if a PCIe card experiences an error. If the problem persists, see Getting Help. 15 Re-seat the power supply by removing and reinstalling it. Temperature indicator Condition The indicator blinks amber if the system experiences a thermal error (for the PCIe...
... persists, see Getting Help. See Getting Help. Update any required drivers for example, a temperature out of range, or a failed power supply or voltage regulator). Corrective Action Restart the system. Re-install the card. If the problem persists, see Getting Help. PCIe indicator ... indicator blinks amber if a PCIe card experiences an error. If the problem persists, see Getting Help. 15 Re-seat the power supply by removing and reinstalling it. Temperature indicator Condition The indicator blinks amber if the system experiences a thermal error (for the PCIe...
Owner's Manual
Page 18
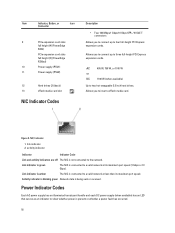
... amber The NIC is connected to a valid network at its maximum port speed. Power Indicator Codes Each AC power supply has an illuminated translucent handle and each DC power supply (when available) has an LED that serves as an indicator to two hot-swappable...occurred. 18 Item Indicator, Button, or Icon Connector 9 PCIe expansion card slots full height (4) (PowerEdge R720) PCIe expansion card slots full height (3) (PowerEdge R720xd) 10 Power supply (PSU1) 11 Power supply (PSU2) 12 Hard drives (2) (back) 13 vFlash media card slot NIC Indicator Codes Description &#...
... amber The NIC is connected to a valid network at its maximum port speed. Power Indicator Codes Each AC power supply has an illuminated translucent handle and each DC power supply (when available) has an LED that serves as an indicator to two hot-swappable...occurred. 18 Item Indicator, Button, or Icon Connector 9 PCIe expansion card slots full height (4) (PowerEdge R720) PCIe expansion card slots full height (3) (PowerEdge R720xd) 10 Power supply (PSU1) 11 Power supply (PSU2) 12 Hard drives (2) (back) 13 vFlash media card slot NIC Indicator Codes Description &#...

Owner's Manual
Page 19
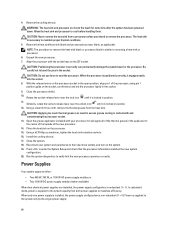
... the power supply is not connected. AC power supply status indicator/handle Figure 11. To change from a High Output configuration to a Low Output configuration or vice versa, you must power down the system. 19 DC Power Supply Status Indicator 1. Indicates a problem with the flashing indicator. AC Power Supply Status Indicator 1. CAUTION: When correcting a power supply mismatch, replace only the power supply with the power supply.
... the power supply is not connected. AC power supply status indicator/handle Figure 11. To change from a High Output configuration to a Low Output configuration or vice versa, you must power down the system. 19 DC Power Supply Status Indicator 1. Indicates a problem with the flashing indicator. AC Power Supply Status Indicator 1. CAUTION: When correcting a power supply mismatch, replace only the power supply with the power supply.

Owner's Manual
Page 20
... the full name of the same type and have the same maximum output power. CAUTION: Combining AC and DC power supplies is available online at support.dell.com/ manuals. When two identical power supplies receive different input voltages, they must be included within this document, see the...an abbreviation or acronym used , they can output different wattages, and trigger a mismatch. Replace the power supply that provides documentation and tools for updates on support.dell.com/manuals and read the updates first because they often supersede information in terms of the other ...
... the full name of the same type and have the same maximum output power. CAUTION: Combining AC and DC power supplies is available online at support.dell.com/ manuals. When two identical power supplies receive different input voltages, they must be included within this document, see the...an abbreviation or acronym used , they can output different wattages, and trigger a mismatch. Replace the power supply that provides documentation and tools for updates on support.dell.com/manuals and read the updates first because they often supersede information in terms of the other ...

Owner's Manual
Page 35
... the right end of removing insulation from the system. Lift the release latch next to ground Following tools are required for assembling cables for a DC power supply unit (PSU), when available: • AMP 90871-1 hand-crimping tool or equivalent • Wire-stripper pliers capable of the bezel and pull the bezel away...
... the right end of removing insulation from the system. Lift the release latch next to ground Following tools are required for assembling cables for a DC power supply unit (PSU), when available: • AMP 90871-1 hand-crimping tool or equivalent • Wire-stripper pliers capable of the bezel and pull the bezel away...
Owner's Manual
Page 84
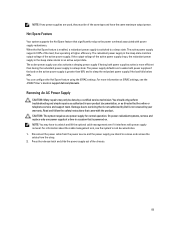
...the system. 18. Allow the heat sink and processor to the system only by the single power supply. 84 WARNING: The heat sink and processor are installed, the power supply configuration is similar to seat the processor. NOTE: The procedure to remove the heat-sink ... the unlock icon until it is non-redundant (1 + 0). Power Supplies Your system supports either: • Two 495 W, 750 W, or 1100 W AC power supply modules or • Two 1100 W DC power supply modules (when available) When two identical power supplies are hot to remove the processor. Install the cooling shroud. ...
...the system. 18. Allow the heat sink and processor to the system only by the single power supply. 84 WARNING: The heat sink and processor are installed, the power supply configuration is similar to seat the processor. NOTE: The procedure to remove the heat-sink ... the unlock icon until it is non-redundant (1 + 0). Power Supplies Your system supports either: • Two 495 W, 750 W, or 1100 W AC power supply modules or • Two 1100 W DC power supply modules (when available) When two identical power supplies are hot to remove the processor. Install the cooling shroud. ...
Owner's Manual
Page 85
... the iDRAC7 User's Guide at support.dell.com/manuals. The redundant power supply in a system that is not authorized by Dell is powered on. If the output voltage of the active power supply. You can also activate a sleeping power supply if having the redundant power supply in your warranty. CAUTION: The system requires one power supply at higher efficiency. Press the release latch...
... the iDRAC7 User's Guide at support.dell.com/manuals. The redundant power supply in a system that is not authorized by Dell is powered on. If the output voltage of the active power supply. You can also activate a sleeping power supply if having the redundant power supply in your warranty. CAUTION: The system requires one power supply at higher efficiency. Press the release latch...
Owner's Manual
Page 86
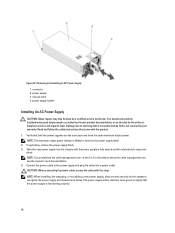
... by Dell is functioning properly. 86 NOTE: When installing, hot-swapping, or hot-adding a new power supply, allow several seconds for the system to the power supply and plug the cable into the chassis until the power supply is listed on the power supply label. 2. The power-supply status...For information about the cable management arm, see the system's rack documentation. 4. If applicable, remove the power supply blank. 3. power supply handle Installing An AC Power Supply CAUTION: Many repairs may only be done by your product documentation, or as authorized in Watts) is fully...
... by Dell is functioning properly. 86 NOTE: When installing, hot-swapping, or hot-adding a new power supply, allow several seconds for the system to the power supply and plug the cable into the chassis until the power supply is listed on the power supply label. 2. The power-supply status...For information about the cable management arm, see the system's rack documentation. 4. If applicable, remove the power supply blank. 3. power supply handle Installing An AC Power Supply CAUTION: Many repairs may only be done by your product documentation, or as authorized in Watts) is fully...
Owner's Manual
Page 87
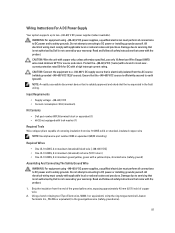
... connecting to two -(48-60) V DC power supplies (when available). All electrical wiring must perform all safety instructions that is not authorized by Dell is efficiently secured to a -(48-60) V DC supply source that came with the product. 1. Wiring Instructions For A DC Power Supply Your system supports up to DC power or installing grounds yourself. Read and...
... connecting to two -(48-60) V DC power supplies (when available). All electrical wiring must perform all safety instructions that is not authorized by Dell is efficiently secured to a -(48-60) V DC supply source that came with the product. 1. Wiring Instructions For A DC Power Supply Your system supports up to DC power or installing grounds yourself. Read and...

Owner's Manual
Page 88
... the system. 2. safety ground wire 2. Insert the copper ends into the power supply. 88 locking washer 4. 3. Strip the insulation from electrostatic discharge, the captive screws must perform all safety instructions that is not authorized by Dell is not covered by your warranty. Figure 48. grounding post 3. spring washer 5. #6-32 nut Assembling The DC...
... the system. 2. safety ground wire 2. Insert the copper ends into the power supply. 88 locking washer 4. 3. Strip the insulation from electrostatic discharge, the captive screws must perform all safety instructions that is not authorized by Dell is not covered by your warranty. Figure 48. grounding post 3. spring washer 5. #6-32 nut Assembling The DC...

Owner's Manual
Page 89
..., see the system's rack documentation. 1. Figure 49. wire RTN 7. CAUTION: The system requires one power supply at a time in a system that is not covered by Dell is powered on. grounding wire Removing A DC Power Supply WARNING: For equipment using -(48-60) V DC power supplies, a qualified electrician must comply with applicable local or national codes and practices. Read and...
..., see the system's rack documentation. 1. Figure 49. wire RTN 7. CAUTION: The system requires one power supply at a time in a system that is not covered by Dell is powered on. grounding wire Removing A DC Power Supply WARNING: For equipment using -(48-60) V DC power supplies, a qualified electrician must comply with applicable local or national codes and practices. Read and...


