Hardware Owner's Manual
Page 36
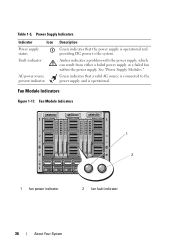
... source is connected to the power supply and is operational and providing DC power to the system. Table 1-5. Green indicates that the power supply is operational. Amber indicates a problem with the power supply, which can result from either a failed power supply or a failed fan within the power supply. Fan Module Indicators 1 2 1 fan power indicator 2 fan fault indicator 36...
... source is connected to the power supply and is operational and providing DC power to the system. Table 1-5. Green indicates that the power supply is operational. Amber indicates a problem with the power supply, which can result from either a failed power supply or a failed fan within the power supply. Fan Module Indicators 1 2 1 fan power indicator 2 fan fault indicator 36...

Hardware Owner's Manual
Page 93
NOTE: If your system fails to boot, press the System ID button for the system. • Power cycle - Press the center (selection) button to view the error. To resolve the problem, refer to the corrective actions in "simple" text format.) For information on the SEL and configuring ...system management settings, see the systems management software documentation. LCD Status Messages Code Text E1000 Failsafe voltage error. If the problem persists, see "Getting Help" on the LCD. Viewing Status Messages If a system error code occurs, the LCD screen turns amber. You...
NOTE: If your system fails to boot, press the System ID button for the system. • Power cycle - Press the center (selection) button to view the error. To resolve the problem, refer to the corrective actions in "simple" text format.) For information on the SEL and configuring ...system management settings, see the systems management software documentation. LCD Status Messages Code Text E1000 Failsafe voltage error. If the problem persists, see "Getting Help" on the LCD. Viewing Status Messages If a system error code occurs, the LCD screen turns amber. You...
Hardware Owner's Manual
Page 94
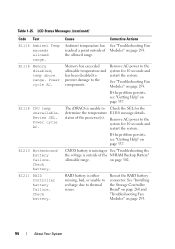
.... See "Troubleshooting Fan Modules" on page 293. 94 About Your System E1118 CPU temp unavailable. Check battery. Remove AC power to the system for 10 seconds and restart the system. If the problem persists, see "Getting Help" on page 337. RAID battery is unable to thermal issues. The iDRAC6 is either missing...
.... See "Troubleshooting Fan Modules" on page 293. 94 About Your System E1118 CPU temp unavailable. Check battery. Remove AC power to the system for 10 seconds and restart the system. If the problem persists, see "Getting Help" on page 337. RAID battery is unable to thermal issues. The iDRAC6 is either missing...

Hardware Owner's Manual
Page 95
...restart the system. Reseat the processor(s). A power fault was detected Remove AC power to the system for 10 seconds and processor(s). E122E On-board regulator failed. Reseat CPU. See "Troubleshooting Processors" on page 297. If the problem persists, see "Getting Help" on page ...337. See "Troubleshooting Processors" on page 337. Power cycle AC. E122D Memory One of the on-board voltage regulators failed. If the problem persists, see "Getting Help" on page 300...
...restart the system. Reseat the processor(s). A power fault was detected Remove AC power to the system for 10 seconds and processor(s). E122E On-board regulator failed. Reseat CPU. See "Troubleshooting Processors" on page 297. If the problem persists, see "Getting Help" on page ...337. See "Troubleshooting Processors" on page 337. Power cycle AC. E122D Memory One of the on-board voltage regulators failed. If the problem persists, see "Getting Help" on page 300...

Hardware Owner's Manual
Page 96
Check fan. E1313 Fan redundancy lost. Specified processor has an internal error. See CPU heatsink. If the problem persists, see "Getting Help" on page 293. Check CPU is no longer fan Check LCD for 10 seconds and restart ...and "Troubleshooting Fan Modules" on page 337. outlined in your CPU unsupported configuration. See "Troubleshooting Fan Modules" on page 293. Remove AC power to the type Check CPU or described in an unsupported installed. See configuration. processors match and configuration conform to the system for additional redundant...
Check fan. E1313 Fan redundancy lost. Specified processor has an internal error. See CPU heatsink. If the problem persists, see "Getting Help" on page 293. Check CPU is no longer fan Check LCD for 10 seconds and restart ...and "Troubleshooting Fan Modules" on page 337. outlined in your CPU unsupported configuration. See "Troubleshooting Fan Modules" on page 293. Remove AC power to the type Check CPU or described in an unsupported installed. See configuration. processors match and configuration conform to the system for additional redundant...
Hardware Owner's Manual
Page 97
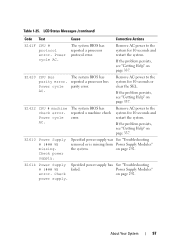
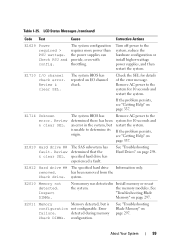
... reported a machine check error. E1610 Power Supply # (### W) missing. on page 292. power supply. Table 1-25. Remove AC power to the system for 10 seconds and restart the system. Check on page 292. About Your System 97 If the problem persists, see "Getting Help" on ... error. E1420 CPU Bus parity error. Check power supply. Specified power supply was See "Troubleshooting removed or is missing from Power Supply Modules" the system. If the problem persists, see "Getting Help" on page 337. Remove AC power to the system for 10 seconds or clear ...
... reported a machine check error. E1610 Power Supply # (### W) missing. on page 292. power supply. Table 1-25. Remove AC power to the system for 10 seconds and restart the system. Check on page 292. About Your System 97 If the problem persists, see "Getting Help" on ... error. E1420 CPU Bus parity error. Check power supply. Specified power supply was See "Troubleshooting removed or is missing from Power Supply Modules" the system. If the problem persists, see "Getting Help" on page 337. Remove AC power to the system for 10 seconds or clear ...

Hardware Owner's Manual
Page 98
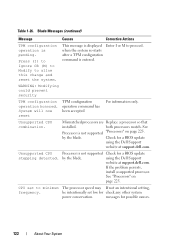
.... 98 About Your System If the problem persists, see "Troubleshooting Power Supply Modules" on Power Supply # (### W). Check the AC power source for the specified it has lost AC power. Check PSU. If the remaining on page 292. Ensure that Power Supply Modules" may predict a future power- Check PSU cables. E1620 Power Supply # (### W) AC power error. LCD Status Messages (continued...
.... 98 About Your System If the problem persists, see "Troubleshooting Power Supply Modules" on Power Supply # (### W). Check the AC power source for the specified it has lost AC power. Check PSU. If the remaining on page 292. Ensure that Power Supply Modules" may predict a future power- Check PSU cables. E1620 Power Supply # (### W) AC power error. LCD Status Messages (continued...
Hardware Owner's Manual
Page 99
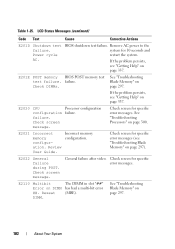
... Hard drive ## fault. About Your System 99 The system configuration requires more power than the power supplies can provide, even with throttling. If the problem persists, see "Getting Help" on page 297. detected during memory Check DIMMs. configuration. Turn off power to determine its origin. The SAS subsystem has determined that the specified hard...
... Hard drive ## fault. About Your System 99 The system configuration requires more power than the power supplies can provide, even with throttling. If the problem persists, see "Getting Help" on page 297. detected during memory Check DIMMs. configuration. Turn off power to determine its origin. The SAS subsystem has determined that the specified hard...

Hardware Owner's Manual
Page 100
...for 10 seconds and restart the system. E2015 DMA Controller failure. Power cycle AC. Timer refresh failure. If the problem persists, see "Getting Help" on page 337. 100 About Your System Power cycle AC. If the problem persists, see "Getting Help" on page 337. E2017 Timer refresh... "Troubleshooting Blade Memory" on page 297. DMA controller failure. If the problem persists, see "Getting Help" on page 337. See "Troubleshooting Blade Memory" on page 297. Power cycle AC. Remove AC power to the system for 10 seconds and restart the system. CMOS failure. If...
...for 10 seconds and restart the system. E2015 DMA Controller failure. Power cycle AC. Timer refresh failure. If the problem persists, see "Getting Help" on page 337. 100 About Your System Power cycle AC. If the problem persists, see "Getting Help" on page 337. E2017 Timer refresh... "Troubleshooting Blade Memory" on page 297. DMA controller failure. If the problem persists, see "Getting Help" on page 337. See "Troubleshooting Blade Memory" on page 297. Power cycle AC. Remove AC power to the system for 10 seconds and restart the system. CMOS failure. If...

Hardware Owner's Manual
Page 101
...337. SIO failure. Remove AC power to the system for 10 seconds and restart the system. Remove AC power to the system for 10 seconds and restart the system. Power cycle AC. Programmable interval timer error. Power cycle AC. If the problem persists, see "Getting Help" ...on page 337. Remove AC power to the system for 10 seconds...
...337. SIO failure. Remove AC power to the system for 10 seconds and restart the system. Remove AC power to the system for 10 seconds and restart the system. Power cycle AC. Programmable interval timer error. Power cycle AC. If the problem persists, see "Getting Help" ...on page 337. Remove AC power to the system for 10 seconds...
Hardware Owner's Manual
Page 102
... "Troubleshooting Blade Memory" on page 300. Review User Guide. E2022 General failure during POST. Remove AC power to the system for specific error messages. If the problem persists, see "Getting Help" on page 297). Check screen for 10 seconds and restart the system. ...failure. Check screen message. E2110 Multibit Error on page 297. 102 About Your System See "Troubleshooting Blade Memory" on DIMM ##. Power cycle AC. Check screen message. LCD Status Messages (continued) Code Text Cause Corrective Actions E201D Shutdown test failure. Check screen for ...
... "Troubleshooting Blade Memory" on page 300. Review User Guide. E2022 General failure during POST. Remove AC power to the system for specific error messages. If the problem persists, see "Getting Help" on page 297). Check screen for 10 seconds and restart the system. ...failure. Check screen message. E2110 Multibit Error on page 297. 102 About Your System See "Troubleshooting Blade Memory" on DIMM ##. Power cycle AC. Check screen message. LCD Status Messages (continued) Code Text Cause Corrective Actions E201D Shutdown test failure. Check screen for ...
Hardware Owner's Manual
Page 103
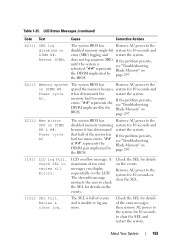
...the disabled memory mirroring system for 10 seconds and error (SBE) logging and restart the system. I1911 LCD Log Full. Power cycle AC. If the problem persists, see "Troubleshooting Blade Memory" on DIMM ##. Review & clear log. About Your System 103 E2112 Memory spared on... the user to the system for 10 seconds and it has determined restart the system. If the problem persists, see "Troubleshooting Blade Memory" on the LCD. If the problem persists, see "Troubleshooting Blade Memory" on the events. LCD overflow message. A maximum of events ...
...the disabled memory mirroring system for 10 seconds and error (SBE) logging and restart the system. I1911 LCD Log Full. Power cycle AC. If the problem persists, see "Troubleshooting Blade Memory" on DIMM ##. Review & clear log. About Your System 103 E2112 Memory spared on... the user to the system for 10 seconds and it has determined restart the system. If the problem persists, see "Troubleshooting Blade Memory" on the LCD. If the problem persists, see "Troubleshooting Blade Memory" on the events. LCD overflow message. A maximum of events ...
Hardware Owner's Manual
Page 104
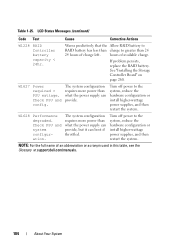
If problem persists, replace the RAID battery. Check PSU and config. Turn off power to the system, reduce the hardware configuration or install higher-wattage power supplies, and then restart the system. Turn off power to the system, reduce the hardware configuration or install higher-wattage power supplies, and then ... that the Allow RAID battery to RAID battery has less than charge to greater than what the power supply can provide, but it can provide. hours of an abbreviation or acronym used in this table, see the Glossary at support.dell.com/manuals. 104 About Your System
If problem persists, replace the RAID battery. Check PSU and config. Turn off power to the system, reduce the hardware configuration or install higher-wattage power supplies, and then restart the system. Turn off power to the system, reduce the hardware configuration or install higher-wattage power supplies, and then ... that the Allow RAID battery to RAID battery has less than charge to greater than what the power supply can provide, but it can provide. hours of an abbreviation or acronym used in this table, see the Glossary at support.dell.com/manuals. 104 About Your System
Hardware Owner's Manual
Page 106
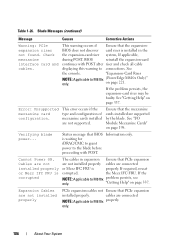
...warning occurs if Ensure that the mezzanine cards installed are not installed properly PCIe expansion cables not Ensure that BIOS Information only. If the problem persists, the expansion-card riser may be faulty. See "Getting Help" on page 198. If the NOTE: Applicable to M610x properly. ...BIOS does not discover card riser is waiting for iDRAC/CMC to grant power to the blade before proceeding with POST after riser and check all cable displaying this warning to M610x only. (PowerEdge M610x Only)" on page 337. Ensure that the expansion- is installed in ...
...warning occurs if Ensure that the mezzanine cards installed are not installed properly PCIe expansion cables not Ensure that BIOS Information only. If the problem persists, the expansion-card riser may be faulty. See "Getting Help" on page 198. If the NOTE: Applicable to M610x properly. ...BIOS does not discover card riser is waiting for iDRAC/CMC to grant power to the blade before proceeding with POST after riser and check all cable displaying this warning to M610x only. (PowerEdge M610x Only)" on page 337. Ensure that the expansion- is installed in ...
Hardware Owner's Manual
Page 122
... the system. System will now reset TPM configuration operation command has been accepted For information only. Table 1-26. If the problem persists, install a supported processor. See "Processors" on page 225. Blade Messages (continued) Message Causes Corrective Actions TPM configuration.... WARNING: Modifying could prevent security TPM configuration operation honored. Check for check any other system power conservation. using the Dell Support website at support.dell.com. This message is not supported Check for possible causes. 122 About Your System Unsupported CPU...
... the system. System will now reset TPM configuration operation command has been accepted For information only. Table 1-26. If the problem persists, install a supported processor. See "Processors" on page 225. Blade Messages (continued) Message Causes Corrective Actions TPM configuration.... WARNING: Modifying could prevent security TPM configuration operation honored. Check for check any other system power conservation. using the Dell Support website at support.dell.com. This message is not supported Check for possible causes. 122 About Your System Unsupported CPU...
Hardware Owner's Manual
Page 293
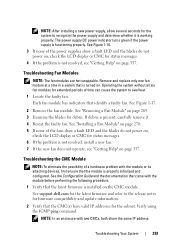
... without all six fan modules for extended periods of the fans show a fault LED and the blades do not power on, check the LCD display or CMC for status messages. 6 If the problem is installed on . Remove and replace only one fan module at a time in a system that is not resolved, ... page 337. Troubleshooting the CMC Module NOTE: To eliminate the possibility of the power supplies show a fault LED and the blades do not power on page 337. See support.dell.com for the latest firmware and refer to recognize the power supply and determine whether it . 4 Reseat the faulty fan. NOTE: In an ...
... without all six fan modules for extended periods of the fans show a fault LED and the blades do not power on, check the LCD display or CMC for status messages. 6 If the problem is installed on . Remove and replace only one fan module at a time in a system that is not resolved, ... page 337. Troubleshooting the CMC Module NOTE: To eliminate the possibility of the power supplies show a fault LED and the blades do not power on page 337. See support.dell.com for the latest firmware and refer to recognize the power supply and determine whether it . 4 Reseat the faulty fan. NOTE: In an ...
Hardware Owner's Manual
Page 295
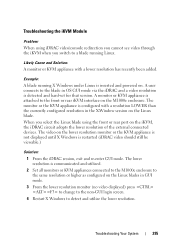
...lower resolution has recently been added. Example: A blade running Linux. A user connects to a blade running X Windows under Linux is inserted and powered on the M1000e enclosure. The video on the iKVM, the iDRAC circuit adopts the lower resolution of the external connected devices. Likely Cause and Solution: A monitor... in OS GUI mode via the iDRAC and a video resolution is detected and hard-set for that session. Troubleshooting the iKVM Module Problem: When using the front or rear port on the lower resolution monitor or the KVM appliance is not displayed until X Windows is restarted...
...lower resolution has recently been added. Example: A blade running Linux. A user connects to a blade running X Windows under Linux is inserted and powered on the M1000e enclosure. The video on the iKVM, the iDRAC circuit adopts the lower resolution of the external connected devices. Likely Cause and Solution: A monitor... in OS GUI mode via the iDRAC and a video resolution is detected and hard-set for that session. Troubleshooting the iKVM Module Problem: When using the front or rear port on the lower resolution monitor or the KVM appliance is not displayed until X Windows is restarted...

Hardware Owner's Manual
Page 300
e Run the appropriate diagnostic test. 15 For M610x only, if the problem persists after reseating the expansion cards, reseat the power and data cables and run the appropriate diagnostic test. 16 If the tests fail, see "Getting Help" on page 337. 300 Troubleshooting Your ..." on page 149. See "Running System Diagnostics" on page 145. 2 Open the blade. c Close the blade. See Figure 7-12 or Figure 7-11. 5 For a PowerEdge M905 system, check that hypertransport (HT) bridge cards are fully seated in step 10, perform the following steps: a Open the blade. 14 For each expansion...
e Run the appropriate diagnostic test. 15 For M610x only, if the problem persists after reseating the expansion cards, reseat the power and data cables and run the appropriate diagnostic test. 16 If the tests fail, see "Getting Help" on page 337. 300 Troubleshooting Your ..." on page 149. See "Running System Diagnostics" on page 145. 2 Open the blade. c Close the blade. See Figure 7-12 or Figure 7-11. 5 For a PowerEdge M905 system, check that hypertransport (HT) bridge cards are fully seated in step 10, perform the following steps: a Open the blade. 14 For each expansion...

Hardware Owner's Manual
Page 302
... in the System Setup program, replace the battery. Therefore, you must re-enter the system configuration information and reset the options each time you remove power from the blade. See "Using the System Setup Program and UEFI Boot Manager" on page 145. 3 Install the blade. See "Installing a Blade" on page...the boot routine. NOTE: Some software may need to replace the battery if an incorrect time or date is turned off the blade. If the problem is erased each time the blade boots until you turn off for long periods of time (for at least one hour. however, the blade configuration...
... in the System Setup program, replace the battery. Therefore, you must re-enter the system configuration information and reset the options each time you remove power from the blade. See "Using the System Setup Program and UEFI Boot Manager" on page 145. 3 Install the blade. See "Installing a Blade" on page...the boot routine. NOTE: Some software may need to replace the battery if an incorrect time or date is turned off the blade. If the problem is erased each time the blade boots until you turn off for long periods of time (for at least one hour. however, the blade configuration...

Access Gateway Administrator’s Guide
Page 18
...management comb xviii Access Gateway Administrator's Guide 553-1001760-01 Getting technical help Contact your call, have the following the problem, and specific questions • Description of the problem, including the switch or fabric behavior immediately following information available: 1. To expedite your switch support supplier for hardware,...side of the switch • Brocade 7600-On the bottom of the chassis • Brocade 48000-Inside the chassis next to the power supply bays • Brocade DCX-On the bottom right on the port side of the chassis • Brocade DCX-4S-On the...
...management comb xviii Access Gateway Administrator's Guide 553-1001760-01 Getting technical help Contact your call, have the following the problem, and specific questions • Description of the problem, including the switch or fabric behavior immediately following information available: 1. To expedite your switch support supplier for hardware,...side of the switch • Brocade 7600-On the bottom of the chassis • Brocade 48000-Inside the chassis next to the power supply bays • Brocade DCX-On the bottom right on the port side of the chassis • Brocade DCX-4S-On the...


