Rack-to-Tower Conversion Guide
Page 9
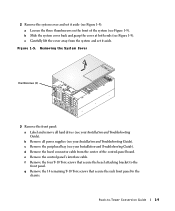
... have difficulty, ensure that the shoulder screws in the rack cabinet may wish to make the system chassis lighter by labeling and removing the hard drives and power supplies (for instructions, see Figure 1-3). You may require up on the yellow system release latches and pull the system forward to... sturdy, elevated platform to stand on the slide assemblies (see Figure 1-2). 7 Remove the cable tray from the back of the system. www.dell.com | support.dell.com 4 Pull the cable-management arm away from the cable tray. 5 Remove the captive thumbscrew and bracket that secure the back end of ...
... have difficulty, ensure that the shoulder screws in the rack cabinet may wish to make the system chassis lighter by labeling and removing the hard drives and power supplies (for instructions, see Figure 1-3). You may require up on the yellow system release latches and pull the system forward to... sturdy, elevated platform to stand on the slide assemblies (see Figure 1-2). 7 Remove the cable tray from the back of the system. www.dell.com | support.dell.com 4 Pull the cable-management arm away from the cable tray. 5 Remove the captive thumbscrew and bracket that secure the back end of ...
Rack-to-Tower Conversion Guide
Page 12
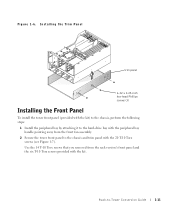
... the three thumbscrews on the front of the control-panel board. d Remove the bezel connector cable from the system and set it aside. b Remove all hard drives (see Figure 1-5). Rack-to the front panel. f Remove the four T-10 Torx screws that secure the rack front panel to the chassis. g Remove the 14...
... the three thumbscrews on the front of the control-panel board. d Remove the bezel connector cable from the system and set it aside. b Remove all hard drives (see Figure 1-5). Rack-to the front panel. f Remove the four T-10 Torx screws that secure the rack front panel to the chassis. g Remove the 14...
Rack-to-Tower Conversion Guide
Page 14
... install the tower front panel (provided with the kit) to the chassis, perform the following steps: 1 Install the peripheral bay by attaching it to the hard-drive bay with the peripheral bay handle pointing away from the rack version's front panel and the six T-10 Torx screws provided with the 20 T-10...
... install the tower front panel (provided with the kit) to the chassis, perform the following steps: 1 Install the peripheral bay by attaching it to the hard-drive bay with the peripheral bay handle pointing away from the rack version's front panel and the six T-10 Torx screws provided with the 20 T-10...
Rack-to-Tower Conversion Guide
Page 16
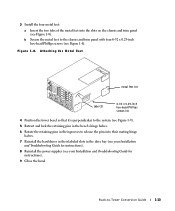
... -Tower Conversion Guide 1-13 3 Install the four metal feet: a Insert the two tabs of the metal feet into their mating hinge halves. 7 Reinstall the hard drives in the drive bay (see your Installation and Troubleshooting Guide for instructions). 8 Reinstall the power supplies (see your Installation and Troubleshooting Guide for instructions). 9 Close the bezel...
... -Tower Conversion Guide 1-13 3 Install the four metal feet: a Insert the two tabs of the metal feet into their mating hinge halves. 7 Reinstall the hard drives in the drive bay (see your Installation and Troubleshooting Guide for instructions). 8 Reinstall the power supplies (see your Installation and Troubleshooting Guide for instructions). 9 Close the bezel...


