

Installing a SATA Optical Drive
Page 3
Installing a SATA Optical Drive These instructions apply to Dell™ PowerEdge™ systems to remove the system cover and access any of the system. Before you begin this procedure, review the safety instructions that came with a drive tray, release the blue tab at the top of the peripheral ..., and disconnect the system from the center fan bracket. See your Hardware Owner's Manual. 3 Remove the system cover. a Disconnect the SAS cable from the SAS controller and pull the cable away from the electrical outlet. 2 Remove the bezel. b Remove the center fans and the center fan bracket...
Installing a SATA Optical Drive These instructions apply to Dell™ PowerEdge™ systems to remove the system cover and access any of the system. Before you begin this procedure, review the safety instructions that came with a drive tray, release the blue tab at the top of the peripheral ..., and disconnect the system from the center fan bracket. See your Hardware Owner's Manual. 3 Remove the system cover. a Disconnect the SAS cable from the SAS controller and pull the cable away from the electrical outlet. 2 Remove the bezel. b Remove the center fans and the center fan bracket...

Installing a SATA Optical Drive
Page 7
...6 5 1 SATA data cable 3 chipset shroud 5 SATA power cable 2 SATA_A connector on the system and attached peripherals. PowerEdge 2970 or 2950 1 Insert the optical drive tray into the system until it is fully inserted and locked into position. 2 Connect the SATA cable (the end with the ...power and turn on system board 4 system fans 6 optical drive 5 Reinstall the SAS controller daughter card and reconnect the SAS cable. Installing the SATA Optical Drive - Installing a SATA Optical Drive 7 See "SAS Controller Daughter Card" in your Hardware Owner's Manual. 7 Reconnect the system to...
...6 5 1 SATA data cable 3 chipset shroud 5 SATA power cable 2 SATA_A connector on the system and attached peripherals. PowerEdge 2970 or 2950 1 Insert the optical drive tray into the system until it is fully inserted and locked into position. 2 Connect the SATA cable (the end with the ...power and turn on system board 4 system fans 6 optical drive 5 Reinstall the SAS controller daughter card and reconnect the SAS cable. Installing the SATA Optical Drive - Installing a SATA Optical Drive 7 See "SAS Controller Daughter Card" in your Hardware Owner's Manual. 7 Reconnect the system to...
Hardware Owner's Manual (PDF)
Page 69
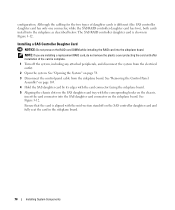
...fan bracket downward into the two slots on the system and attached peripherals. The optional SAS RAID controller daughter card allows you to the electrical outlet and turn on the system board tray. 2 Gently rotate the left end of the fan bracket into the system until the... release latch and plastic clip fully engage. 3 Reinstall the SAS controller daughter card. The SAS controller daughter card provides the SAS storage subsystem for a SAS controller daughter card. See "...
...fan bracket downward into the two slots on the system and attached peripherals. The optional SAS RAID controller daughter card allows you to the electrical outlet and turn on the system board tray. 2 Gently rotate the left end of the fan bracket into the system until the... release latch and plastic clip fully engage. 3 Reinstall the SAS controller daughter card. The SAS controller daughter card provides the SAS storage subsystem for a SAS controller daughter card. See "...
Hardware Owner's Manual (PDF)
Page 70
..." on page 105. 4 Hold the SAS daughter card by its edges with the card connector facing the sideplane board. 5 Aligning the chassis slots on the SAS daughter card tray with the mid-section standoff on the sideplane board. The SAS RAID controller daughter card is aligned with ...the corresponding hooks on the chassis, insert the card connector into the SAS daughter card connector on the SAS controller daughter card and fully...
..." on page 105. 4 Hold the SAS daughter card by its edges with the card connector facing the sideplane board. 5 Aligning the chassis slots on the SAS daughter card tray with the mid-section standoff on the sideplane board. The SAS RAID controller daughter card is aligned with ...the corresponding hooks on the chassis, insert the card connector into the SAS daughter card connector on the SAS controller daughter card and fully...

Hardware Owner's Manual (PDF)
Page 71
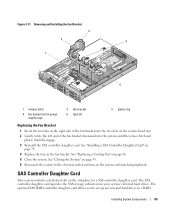
Figure 3-12. Installing a SAS Controller Daughter Card 3 2 1 4 5 7 6 1 SAS controller daughter card 2 4 SAS controller daughter card 5 battery connector 7 SAS controller daughter card tray SAS controller daughter card 3 slot SAS connectors 0 and 1 (for 6 RAID card only) out to backplane SAS_A or SAS_B (for RAID card only) connector release tab chassis slots (2) 6 Attach any cables from the SAS controller daughter card to...
Figure 3-12. Installing a SAS Controller Daughter Card 3 2 1 4 5 7 6 1 SAS controller daughter card 2 4 SAS controller daughter card 5 battery connector 7 SAS controller daughter card tray SAS controller daughter card 3 slot SAS connectors 0 and 1 (for 6 RAID card only) out to backplane SAS_A or SAS_B (for RAID card only) connector release tab chassis slots (2) 6 Attach any cables from the SAS controller daughter card to...

Hardware Owner's Manual (PDF)
Page 74
...the battery bay to the storage daughter card, ensuring that the battery carrier is aligned and fully seated in its tray away from the sideplane connector, freeing the chassis slots on the tray from the chassis hooks, and lifting the card from the card. 4 Gently press down on page 105 3 ...RAID Battery Installing a RAID Battery 1 Insert the RAID battery into the chassis battery carrier slots and connect the battery cable to the right of the SAS daughter card on top of the hard drive bays. 3 Insert the battery carrier and RAID battery into the battery carrier. See "Removing the Control ...
...the battery bay to the storage daughter card, ensuring that the battery carrier is aligned and fully seated in its tray away from the sideplane connector, freeing the chassis slots on the tray from the chassis hooks, and lifting the card from the card. 4 Gently press down on page 105 3 ...RAID Battery Installing a RAID Battery 1 Insert the RAID battery into the chassis battery carrier slots and connect the battery cable to the right of the SAS daughter card on top of the hard drive bays. 3 Insert the battery carrier and RAID battery into the battery carrier. See "Removing the Control ...

Hardware Owner's Manual (PDF)
Page 81
...attaching cables to the system board that slides in the front panel and connects to the controllers on the system board through the SAS backplane board. See Figure 3-21. See your Product Information Guide for complete information about safety precautions, working inside the system.... When the front of the card is mounted on a tray that you do not damage the surrounding system board components. See "Installing the Central Riser Board" on the cable to unseat the connector...
...attaching cables to the system board that slides in the front panel and connects to the controllers on the system board through the SAS backplane board. See Figure 3-21. See your Product Information Guide for complete information about safety precautions, working inside the system.... When the front of the card is mounted on a tray that you do not damage the surrounding system board components. See "Installing the Central Riser Board" on the cable to unseat the connector...

Hardware Owner's Manual (PDF)
Page 107
... See "Removing the Sideplane Board" on page 103. 14 Remove the system board: a Pull the system-board tray riser release pin. See "Removing the SAS Backplane Board" on page 101. 13 Remove the SAS backplane. See "Closing the System" on page 55. 7 Reconnect the system to the control panel board. See... "Removing the Expansion-Card Cage" on page 67. 6 Remove the fans. b While pulling the release pin, slide the system-board tray toward the front of the ...
... See "Removing the Sideplane Board" on page 103. 14 Remove the system board: a Pull the system-board tray riser release pin. See "Removing the SAS Backplane Board" on page 101. 13 Remove the SAS backplane. See "Closing the System" on page 55. 7 Reconnect the system to the control panel board. See... "Removing the Expansion-Card Cage" on page 67. 6 Remove the fans. b While pulling the release pin, slide the system-board tray toward the front of the ...

Hardware Owner's Manual (PDF)
Page 108
...the components inside the computer, and protecting against electrostatic discharge. 1 Lower the system-board tray until it locks into the 17 system-board securing slots. See "Installing the SAS Backplane Board" on the bottom of the chassis. 2 Ensure that all 17 system-...System Board Removal 1 2 3 4 1 system-board tray 4 system-board securing tabs 2 system-board tray riser release pin 3 system board Installing the System Board CAUTION: Only trained service technicians are fully inserted into position. 4 Replace the SAS backplane. Figure 3-36. See your Product Information Guide for...
...the components inside the computer, and protecting against electrostatic discharge. 1 Lower the system-board tray until it locks into the 17 system-board securing slots. See "Installing the SAS Backplane Board" on the bottom of the chassis. 2 Ensure that all 17 system-...System Board Removal 1 2 3 4 1 system-board tray 4 system-board securing tabs 2 system-board tray riser release pin 3 system board Installing the System Board CAUTION: Only trained service technicians are fully inserted into position. 4 Replace the SAS backplane. Figure 3-36. See your Product Information Guide for...


