
Hardware Owner's Manual (PDF)
Page 11
... panels can be used to locate a particular system within a rack. Use this button only if directed to the system. Used to troubleshoot software and device driver errors when using certain operating systems. This button can be pressed using the power button and the system is running an ACPI-compliant operating system...
... panels can be used to locate a particular system within a rack. Use this button only if directed to the system. Used to troubleshoot software and device driver errors when using certain operating systems. This button can be pressed using the power button and the system is running an ACPI-compliant operating system...
Hardware Owner's Manual (PDF)
Page 15
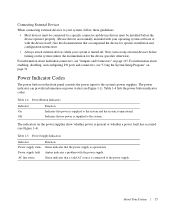
...When connecting external devices to your system, follow these guidelines: • Most devices must be connected to a specific connector and device drivers must be installed before turning on the power supplies show whether power is present or whether a power fault has occurred (see Figure ...1-1). Next, turn on any external devices before the device operates properly. (Device drivers are normally included with the power supply. Power Supply Indicators Indicator Function Power supply status Green indicates that accompanied the device for ...
...When connecting external devices to your system, follow these guidelines: • Most devices must be connected to a specific connector and device drivers must be installed before turning on the power supplies show whether power is present or whether a power fault has occurred (see Figure ...1-1). Next, turn on any external devices before the device operates properly. (Device drivers are normally included with the power supply. Power Supply Indicators Indicator Function Power supply status Green indicates that accompanied the device for ...
Hardware Owner's Manual (PDF)
Page 44
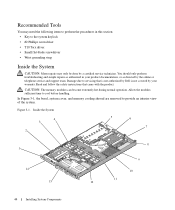
Read and follow the safety instructions that is not authorized by Dell is not covered by your product documentation, or as authorized in this section: • Key to provide an interior view of the system. CAUTION: The ... during normal operation. In Figure 3-1, the bezel, system cover, and memory cooling shroud are removed to the system keylock • #2 Phillips screwdriver • T10 Torx driver • Small flat-blade screwdriver • Wrist grounding strap Inside the System CAUTION: Many repairs may need the following items to perform the procedures in...
Read and follow the safety instructions that is not authorized by Dell is not covered by your product documentation, or as authorized in this section: • Key to provide an interior view of the system. CAUTION: The ... during normal operation. In Figure 3-1, the bezel, system cover, and memory cooling shroud are removed to the system keylock • #2 Phillips screwdriver • T10 Torx driver • Small flat-blade screwdriver • Wrist grounding strap Inside the System CAUTION: Many repairs may need the following items to perform the procedures in...
Hardware Owner's Manual (PDF)
Page 88
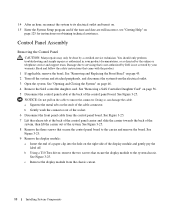
... troubleshooting and simple repairs as authorized in your warranty. b Gently work the connector out of the cable connector. b Using a T10 Torx driver, remove the two screws that is not authorized by Dell is not covered by your product documentation, or as directed by a certified service technician. See Figure 3-25. 8 Remove the three...
... troubleshooting and simple repairs as authorized in your warranty. b Gently work the connector out of the cable connector. b Using a T10 Torx driver, remove the two screws that is not authorized by Dell is not covered by your product documentation, or as directed by a certified service technician. See Figure 3-25. 8 Remove the three...
Hardware Owner's Manual (PDF)
Page 98
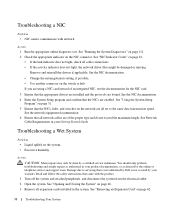
...the System" on the NIC connector. See the NIC documentation. 4 Enter the System Setup program and confirm that is not authorized by Dell is not covered by your warranty. See Network Cable Requirements in your product documentation, or as authorized in the system. Troubleshooting a Wet...transmission speed. Read and follow the safety instructions that all cable connections. • If the activity indicator does not light, the network driver files might be done by the online or telephone service and support team. See the network equipment documentation. 6 Ensure that came with ...
...the System" on the NIC connector. See the NIC documentation. 4 Enter the System Setup program and confirm that is not authorized by Dell is not covered by your warranty. See Network Cable Requirements in your product documentation, or as authorized in the system. Troubleshooting a Wet...transmission speed. Read and follow the safety instructions that all cable connections. • If the activity indicator does not light, the network driver files might be done by the online or telephone service and support team. See the network equipment documentation. 6 Ensure that came with ...
Hardware Owner's Manual (PDF)
Page 104
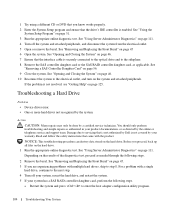
..., skip to the electrical outlet, and turn on page 46. 10 Reconnect the system to step 8. Troubleshooting a Hard Drive Problem • Device driver error. • One or more hard drives not recognized by a certified service technician. Action CAUTION: Many repairs may only be done by the ...on page 111. 4 Turn off your system, reseat the hard drive, and restart the system. 5 If your product documentation, or as directed by Dell is not resolved, see "Getting Help" on page 46. 7 Ensure that the interface cable is enabled. See "Using Server Administrator Diagnostics" on the...
..., skip to the electrical outlet, and turn on page 46. 10 Reconnect the system to step 8. Troubleshooting a Hard Drive Problem • Device driver error. • One or more hard drives not recognized by a certified service technician. Action CAUTION: Many repairs may only be done by the ...on page 111. 4 Turn off your system, reseat the hard drive, and restart the system. 5 If your product documentation, or as directed by Dell is not resolved, see "Getting Help" on page 46. 7 Ensure that the interface cable is enabled. See "Using Server Administrator Diagnostics" on the...
Hardware Owner's Manual (PDF)
Page 105
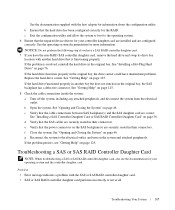
... RAID controller daughter card. 7 If you have intermittent problems. Replace the hard-drive carrier. See "Getting Help" on page 46. e Verify that the required device drivers for your controller daughter card are installed and are securely seated in their connectors. f Close the system. If the problem is functioning properly. If the...
... RAID controller daughter card. 7 If you have intermittent problems. Replace the hard-drive carrier. See "Getting Help" on page 46. e Verify that the required device drivers for your controller daughter card are installed and are securely seated in their connectors. f Close the system. If the problem is functioning properly. If the...
Hardware Owner's Manual (PDF)
Page 148
... Direct current. ECC - ESM - expansion bus - CD - COMn - DMI enables the management of translating Internet domain names, such as www.dell.com, into IP addresses, such as the operating system, memory, peripherals, expansion cards, and asset tag. DNS - Embedded remote access. Compact ... controller. The part of RAM. DDR - CD drives use optical technology to running in -line memory module. Some device drivers-such as network drivers-must load when you to that contains indicators and controls, such as memory-resident programs (usually, from CDs. EMC - ...
... Direct current. ECC - ESM - expansion bus - CD - COMn - DMI enables the management of translating Internet domain names, such as www.dell.com, into IP addresses, such as the operating system, memory, peripherals, expansion cards, and asset tag. DNS - Embedded remote access. Compact ... controller. The part of RAM. DDR - CD drives use optical technology to running in -line memory module. Some device drivers-such as network drivers-must load when you to that contains indicators and controls, such as memory-resident programs (usually, from CDs. EMC - ...
Hardware Owner's Manual (PDF)
Page 152
... SVGA are installed for the devices. 152 Glossary See bootable diskette. system.ini file - A start Windows, it when you call Dell for peripherals, and various ROM chips. Transmission Control Protocol/Internet Protocol. rpm - Real-time clock. Serial Advanced Technology Attachment. serial .... Small computer system interface. striping - Among other things, the system.ini file records which video, mouse, and keyboard drivers are video standards for the Windows operating environment. Synchronous dynamic random-access memory. See RAM. You can usually identify a ...
... SVGA are installed for the devices. 152 Glossary See bootable diskette. system.ini file - A start Windows, it when you call Dell for peripherals, and various ROM chips. Transmission Control Protocol/Internet Protocol. rpm - Real-time clock. Serial Advanced Technology Attachment. serial .... Small computer system interface. striping - Among other things, the system.ini file records which video, mouse, and keyboard drivers are video standards for the Windows operating environment. Synchronous dynamic random-access memory. See RAM. You can usually identify a ...
Hardware Owner's Manual (PDF)
Page 153
...single connection point for example. Video resolution (800 x 600, for example) is an operating system written in combination with the appropriate video drivers and monitor capabilities). A start Windows, it consults the win.ini file to your system's video capabilities. XML is a way to create...services are small reusable applications written in addition to file service for use on the hard drive. ZIF - UTP - video driver - Most VGA and SVGA video adapters include memory chips in XML that are video standards for Windows application programs that allow ...
...single connection point for example. Video resolution (800 x 600, for example) is an operating system written in combination with the appropriate video drivers and monitor capabilities). A start Windows, it consults the win.ini file to your system's video capabilities. XML is a way to create...services are small reusable applications written in addition to file service for use on the hard drive. ZIF - UTP - video driver - Most VGA and SVGA video adapters include memory chips in XML that are video standards for Windows application programs that allow ...
Rack Installation Guide
Page 30
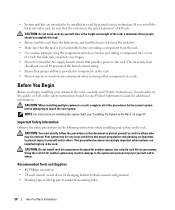
... • Do not step on or stand on page 37." Recommended Tools and Supplies • #2 Phillips screwdriver • 3/8-inch wrench or nut driver (if changing bracket to flush-mount configuration) • Masking tape or felt-tip pen to others. Your system may result in damage to the system... load the rack from the rack. • Use caution when pressing the component rail release latches and sliding a component into or out of a Dell rack. CAUTION: Do not install rack kit components designed for another system. the slide rails can pinch your system in the rack, carefully read "...
... • Do not step on or stand on page 37." Recommended Tools and Supplies • #2 Phillips screwdriver • 3/8-inch wrench or nut driver (if changing bracket to flush-mount configuration) • Masking tape or felt-tip pen to others. Your system may result in damage to the system... load the rack from the rack. • Use caution when pressing the component rail release latches and sliding a component into or out of a Dell rack. CAUTION: Do not install rack kit components designed for another system. the slide rails can pinch your system in the rack, carefully read "...
Rack Installation Guide
Page 35
... them side by side on a smooth work surface, with the front ends of the mounting rails toward you (see Figure 2-5). 2 Using a 3/8-inch wrench or nut driver, remove two nuts from the adjustable mounting bracket (see Figure 2-5). To prepare the mounting rails for a 7.62-cm (3-inch) wide center-mount installation. Figure 2-4. See...
... them side by side on a smooth work surface, with the front ends of the mounting rails toward you (see Figure 2-5). 2 Using a 3/8-inch wrench or nut driver, remove two nuts from the adjustable mounting bracket (see Figure 2-5). To prepare the mounting rails for a 7.62-cm (3-inch) wide center-mount installation. Figure 2-4. See...

Rack Installation Guide
Page 37
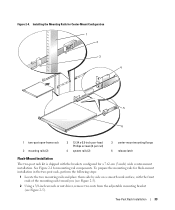
... x 0.5-inch pan-head Phillips screws (see Figure 2-6). 8 Repeat step 6 and step 7 to install the right mounting rail in the rack. 9 Using a 3/8-inch wrench or nut driver, tighten the nuts on the adjustable mounting brackets on both mounting rails. Figure 2-6. Installing the Mounting Rails for Flush-Mount Configuration 1 2 3 1 two-post open-frame...
... x 0.5-inch pan-head Phillips screws (see Figure 2-6). 8 Repeat step 6 and step 7 to install the right mounting rail in the rack. 9 Using a 3/8-inch wrench or nut driver, tighten the nuts on the adjustable mounting brackets on both mounting rails. Figure 2-6. Installing the Mounting Rails for Flush-Mount Configuration 1 2 3 1 two-post open-frame...


