

User Manual
Page 1
Dell™ PowerConnect™ 3024, 3048, and 5012 Network Switches Addendum to the 3024, 3048, and 5012 User's Guides www.dell.com | support.dell.com
Dell™ PowerConnect™ 3024, 3048, and 5012 Network Switches Addendum to the 3024, 3048, and 5012 User's Guides www.dell.com | support.dell.com

User Manual
Page 3
..., IP Filtering, and Allowed IP Addresses • Layer 3 Priority - NOTE: The graphics in this section may differ slightly from the graphics on your switch. Addendum to the 3024, 3048, and 5012 User's Guides New Features: • IP Assignment Mode • SNMP Host Authorization Table • User Authentication Mode - DiffServ • Configuration File... Summary NOTE: The features described in this section apply to both the Web interface and the console interface for your computer. Addendum to the 3024, 3048, and 5012 User's Guides 3
..., IP Filtering, and Allowed IP Addresses • Layer 3 Priority - NOTE: The graphics in this section may differ slightly from the graphics on your switch. Addendum to the 3024, 3048, and 5012 User's Guides New Features: • IP Assignment Mode • SNMP Host Authorization Table • User Authentication Mode - DiffServ • Configuration File... Summary NOTE: The features described in this section apply to both the Web interface and the console interface for your computer. Addendum to the 3024, 3048, and 5012 User's Guides 3

User Manual
Page 5
... then a RADIUS server attempts to authenticate the user. - Allows up to 16 IP addresses to the 3024, 3048, and 5012 User's Guides 5 Addendum to access the switch management function, if enabled. • Password Admin - System Manager/Security Admin: • User Authentication Mode -... Specifies the text string that is shared between the switch and the RADIUS server. • IP Filtering - A RADIUS server authenticates the user. • RADIUS Server IP Address - Remote Only ...
... then a RADIUS server attempts to authenticate the user. - Allows up to 16 IP addresses to the 3024, 3048, and 5012 User's Guides 5 Addendum to access the switch management function, if enabled. • Password Admin - System Manager/Security Admin: • User Authentication Mode -... Specifies the text string that is shared between the switch and the RADIUS server. • IP Filtering - A RADIUS server authenticates the user. • RADIUS Server IP Address - Remote Only ...
User Manual
Page 6
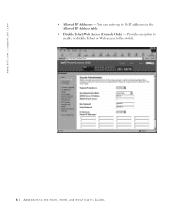
Provides an option to enable or disable Telnet or Web access to the switch. 6 Addendum to 16 IP addresses in the Allowed IP Address table. • Disable Telnet/Web Access (Console Only) - www.dell.com | support.dell.com • Allowed IP Addresses - You can enter up to the 3024, 3048, and 5012 User's Guides
Provides an option to enable or disable Telnet or Web access to the switch. 6 Addendum to 16 IP addresses in the Allowed IP Address table. • Disable Telnet/Web Access (Console Only) - www.dell.com | support.dell.com • Allowed IP Addresses - You can enter up to the 3024, 3048, and 5012 User's Guides
User Manual
Page 9
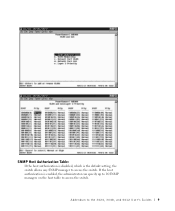
If the host authorization is the default setting, the switch allows any SNMP manager to access the switch. SNMP Host Authorization Table: If the host authorization is disabled, which is enabled, the administrator can specify up to 16 SNMP managers on the host table to access the switch. Addendum to the 3024, 3048, and 5012 User's Guides 9
If the host authorization is the default setting, the switch allows any SNMP manager to access the switch. SNMP Host Authorization Table: If the host authorization is disabled, which is enabled, the administrator can specify up to 16 SNMP managers on the host table to access the switch. Addendum to the 3024, 3048, and 5012 User's Guides 9
User Manual
Page 14
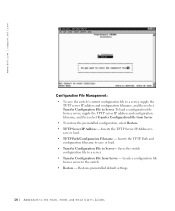
... Configuration File from a server to save or load. • TFTP Path/Configuration Filename - www.dell.com | support.dell.com Configuration File Management: • To save the switch's current configuration file to a server, supply the TFTP server IP address and configuration filename, and then... select Transfer Configuration File to the 30 24, 3048 , and 5 012 Us er 's Guides Restores preinstalled...
... Configuration File from a server to save or load. • TFTP Path/Configuration Filename - www.dell.com | support.dell.com Configuration File Management: • To save the switch's current configuration file to a server, supply the TFTP server IP address and configuration filename, and then... select Transfer Configuration File to the 30 24, 3048 , and 5 012 Us er 's Guides Restores preinstalled...
System Information Guide
Page 5
... You Connect to the Network: Mounting Kit Instructions 11 Connecting the Console Port 12 Password Protection 13 IP Address Assignment 14 Connecting Devices to the Switch 15 Regulatory Information 15 CE Notice (European Union 17 EN 55022 Compliance (Czech Republic Only 18 Polish Center for Testing and Certification Notice 18 Contents...
... You Connect to the Network: Mounting Kit Instructions 11 Connecting the Console Port 12 Password Protection 13 IP Address Assignment 14 Connecting Devices to the Switch 15 Regulatory Information 15 CE Notice (European Union 17 EN 55022 Compliance (Czech Republic Only 18 Polish Center for Testing and Certification Notice 18 Contents...
System Information Guide
Page 11
...started/setup, safety, regulatory, and warranty information about such batteries, refer to the documentation for the specific card or component. PowerConnect System Information Guide 9 Just before unwrapping the antistatic packaging, be disposed of the documents on your system. To obtain the...): • When unpacking a static-sensitive component from its shipping carton, do not remove the component from your Dell™ PowerConnect™ network switch. If possible, use antistatic floor pads and workbench pads and an antistatic grounding strap. NOTE: Your system may also...
...started/setup, safety, regulatory, and warranty information about such batteries, refer to the documentation for the specific card or component. PowerConnect System Information Guide 9 Just before unwrapping the antistatic packaging, be disposed of the documents on your system. To obtain the...): • When unpacking a static-sensitive component from its shipping carton, do not remove the component from your Dell™ PowerConnect™ network switch. If possible, use antistatic floor pads and workbench pads and an antistatic grounding strap. NOTE: Your system may also...
System Information Guide
Page 12
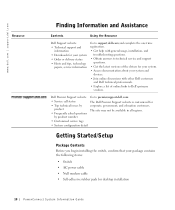
...Started/Setup Package Contents Before you begin installing the switch, confirm that your system and devices. • Join online discussions with other Dell customers and Dell technical professionals. • Explore a list of online links to premiersupport.dell.com: • Service call status • Top.... • Get the latest versions of the drivers for your system. • Access documentation about your package contains the following items: • Switch • AC power cable • Null modem cable • Self-adhesive rubber pads for desktop installation 10 Po werC on n e c t...
...Started/Setup Package Contents Before you begin installing the switch, confirm that your system and devices. • Join online discussions with other Dell customers and Dell technical professionals. • Explore a list of online links to premiersupport.dell.com: • Service call status • Top.... • Get the latest versions of the drivers for your system. • Access documentation about your package contains the following items: • Switch • AC power cable • Null modem cable • Self-adhesive rubber pads for desktop installation 10 Po werC on n e c t...
System Information Guide
Page 13
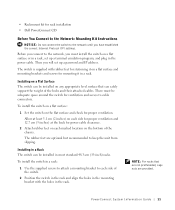
... access to cable connectors. Then you must be adequate space around the switch for rack installation • Dell PowerConnect CD Before You Connect to the Network: Mounting Kit Instructions NOTICE: Do not connect the switch to keep the unit from slipping. The switch is supplied with the holes in most standard 48.3-cm (19-inch...
... access to cable connectors. Then you must be adequate space around the switch for rack installation • Dell PowerConnect CD Before You Connect to the Network: Mounting Kit Instructions NOTICE: Do not connect the switch to keep the unit from slipping. The switch is supplied with the holes in most standard 48.3-cm (19-inch...

System Information Guide
Page 14
... www.dell.com | support.dell.com 3 Insert and tighten two screws appropriate for Function, Arrow, and Ctrl keys. f Select Terminal keys for your rack through each of the mounting brackets. NOTICE: When using HyperTerminal with a female DB-9 connector for the console port on the switch To ...2, the arrow keys function properly in HyperTerminal's VT100 emulation. Ensure that the setting is for Emulation mode. Connecting the Console Port The switch provides an RS-232 serial port that you need the following equipment: • A terminal or TTY-compatible terminal, or a desktop or...
... www.dell.com | support.dell.com 3 Insert and tighten two screws appropriate for Function, Arrow, and Ctrl keys. f Select Terminal keys for your rack through each of the mounting brackets. NOTICE: When using HyperTerminal with a female DB-9 connector for the console port on the switch To ...2, the arrow keys function properly in HyperTerminal's VT100 emulation. Ensure that the setting is for Emulation mode. Connecting the Console Port The switch provides an RS-232 serial port that you need the following equipment: • A terminal or TTY-compatible terminal, or a desktop or...
System Information Guide
Page 15
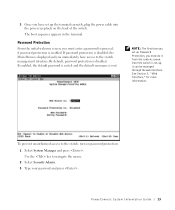
...up the terminal correctly, plug the power cable into the power receptacle on password protection: 1 Select System Manager and press . PowerConnect System Infor mation Guide 13 Password Protection From the initial welcome screen, you must do it can be managed through the web interface... The boot sequence appears in the terminal. If enabled, the default password is switch and the default username is disabled. Once the switch is displayed and you must enter a password to the switch management interface. To prevent unauthorized access to navigate the menu. 2 Select Security Admin...
...up the terminal correctly, plug the power cable into the power receptacle on password protection: 1 Select System Manager and press . PowerConnect System Infor mation Guide 13 Password Protection From the initial welcome screen, you must do it can be managed through the web interface... The boot sequence appears in the terminal. If enabled, the default password is switch and the default username is disabled. Once the switch is displayed and you must enter a password to the switch management interface. To prevent unauthorized access to navigate the menu. 2 Select Security Admin...
System Information Guide
Page 16
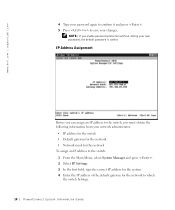
...; Default gateway for the network • Network mask for this network To assign an IP address to the switch: 1 From the Main Menu, select System Manager and press . 2 Select IP Settings. 3 In the first field, type the correct IP address for the system. 4 Enter ... default gateway for the network to save your changes. NOTE: If you must obtain the following information from your own password, the default password is switch. www.dell.com | support.dell.com 4 Type your password again to confirm it and press . 5 Press to which the...
...; Default gateway for the network • Network mask for this network To assign an IP address to the switch: 1 From the Main Menu, select System Manager and press . 2 Select IP Settings. 3 In the first field, type the correct IP address for the system. 4 Enter ... default gateway for the network to save your changes. NOTE: If you must obtain the following information from your own password, the default password is switch. www.dell.com | support.dell.com 4 Type your password again to confirm it and press . 5 Press to which the...

System Information Guide
Page 17
...contribute to the connectors on the GBIC module. 5 Enter the network mask for the changes to take effect. Confirm the reset. Connecting Devices to the Switch At this network. 6 Press to save your cabling requirements to select an appropriate GBIC module type. 2 Insert the GBIC module (sold separately) into ...make IP changes, restart the system. 8 Press twice to return to the Main Menu. 9 Select System Manager and then select Reset to the switch's RJ-45 connectors. Radio communications services include but are ready to use appropriate network cabling to connect devices to restart the...
...contribute to the connectors on the GBIC module. 5 Enter the network mask for the changes to take effect. Confirm the reset. Connecting Devices to the Switch At this network. 6 Press to save your cabling requirements to select an appropriate GBIC module type. 2 Insert the GBIC module (sold separately) into ...make IP changes, restart the system. 8 Press twice to return to the Main Menu. 9 Select System Manager and then select Reset to the switch's RJ-45 connectors. Radio communications services include but are ready to use appropriate network cabling to connect devices to restart the...

System Information Guide
Page 20
... installation should have a reserve short-circuit protection device in the form of a fuse with a nominal value no larger than 16 amperes (A). To completely switch off the equipment, the power supply cable must be located near the equipment and easily accessible. Polish Center for m a t io n G u ...id e A protection mark "B" confirms that the equipment is a Class A device on the specification label. www.dell.com | support.dell.com EN 55022 Compliance (Czech Republic Only) This device belongs to Class B devices as described in EN 55022, unless it is specifically stated that...
... installation should have a reserve short-circuit protection device in the form of a fuse with a nominal value no larger than 16 amperes (A). To completely switch off the equipment, the power supply cable must be located near the equipment and easily accessible. Polish Center for m a t io n G u ...id e A protection mark "B" confirms that the equipment is a Class A device on the specification label. www.dell.com | support.dell.com EN 55022 Compliance (Czech Republic Only) This device belongs to Class B devices as described in EN 55022, unless it is specifically stated that...

System Information Guide
Page 162
www.dell.com support.euro.dell.com Main Menu switch root Enter Manager System Tab Admin Security Enter Enter Ctrl> ˘˜‰ µ Æswitch 169 | PowerConnect
www.dell.com support.euro.dell.com Main Menu switch root Enter Manager System Tab Admin Security Enter Enter Ctrl> ˘˜‰ µ Æswitch 169 | PowerConnect


