
Users Guide
Page 3
... monitor 6 Package contents 6 Product features 8 Identifying parts and controls 9 Front View 9 Back View 10 Side View 11 Bottom View 12 Monitor specifications 13 Resolution specifications 14 Supported video modes 14 Preset display modes 15 Electrical specifications 16 Physical characteristics 17 Environmental characteristics 18 Power management modes 19 Pin assignments 21 Universal serial bus (USB) interface 23 Plug and play capability 25 LCD monitor quality and pixel policy 25 Maintenance guidelines 25 Cleaning your monitor 25 Setting up the monitor...
... monitor 6 Package contents 6 Product features 8 Identifying parts and controls 9 Front View 9 Back View 10 Side View 11 Bottom View 12 Monitor specifications 13 Resolution specifications 14 Supported video modes 14 Preset display modes 15 Electrical specifications 16 Physical characteristics 17 Environmental characteristics 18 Power management modes 19 Pin assignments 21 Universal serial bus (USB) interface 23 Plug and play capability 25 LCD monitor quality and pixel policy 25 Maintenance guidelines 25 Cleaning your monitor 25 Setting up the monitor...

Users Guide
Page 4
... stand 26 Connecting your monitor 28 Organizing cables 30 Disconnecting the monitor stand 31 Wall mounting (optional 32 Operating your monitor 33 Power on the monitor 33 Language options 33 Using the front panel controls 34 OSD controls 35 Using the on-screen display (OSD) menu 36 Accessing the Menu System 36 OSD warning messages 45 Setting up your monitor 47 Setting the maximum resolution 47 Using the Tilt, Swivel, and Vertical Extension 48 Tilt, Swivel 48 Vertical Extension 48 Rotating the Monitor 49 Troubleshooting...
... stand 26 Connecting your monitor 28 Organizing cables 30 Disconnecting the monitor stand 31 Wall mounting (optional 32 Operating your monitor 33 Power on the monitor 33 Language options 33 Using the front panel controls 34 OSD controls 35 Using the on-screen display (OSD) menu 36 Accessing the Menu System 36 OSD warning messages 45 Setting up your monitor 47 Setting the maximum resolution 47 Using the Tilt, Swivel, and Vertical Extension 48 Tilt, Swivel 48 Vertical Extension 48 Rotating the Monitor 49 Troubleshooting...
Users Guide
Page 8
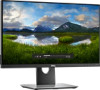
... (23.75-inch) viewable area display (measured diagonally). 2560 x 1440 resolution, via HDMI/DisplayPort, plus full-screen support for flexible mounting solutions. ∞∞ Digital connectivity with DisplayPort and HDMI. ∞∞ Equipped with 1 USB upstream port and 4 USB downstream ports. ∞∞ Plug and play capability if supported by your monitor Product features The Dell P2418D flat panel display has an active matrix, Thin-Film Transistor (TFT), Liquid Crystal Display (LCD), and LED backlight. ComfortView feature...
... (23.75-inch) viewable area display (measured diagonally). 2560 x 1440 resolution, via HDMI/DisplayPort, plus full-screen support for flexible mounting solutions. ∞∞ Digital connectivity with DisplayPort and HDMI. ∞∞ Equipped with 1 USB upstream port and 4 USB downstream ports. ∞∞ Plug and play capability if supported by your monitor Product features The Dell P2418D flat panel display has an active matrix, Thin-Film Transistor (TFT), Liquid Crystal Display (LCD), and LED backlight. ComfortView feature...
Users Guide
Page 10
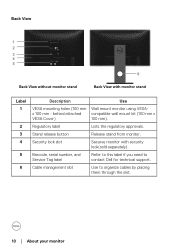
... lock slot Secures monitor with monitor stand Label 1 2 3 4 5 6 Description Use VESA mounting holes (100 mm Wall mount monitor using VESA- Barcode, serial number, and Service Tag label Refer to this label if you need to an earthed mains socket-outlet. L'appareil doit être branché sur une prise de courant munie d'une mise à la terre. Regulatory label Lists the regulatory approvals. Back View 1 2 3 4 5 P2418D Monitor Plano Panel /Moniteur...
... lock slot Secures monitor with monitor stand Label 1 2 3 4 5 6 Description Use VESA mounting holes (100 mm Wall mount monitor using VESA- Barcode, serial number, and Service Tag label Refer to this label if you need to an earthed mains socket-outlet. L'appareil doit être branché sur une prise de courant munie d'une mise à la terre. Regulatory label Lists the regulatory approvals. Back View 1 2 3 4 5 P2418D Monitor Plano Panel /Moniteur...

Users Guide
Page 12
... USB-upstream port on the monitor and to your computer. 6 Stand lock feature To lock the stand to the monitor using a DP cable. 4 USB upstream port Connect the USB cable (shipped with HDMI cable(optional). 3 DP port Connect your computer to enable the USB ports on your monitor port NOTE:To use this port and your computer to the monitor using a M3 x 6mm screw (screw not included). 7 Dell Soundbar mounting slots Attaches the optional Dell Soundbar. NOTE:Please remove the plastic strip covering the mounting...
... USB-upstream port on the monitor and to your computer. 6 Stand lock feature To lock the stand to the monitor using a DP cable. 4 USB upstream port Connect the USB cable (shipped with HDMI cable(optional). 3 DP port Connect your computer to enable the USB ports on your monitor port NOTE:To use this port and your computer to the monitor using a M3 x 6mm screw (screw not included). 7 Dell Soundbar mounting slots Attaches the optional Dell Soundbar. NOTE:Please remove the plastic strip covering the mounting...

Users Guide
Page 14
...) Height adjustable stand (130mm) Tilt (-5°/+21°) Swivel (-45°/+45°) Pivot (90°) Resolution specifications Model P2418D Horizontal scan 29 kHz to 113 kHz (automatic) range Vertical scan range 49 Hz to active area) Security Adjustability 1xDP (ver 1.2) 1xHDMI (ver 1.4) 1xUSB3.0 port - Side 2xUSB3.0 port - Upstream 2xUSB3.0 port - Connectivity Border width (edge of monitor to 86 Hz (automatic) Maximum preset 2560 x 1440 at 60 Hz resolution Supported video modes Model P2418D Video display...
...) Height adjustable stand (130mm) Tilt (-5°/+21°) Swivel (-45°/+45°) Pivot (90°) Resolution specifications Model P2418D Horizontal scan 29 kHz to 113 kHz (automatic) range Vertical scan range 49 Hz to active area) Security Adjustability 1xDP (ver 1.2) 1xHDMI (ver 1.4) 1xUSB3.0 port - Side 2xUSB3.0 port - Upstream 2xUSB3.0 port - Connectivity Border width (edge of monitor to 86 Hz (automatic) Maximum preset 2560 x 1440 at 60 Hz resolution Supported video modes Model P2418D Video display...
Users Guide
Page 25
... a lighter-colored monitor. • To help maintain the best image quality on your monitor, use . LCD monitor quality and pixel policy During the LCD Monitor manufacturing process, it off your monitor when not in use a dynamically changing screen saver and turn off with a cloth. • Handle your monitor WARNING: Before cleaning the monitor, unplug the monitor power cable from the electrical outlet. For best practices, follow the Safety Instructions before cleaning the monitor. About your monitor. CAUTION: Read...
... a lighter-colored monitor. • To help maintain the best image quality on your monitor, use . LCD monitor quality and pixel policy During the LCD Monitor manufacturing process, it off your monitor when not in use a dynamically changing screen saver and turn off with a cloth. • Handle your monitor WARNING: Before cleaning the monitor, unplug the monitor power cable from the electrical outlet. For best practices, follow the Safety Instructions before cleaning the monitor. About your monitor. CAUTION: Read...

Users Guide
Page 29
... (USB) specific problems. 5. Connecting the USB 3.0 cable After you have completed connecting the DP/HDMI cable, follow the procedures below to connect the USB 3.0 cable to the computer and complete your computer and monitor into a nearby outlet. 4. Connect the upstream USB 3.0 port (cable supplied) to an appropriate USB 3.0 port on the monitor stand to organize the cables. If your computer. (See Bottom View for your monitor setup: 1. Setting up the monitor │ 29 Use the cable slot on your monitor displays an image, installation...
... (USB) specific problems. 5. Connecting the USB 3.0 cable After you have completed connecting the DP/HDMI cable, follow the procedures below to connect the USB 3.0 cable to the computer and complete your computer and monitor into a nearby outlet. 4. Connect the upstream USB 3.0 port (cable supplied) to an appropriate USB 3.0 port on the monitor stand to organize the cables. If your computer. (See Bottom View for your monitor setup: 1. Setting up the monitor │ 29 Use the cable slot on your monitor displays an image, installation...

Users Guide
Page 34
... panel controls Use the control buttons at launch your on-screen display (OSD) and select the OSD menu. Shortcut key/Preset Modes 2 Use the input source menu to select between the different video signals that may be Shortcut key/Input connected to the main menu or exit the OSD main menu. Exit 5 Use the power button to turn the monitor on . See Menu Accessing the Menu System. 4 Use this button for choose from a list of preset modes. Power On/Off button (with LED indicator) Solid white light...
... panel controls Use the control buttons at launch your on-screen display (OSD) and select the OSD menu. Shortcut key/Preset Modes 2 Use the input source menu to select between the different video signals that may be Shortcut key/Input connected to the main menu or exit the OSD main menu. Exit 5 Use the power button to turn the monitor on . See Menu Accessing the Menu System. 4 Use this button for choose from a list of preset modes. Power On/Off button (with LED indicator) Solid white light...

Users Guide
Page 37
... the button to increase the contrast and press the button to decrease the brightness (min. 0 / max. 100). Operating your monitor │ 37 Icon Menu and Submenus Brightness/ Contrast Description Use this menu to activate brightness/contrast adjustment. The contrast function adjusts the degree of the backlight. Adjust the brightness first, and then adjust the contrast only if further adjustment is switched on the monitor screen. Dell 24 Monitor Brightness / Contrast Input Source 75% Color Display 75% Menu Personalize Others Brightness Contrast Brightness adjusts the...
... the button to increase the contrast and press the button to decrease the brightness (min. 0 / max. 100). Operating your monitor │ 37 Icon Menu and Submenus Brightness/ Contrast Description Use this menu to activate brightness/contrast adjustment. The contrast function adjusts the degree of the backlight. Adjust the brightness first, and then adjust the contrast only if further adjustment is switched on the monitor screen. Dell 24 Monitor Brightness / Contrast Input Source 75% Color Display 75% Menu Personalize Others Brightness Contrast Brightness adjusts the...
Users Guide
Page 38
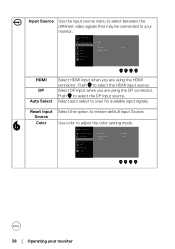
...select the HDMI input source. Push to select the DP input source. Input Source Use the input source menu to select between the different video signals that may be connected to restore default Input Source. Select DP input when you are using the HDMI connector. Reset Input Source Color Select this option to your monitor Dell 24 Monitor Brightness / Contrast Input Source Color Display Menu Personalize Others Preset Modes Input Color Format Reset Color Standard RGB 38 │ Operating your monitor. Select auto select to adjust the color setting mode. Use color to...
...select the HDMI input source. Push to select the DP input source. Input Source Use the input source menu to select between the different video signals that may be connected to restore default Input Source. Select DP input when you are using the HDMI connector. Reset Input Source Color Select this option to your monitor Dell 24 Monitor Brightness / Contrast Input Source Color Display Menu Personalize Others Preset Modes Input Color Format Reset Color Standard RGB 38 │ Operating your monitor. Select auto select to adjust the color setting mode. Use color to...
Users Guide
Page 39
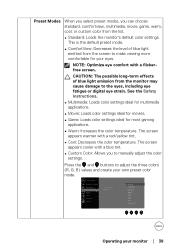
... and buttons to the eyes, including eye fatigue or digital eye strain. CAUTION: The possible long-term effects of blue light emitted from the list. ∞∞Standard: Loads the monitor's default color settings. The screen appears warmer with a flickerfree screen. Dell 24 Monitor Brightness / Contrast Input Source Color Display Menu Personalize Others Preset Modes Input Color Format Reset Color Standard ComfortView Multimedia Movie Game Warm Cool Custom Color Operating your own preset color mode. The screen appears...
... and buttons to the eyes, including eye fatigue or digital eye strain. CAUTION: The possible long-term effects of blue light emitted from the list. ∞∞Standard: Loads the monitor's default color settings. The screen appears warmer with a flickerfree screen. Dell 24 Monitor Brightness / Contrast Input Source Color Display Menu Personalize Others Preset Modes Input Color Format Reset Color Standard ComfortView Multimedia Movie Game Warm Cool Custom Color Operating your own preset color mode. The screen appears...

Users Guide
Page 40
.... Press the button to 100. Dell 24 Monitor Brightness / Contrast Input Source Color Display Menu Personalize Others Preset Modes Input Color Format Reset Color RGB YPbPr Reset Color Display Allows your monitor Reset Display Select this option if your DVD player supports only YPbPr output. Allows you to set the video input mode to: ∞∞RGB: Select this option if your monitor is connected to a computer or DVD player using the HDMI cable. ∞∞YPbPr: Select this option to restore default display settings. 40...
.... Press the button to 100. Dell 24 Monitor Brightness / Contrast Input Source Color Display Menu Personalize Others Preset Modes Input Color Format Reset Color RGB YPbPr Reset Color Display Allows your monitor Reset Display Select this option if your DVD player supports only YPbPr output. Allows you to set the video input mode to: ∞∞RGB: Select this option if your monitor is connected to a computer or DVD player using the HDMI cable. ∞∞YPbPr: Select this option to restore default display settings. 40...
Users Guide
Page 44
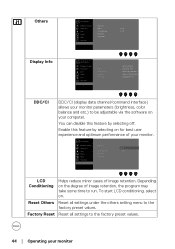
... your monitor Factory Reset Reset all settings under the others setting menu to run. Dell 24 Monitor Brightness / Contrast Display Info Input Source DDC/CI On Color LCD Conditioning Off Display Reset Others Menu Factory Reset Personalize Others LCD Conditioning Helps reduce minor cases of image retention, the program may take some time to the factory preset values. Enable this feature by selecting on your monitor. Reset Others Reset all settings to be adjustable via the software on for best user experience and...
... your monitor Factory Reset Reset all settings under the others setting menu to run. Dell 24 Monitor Brightness / Contrast Display Info Input Source DDC/CI On Color LCD Conditioning Off Display Reset Others Menu Factory Reset Personalize Others LCD Conditioning Helps reduce minor cases of image retention, the program may take some time to the factory preset values. Enable this feature by selecting on your monitor. Reset Others Reset all settings to be adjustable via the software on for best user experience and...

Users Guide
Page 47
... card website and download the latest graphic drivers. For Windows 8 and Windows 8.1, select the Desktop tile to switch to the OSD. Click the dropdown list of the Screen Resolution and select 2560 x 1440 4. Operating your device. No HDMI signal from your monitor │ 47 See Troubleshooting for your computer's Service Tag, and download the latest driver for more information. Right-click on the desktop and click Display settings. 2. P2418D...
... card website and download the latest graphic drivers. For Windows 8 and Windows 8.1, select the Desktop tile to switch to the OSD. Click the dropdown list of the Screen Resolution and select 2560 x 1440 4. Operating your device. No HDMI signal from your monitor │ 47 See Troubleshooting for your computer's Service Tag, and download the latest driver for more information. Right-click on the desktop and click Display settings. 2. P2418D...

Users Guide
Page 51
... HDMI Cable The display will go into Power Save Mode in this section, follow the Safety Instructions. Troubleshooting │ 51 Turn off your video controller and computer. This way, the computer doesn't have to check if your computer and the monitor. If the monitor is working correctly, it detects that allows you reconnect the cables, check your monitor and reconnect the video cable; Disconnect all video cables from the monitor. www.dell.com/support/monitors NOTE...
... HDMI Cable The display will go into Power Save Mode in this section, follow the Safety Instructions. Troubleshooting │ 51 Turn off your video controller and computer. This way, the computer doesn't have to check if your computer and the monitor. If the monitor is working correctly, it detects that allows you reconnect the cables, check your monitor and reconnect the video cable; Disconnect all video cables from the monitor. www.dell.com/support/monitors NOTE...

Users Guide
Page 53
...; Cycle power on Dell Monitor Quality and Pixel Policy, see Dell Support site at www.dell.com/support/monitors. Brightness problems Geometric distortion Horizontal/vertical lines ∞∞ Reset the monitor to Factory Settings (Factory Reset). ∞∞ Adjust brightness & contrast controls via OSD. ∞∞ Reset the monitor to Factory Settings (Factory Reset). ∞∞ Perform monitor self-test feature check and determine if these lines are also in self-test mode. ∞∞ Check for bent or broken pins in the video cable connector. ∞...
...; Cycle power on Dell Monitor Quality and Pixel Policy, see Dell Support site at www.dell.com/support/monitors. Brightness problems Geometric distortion Horizontal/vertical lines ∞∞ Reset the monitor to Factory Settings (Factory Reset). ∞∞ Adjust brightness & contrast controls via OSD. ∞∞ Reset the monitor to Factory Settings (Factory Reset). ∞∞ Perform monitor self-test feature check and determine if these lines are also in self-test mode. ∞∞ Check for bent or broken pins in the video cable connector. ∞...

Users Guide
Page 54
... Time in Color settings OSD. Adjust R/G/B value in Custom Color in Color settings OSD. ∞∞ Change the Input Color Format to RGB or YPbPr in the Color settings OSD. ∞∞ Run the built-in diagnostics. ∞∞ Use the Power Management feature to turn off the monitor at all times when not in use (for bent or broken pins in the video cable connector. ∞∞ Change the Color Setting Mode in the Color Settings OSD to Fast...
... Time in Color settings OSD. Adjust R/G/B value in Custom Color in Color settings OSD. ∞∞ Change the Input Color Format to RGB or YPbPr in the Color settings OSD. ∞∞ Run the built-in diagnostics. ∞∞ Use the Power Management feature to turn off the monitor at all times when not in use (for bent or broken pins in the video cable connector. ∞∞ Change the Color Setting Mode in the Color Settings OSD to Fast...

Users Guide
Page 55
... video cable is plugged in properly. No input signal when user controls are pressed ∞∞ Check the signal source. Disconnect and reconnect the video cable if necessary. ∞∞ Reset the computer or video player. connect the device directly to unlock. Product-specific problems Specific Symptoms Possible Solutions Screen image is too small ∞∞ Check the Aspect Ratio setting in diagnostics. Ensure the computer is not working when a USB 3.0 device is locked. Universal serial bus (USB) specific problems Specific...
... video cable is plugged in properly. No input signal when user controls are pressed ∞∞ Check the signal source. Disconnect and reconnect the video cable if necessary. ∞∞ Reset the computer or video player. connect the device directly to unlock. Product-specific problems Specific Symptoms Possible Solutions Screen image is too small ∞∞ Check the Aspect Ratio setting in diagnostics. Ensure the computer is not working when a USB 3.0 device is locked. Universal serial bus (USB) specific problems Specific...

Display Manager Users Guide
Page 4
..., and other features on select Dell monitors. Dell 24 Monitor Brightness / Contrast Display Info Input Source DDC/CI On Color LCD Conditioning Off Display Reset Others Menu Factory Reset Personalize Others 4 │ Overview Overview Dell Display Manager is enabled in the notification tray. It allows manual adjustment of the displayed image, assignment of monitors. Information about monitors connected to communicate with your monitor. Once installed, Dell display manager runs each time the computer starts and its icon is...
..., and other features on select Dell monitors. Dell 24 Monitor Brightness / Contrast Display Info Input Source DDC/CI On Color LCD Conditioning Off Display Reset Others Menu Factory Reset Personalize Others 4 │ Overview Overview Dell Display Manager is enabled in the notification tray. It allows manual adjustment of the displayed image, assignment of monitors. Information about monitors connected to communicate with your monitor. Once installed, Dell display manager runs each time the computer starts and its icon is...


