Dell Display Manager User's Guide
Page 1
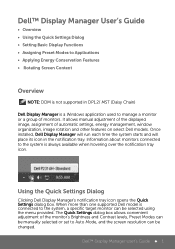
...selected or set to Auto Mode, and the screen resolution can be changed. It allows manual adjustment of the displayed image, assignment of monitors. Dell™ Display Manager User's Guide • Overview • Using the Quick Settings Dialog • Setting Basic Display Functions • ...Content Overview NOTE: DDM is not supported in the notification tray. When more than one supported Dell model is connected to the system is a Windows application used to manage a monitor or a group of automatic settings, energy management, window organization, image rotation and other features on...
...selected or set to Auto Mode, and the screen resolution can be changed. It allows manual adjustment of the displayed image, assignment of monitors. Dell™ Display Manager User's Guide • Overview • Using the Quick Settings Dialog • Setting Basic Display Functions • ...Content Overview NOTE: DDM is not supported in the notification tray. When more than one supported Dell model is connected to the system is a Windows application used to manage a monitor or a group of automatic settings, energy management, window organization, image rotation and other features on...
Dell Display Manager User's Guide
Page 2
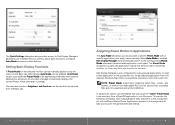
... the next. To add a new application to the assignment list, simply drag the application from one monitor to a particular application may be the same on the Basic tab. Dell™ Display Manager User's Guide 3 Setting Basic Display Functions A Preset Mode for many .... Applications present in the assignment list take priority over the general Direct3D setting. The selected monitor's Brightness and Contrast can be directly adjusted from the Basic tab. 2 Dell™ Display Manager User's Guide Assigning Preset Modes to Applications The Auto Mode tab allows...
... the next. To add a new application to the assignment list, simply drag the application from one monitor to a particular application may be the same on the Basic tab. Dell™ Display Manager User's Guide 3 Setting Basic Display Functions A Preset Mode for many .... Applications present in the assignment list take priority over the general Direct3D setting. The selected monitor's Brightness and Contrast can be directly adjusted from the Basic tab. 2 Dell™ Display Manager User's Guide Assigning Preset Modes to Applications The Auto Mode tab allows...
Dell Display Manager User's Guide
Page 3
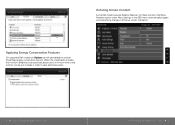
... in Windows screen orientation. When the screensaver activates, the monitor's Brightness can automatically be set to minimum level or the monitor can be available to save additional power. 4 Dell™ Display Manager User's Guide Dell™ Display Manager User's Guide 5 On these monitors the Menu Rotation option under Menu Settings in the OSD...
... in Windows screen orientation. When the screensaver activates, the monitor's Brightness can automatically be set to minimum level or the monitor can be available to save additional power. 4 Dell™ Display Manager User's Guide Dell™ Display Manager User's Guide 5 On these monitors the Menu Rotation option under Menu Settings in the OSD...

Dell Monitor Outline Drawing
Page 1
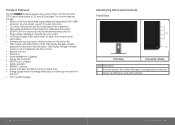
P2314H Outline Dimension Swivel 45° Swivel 45° Z = 0 46.5 (1.83) 13.0 (0.51) 17.5 (0.69) 545.8 (21.49) 510.7 (20.15) Pivot 90° 7.9 (0.31) 51.8 (2.04) 100.0.2x (3.94) Nominal Dimensions Unit:mm(inch) 122.0.2x (4.80) Z=39.5 (1.56) Z=40.5 (1.59) M4x10(4x) Back View of Monitor without stand Tilt 5° 21...
P2314H Outline Dimension Swivel 45° Swivel 45° Z = 0 46.5 (1.83) 13.0 (0.51) 17.5 (0.69) 545.8 (21.49) 510.7 (20.15) Pivot 90° 7.9 (0.31) 51.8 (2.04) 100.0.2x (3.94) Nominal Dimensions Unit:mm(inch) 122.0.2x (4.80) Z=39.5 (1.56) Z=40.5 (1.59) M4x10(4x) Back View of Monitor without stand Tilt 5° 21...
Dell Users Guide
Page 2
...is subject to either trademarks or registered trademarks of Microsoft Corporation in the U.S. Dell Inc. Trademarks used by Dell under license; and other than its own. 2013 - 07 Rev. A01 Contents About Your Monitor 6 Package Contents 6 Product Features 8 Identifying Parts and Controls 9 Front View...9...(BDA) and licensed for property damage, personal injury, or death. © 2013 Dell Inc. NOTE: A NOTE indicates important information that helps you make better use on the monitor 27 Using the Front Panel Controls 27 Using the On-Screen Display (OSD) Menu ...
...is subject to either trademarks or registered trademarks of Microsoft Corporation in the U.S. Dell Inc. Trademarks used by Dell under license; and other than its own. 2013 - 07 Rev. A01 Contents About Your Monitor 6 Package Contents 6 Product Features 8 Identifying Parts and Controls 9 Front View...9...(BDA) and licensed for property damage, personal injury, or death. © 2013 Dell Inc. NOTE: A NOTE indicates important information that helps you make better use on the monitor 27 Using the Front Panel Controls 27 Using the On-Screen Display (OSD) Menu ...
Dell Users Guide
Page 3
... Setting the display resolution to 1920 x 1080 (maximum 58 If you have a Dell desktop or a Dell portable computer with internet access...59 If you have non Dell desktop, portable computer, or graphic card....60 Procedure on setting up dual monitors in Diagnostics 49 Common Problems 50 Product Specific Problems 55 Universal Serial Bus(USB...
... Setting the display resolution to 1920 x 1080 (maximum 58 If you have a Dell desktop or a Dell portable computer with internet access...59 If you have non Dell desktop, portable computer, or graphic card....60 Procedure on setting up dual monitors in Diagnostics 49 Common Problems 50 Product Specific Problems 55 Universal Serial Bus(USB...
Dell Users Guide
Page 4
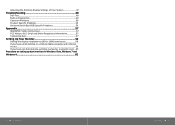
...may not ship with any other stand, please refer to the respective stand setup guide for setup instructions. • Monitor • Stand • Cable Cover 6 About Your Monitor • Power Cable (varies by countries) • VGA Cable • DisplayPort Cable • USB Upstream ...Setup Guide • Product and Safety Information Guide About Your Monitor 7 About Your Monitor Package Contents Your monitor ships with the components shown below. Ensure that you have received all the components and contact Dell if something is missing. Some features or media may not ...
...may not ship with any other stand, please refer to the respective stand setup guide for setup instructions. • Monitor • Stand • Cable Cover 6 About Your Monitor • Power Cable (varies by countries) • VGA Cable • DisplayPort Cable • USB Upstream ...Setup Guide • Product and Safety Information Guide About Your Monitor 7 About Your Monitor Package Contents Your monitor ships with the components shown below. Ensure that you have received all the components and contact Dell if something is missing. Some features or media may not ...
Dell Users Guide
Page 5
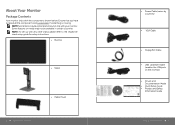
Identifying Parts and Controls Front View Front View Front panel controls Label Description 1. Power On/Off button (with the monitor). • Security lock slot. • Stand lock. • Asset Management Capability. • Energy Star Compliant. • EPEAT Gold...Features The Dell P2314H flat panel display has an active matrix, thin-film transistor (TFT), liquid crystal display (LCD), and LED backlight. Dell Display Manager included (comes in real time. • TCO Certified Displays. Function buttons (For more information, see Operating the Monitor) 2. The monitor features ...
Identifying Parts and Controls Front View Front View Front panel controls Label Description 1. Power On/Off button (with the monitor). • Security lock slot. • Stand lock. • Asset Management Capability. • Energy Star Compliant. • EPEAT Gold...Features The Dell P2314H flat panel display has an active matrix, thin-film transistor (TFT), liquid crystal display (LCD), and LED backlight. Dell Display Manager included (comes in real time. • TCO Certified Displays. Function buttons (For more information, see Operating the Monitor) 2. The monitor features ...

Dell Users Guide
Page 6
... label if you can use the USB connectors on the monitor. Back View Side View Back view Back view with your monitor to contact Dell for technical support. Refer to this cable is connected, you need to the monitor and the computer. behind attached VESA Cover) 2 Regulatory label...3 Stand release button 4 Security lock slot 5 Barcode serial number label 6 Dell Soundbar mounting slots 7 Cable management slot Use Wall mount monitor using a VGA cable. 5 USB upstream port Connect the USB cable that came with monitor stand Label Description 1 VESA mounting holes (100 mm x 100 mm - Attaches...
... label if you can use the USB connectors on the monitor. Back View Side View Back view Back view with your monitor to contact Dell for technical support. Refer to this cable is connected, you need to the monitor and the computer. behind attached VESA Cover) 2 Regulatory label...3 Stand release button 4 Security lock slot 5 Barcode serial number label 6 Dell Soundbar mounting slots 7 Cable management slot Use Wall mount monitor using a VGA cable. 5 USB upstream port Connect the USB cable that came with monitor stand Label Description 1 VESA mounting holes (100 mm x 100 mm - Attaches...

Dell Users Guide
Page 7
... 3 Hz/1.5 A (Max.) 120 V:30 A (Max.) 240 V:60 A (Max.) About Your Monitor 13 g-to-g with OD 16.7 million colors 83%* (CIE1976) *[P2314H] color gamut (typical) is based on the monitor. 7 Stand lock To disable the stand release button and lock the stand assembly using an M3 X 6... mm screw (screw not included). 6 USB downstream Connect your USB device. Monitor Specifications Flat Panel Specifications Screen ...
... 3 Hz/1.5 A (Max.) 120 V:30 A (Max.) 240 V:60 A (Max.) About Your Monitor 13 g-to-g with OD 16.7 million colors 83%* (CIE1976) *[P2314H] color gamut (typical) is based on the monitor. 7 Stand lock To disable the stand release button and lock the stand assembly using an M3 X 6... mm screw (screw not included). 6 USB downstream Connect your USB device. Monitor Specifications Flat Panel Specifications Screen ...

Dell Users Guide
Page 8
...Glowing White Off 20 W (typical)/38 W (maximum) Less than 0.3 W Less than 0.3 W The OSD function will be displayed: About Your Monitor 15 DP, black connector Digital: Detachable, DVI-D, Solid pins. Vertical Sync Active Video Active Inactive Blanked - - When any button is ...when not in the normal operation mode. If the computer detects input from keyboard, mouse, or other input devices, the monitor automatically resumes functioning. Physical Characteristics Connector type Signal cable type Dimensions (with stand) Height(extended) Height(compressed) Width Depth ...
...Glowing White Off 20 W (typical)/38 W (maximum) Less than 0.3 W Less than 0.3 W The OSD function will be displayed: About Your Monitor 15 DP, black connector Digital: Detachable, DVI-D, Solid pins. Vertical Sync Active Video Active Inactive Blanked - - When any button is ...when not in the normal operation mode. If the computer detects input from keyboard, mouse, or other input devices, the monitor automatically resumes functioning. Physical Characteristics Connector type Signal cable type Dimensions (with stand) Height(extended) Height(compressed) Width Depth ...

Dell Users Guide
Page 9
... Pin Number 1 2 3 4 5 6 7 15-pin Side of the Connected Signal Cable Video-Red Video-Green Video-Blue GND Self-test GND-R GND-G 16 About Your Monitor 8 GND-B 9 Computer 5V/3.3V 10 GND-sync 11 GND 12 DDC data 13 H-sync 14 V-sync 15 DDC clock DVI Connector Pin Number 1 2 3 4 5 6 7 8 9 10 ... Floating Floating DDC Clock DDC Data Floating TMDS RX1 TMDS RX1+ TMDS Ground Floating Floating +5 V/+3.3 V power Self test Hot Plug Detect About Your Monitor 17 NOTE: Zero power consumption in OFF mode can only be achieved by disconnecting the main cable from the...
... Pin Number 1 2 3 4 5 6 7 15-pin Side of the Connected Signal Cable Video-Red Video-Green Video-Blue GND Self-test GND-R GND-G 16 About Your Monitor 8 GND-B 9 Computer 5V/3.3V 10 GND-sync 11 GND 12 DDC data 13 H-sync 14 V-sync 15 DDC clock DVI Connector Pin Number 1 2 3 4 5 6 7 8 9 10 ... Floating Floating DDC Clock DDC Data Floating TMDS RX1 TMDS RX1+ TMDS Ground Floating Floating +5 V/+3.3 V power Self test Hot Plug Detect About Your Monitor 17 NOTE: Zero power consumption in OFF mode can only be achieved by disconnecting the main cable from the...

Dell Users Guide
Page 10
... TMDS RX0 18 TMDS RX0+ 19 TMDS Ground 20 Floating 21 Floating 22 TMDS Ground 23 TMDS Clock+ 24 TMDS Clock- The monitor automatically provides the computer system with its Extended Display Identification Data (EDID) using Display Data Channel (DDC) protocols so the system can select different settings ... 3 ML0(n) 4 ML1(p) 5 GND 6 ML1(n) 7 ML2(p) 8 GND 9 ML2(n) 10 ML3(p) 11 GND 12 ML3(n) 13 GND 14 GND 15 AUX(p) 16 GND 18 About Your Monitor 17 AUX(n) 18 HPD 19 Re-PWR 20 PWR Plug and Play Capability You can install the...
... TMDS RX0 18 TMDS RX0+ 19 TMDS Ground 20 Floating 21 Floating 22 TMDS Ground 23 TMDS Clock+ 24 TMDS Clock- The monitor automatically provides the computer system with its Extended Display Identification Data (EDID) using Display Data Channel (DDC) protocols so the system can select different settings ... 3 ML0(n) 4 ML1(p) 5 GND 6 ML1(n) 7 ML2(p) 8 GND 9 ML2(n) 10 ML3(p) 11 GND 12 ML3(n) 13 GND 14 GND 15 AUX(p) 16 GND 18 About Your Monitor 17 AUX(n) 18 HPD 19 Re-PWR 20 PWR Plug and Play Capability You can install the...

Dell Users Guide
Page 11
... it on, the attached peripherals may scratch and show white scuff marks more than light-colored monitors. • To help maintain the best image quality on Dell Monitor Quality and Pixel Policy, see and do not affect the display quality or usability. back NOTE: USB 2.0 ...follow the Safety Instructions before cleaning the monitor. For more pixels to become fixed in an unchanging state which are hard to see Dell Support site at: www.dell.com/ support/monitors. 20 About Your Monitor Maintenance Guidelines Cleaning Your Monitor WARNING: Read and follow the instructions...
... it on, the attached peripherals may scratch and show white scuff marks more than light-colored monitors. • To help maintain the best image quality on Dell Monitor Quality and Pixel Policy, see and do not affect the display quality or usability. back NOTE: USB 2.0 ...follow the Safety Instructions before cleaning the monitor. For more pixels to become fixed in an unchanging state which are hard to see Dell Support site at: www.dell.com/ support/monitors. 20 About Your Monitor Maintenance Guidelines Cleaning Your Monitor WARNING: Read and follow the instructions...

Dell Users Guide
Page 12
... Press the stand till it is shipped from the factory. Connecting Your Monitor WARNING: Before you begin any other stand is applicable for a monitor with appropriate video systems. 22 Setting Up the Monitor Connecting the black DisplayPort Cable CAUTION: The graphics are connected to the ...Appearance of your computer and disconnect the power cable. 2. Setting Up the Monitor 23 Remove the cover and place the monitor on the same computer. Turn off your computer. When any of the monitor. 3. Connect either the white (digital DVI-D) or the blue (analog VGA...
... Press the stand till it is shipped from the factory. Connecting Your Monitor WARNING: Before you begin any other stand is applicable for a monitor with appropriate video systems. 22 Setting Up the Monitor Connecting the black DisplayPort Cable CAUTION: The graphics are connected to the ...Appearance of your computer and disconnect the power cable. 2. Setting Up the Monitor 23 Remove the cover and place the monitor on the same computer. Turn off your computer. When any of the monitor. 3. Connect either the white (digital DVI-D) or the blue (analog VGA...

Dell Users Guide
Page 13
... setup guide for cable attachment,) use the cable management slot to your monitor and computer, (See Connecting Your Monitor for set up and away from the monitor. Place the monitor a flat surface. 2. Plug the power cables for a monitor with a stand. If it does not display an image, see Solving...Press and hold the Stand release button. 3. Lift the stand up instructions. Use the cable slot on a clean surface. Setting Up the Monitor 25 Connecting the USB Cable After you have completed connecting the DVI/VGA/DP cable, follow the procedures below to connect the ...
... setup guide for cable attachment,) use the cable management slot to your monitor and computer, (See Connecting Your Monitor for set up and away from the monitor. Place the monitor a flat surface. 2. Plug the power cables for a monitor with a stand. If it does not display an image, see Solving...Press and hold the Stand release button. 3. Lift the stand up instructions. Use the cable slot on a clean surface. Setting Up the Monitor 25 Connecting the USB Cable After you have completed connecting the DVI/VGA/DP cable, follow the procedures below to connect the ...

Dell Users Guide
Page 14
... mm). Refer to the instructions that came with the wall mounting kit. NOTE: For use these buttons to turn on the front of the monitor to adjust the characteristics of the characteristics as they change. As you use only with UL Listed Wall Mount Bracket with the VESA-compatible wall... four screws securing the plastic cover. 4. Mount the LCD on stable flat table. 2. Use a screwdriver to the LCD. 5. Wall Mounting (Optional) Operating the Monitor Power On the Monitor Press the button to adjust the controls, an OSD shows the numeric values of the image being displayed. Place the...
... mm). Refer to the instructions that came with the wall mounting kit. NOTE: For use these buttons to turn on the front of the monitor to adjust the characteristics of the characteristics as they change. As you use only with UL Listed Wall Mount Bracket with the VESA-compatible wall... four screws securing the plastic cover. 4. Mount the LCD on stable flat table. 2. Use a screwdriver to the LCD. 5. Wall Mounting (Optional) Operating the Monitor Power On the Monitor Press the button to adjust the controls, an OSD shows the numeric values of the image being displayed. Place the...

Dell Users Guide
Page 15
.../Contrast Use the MENU button to launch the on and fully Power functional. Exit Use the Power button to turn the monitor on and off. 5 The Blue LED indicates the monitor is on -screen 3 display (OSD) and select the OSD Menu. Front panel Button Description 1 Use this button to... key to the previous menu. Down 3 Use the OK key to directly access the "Brightness/ Contrast" menu. indicator) 28 Operating the Monitor Front Panel Button Use the buttons on the front of preset color modes. An amber LED indicates DPMS power (with power light save mode. Shortcut...
.../Contrast Use the MENU button to launch the on and fully Power functional. Exit Use the Power button to turn the monitor on and off. 5 The Blue LED indicates the monitor is on -screen 3 display (OSD) and select the OSD Menu. Front panel Button Description 1 Use this button to... key to the previous menu. Down 3 Use the OK key to directly access the "Brightness/ Contrast" menu. indicator) 28 Operating the Monitor Front Panel Button Use the buttons on the front of preset color modes. An amber LED indicates DPMS power (with power light save mode. Shortcut...

Dell Users Guide
Page 16
...luminance of the backlight. Icon Menu and Submenus Energy Use Brightness/ Contrast Description This meter shows the energy level being consumed by the monitor in PowerNap option when screen saver is activated. Press to enter the slide bar and then use the or button, according to the...to increase contrast and Press the button to activate Brightness/Contrast adjustment. The Contrast function adjusts the degree of all the options available for the monitor. NOTE: Auto Adjust is only available when you use the analog (VGA) connector. 2. Using the On-Screen Display (OSD) Menu Accessing...
...luminance of the backlight. Icon Menu and Submenus Energy Use Brightness/ Contrast Description This meter shows the energy level being consumed by the monitor in PowerNap option when screen saver is activated. Press to enter the slide bar and then use the or button, according to the...to increase contrast and Press the button to activate Brightness/Contrast adjustment. The Contrast function adjusts the degree of all the options available for the monitor. NOTE: Auto Adjust is only available when you use the analog (VGA) connector. 2. Using the On-Screen Display (OSD) Menu Accessing...

Dell Users Guide
Page 17
... DisplayPort input when you are using the analog (VGA) connector. Auto Adjustment allows the monitor to self-adjust to select the 32 Operating the Monitor Operating the Monitor 33 Select VGA input when you can further tune your monitor. Press source. to the incoming video signal. Auto Adjust Even though your computer...
... DisplayPort input when you are using the analog (VGA) connector. Auto Adjustment allows the monitor to self-adjust to select the 32 Operating the Monitor Operating the Monitor 33 Select VGA input when you can further tune your monitor. Press source. to the incoming video signal. Auto Adjust Even though your computer...


