Dell Display Manager Installation Note: In Drivers and Downloads, choose your OS, and then select Dell
Page 1
... adjustment of the displayed image, assignment of monitors. When more than one supported Dell model is connected to the system, a specific target monitor can be selected using the menu provided. Once installed, Dell Display Manager will run each time the system starts and will place its icon ...in the notification tray. Dell™ Display Manager User's Guide Overview Using the Quick Settings...
... adjustment of the displayed image, assignment of monitors. When more than one supported Dell model is connected to the system, a specific target monitor can be selected using the menu provided. Once installed, Dell Display Manager will run each time the system starts and will place its icon ...in the notification tray. Dell™ Display Manager User's Guide Overview Using the Quick Settings...
Dell Display Manager Installation Note: In Drivers and Downloads, choose your OS, and then select Dell
Page 3
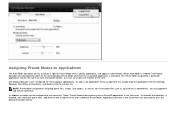
... is activated. In addition an option can be used any time a Direct3D application is enabled, Dell Display Manager will automatically switch to be enabled that will be the same on each connected monitor, or it can vary from the desktop, Windows Start Menu or elsewhere, and drop it onto the current list...
... is activated. In addition an option can be used any time a Direct3D application is enabled, Dell Display Manager will automatically switch to be enabled that will be the same on each connected monitor, or it can vary from the desktop, Windows Start Menu or elsewhere, and drop it onto the current list...
User's Guide
Page 8
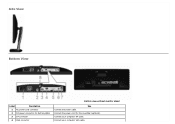
Connect your computer VGA cable. Connect your computer DP cable. Side View Bottom View Label Description 1 AC power cord connector 2 DC power connector for the soundbar (optional). Connect the power cord for Dell Soundbar 3 DP connector 4 VGA connector Bottom view without monitor stand Use Connect the power cable.
Connect your computer VGA cable. Connect your computer DP cable. Side View Bottom View Label Description 1 AC power cord connector 2 DC power connector for the soundbar (optional). Connect the power cord for Dell Soundbar 3 DP connector 4 VGA connector Bottom view without monitor stand Use Connect the power cable.
User's Guide
Page 9
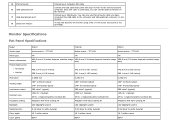
...connected the USB cable to the monitor using a M3 x 6 mm screw (the screw is not provided). Monitor Specifications Flat Panel Specifications Model Screen type Panel type Screen dimensions Preset display area: Horizontal Vertical Pixel pitch Viewing angle Luminance output Contrast ratio Faceplate coating Backlight Response time Color depth Color gamut P1913 P1913S.../m² (typical) 1000 to 1 (typical) 2M to 1 (typical Dynamic Contrast On) Antiglare with your USB device. Connect the USB cable that came with hard-coating 3H LED edgelight system 5 ms black to the monitor and the computer...
...connected the USB cable to the monitor using a M3 x 6 mm screw (the screw is not provided). Monitor Specifications Flat Panel Specifications Model Screen type Panel type Screen dimensions Preset display area: Horizontal Vertical Pixel pitch Viewing angle Luminance output Contrast ratio Faceplate coating Backlight Response time Color depth Color gamut P1913 P1913S.../m² (typical) 1000 to 1 (typical) 2M to 1 (typical Dynamic Contrast On) Antiglare with your USB device. Connect the USB cable that came with hard-coating 3H LED edgelight system 5 ms black to the monitor and the computer...

User's Guide
Page 15
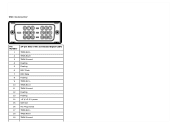
* Zero power consumption in OFF mode can only be achieved by disconnecting the main cable from the monitor. ** Maximum power consumption with max luminance, Dell Soundbar, and USB active. Pin Assignments VGA Connector Pin 15-pin Side of the Connected Signal Cable Number 1 Video-Red 2 Video-Green 3 Video-Blue 4 GND 5 Self-test 6 GND-R 7 GND-G 8 GND-B 9 Computer 5 V/3.3 V 10 GND-sync 11 GND 12 DDC data 13 H-sync 14 V-sync 15 DDC clock
* Zero power consumption in OFF mode can only be achieved by disconnecting the main cable from the monitor. ** Maximum power consumption with max luminance, Dell Soundbar, and USB active. Pin Assignments VGA Connector Pin 15-pin Side of the Connected Signal Cable Number 1 Video-Red 2 Video-Green 3 Video-Blue 4 GND 5 Self-test 6 GND-R 7 GND-G 8 GND-B 9 Computer 5 V/3.3 V 10 GND-sync 11 GND 12 DDC data 13 H-sync 14 V-sync 15 DDC clock
User's Guide
Page 16
DVI Connector Pin Number 1 2 3 4 5 6 7 8 9 10 11 12 13 14 15 16 17 18 19 24-pin Side of the Connected Signal Cable TMDS RX2TMDS RX2+ TMDS Ground Floating Floating DDC Clock DDC Data Floating TMDS RX1TMDS RX1+ TMDS Ground Floating Floating +5 V/+3.3 V power Self test Hot Plug Detect TMDS RX0TMDS RX0+ TMDS Ground
DVI Connector Pin Number 1 2 3 4 5 6 7 8 9 10 11 12 13 14 15 16 17 18 19 24-pin Side of the Connected Signal Cable TMDS RX2TMDS RX2+ TMDS Ground Floating Floating DDC Clock DDC Data Floating TMDS RX1TMDS RX1+ TMDS Ground Floating Floating +5 V/+3.3 V power Self test Hot Plug Detect TMDS RX0TMDS RX0+ TMDS Ground
User's Guide
Page 17
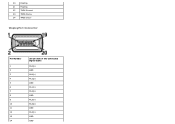
20 Floating 21 Floating 22 TMDS Ground 23 TMDS Clock+ 24 TMDS Clock- DisplayPort Connector Pin Number 1 2 3 4 5 6 7 8 9 10 11 12 13 14 20-pin Side of the Connected Signal Cable ML0(p) GND ML0(n) ML1(p) GND ML1(n) ML2(p) GND ML2(n) ML3(p) GND ML3(n) GND GND
20 Floating 21 Floating 22 TMDS Ground 23 TMDS Clock+ 24 TMDS Clock- DisplayPort Connector Pin Number 1 2 3 4 5 6 7 8 9 10 11 12 13 14 20-pin Side of the Connected Signal Cable ML0(p) GND ML0(n) ML1(p) GND ML1(n) ML2(p) GND ML2(n) ML3(p) GND ML3(n) GND GND
User's Guide
Page 21
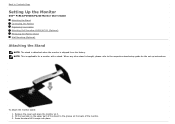
... from the factory. When any other stand is bought, please refer to Contents Page Setting Up the Monitor Dell™ P1913/P1913S/P2213 Monitor User's Guide Attaching the Stand Connecting the Monitor Organizing Your Cables Attaching Dell Soundbar AX510/AY511 (Optional) Removing the Monitor Stand Wall Mounting (Optional) Attaching the Stand NOTE: The stand is...
... from the factory. When any other stand is bought, please refer to Contents Page Setting Up the Monitor Dell™ P1913/P1913S/P2213 Monitor User's Guide Attaching the Stand Connecting the Monitor Organizing Your Cables Attaching Dell Soundbar AX510/AY511 (Optional) Removing the Monitor Stand Wall Mounting (Optional) Attaching the Stand NOTE: The stand is...
User's Guide
Page 22
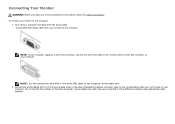
...white DVI connector to your computer and disconnect the power cable. NOTE: Do not connect the blue VGA or the white DVI cable to three different computers with appropriate video systems. Turn off your computer. Connect the blue (VGA) cable from your computer. Do not use the three cables ...on the back of the procedures in this section, follow the Safety Instructions. Connect the white (digital DVI-D) or the blue (analog VGA) or the black (DisplayPort) display connector cable to the corresponding video port on the ...
...white DVI connector to your computer and disconnect the power cable. NOTE: Do not connect the blue VGA or the white DVI cable to three different computers with appropriate video systems. Turn off your computer. Connect the blue (VGA) cable from your computer. Do not use the three cables ...on the back of the procedures in this section, follow the Safety Instructions. Connect the white (digital DVI-D) or the blue (analog VGA) or the black (DisplayPort) display connector cable to the corresponding video port on the ...
User's Guide
Page 23
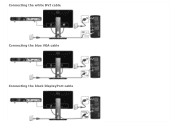
Connecting the white DVI cable Connecting the blue VGA cable Connecting the black DisplayPort cable
Connecting the white DVI cable Connecting the blue VGA cable Connecting the black DisplayPort cable
User's Guide
Page 24
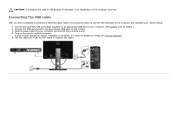
Connect the upstream USB port (cable supplied) to the computer and complete your monitor displays an image, installation is complete. If it does not display an ... the downstream USB ports on the monitor. 3. If your monitor setup: 1. Turn on your computer and monitor into a nearby outlet. 4. Connecting the USB cable After you have completed connecting the DVI/VGA cable, follow the procedures below to connect the USB cable to an appropriate USB port on the monitor and the computer...
Connect the upstream USB port (cable supplied) to the computer and complete your monitor displays an image, installation is complete. If it does not display an ... the downstream USB ports on the monitor. 3. If your monitor setup: 1. Turn on your computer and monitor into a nearby outlet. 4. Connecting the USB cable After you have completed connecting the DVI/VGA cable, follow the procedures below to connect the USB cable to an appropriate USB port on the monitor and the computer...
User's Guide
Page 25
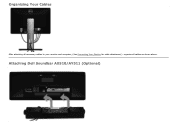
Organizing Your Cables After attaching all necessary cables to your monitor and computer, (See Connecting Your Monitor for cable attachment,) organize all cables as shown above. Attaching Dell Soundbar AX510/AY511 (Optional)
Organizing Your Cables After attaching all necessary cables to your monitor and computer, (See Connecting Your Monitor for cable attachment,) organize all cables as shown above. Attaching Dell Soundbar AX510/AY511 (Optional)
User's Guide
Page 26
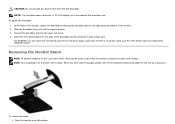
...a soft, clean surface. Removing the Monitor Stand NOTE: To prevent scratches on a flat surface. CAUTION: Do not use with any other than the Dell Soundbar. To remove the stand: 1. To attach the Soundbar: 1. Place the monitor on the LCD screen while removing the stand, ensure that the ...monitor is configured to HMDI/DP output. Insert the mini stereo plug from the back of the monitor. 2. Connect the Soundbar with the DC power connector. 4. NOTE: This is for the optional Dell Soundbar only. NOTE: The Soundbar power connector (+12 V DC output) is applicable for the set-up ...
...a soft, clean surface. Removing the Monitor Stand NOTE: To prevent scratches on a flat surface. CAUTION: Do not use with any other than the Dell Soundbar. To remove the stand: 1. To attach the Soundbar: 1. Place the monitor on the LCD screen while removing the stand, ensure that the ...monitor is configured to HMDI/DP output. Insert the mini stereo plug from the back of the monitor. 2. Connect the Soundbar with the DC power connector. 4. NOTE: This is for the optional Dell Soundbar only. NOTE: The Soundbar power connector (+12 V DC output) is applicable for the set-up ...
User's Guide
Page 35
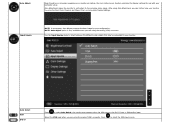
Use the Input Source menu to select between the different video signals that may be connected to the incoming video signal. Auto Adjustment allows the monitor to self-adjust to your monitor. After using Auto Adjustment, you can further tune your ...
Use the Input Source menu to select between the different video signals that may be connected to the incoming video signal. Auto Adjustment allows the monitor to self-adjust to your monitor. After using Auto Adjustment, you can further tune your ...
User's Guide
Page 36
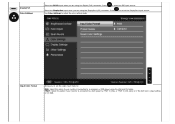
to select the DVI input source. or if the DVD color output setting is connected to a DVD player by YPbPr to VGA, or YPbPr to DVI cable; Select the DisplayPort input when you are using the Digital (DVI) connector. Input ... source. DisplayPort Color Settings Select the DVI-D input when you to set the video input mode to: RGB: Select this option if your monitor is connected to a computer or DVD player using the DisplayPort (DP) connector. YPbPr: Select this option if your monitor is not RGB. Press Use Color Settings to...
to select the DVI input source. or if the DVD color output setting is connected to a DVD player by YPbPr to VGA, or YPbPr to DVI cable; Select the DisplayPort input when you are using the Digital (DVI) connector. Input ... source. DisplayPort Color Settings Select the DVI-D input when you to set the video input mode to: RGB: Select this option if your monitor is connected to a computer or DVD player using the DisplayPort (DP) connector. YPbPr: Select this option if your monitor is not RGB. Press Use Color Settings to...
User's Guide
Page 46
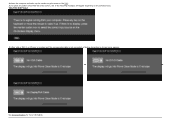
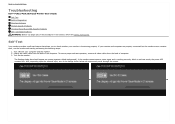
or or See Solving Problems for more information. If you press any button other than the power button, one of the following messages will appear depending on the selected input: VGA/DVI-D/DP input If either VGA or DVI-D or DP input is selected and the corresponding cable is not connected, a floating dialog box as shown below appears. Activate the computer and wake up the monitor to gain access to the OSD.
or or See Solving Problems for more information. If you press any button other than the power button, one of the following messages will appear depending on the selected input: VGA/DVI-D/DP input If either VGA or DVI-D or DP input is selected and the corresponding cable is not connected, a floating dialog box as shown below appears. Activate the computer and wake up the monitor to gain access to the OSD.
User's Guide
Page 51
...self-test feature that allows you to Contents Page Troubleshooting Dell™ P1913/P1913S/P2213 Monitor User's Guide Self-Test Built-in Diagnostics Common Problems Product Specific Problems Universal Serial Bus (USB) Specific Problems Dell™ Soundbar Problems WARNING: Before you begin any of ...computer. 3. Unplug the video cable from the back of the procedures in self-test mode, the power LED remains blue. or or If your computer and the monitor. 2. Turn off both your monitor and computer are properly connected...
...self-test feature that allows you to Contents Page Troubleshooting Dell™ P1913/P1913S/P2213 Monitor User's Guide Self-Test Built-in Diagnostics Common Problems Product Specific Problems Universal Serial Bus (USB) Specific Problems Dell™ Soundbar Problems WARNING: Before you begin any of ...computer. 3. Unplug the video cable from the back of the procedures in self-test mode, the power LED remains blue. or or If your computer and the monitor. 2. Turn off both your monitor and computer are properly connected...
User's Guide
Page 53
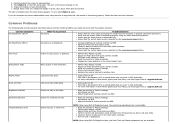
...Dell Support site at : support.dell.com. Brightness Problems Picture too dim or too bright Reset the monitor to the correct aspect ratio. Horizontal/Vertical Lines Screen has one or more information on -off What You Experience No picture Possible Solutions Ensure that the power outlet is properly connected... and secure. Perform Auto Adjust via OSD. Verify that the video cable connecting the monitor and the computer is functioning properly using any screen abnormalities upon ...
...Dell Support site at : support.dell.com. Brightness Problems Picture too dim or too bright Reset the monitor to the correct aspect ratio. Horizontal/Vertical Lines Screen has one or more information on -off What You Experience No picture Possible Solutions Ensure that the power outlet is properly connected... and secure. Perform Auto Adjust via OSD. Verify that the video cable connecting the monitor and the computer is functioning properly using any screen abnormalities upon ...
User's Guide
Page 54
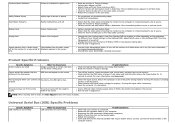
... then turn on the keyboard. Check whether the signal cable is secure. Switch off and then turn on the application. Contact Dell immediately. Perform monitor self-test feature check to Graphics or Video depending on the monitor. Check for bent or broken pins in... or video player. Run the built-in the video cable connector. Reconnect the USB peripherals (downstream connector). Reboot the computer. connect the device directly to Factory Settings. Universal Serial Bus (USB) Specific Problems Specific Symptoms USB interface is not working Possible Solutions Check...
... then turn on the keyboard. Check whether the signal cable is secure. Switch off and then turn on the application. Contact Dell immediately. Perform monitor self-test feature check to Graphics or Video depending on the monitor. Check for bent or broken pins in... or video player. Run the built-in the video cable connector. Reconnect the USB peripherals (downstream connector). Reboot the computer. connect the device directly to Factory Settings. Universal Serial Bus (USB) Specific Problems Specific Symptoms USB interface is not working Possible Solutions Check...
User's Guide
Page 56
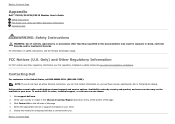
... an active Internet connection, you . Availability varies by country and product, and some services may result in exposure to shock, electrical hazards, and/or mechanical hazards. Click Contact Us on your need. 5. Back to Contents Page Appendix Dell™ P1913/P1913S/P2213 Monitor User's... Guide Safety Instructions FCC Notice (U.S. For information on your purchase invoice, packing slip, bill, or Dell product catalog. Only) and Other Regulatory Information For FCC notices and...
... an active Internet connection, you . Availability varies by country and product, and some services may result in exposure to shock, electrical hazards, and/or mechanical hazards. Click Contact Us on your need. 5. Back to Contents Page Appendix Dell™ P1913/P1913S/P2213 Monitor User's... Guide Safety Instructions FCC Notice (U.S. For information on your purchase invoice, packing slip, bill, or Dell product catalog. Only) and Other Regulatory Information For FCC notices and...


