
User Guide
Page 78
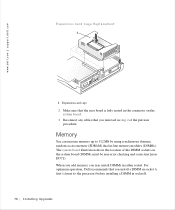
When you add memory, you may install DIMMs in step 2 of the DIMM sockets on the system board. 3 Reconnect any cables that you removed in either socket. www.dell.com | support.dell.com Expansion-Card Cage Replacement 1 1 Expansion-card cage 2 Make sure that the riser board... correction [nonECC]). The system board illustration shows the location of the previous procedure. Memory You can increase memory up to the processor) before installing a DIMM in -line memory modules (DIMMs). For optimum operation, Dell recommends that you install a DIMM in socket A first (closest to 512 MB...
When you add memory, you may install DIMMs in step 2 of the DIMM sockets on the system board. 3 Reconnect any cables that you removed in either socket. www.dell.com | support.dell.com Expansion-Card Cage Replacement 1 1 Expansion-card cage 2 Make sure that the riser board... correction [nonECC]). The system board illustration shows the location of the previous procedure. Memory You can increase memory up to the processor) before installing a DIMM in -line memory modules (DIMMs). For optimum operation, Dell recommends that you install a DIMM in socket A first (closest to 512 MB...
User Guide
Page 79
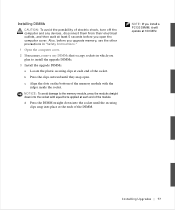
...electric shock, turn off the computer and any devices, disconnect them from their electrical outlets, and then wait at least 5 seconds before you upgrade memory, see the other precautions in "Safety Instructions." 1 Open the computer cover. 2 If necessary, remove any DIMMs that occupy sockets in which...module straight down into the socket with equal force applied at each end of the memory module with the ridges inside the socket. NOTICE: To avoid damage to install the upgrade DIMMs. 3 Install the upgrade DIMMs. a Locate the plastic securing clips at 100 MHz. c Align the slots ...
...electric shock, turn off the computer and any devices, disconnect them from their electrical outlets, and then wait at least 5 seconds before you upgrade memory, see the other precautions in "Safety Instructions." 1 Open the computer cover. 2 If necessary, remove any DIMMs that occupy sockets in which...module straight down into the socket with equal force applied at each end of the memory module with the ridges inside the socket. NOTICE: To avoid damage to install the upgrade DIMMs. 3 Install the upgrade DIMMs. a Locate the plastic securing clips at 100 MHz. c Align the slots ...
User Guide
Page 80
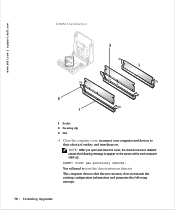
...their electrical outlets, and turn them on the screen at the next computer start-up: ALERT! The computer detects that the new memory does not match the existing configuration information and generates the following message to appear on . NOTE: After you open and close the ...cover, the chassis intrusion detector causes the following message: 78 Instal ling Upgrades www.dell.com | support.dell.com DIMM Installation 3 2 1 1 Socket 2 Securing clip 3 Slot 4 Close the computer cover, reconnect your computer and devices to reset ...
...their electrical outlets, and turn them on the screen at the next computer start-up: ALERT! The computer detects that the new memory does not match the existing configuration information and generates the following message to appear on . NOTE: After you open and close the ...cover, the chassis intrusion detector causes the following message: 78 Instal ling Upgrades www.dell.com | support.dell.com DIMM Installation 3 2 1 1 Socket 2 Securing clip 3 Slot 4 Close the computer cover, reconnect your computer and devices to reset ...


