
User Guide
Page 5
Removing an Expansion Card 73 Expansion Card Cage (Small Desktop Computer Only 74 Removing the Expansion-Card Cage 74 Replacing the Expansion-Card Cage 75 Memory 76 Installing DIMMs 77 Removing DIMMs 79 Microprocessor 80 Front Panel Inserts 85 Removing Front Panel Inserts-Small Form-Factor and Small Desktop Computers 85 ...
Removing an Expansion Card 73 Expansion Card Cage (Small Desktop Computer Only 74 Removing the Expansion-Card Cage 74 Replacing the Expansion-Card Cage 75 Memory 76 Installing DIMMs 77 Removing DIMMs 79 Microprocessor 80 Front Panel Inserts 85 Removing Front Panel Inserts-Small Form-Factor and Small Desktop Computers 85 ...

User Guide
Page 7
... 179 Repairing a Dropped or Damaged Computer 180 Hardware Conflicts 180 Computer Memory Problems 181 System Board Problems 182 Resetting a Damaged System Board 183 Dell Diagnostics 184 When to Use the Dell Diagnostics 184 Features 184 Before You Start Testing 184 Running the Dell Diagnostics 185 Advanced Testing 187 Advanced Testing Help Menu 188 Messages...
... 179 Repairing a Dropped or Damaged Computer 180 Hardware Conflicts 180 Computer Memory Problems 181 System Board Problems 182 Resetting a Damaged System Board 183 Dell Diagnostics 184 When to Use the Dell Diagnostics 184 Features 184 Before You Start Testing 184 Running the Dell Diagnostics 185 Advanced Testing 187 Advanced Testing Help Menu 188 Messages...
User Guide
Page 8
...201 Software Problems 203 Operating System Compatibility 204 Input Errors 204 Error Messages 204 Device Drivers 205 Memory-Resident Programs 205 Program Conflicts 205 Memory Address Conflicts 206 Interrupt Assignment Conflicts 206 BIOS Recovery Utility 207 7 Getting Help Help Overview 210... Technical Assistance 210 Help Tools 210 Problems With Your Order 213 Product Information 213 Returning Items for Warranty Repair or Credit 213 Before You Call 214 Dell...
...201 Software Problems 203 Operating System Compatibility 204 Input Errors 204 Error Messages 204 Device Drivers 205 Memory-Resident Programs 205 Program Conflicts 205 Memory Address Conflicts 206 Interrupt Assignment Conflicts 206 BIOS Recovery Utility 207 7 Getting Help Help Overview 210... Technical Assistance 210 Help Tools 210 Problems With Your Order 213 Product Information 213 Returning Items for Warranty Repair or Credit 213 Before You Call 214 Dell...
User Guide
Page 28
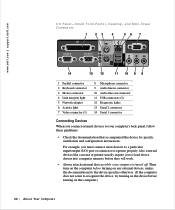
www.dell.com | support.dell.com I /O) port or connector to operate properly. Fact or, Desktop, and Mini-Tower Computers 1 23 4 56 7 14 13 12 11 10 9 8 1 Parallel connector 2 Keyboard connector 3 ... device, try turning on the device before turning on the computer.) 26 Abo u t You r C o mp u t er For example, you to load device drivers into computer memory before they will work. • Always attach external devices while your computer's back panel, follow these guidelines: • Check the documentation that accompanied the device...
www.dell.com | support.dell.com I /O) port or connector to operate properly. Fact or, Desktop, and Mini-Tower Computers 1 23 4 56 7 14 13 12 11 10 9 8 1 Parallel connector 2 Keyboard connector 3 ... device, try turning on the device before turning on the computer.) 26 Abo u t You r C o mp u t er For example, you to load device drivers into computer memory before they will work. • Always attach external devices while your computer's back panel, follow these guidelines: • Check the documentation that accompanied the device...

User Guide
Page 36
www.dell.com | support.dell.com 1 Floppy drive connector 13 Front panel audio connector 2 Battery 14 Video connector (upper) and audio connectors (lower) 3 EIDE2 connector 15 Modem connector 4 EIDE1 connector ..., and microphone jacks AUX_PWR Standby power light BATTERY Battery socket CD_IN CD drive audio cable connector DIAG_LED Diagnostic lights DIMM_A and DIMM_B Dual in-line memory module (DIMM) sockets DSKT Floppy drive interface connector FAN Microprocessor fan connector FRONTAUDIO Front panel audio connector for onboard audio FRONTPANEL Front panel cable connector...
www.dell.com | support.dell.com 1 Floppy drive connector 13 Front panel audio connector 2 Battery 14 Video connector (upper) and audio connectors (lower) 3 EIDE2 connector 15 Modem connector 4 EIDE1 connector ..., and microphone jacks AUX_PWR Standby power light BATTERY Battery socket CD_IN CD drive audio cable connector DIAG_LED Diagnostic lights DIMM_A and DIMM_B Dual in-line memory module (DIMM) sockets DSKT Floppy drive interface connector FAN Microprocessor fan connector FRONTAUDIO Front panel audio connector for onboard audio FRONTPANEL Front panel cable connector...
User Guide
Page 49
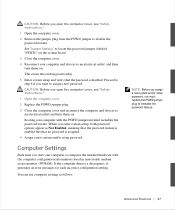
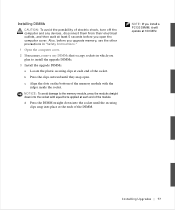
... and verify that no password is disabled. Computer Settings Each time you start your computer with the computer configuration information stored in nonvolatile random access memory (NVRAM). Proceed to step 6 if you want to assign a new password. CAUTION: Before you open the computer cover, see "Safety Instructions." 1 Open the computer cover...
... and verify that no password is disabled. Computer Settings Each time you start your computer with the computer configuration information stored in nonvolatile random access memory (NVRAM). Proceed to step 6 if you want to assign a new password. CAUTION: Before you open the computer cover, see "Safety Instructions." 1 Open the computer cover...

User Guide
Page 50
...information, see the Manufacturing Test Report that was shipped with your computer is located in the Dell Accessories folder. then shut down and then turn it on the screen is organized into memory, let the computer complete the load operation; the box at the top of hard drive ...power conservation, and security features. 48 Advanced Features www.dell.com | support.dell.com • To set user-selectable options such as date and time, or system password • To set the current configuration information such as the amount of memory or type of all screens lists the computer name. ...
...information, see the Manufacturing Test Report that was shipped with your computer is located in the Dell Accessories folder. then shut down and then turn it on the screen is organized into memory, let the computer complete the load operation; the box at the top of hard drive ...power conservation, and security features. 48 Advanced Features www.dell.com | support.dell.com • To set user-selectable options such as date and time, or system password • To set the current configuration information such as the amount of memory or type of all screens lists the computer name. ...
User Guide
Page 54
...compatibility speed, which is included with your software support utilities, to enter an asset tag number up to ten characters long into nonvolatile random-access memory (NVRAM). • Auto Power On allows you to set Auto Power On to the computer. To change to increase the number in the...and time fields. If the computer is on the computer automatically. You can type numbers in a 24-hour format (hours:minutes). www.dell.com | support.dell.com Additional System Setup Options • AC Power Recovery determines what happens when AC power is restored to turn on when AC power ...
...compatibility speed, which is included with your software support utilities, to enter an asset tag number up to ten characters long into nonvolatile random-access memory (NVRAM). • Auto Power On allows you to set Auto Power On to the computer. To change to increase the number in the...and time fields. If the computer is on the computer automatically. You can type numbers in a 24-hour format (hours:minutes). www.dell.com | support.dell.com Additional System Setup Options • AC Power Recovery determines what happens when AC power is restored to turn on when AC power ...
User Guide
Page 57
...), 278h, or 3BCh. To determine the correct mode to use them both serial ports at the same time. DMA Channel: This option determines the direct memory access (DMA) channel used by the parallel port and appears only when Mode is set to ECP. With Auto (the default) selected, the computer turns...
...), 278h, or 3BCh. To determine the correct mode to use them both serial ports at the same time. DMA Channel: This option determines the direct memory access (DMA) channel used by the parallel port and appears only when Mode is set to ECP. With Auto (the default) selected, the computer turns...
User Guide
Page 59
...operating system requires a specific IRQ line already in the computer. Press to cycle through the available IRQ lines. Then type characters from Dell that the new memory is installed correctly and is recognized by a PCI device. • Primary Drive n and Secondary Drive n Primary Drive n identifies ...IRQ lines are assigned to the secondary EIDE interface connector (labeled "IDE2"). Then select the device whose IRQ line you add memory, check this setting for EIDE CD drives and EIDE tape drives. Use the secondary EIDE interface connector for all devices obtained from...
...operating system requires a specific IRQ line already in the computer. Press to cycle through the available IRQ lines. Then type characters from Dell that the new memory is installed correctly and is recognized by a PCI device. • Primary Drive n and Secondary Drive n Primary Drive n identifies ...IRQ lines are assigned to the secondary EIDE interface connector (labeled "IDE2"). Then select the device whose IRQ line you add memory, check this setting for EIDE CD drives and EIDE tape drives. Use the secondary EIDE interface connector for all devices obtained from...

User Guide
Page 62
Viruses, which are pieces of code that you can quickly use all available computer memory, damage or destroy data stored on the hard drive, and permanently affect the performance of computer you have, and what hardware it on...BBSs) archive freely distributed virus-scanning programs that can replicate themselves, can download with virus-scanning software before running a program's installation routine. www.dell.com | support.dell.com Software Installation and Configuration When you obtain software, check it for viruses with a modem. Before you in its defaults are. The software ...
Viruses, which are pieces of code that you can quickly use all available computer memory, damage or destroy data stored on the hard drive, and permanently affect the performance of computer you have, and what hardware it on...BBSs) archive freely distributed virus-scanning programs that can replicate themselves, can download with virus-scanning software before running a program's installation routine. www.dell.com | support.dell.com Software Installation and Configuration When you obtain software, check it for viruses with a modem. Before you in its defaults are. The software ...
User Guide
Page 78
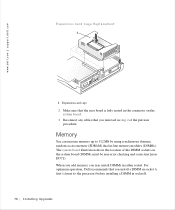
... connector on the system board. 3 Reconnect any cables that you may install DIMMs in either socket. Memory You can increase memory up to the processor) before installing a DIMM in -line memory modules (DIMMs). For optimum operation, Dell recommends that you removed in step 2 of the DIMM sockets on the system board (DIMMs must be...
... connector on the system board. 3 Reconnect any cables that you may install DIMMs in either socket. Memory You can increase memory up to the processor) before installing a DIMM in -line memory modules (DIMMs). For optimum operation, Dell recommends that you removed in step 2 of the DIMM sockets on the system board (DIMMs must be...
User Guide
Page 79
... electric shock, turn off the computer and any devices, disconnect them from their electrical outlets, and then wait at least 5 seconds before you upgrade memory, see the other precautions in "Safety Instructions." 1 Open the computer cover. 2 If necessary, remove any DIMMs that occupy sockets in which you... plan to the memory module, press the module straight down into the socket until they snap open the computer cover. b Press the clips outward until the securing clips...
... electric shock, turn off the computer and any devices, disconnect them from their electrical outlets, and then wait at least 5 seconds before you upgrade memory, see the other precautions in "Safety Instructions." 1 Open the computer cover. 2 If necessary, remove any DIMMs that occupy sockets in which you... plan to the memory module, press the module straight down into the socket until they snap open the computer cover. b Press the clips outward until the securing clips...
User Guide
Page 80
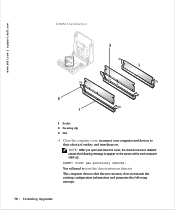
... removed. You will need to reset the chassis intrusion detector. The computer detects that the new memory does not match the existing configuration information and generates the following message to appear on . www.dell.com | support.dell.com DIMM Installation 3 2 1 1 Socket 2 Securing clip 3 Slot 4 Close the computer cover, reconnect your computer and devices...
... removed. You will need to reset the chassis intrusion detector. The computer detects that the new memory does not match the existing configuration information and generates the following message to appear on . www.dell.com | support.dell.com DIMM Installation 3 2 1 1 Socket 2 Securing clip 3 Slot 4 Close the computer cover, reconnect your computer and devices...

User Guide
Page 81
... slightly from their sockets. The computer should have already changed . If it is correct, skip to step 7. 6 If the memory total is correct, press to exit system setup. 9 Run the Dell Diagnostics to make sure that the DIMMs are seated properly in their electrical outlets. The amount of system... memory has changed the value of the socket. Instal ling Upgr ades 79 Strike the F1 key to continue, F2 to...
... slightly from their sockets. The computer should have already changed . If it is correct, skip to step 7. 6 If the memory total is correct, press to exit system setup. 9 Run the Dell Diagnostics to make sure that the DIMMs are seated properly in their electrical outlets. The amount of system... memory has changed the value of the socket. Instal ling Upgr ades 79 Strike the F1 key to continue, F2 to...

User Guide
Page 83
Air flow Shr oud Removal-Small Mini-Tower Computer 1 1 Anchor tabs 4 Remove the cooling fan/heat sink assembly. b Pull down on the toggle clip lever until you can unhook the ends of the clip from the microprocessor. a Remove the memory module closest to the heat sink assembly. Instal ling Upgr ades 81 c Remove the clip from the socket, and then lift the heat sink from the tabs on each side of the ZIF socket.
Air flow Shr oud Removal-Small Mini-Tower Computer 1 1 Anchor tabs 4 Remove the cooling fan/heat sink assembly. b Pull down on the toggle clip lever until you can unhook the ends of the clip from the microprocessor. a Remove the memory module closest to the heat sink assembly. Instal ling Upgr ades 81 c Remove the clip from the socket, and then lift the heat sink from the tabs on each side of the ZIF socket.

User Guide
Page 133
..., and IRQs. then reconnect the computer, turn them on. 10 Update your configuration information by running the Dell Diagnostics. The operating life of memory. 7 Check all cable connections, and fold cables out of the way to provide airflow for the fan and cooling vents. 8 If the CD drive bay ...
..., and IRQs. then reconnect the computer, turn them on. 10 Update your configuration information by running the Dell Diagnostics. The operating life of memory. 7 Check all cable connections, and fold cables out of the way to provide airflow for the fan and cooling vents. 8 If the CD drive bay ...

User Guide
Page 149
... 147 While most applications continue to run in the background during a fast user switch, multimedia applications do not. On computers with limited memory, this can cause the entire computer to run slowly. Special Considerations With Fast User Switching Considerations when using Fast User Switching include: •.... For example, if one user is downloading a large file from the Internet and another user logs on computers with low memory configurations can switch between different users on other Microsoft operating systems. On Windows XP, the user's logon remains active, but ...
... 147 While most applications continue to run in the background during a fast user switch, multimedia applications do not. On computers with limited memory, this can cause the entire computer to run slowly. Special Considerations With Fast User Switching Considerations when using Fast User Switching include: •.... For example, if one user is downloading a large file from the Internet and another user logs on computers with low memory configurations can switch between different users on other Microsoft operating systems. On Windows XP, the user's logon remains active, but ...
User Guide
Page 156
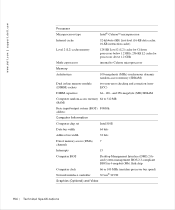
www.dell.com | support.dell.com Processor Microprocessor type Intel® Celeron™ microprocessor Internal cache 32-kilobyte (KB) first-level (16-KB data cache; 16-KB instruction cache) Level 2 (L2) cache memory 128-KB Level 2 (L2) cache for Celeron processors below 1.2 GHz; 256-KB... system (BIOS) F0000h address Computer Information Computer chip set Intel 810E Data bus width 64 bits Address bus width 32 bits Direct memory access (DMA) 7 channels Interrupts 15 Computer BIOS Desktop Management Interface (DMI) 2.0sand system management BIOS 2.3-compliant BIOS in 4-megabit...
www.dell.com | support.dell.com Processor Microprocessor type Intel® Celeron™ microprocessor Internal cache 32-kilobyte (KB) first-level (16-KB data cache; 16-KB instruction cache) Level 2 (L2) cache memory 128-KB Level 2 (L2) cache for Celeron processors below 1.2 GHz; 256-KB... system (BIOS) F0000h address Computer Information Computer chip set Intel 810E Data bus width 64 bits Address bus width 32 bits Direct memory access (DMA) 7 channels Interrupts 15 Computer BIOS Desktop Management Interface (DMI) 2.0sand system management BIOS 2.3-compliant BIOS in 4-megabit...

User Guide
Page 157
... [6.95 inches] long) Technical Speci ficat ions 155 headphones minijack on the rear input/output (I/O) panel; Graphics accelerator Embedded Intel Dynamic Video Memory Technology (DVMT) Graphics memory Dynamically assigned from computer memory Video resolutions (display supports some or all of these resolutions) 640 x 480 pixels; 85 hertz (Hz) max refresh rate with 16...
... [6.95 inches] long) Technical Speci ficat ions 155 headphones minijack on the rear input/output (I/O) panel; Graphics accelerator Embedded Intel Dynamic Video Memory Technology (DVMT) Graphics memory Dynamically assigned from computer memory Video resolutions (display supports some or all of these resolutions) 640 x 480 pixels; 85 hertz (Hz) max refresh rate with 16...


