Setup and Quick Reference Guide
Page 6
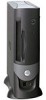
... installed on your CD to reinstall drivers, run the Dell Diagnostics, or access your hard drive, see the Dell Support website at support.dell.com. You can use the CD to provide last-minute updates about your Dell™ OptiPlex™ computer. Readme files may be included on your...shown below: Regulatory Model Numbers and Chassis Types DHS = small desktop (SD) chassis DHP = small form-factor (SF) chassis DHM = small mini-tower (SMT) chassis Finding Information for Your Computer What Are You Looking For? • A diagnostic program for my computer • Drivers for experienced users...
... installed on your CD to reinstall drivers, run the Dell Diagnostics, or access your hard drive, see the Dell Support website at support.dell.com. You can use the CD to provide last-minute updates about your Dell™ OptiPlex™ computer. Readme files may be included on your...shown below: Regulatory Model Numbers and Chassis Types DHS = small desktop (SD) chassis DHP = small form-factor (SF) chassis DHM = small mini-tower (SMT) chassis Finding Information for Your Computer What Are You Looking For? • A diagnostic program for my computer • Drivers for experienced users...
Setup and Quick Reference Guide
Page 16
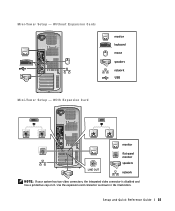
Use the expansion card connector as shown in the illustration. With Expansion Card ABCD monitor LINE OUT flat-panel monitor speakers network NOTE: If your system has two video connectors, the integrated video connector is disabled and has a protective cap on it. Mini-Tower Setup - Setup and Quick Reference Guide 15 Without Expansion Cards ABCD monitor keyboard mouse speakers network USB Mini-Tower Setup -
Use the expansion card connector as shown in the illustration. With Expansion Card ABCD monitor LINE OUT flat-panel monitor speakers network NOTE: If your system has two video connectors, the integrated video connector is disabled and has a protective cap on it. Mini-Tower Setup - Setup and Quick Reference Guide 15 Without Expansion Cards ABCD monitor keyboard mouse speakers network USB Mini-Tower Setup -

User Guide
Page 2
... for property damage, personal injury, or death. NetWare and Novell are registered trademarks of Dell Computer Corporation is strictly forbidden. Small Mini-Tower Computer About Your Computer Front View Back View Inside Your Computer Adding and Removing Parts Opening...and Return Policy Notes, Notices, and Cautions NOTE: A NOTE indicates important information that this text: Dell, the DELL logo, OptiPlex, Inspiron, Dimension, Latitude, Dell Precision, DellNet, and Dell OpenManage are not applicable. Trademarks used in this document is a registered trademark of Novell, Inc. ...
... for property damage, personal injury, or death. NetWare and Novell are registered trademarks of Dell Computer Corporation is strictly forbidden. Small Mini-Tower Computer About Your Computer Front View Back View Inside Your Computer Adding and Removing Parts Opening...and Return Policy Notes, Notices, and Cautions NOTE: A NOTE indicates important information that this text: Dell, the DELL logo, OptiPlex, Inspiron, Dimension, Latitude, Dell Precision, DellNet, and Dell OpenManage are not applicable. Trademarks used in this document is a registered trademark of Novell, Inc. ...
User Guide
Page 8
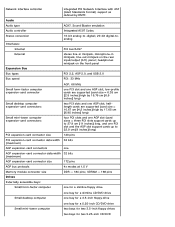
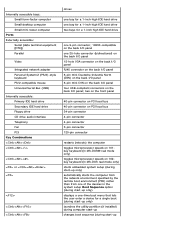
...one for a slimline floppy drive one bay for a slimline CD/DVD drive Small desktop computer one bay for a 3.5-inch floppy drive Small mini-tower computer one AGP expansion-card connector data width 32 bits (maximum) AGP expansion-card connector size 172 pins AGP bus protocols 4x modes at 1.5...Network interface controller integrated PCI Network Interface with ASF (Alert Standards Format) support as defined by 17.65 cm [6.95 inches] long) Small mini-tower computer expansion-card connectors: four PCI slots and one AGP slot (card sizes = three PCI slots support cards up to 27.9 cm [11 ...
...one for a slimline floppy drive one bay for a slimline CD/DVD drive Small desktop computer one bay for a 3.5-inch floppy drive Small mini-tower computer one AGP expansion-card connector data width 32 bits (maximum) AGP expansion-card connector size 172 pins AGP bus protocols 4x modes at 1.5...Network interface controller integrated PCI Network Interface with ASF (Alert Standards Format) support as defined by 17.65 cm [6.95 inches] long) Small mini-tower computer expansion-card connectors: four PCI slots and one AGP slot (card sizes = three PCI slots support cards up to 27.9 cm [11 ...
User Guide
Page 9
Internally accessible bays: Small form-factor computer Small desktop computer Small mini-tower computer Ports Externally accessible: Serial (data terminal equipment [DTE]) Parallel Video Integrated network adapter Personal System/2 (PS/2)-style keyboard PS/2-compatible mouse Universal Serial Bus (...
Internally accessible bays: Small form-factor computer Small desktop computer Small mini-tower computer Ports Externally accessible: Serial (data terminal equipment [DTE]) Parallel Video Integrated network adapter Personal System/2 (PS/2)-style keyboard PS/2-compatible mouse Universal Serial Bus (...
User Guide
Page 10
... on the system board Power DC power supply: Wattage small form-factor computer: 160 W small desktop computer: 180 W small mini-tower computer: 250 W Heat dissipation small form-factor computer: 455 BTU/hr (average) small desktop computer: 500 BTU/hr (average) small mini...lbs) Small desktop computer: Height 10.6 cm (4.2 inches) Width 38.9 cm (15.3 inches) Depth 43.2 cm (17 inches) Weight 9.9 kg (22 lbs) Small mini-tower computer: Height 42.5 cm (16.7 inches) Width 18.1 cm (7.1 inches) Depth 44.7 cm (17.6 inches) Weight 12.7 kg (28 lbs) Environmental yellow light for...
... on the system board Power DC power supply: Wattage small form-factor computer: 160 W small desktop computer: 180 W small mini-tower computer: 250 W Heat dissipation small form-factor computer: 455 BTU/hr (average) small desktop computer: 500 BTU/hr (average) small mini...lbs) Small desktop computer: Height 10.6 cm (4.2 inches) Width 38.9 cm (15.3 inches) Depth 43.2 cm (17 inches) Weight 9.9 kg (22 lbs) Small mini-tower computer: Height 42.5 cm (16.7 inches) Width 18.1 cm (7.1 inches) Depth 44.7 cm (17.6 inches) Weight 12.7 kg (28 lbs) Environmental yellow light for...
User Guide
Page 12
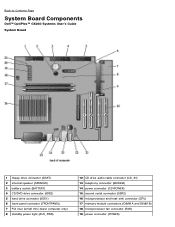
Back to Contents Page System Board Components Dell™ OptiPlex™ GX260 Systems User's Guide System Board 1 floppy drive connector (DSKT) 2 internal speaker (SPEAKER) 3 battery socket (BATTERY) 4 CD/DVD drive connector (IDE2) 5 hard drive connector (IDE1) 6 front-panel connector (FRONTPANEL) 7 PCI riser (small mini-tower computer only) 8 standby power light (AUX_PWR) 12 CD drive audio...
Back to Contents Page System Board Components Dell™ OptiPlex™ GX260 Systems User's Guide System Board 1 floppy drive connector (DSKT) 2 internal speaker (SPEAKER) 3 battery socket (BATTERY) 4 CD/DVD drive connector (IDE2) 5 hard drive connector (IDE1) 6 front-panel connector (FRONTPANEL) 7 PCI riser (small mini-tower computer only) 8 standby power light (AUX_PWR) 12 CD drive audio...
User Guide
Page 121
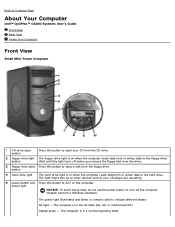
... light The hard-drive light is in a normal operating state Back to Contents Page About Your Computer Dell™ OptiPlex™ GX260 Systems User's Guide Front View Back View Inside Your Computer Front View Small Mini-Tower Computer 1 CD-drive eject button Press this button to eject your CD player are operating. 5 power button...
... light The hard-drive light is in a normal operating state Back to Contents Page About Your Computer Dell™ OptiPlex™ GX260 Systems User's Guide Front View Back View Inside Your Computer Front View Small Mini-Tower Computer 1 CD-drive eject button Press this button to eject your CD player are operating. 5 power button...

User Guide
Page 122
...or click or move the mouse. 6 front-panel door See "Diagnostic Lights" for a description of the USB connectors. if you access the Dell | Support website or call technical support. 8 USB connectors 9 headphone connector Connect USB devices such as a mouse, keyboard, printer, joystick, and... computer speakers into any of light codes that can automatically detect the correct operating voltage. label Back View Small Mini-Tower Computer 1 power connector 2 voltage selection switch (may not be available on the back panel and can help you reinstall Windows. Attach ...
...or click or move the mouse. 6 front-panel door See "Diagnostic Lights" for a description of the USB connectors. if you access the Dell | Support website or call technical support. 8 USB connectors 9 headphone connector Connect USB devices such as a mouse, keyboard, printer, joystick, and... computer speakers into any of light codes that can automatically detect the correct operating voltage. label Back View Small Mini-Tower Computer 1 power connector 2 voltage selection switch (may not be available on the back panel and can help you reinstall Windows. Attach ...

User Guide
Page 124
... your VGA-compatible monitor into a sound or telephony program. connector 13 serial Connect a serial device, such as a cassette player, CD player, or VCR. Small Mini-Tower Computer On computers with a sound card, the microphone connector is on the card. 9 microphone Use the pink microphone connector (available on computers with integrated sound...
... your VGA-compatible monitor into a sound or telephony program. connector 13 serial Connect a serial device, such as a cassette player, CD player, or VCR. Small Mini-Tower Computer On computers with a sound card, the microphone connector is on the card. 9 microphone Use the pink microphone connector (available on computers with integrated sound...

User Guide
Page 126
Back to Contents Page Adding and Removing Small Mini-Tower Computer Parts Dell™ OptiPlex™ GX260 Systems User's Guide Opening the Computer Cover AGP and DVI Adapter Cards Battery Drives Memory Microprocessor PCI Cards and Serial Port Adapters Telephony Applications Programming Interface (TAPI) Closing the Computer Cover Back to Contents Page
Back to Contents Page Adding and Removing Small Mini-Tower Computer Parts Dell™ OptiPlex™ GX260 Systems User's Guide Opening the Computer Cover AGP and DVI Adapter Cards Battery Drives Memory Microprocessor PCI Cards and Serial Port Adapters Telephony Applications Programming Interface (TAPI) Closing the Computer Cover Back to Contents Page
Service Manual
Page 2
...and all attached devices. 3. While you . Back to Contents Page Before You Begin Dell™ OptiPlex™ GX260 Service Manual Getting Started Recommended Tools Precautionary Measures Protecting Against Electrostatic Discharge Getting Started This ...Dell recommends that the following steps in "Precautionary Measures." Perform an orderly computer shutdown using the operating system menu. 2. Ground yourself by touching an unpainted metal surface on the chassis, such as explained in the Dell™ OptiPlex™ GX260 small form-factor, small desktop, and small mini-tower...
...and all attached devices. 3. While you . Back to Contents Page Before You Begin Dell™ OptiPlex™ GX260 Service Manual Getting Started Recommended Tools Precautionary Measures Protecting Against Electrostatic Discharge Getting Started This ...Dell recommends that the following steps in "Precautionary Measures." Perform an orderly computer shutdown using the operating system menu. 2. Ground yourself by touching an unpainted metal surface on the chassis, such as explained in the Dell™ OptiPlex™ GX260 small form-factor, small desktop, and small mini-tower...

Service Manual
Page 5
Remove the padlock from the padlock ring, if present. 1 security cable slot 2 padlock ring 3 release buttons (one on each side) Small Mini-Tower Computer 1 release buttons 2 security cable slot 3 padlock ring 1.
Remove the padlock from the padlock ring, if present. 1 security cable slot 2 padlock ring 3 release buttons (one on each side) Small Mini-Tower Computer 1 release buttons 2 security cable slot 3 padlock ring 1.

Service Manual
Page 6
... desktop space. d. Closing the Computer Cover 1. Press down on the left side of the computer with one hand while pulling up on the small mini-tower computer: a. d. To open the cover on its side as shown in the illustration, and then press the two release buttons as you so that they...
... desktop space. d. Closing the Computer Cover 1. Press down on the left side of the computer with one hand while pulling up on the small mini-tower computer: a. d. To open the cover on its side as shown in the illustration, and then press the two release buttons as you so that they...
Service Manual
Page 8
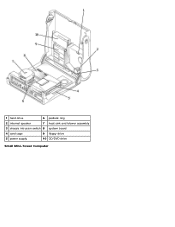
1 hard drive 6 padlock ring 2 internal speaker 7 heat sink and blower assembly 3 chassis intrusion switch 8 system board 4 card cage 9 floppy drive 5 power supply 10 CD/DVD drive Small Mini-Tower Computer
1 hard drive 6 padlock ring 2 internal speaker 7 heat sink and blower assembly 3 chassis intrusion switch 8 system board 4 card cage 9 floppy drive 5 power supply 10 CD/DVD drive Small Mini-Tower Computer
Service Manual
Page 13
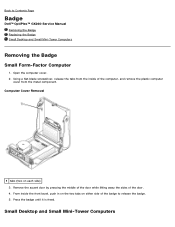
... pressing the middle of the door while lifting away the sides of the badge to Contents Page Badge Dell™ OptiPlex™ GX260 Service Manual Removing the Badge Replacing the Badge Small Desktop and Small Mini-Tower Computers Removing the Badge Small Form-Factor Computer 1. Using a flat-blade screwdriver, release the tabs from...push in on the two tabs on each side) 3. Computer Cover Removal 1 tabs (two on either side of the door. 4. Small Desktop and Small Mini-Tower Computers Back to release the badge. 5. Open the computer cover. 2. Press the badge until it is freed.
... pressing the middle of the door while lifting away the sides of the badge to Contents Page Badge Dell™ OptiPlex™ GX260 Service Manual Removing the Badge Replacing the Badge Small Desktop and Small Mini-Tower Computers Removing the Badge Small Form-Factor Computer 1. Using a flat-blade screwdriver, release the tabs from...push in on the two tabs on each side) 3. Computer Cover Removal 1 tabs (two on either side of the door. 4. Small Desktop and Small Mini-Tower Computers Back to release the badge. 5. Open the computer cover. 2. Press the badge until it is freed.

Service Manual
Page 15
Replace the badge by pressing it into place, ensuring that the two tabs click, securing it into position. Back to Contents Page Small Desktop and Small Mini-Tower Computers Replace the badge by pressing it into place, ensuring that the two tabs click, securing it into position. 1 accent door 2 front mask 2.
Replace the badge by pressing it into place, ensuring that the two tabs click, securing it into position. Back to Contents Page Small Desktop and Small Mini-Tower Computers Replace the badge by pressing it into place, ensuring that the two tabs click, securing it into position. 1 accent door 2 front mask 2.

Service Manual
Page 19
Chassis hooks may hold the cable in place inside the chassis. Disconnect the chassis intrusion switch cable connector from the chassis. Note the routing of the chassis intrusion cable as you remove it from the control panel on the front of the chassis. Small Mini-Tower Computer 1.
Chassis hooks may hold the cable in place inside the chassis. Disconnect the chassis intrusion switch cable connector from the chassis. Note the routing of the chassis intrusion cable as you remove it from the control panel on the front of the chassis. Small Mini-Tower Computer 1.
Service Manual
Page 23
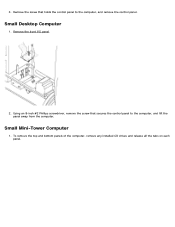
To remove the top and bottom panels of the computer, remove any installed CD drives and release all the tabs on each panel. Small Mini-Tower Computer 1. Small Desktop Computer 1. Using an 8-inch #2 Phillips screwdriver, remove the screw that holds the control panel to the computer, and lift the panel away from the computer. Remove the front I/O panel. 2. 3. Remove the screw that secures the control panel to the computer, and remove the control panel.
To remove the top and bottom panels of the computer, remove any installed CD drives and release all the tabs on each panel. Small Mini-Tower Computer 1. Small Desktop Computer 1. Using an 8-inch #2 Phillips screwdriver, remove the screw that holds the control panel to the computer, and lift the panel away from the computer. Remove the front I/O panel. 2. 3. Remove the screw that secures the control panel to the computer, and remove the control panel.

Service Manual
Page 27
1 metal hooks (2) 4. To replace the front mask and accent door, press them into position. Small Desktop Computer Follow the steps in the "Removing the Control Panel" procedure in the reverse order, ensuring that all tabs are secure. Small Mini-Tower Computer Follow the steps in the "Removing the Control Panel" procedure in the reverse order, ensuring that all tabs are secure. Back to Contents Page
1 metal hooks (2) 4. To replace the front mask and accent door, press them into position. Small Desktop Computer Follow the steps in the "Removing the Control Panel" procedure in the reverse order, ensuring that all tabs are secure. Small Mini-Tower Computer Follow the steps in the "Removing the Control Panel" procedure in the reverse order, ensuring that all tabs are secure. Back to Contents Page


