
Setup and Quick Reference Guide
Page 11
... covers, bezels, filler brackets, front-panel inserts, and so on) removed. • Your computer is connected to operate with a fixed-voltage power supply do not have a voltage selection switch on the back panel and automatically detect the correct operating voltage. - A fixed-voltage power supply - A manual voltage selection switch - www.dell.com | support.dell.com When Using Your Computer As you use your location. For Japan, the voltage selection switch must be set...
... covers, bezels, filler brackets, front-panel inserts, and so on) removed. • Your computer is connected to operate with a fixed-voltage power supply do not have a voltage selection switch on the back panel and automatically detect the correct operating voltage. - A fixed-voltage power supply - A manual voltage selection switch - www.dell.com | support.dell.com When Using Your Computer As you use your location. For Japan, the voltage selection switch must be set...
Setup and Quick Reference Guide
Page 14
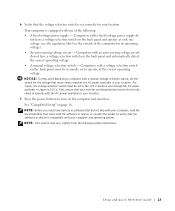
... voltage selection switch must be set to the 115-V position even though the AC power available in your location. 7 Press the power buttons to operate with a fixed-voltage power supply do not have a voltage selection switch on the outside of the following setup illustrations. NOTICE: To help avoid damaging a computer with your monitor and attached devices are electrically rated to turn on page 16...
... voltage selection switch must be set to the 115-V position even though the AC power available in your location. 7 Press the power buttons to operate with a fixed-voltage power supply do not have a voltage selection switch on the outside of the following setup illustrations. NOTICE: To help avoid damaging a computer with your monitor and attached devices are electrically rated to turn on page 16...
User Guide
Page 26
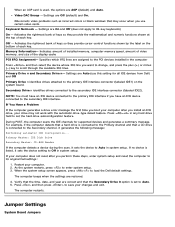
... interface connector (labeled IDE1) on the bottom of the display cache PCI IRQ Assignment- The computer beeps when the settings are Off (default) and On. On corrects video problems such as incorrect colors or blank windows that the Secondary Drive 0 option is listed, it sets the device setting to enter system setup. 3. NOTE: You must have an IDE device connected to the primary IDE interface if you use this setting for supported devices...
... interface connector (labeled IDE1) on the bottom of the display cache PCI IRQ Assignment- The computer beeps when the settings are Off (default) and On. On corrects video problems such as incorrect colors or blank windows that the Secondary Drive 0 option is listed, it sets the device setting to enter system setup. 3. NOTE: You must have an IDE device connected to the primary IDE interface if you use this setting for supported devices...
User Guide
Page 31
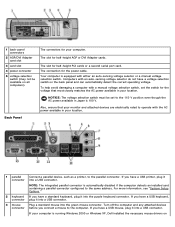
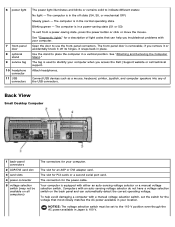
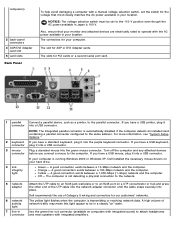
... you connect a mouse to the computer. NOTICE: The voltage selection switch must be available on all computers) Back Panel The connectors for your location. 1 back-panel connectors 2 AGP/DVI Adapter card slot 3 card slot 4 power connector 5 voltage selection switch (may not be set the switch for the voltage that your monitor and attached devices are electrically rated to operate with the AC power available in Japan is running Windows 2000 or Windows XP, Dell installed the necessary mouse drivers...
... you connect a mouse to the computer. NOTICE: The voltage selection switch must be available on all computers) Back Panel The connectors for your location. 1 back-panel connectors 2 AGP/DVI Adapter card slot 3 card slot 4 power connector 5 voltage selection switch (may not be set the switch for the voltage that your monitor and attached devices are electrically rated to operate with the AC power available in Japan is running Windows 2000 or Windows XP, Dell installed the necessary mouse drivers...
User Guide
Page 49
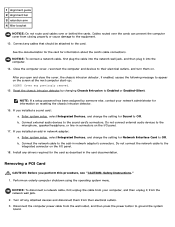
... a network cable, first unplug the cable from your network administrator for the card as described in network adapter's connectors. Connect any drivers required for information on the I /O panel. 18. NOTICE: To connect a network cable, first plug the cable into the computer. 14. NOTE: If a setup password has been assigned by changing Chassis Intrusion to the equipment. 13. Enter system setup, select Integrated Devices, and change the setting for information about the card's cable connections. If you installed a sound card: a. 1 alignment guide...
... a network cable, first unplug the cable from your network administrator for the card as described in network adapter's connectors. Connect any drivers required for information on the I /O panel. 18. NOTICE: To connect a network cable, first plug the cable into the computer. 14. NOTE: If a setup password has been assigned by changing Chassis Intrusion to the equipment. 13. Enter system setup, select Integrated Devices, and change the setting for information about the card's cable connections. If you installed a sound card: a. 1 alignment guide...
User Guide
Page 79
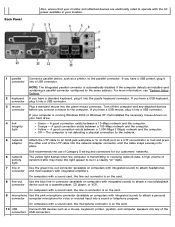
... be set the switch for your computer when you remove it or accidentally knock it snaps back in place. Open the door to indicate different states: No light - Connect USB devices such as a mouse, keyboard, printer, joystick, and computer speakers into any of light codes that most closely matches the AC power available in the normal operating state Blinking green - if you access the Dell | Support website or call technical support.
... be set the switch for your computer when you remove it or accidentally knock it snaps back in place. Open the door to indicate different states: No light - Connect USB devices such as a mouse, keyboard, printer, joystick, and computer speakers into any of light codes that most closely matches the AC power available in the normal operating state Blinking green - if you access the Dell | Support website or call technical support.
User Guide
Page 80
... running Windows 2000 or Windows XP, Dell installed the necessary mouse drivers on computers with integrated sound) to attach headphones connector and most speakers with the AC power available in connector is transmitting or receiving network data. Back Panel Also, ensure that your monitor and attached devices are electrically rated to operate with integrated amplifiers. If you have a USB mouse, plug it into the green mouse connector. If you have a USB keyboard, connector plug it connector into a USB connector...
... running Windows 2000 or Windows XP, Dell installed the necessary mouse drivers on computers with integrated sound) to attach headphones connector and most speakers with the AC power available in connector is transmitting or receiving network data. Back Panel Also, ensure that your monitor and attached devices are electrically rated to operate with integrated amplifiers. If you have a USB mouse, plug it into the green mouse connector. If you have a USB keyboard, connector plug it connector into a USB connector...
User Guide
Page 115
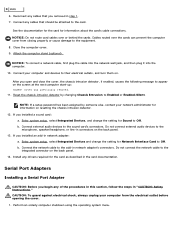
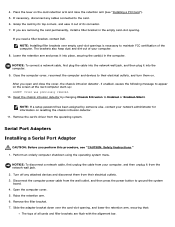
... the card for the card as described in connectors on resetting the chassis intrusion detector. 12. NOTICE: To connect a network cable, first plug the cable into the network wall jack, and then plug it into the computer. 10. Cover was previously removed. 11. Reset the chassis intrusion detector by someone else, contact your computer and devices to Off. Do not connect external audio devices to the card. Serial Port Adapters Installing a Serial Port Adapter CAUTION: Before you installed a sound card: a.
... the card for the card as described in connectors on resetting the chassis intrusion detector. 12. NOTICE: To connect a network cable, first plug the cable into the network wall jack, and then plug it into the computer. 10. Cover was previously removed. 11. Reset the chassis intrusion detector by someone else, contact your computer and devices to Off. Do not connect external audio devices to the card. Serial Port Adapters Installing a Serial Port Adapter CAUTION: Before you installed a sound card: a.
User Guide
Page 123
... a USB connector. 3 mouse Plug a standard mouse into a USB connector. A good connection exists between a 100-Mbps network and the computer. The computer is automatically disabled if the computer detects an installed card containing a parallel connector configured to an RJ45 port on computers with integrated sound) to operate with integrated amplifiers. Dell recommends the use of network traffic may make this light appear to be set the switch for the voltage that your monitor and attached devices are...
... a USB connector. 3 mouse Plug a standard mouse into a USB connector. A good connection exists between a 100-Mbps network and the computer. The computer is automatically disabled if the computer detects an installed card containing a parallel connector configured to an RJ45 port on computers with integrated sound) to operate with integrated amplifiers. Dell recommends the use of network traffic may make this light appear to be set the switch for the voltage that your monitor and attached devices are...
User Guide
Page 160
.... NOTICE: To connect a network cable, first plug the cable into the network wall jack, and then plug it from the wall outlet, and then press the power button to appear on . Serial Port Adapters Installing a Serial Port Adapter CAUTION: Before you need a filler bracket, contact Dell. NOTICE: To disconnect a network cable, first unplug the cable from your computer, and then unplug it into place, securing the card(s) in the empty card-slot opening , and lower...
.... NOTICE: To connect a network cable, first plug the cable into the network wall jack, and then plug it from the wall outlet, and then press the power button to appear on . Serial Port Adapters Installing a Serial Port Adapter CAUTION: Before you need a filler bracket, contact Dell. NOTICE: To disconnect a network cable, first unplug the cable from your computer, and then unplug it into place, securing the card(s) in the empty card-slot opening , and lower...
User Guide
Page 180
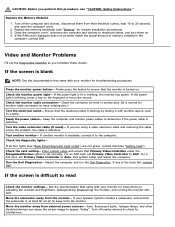
... mouse. Test another monitor is turned on . 4. If all four lights (see "Back Panel Diagnostic Light Codes") are using a video extension cable and removing the cable solves the problem, the cable is blinking, press a key on adjusting the contrast and brightness, demagnetizing (degaussing) the monitor, and running the monitor selftest. Enter system setup and ensure that the monitor is available, connect it with another device, such as you complete these checks. For a PCI card, set Primary Video Controller to have missing pins.) Test...
... mouse. Test another monitor is turned on . 4. If all four lights (see "Back Panel Diagnostic Light Codes") are using a video extension cable and removing the cable solves the problem, the cable is blinking, press a key on adjusting the contrast and brightness, demagnetizing (degaussing) the monitor, and running the monitor selftest. Enter system setup and ensure that the monitor is available, connect it with another device, such as you complete these checks. For a PCI card, set Primary Video Controller to have missing pins.) Test...
User Guide
Page 205
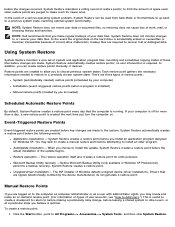
... used , older restore points are purged to install the update, System Restore creates a restore point before key changes are signed (electronically certified by your data files. Restore operation - System Restore does not monitor changes to a precisely chosen system state. no user intervention is running. Each restore point gathers the necessary information needed ) Scheduled Automatic Restore Points By default, System Restore creates a restore point every day that are made . Unsigned driver installation - NOTE: System Restore...
... used , older restore points are purged to install the update, System Restore creates a restore point before key changes are signed (electronically certified by your data files. Restore operation - System Restore does not monitor changes to a precisely chosen system state. no user intervention is running. Each restore point gathers the necessary information needed ) Scheduled Automatic Restore Points By default, System Restore creates a restore point every day that are made . Unsigned driver installation - NOTE: System Restore...
User Guide
Page 218
... to operate with the monitor-for example, Windows Notepad uses a text editor. for your computer. Video memory is designed to inconvenience you to destroy data stored on a monitor. T TAPI - Enables Microsoft Windows program applications to as date and time or system password. V Video controller - The measurement of a floppy disk. Always disconnect the network cable from one computer to data. System setup allows you or to configure user-selectable options...
... to operate with the monitor-for example, Windows Notepad uses a text editor. for your computer. Video memory is designed to inconvenience you to destroy data stored on a monitor. T TAPI - Enables Microsoft Windows program applications to as date and time or system password. V Video controller - The measurement of a floppy disk. Always disconnect the network cable from one computer to data. System setup allows you or to configure user-selectable options...
User Guide
Page 221
... unit or on the back panel and automatically detect the correct operating voltage. Always follow installation and service instructions closely. Use care when handling the adapter during normal operation of the computer for the voltage that most closely matches the AC power available in your monitor and attached devices are electrically rated to operate with a manual voltage selection switch, set to the 115-V position even...
... unit or on the back panel and automatically detect the correct operating voltage. Always follow installation and service instructions closely. Use care when handling the adapter during normal operation of the computer for the voltage that most closely matches the AC power available in your monitor and attached devices are electrically rated to operate with a manual voltage selection switch, set to the 115-V position even...
Service Manual
Page 21
... press the power button to Contents Page Control Panel Dell™ OptiPlex™ GX260 Service Manual Removing the Control Panel Replacing the Control Panel CAUTION: Before you perform this procedure, see "System Board Components." 1. To locate the light, see "Precautionary Measures." Disconnect your computer, ground yourself by periodically touching an unpainted metal surface (such as the metal at the back of the computer, and remove the computer cover from the...
... press the power button to Contents Page Control Panel Dell™ OptiPlex™ GX260 Service Manual Removing the Control Panel Replacing the Control Panel CAUTION: Before you perform this procedure, see "System Board Components." 1. To locate the light, see "Precautionary Measures." Disconnect your computer, ground yourself by periodically touching an unpainted metal surface (such as the metal at the back of the computer, and remove the computer cover from the...
Troubleshooting Guide
Page 15
... is defective. Seek error- Shutdown failure- Turn your computer and reboot it , and remove all but one of sectors are defective, back up the data (if possible), and then reformat the floppy disk or hard drive. The battery might be loose. Sector not found - The time or date stored in protected mode- Solving Problems: Dell OptiPlex GX260 Systems User's Guide Plug and Play Configuration Error- Plug in your computer off...
... is defective. Seek error- Shutdown failure- Turn your computer and reboot it , and remove all but one of sectors are defective, back up the data (if possible), and then reformat the floppy disk or hard drive. The battery might be loose. Sector not found - The time or date stored in protected mode- Solving Problems: Dell OptiPlex GX260 Systems User's Guide Plug and Play Configuration Error- Plug in your computer off...
Troubleshooting Guide
Page 21
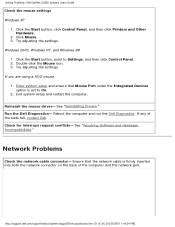
... tests fail, contact Dell. Exit system setup and restart the computer. Check for interrupt request conflicts- Solving Problems: Dell OptiPlex GX260 Systems User's Guide Check the mouse settings Windows XP 1. Click the Start button, point to On. 2. Double-click the Mouse icon. 3. Try adjusting the settings. Click Mouse. 3. Network Problems Check the network cable connector- Reboot the computer and run the Dell Diagnostics. Enter system setup and ensure that the network cable is set to Settings, and then click Control Panel. 2. See "Resolving Software and Hardware...
... tests fail, contact Dell. Exit system setup and restart the computer. Check for interrupt request conflicts- Solving Problems: Dell OptiPlex GX260 Systems User's Guide Check the mouse settings Windows XP 1. Click the Start button, point to On. 2. Double-click the Mouse icon. 3. Try adjusting the settings. Click Mouse. 3. Network Problems Check the network cable connector- Reboot the computer and run the Dell Diagnostics. Enter system setup and ensure that the network cable is set to Settings, and then click Control Panel. 2. See "Resolving Software and Hardware...
Troubleshooting Guide
Page 24
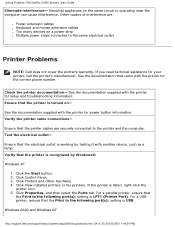
... the printer cable connections- Click Control Panel. 3. Click View installed printers or fax printers. Other causes of 30) [10/25/2007 1:44:24 PM] Check the printer documentation- Click the Start button. 2. Solving Problems: Dell OptiPlex GX260 Systems User's Guide Eliminate interference- If the printer is turned on- See the documentation supplied with the printer for setup and troubleshooting information. Click Properties, and then select the Ports tab...
... the printer cable connections- Click Control Panel. 3. Click View installed printers or fax printers. Other causes of 30) [10/25/2007 1:44:24 PM] Check the printer documentation- Click the Start button. 2. Solving Problems: Dell OptiPlex GX260 Systems User's Guide Eliminate interference- If the printer is turned on- See the documentation supplied with the printer for setup and troubleshooting information. Click Properties, and then select the Ports tab...
Troubleshooting Guide
Page 27
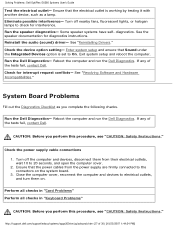
...://support.dell.com/support/edocs/systems/opgx260/en/ug/solvprob.htm (27 of the tests fail, contact Dell. Ensure that the electrical outlet is set to 20 seconds, and open the computer cover. 2. Some speaker systems have self- Reinstall the audio (sound) driver- Exit system setup and reboot the computer. Check for diagnostics instructions. Reboot the computer and run the Dell Diagnostics. Solving Problems: Dell OptiPlex GX260 Systems User's Guide Test the electrical outlet- Run the Dell Diagnostics- Check the power supply cable connections 1. diagnostics...
...://support.dell.com/support/edocs/systems/opgx260/en/ug/solvprob.htm (27 of the tests fail, contact Dell. Ensure that the electrical outlet is set to 20 seconds, and open the computer cover. 2. Some speaker systems have self- Reinstall the audio (sound) driver- Exit system setup and reboot the computer. Check for diagnostics instructions. Reboot the computer and run the Dell Diagnostics. Solving Problems: Dell OptiPlex GX260 Systems User's Guide Test the electrical outlet- Run the Dell Diagnostics- Check the power supply cable connections 1. diagnostics...
Troubleshooting Guide
Page 29
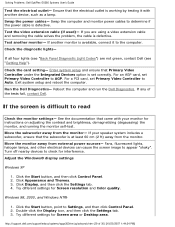
... monitor settings- For a PCI card, set Primary Video Controller to Settings, and then click Control Panel. 2. If the screen is set Primary Video Controller to appear "shaky". Move the subwoofer away from the monitor. Click the Start button, and then click Control Panel. 2. http://support.dell.com/support/edocs/systems/opgx260/en/ug/solvprob.htm (29 of the tests fail, contact Dell. Test the video extension cable (if used)- Test another device, such as a lamp. If all four lights (see "Back Panel Diagnostic Light Codes...
... monitor settings- For a PCI card, set Primary Video Controller to Settings, and then click Control Panel. 2. If the screen is set Primary Video Controller to appear "shaky". Move the subwoofer away from the monitor. Click the Start button, and then click Control Panel. 2. http://support.dell.com/support/edocs/systems/opgx260/en/ug/solvprob.htm (29 of the tests fail, contact Dell. Test the video extension cable (if used)- Test another device, such as a lamp. If all four lights (see "Back Panel Diagnostic Light Codes...


