
Setup and Quick Reference Guide
Page 26
... media. If your concerns. Any award of the arbitrator(s) shall be replaced. If we do if I purchased a service contract? NOTE: Before you replace parts, make sure to back up the data on the hard drive(s) and any court of competent jurisdiction. We pride ourselves on our great...) under its interpretation, or the breach, termination, or validity thereof, the relationships which were never used by applicable law, relationships with Dell, service will ship the part freight collect. We use an address in the product(s). Therefore, ANY CLAIM, DISPUTE, OR CONTROVERSY (WHETHER...
... media. If your concerns. Any award of the arbitrator(s) shall be replaced. If we do if I purchased a service contract? NOTE: Before you replace parts, make sure to back up the data on the hard drive(s) and any court of competent jurisdiction. We pride ourselves on our great...) under its interpretation, or the breach, termination, or validity thereof, the relationships which were never used by applicable law, relationships with Dell, service will ship the part freight collect. We use an address in the product(s). Therefore, ANY CLAIM, DISPUTE, OR CONTROVERSY (WHETHER...

Setup and Quick Reference Guide
Page 30
... . If we will charge to you contact us a service contract with Dell, service will pay to ship the part to back up the data on each replacement part for your packing slip or invoice) for details on the hard drive(s) and any other storage device(s) in the product(s). We will be found... online at www.dell.ca or by various manufacturers in performing warranty repairs and in...
... . If we will charge to you contact us a service contract with Dell, service will pay to ship the part to back up the data on each replacement part for your packing slip or invoice) for details on the hard drive(s) and any other storage device(s) in the product(s). We will be found... online at www.dell.ca or by various manufacturers in performing warranty repairs and in...

User Guide
Page 5
...drivers for the devices that came with other users and The Dell Support website provides several online tools, including: technical support Documentation for my computer Knowledge Base - Follow the instructions shown on your hard drive. Type a word or phrase that describes your problem. ... configuration Service contract for my computer Dell Premier Support website The Dell Premier Support website is customized for components, such as memory, the hard drive, and the operating system Customer Care - How to remove and replace parts Technical specifications How to configure ...
...drivers for the devices that came with other users and The Dell Support website provides several online tools, including: technical support Documentation for my computer Knowledge Base - Follow the instructions shown on your hard drive. Type a word or phrase that describes your problem. ... configuration Service contract for my computer Dell Premier Support website The Dell Premier Support website is customized for components, such as memory, the hard drive, and the operating system Customer Care - How to remove and replace parts Technical specifications How to configure ...

User Guide
Page 21
... or set the type of hard drive installed This disables the existing password(s). 5. Close the computer cover and reconnect the computer and devices to electrical outlets and turn them on . Exit system setup. Open the computer cover. 2. Enter system setup and verify that Setup Password is assigned. 10. Replace the PSWD jumper plug...
... or set the type of hard drive installed This disables the existing password(s). 5. Close the computer cover and reconnect the computer and devices to electrical outlets and turn them on . Exit system setup. Open the computer cover. 2. Enter system setup and verify that Setup Password is assigned. 10. Replace the PSWD jumper plug...

User Guide
Page 55
...opening the cover. Disconnect the computer power cable from the electrical outlet before touching anything inside your computer. Removing Power and Drive Cables If you are replacing a hard drive that it is attached. 9. Turn off your computer from the wall outlet, and then press the power button to the... drive, do not set the drive on the computer chassis to verify that contains data you want to keep, back up your computer. 3. ...
...opening the cover. Disconnect the computer power cable from the electrical outlet before touching anything inside your computer. Removing Power and Drive Cables If you are replacing a hard drive that it is attached. 9. Turn off your computer from the wall outlet, and then press the power button to the... drive, do not set the drive on the computer chassis to verify that contains data you want to keep, back up your computer. 3. ...

User Guide
Page 57
... Attach the bracket rails to the new drive by aligning the screw holes on the drive with pin 1 on each rail to the drive. Install the hard drive into place until you hear it for installation. 2. Unpack the replacement hard drive, and prepare it securely click. Hard Drive Bracket Rails 1 drive 2 bracket rails (2) 3 screws (4) 3. NOTICE: Match the colored strip on the...
... Attach the bracket rails to the new drive by aligning the screw holes on the drive with pin 1 on each rail to the drive. Install the hard drive into place until you hear it for installation. 2. Unpack the replacement hard drive, and prepare it securely click. Hard Drive Bracket Rails 1 drive 2 bracket rails (2) 3 screws (4) 3. NOTICE: Match the colored strip on the...

User Guide
Page 92
...Disconnect your computer, and then unplug it from their power sources. Also, disconnect any static electricity that contains data you are replacing a hard drive that might harm internal components. CAUTION: To guard against electrical shock, always unplug your computer. While you begin any of ... computer stand, if it by touching an unpainted metal surface on the computer chassis to ground the system board. 7. Removing the Hard-Drive Shroud Perform an orderly computer shutdown using the operating system menu. 3. NOTICE: To disconnect a network cable, first unplug the cable...
...Disconnect your computer, and then unplug it from their power sources. Also, disconnect any static electricity that contains data you are replacing a hard drive that might harm internal components. CAUTION: To guard against electrical shock, always unplug your computer. While you begin any of ... computer stand, if it by touching an unpainted metal surface on the computer chassis to ground the system board. 7. Removing the Hard-Drive Shroud Perform an orderly computer shutdown using the operating system menu. 3. NOTICE: To disconnect a network cable, first unplug the cable...

User Guide
Page 94
... 2 hard drive Installing a Hard Drive 1. Hard Drive Bracket Rails If your computer. Unpack the replacement hard drive, and prepare it on a hard surface. Instead, set it for your replacement hard drive does not have the bracket rails attached, remove the rails from the old drive by aligning the screw holes on the drive with ... that will sufficiently cushion it is configured for installation. 3. NOTICE: To avoid damage to the drive, do not set the drive on each rail to the drive. Attach the bracket rails to verify that secure each rail). Check the documentation for the...
... 2 hard drive Installing a Hard Drive 1. Hard Drive Bracket Rails If your computer. Unpack the replacement hard drive, and prepare it on a hard surface. Instead, set it for your replacement hard drive does not have the bracket rails attached, remove the rails from the old drive by aligning the screw holes on the drive with ... that will sufficiently cushion it is configured for installation. 3. NOTICE: To avoid damage to the drive, do not set the drive on each rail to the drive. Attach the bracket rails to verify that secure each rail). Check the documentation for the...

User Guide
Page 95
... your computer has a hard-drive shroud, replace the shroud by gently sliding the drive into place until you just installed is marked as "1"). 5. If your computer and devices to their electrical outlets, and turn them on the drive (pin 1 is the primary drive, insert a bootable floppy disk into drive A. Connect the power and hard-drive cables to be certain...
... your computer has a hard-drive shroud, replace the shroud by gently sliding the drive into place until you just installed is marked as "1"). 5. If your computer and devices to their electrical outlets, and turn them on the drive (pin 1 is the primary drive, insert a bootable floppy disk into drive A. Connect the power and hard-drive cables to be certain...
User Guide
Page 96
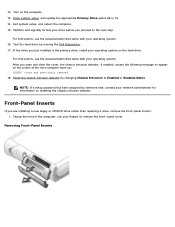
... front of the computer, use your network administrator for information on the hard drive. After you are installing a new floppy or CD/DVD drive rather than replacing a drive, remove the front-panel inserts: 1. NOTE: If a setup password has been assigned by running the Dell Diagnostics. 17. Removing Front-Panel Inserts For instructions, see the documentation that...
... front of the computer, use your network administrator for information on the hard drive. After you are installing a new floppy or CD/DVD drive rather than replacing a drive, remove the front-panel inserts: 1. NOTE: If a setup password has been assigned by running the Dell Diagnostics. 17. Removing Front-Panel Inserts For instructions, see the documentation that...

User Guide
Page 134
...before you begin any of the computer, before opening the cover. Disconnect your computer and any devices. 4. If you are replacing a hard drive that will sufficiently cushion it from your computer. While you work, periodically touch an unpainted metal surface on the chassis, such...dissipate any static electricity that might harm internal components. Also, disconnect any telephone or telecommunication lines from the drive. Removing a Hard Drive 1. Disconnect the power and hard-drive cables from the computer. 6. Instead, set it on a surface, such as the metal around the card...
...before you begin any of the computer, before opening the cover. Disconnect your computer and any devices. 4. If you are replacing a hard drive that will sufficiently cushion it from your computer. While you work, periodically touch an unpainted metal surface on the chassis, such...dissipate any static electricity that might harm internal components. Also, disconnect any telephone or telecommunication lines from the drive. Removing a Hard Drive 1. Disconnect the power and hard-drive cables from the computer. 6. Instead, set it on a surface, such as the metal around the card...

User Guide
Page 135
Unpack the replacement hard drive, and prepare it is configured for installation. 2. Check the documentation for the drive to verify that it for your computer. Press in on the tabs on each side of the drive and slide the drive up and out. 1 power cable 2 hard-drive cable 2. Removing the Hard Drive 1 tabs (2) 2 hard drive Installing a Hard Drive 1.
Unpack the replacement hard drive, and prepare it is configured for installation. 2. Check the documentation for the drive to verify that it for your computer. Press in on the tabs on each side of the drive and slide the drive up and out. 1 power cable 2 hard-drive cable 2. Removing the Hard Drive 1 tabs (2) 2 hard drive Installing a Hard Drive 1.

User Guide
Page 136
... hard-drive cables to the drive. Attaching Power and Drive Cables If your replacement hard drive does not have the bracket rails attached, remove the rails from the old drive by removing the two screws that secure each rail). Install the hard drive into the computer by aligning the screw holes on the drive with pin 1 on each rail to the drive. Hard Drive...
... hard-drive cables to the drive. Attaching Power and Drive Cables If your replacement hard drive does not have the bracket rails attached, remove the rails from the old drive by removing the two screws that secure each rail). Install the hard drive into the computer by aligning the screw holes on the drive with pin 1 on each rail to the drive. Hard Drive...

User Guide
Page 140
.... After you are installing a new floppy or CD/DVD drive rather than replacing a drive, remove the front-panel inserts. 1. Reset the chassis intrusion detector by someone else, contact your computer and devices to appear on the screen ... Intrusion to a 90-degree angle and release the insert tabs from inside the computer. 1 power cable 2 second hard-drive cable (secondary drive) 3 first hard-drive cable (primary boot drive) 14. See the documentation that came with the drive for instructions on installing any software required for information on . 16. NOTICE: To connect a network cable, first...
.... After you are installing a new floppy or CD/DVD drive rather than replacing a drive, remove the front-panel inserts. 1. Reset the chassis intrusion detector by someone else, contact your computer and devices to appear on the screen ... Intrusion to a 90-degree angle and release the insert tabs from inside the computer. 1 power cable 2 second hard-drive cable (secondary drive) 3 first hard-drive cable (primary boot drive) 14. See the documentation that came with the drive for instructions on installing any software required for information on . 16. NOTICE: To connect a network cable, first...

User Guide
Page 170
... necessary, replace them (see "Memory" for information on , try a different disk. See "Drive Problems" for troubleshooting suggestions. If the drive access light turns on running these utilities. Diskette subsystem reset failed- Drive not ready- The operating system is in the drive. Hard-disk configuration error- See "Drive Problems" for troubleshooting suggestions. The hard drive failed initialization. Run the Dell Diagnostics...
... necessary, replace them (see "Memory" for information on , try a different disk. See "Drive Problems" for troubleshooting suggestions. If the drive access light turns on running these utilities. Diskette subsystem reset failed- Drive not ready- The operating system is in the drive. Hard-disk configuration error- See "Drive Problems" for troubleshooting suggestions. The hard drive failed initialization. Run the Dell Diagnostics...

User Guide
Page 171
... value expecting value- See "Memory Problems" for additional troubleshooting suggestions. If the error appears again, contact Dell. If the floppy drive is your boot device, ensure that the drive is correct. No timer tick interrupt- A chip on it . Not a boot diskette- The computer ... CMOS invalid- Read fault- Reinstall the memory modules and, if necessary, replace them . Reinstall the memory modules and, if necessary, replace them . Memory size in your operating system documentation for the hard drive is trying to boot to a floppy disk that has a bootable operating ...
... value expecting value- See "Memory Problems" for additional troubleshooting suggestions. If the error appears again, contact Dell. If the floppy drive is your boot device, ensure that the drive is correct. No timer tick interrupt- A chip on it . Not a boot diskette- The computer ... CMOS invalid- Read fault- Reinstall the memory modules and, if necessary, replace them . Reinstall the memory modules and, if necessary, replace them . Memory size in your operating system documentation for the hard drive is trying to boot to a floppy disk that has a bootable operating ...

User Guide
Page 172
... set-please run the System Setup program- If the problem persists, contact Dell. It is advisable to immediately back up your data and replace your hard drive (for installation procedures, see "Adding and Removing Parts" for troubleshooting suggestions. Write fault on the floppy or hard drive. Click End Task. Click Task Manager, and click Applications. 3. See...
... set-please run the System Setup program- If the problem persists, contact Dell. It is advisable to immediately back up your data and replace your hard drive (for installation procedures, see "Adding and Removing Parts" for troubleshooting suggestions. Write fault on the floppy or hard drive. Click End Task. Click Task Manager, and click Applications. 3. See...
User Guide
Page 201
...Support Center The Help and Support Center, introduced with Microsoft Windows Millennium Edition (Me), replaces Windows Help from earlier operating systems. The Help and Support Center provides an integrated ...help content. Back to Contents Page Microsoft® Windows® XP Features Dell™ OptiPlex™ GX260 Systems User's Guide Overview New User Interface Files and Settings Transfer Wizard ... operating system, Windows XP is available in addition to files resident on the hard drive. For home users, Windows XP brings the significantly increased stability and security inherent...
...Support Center The Help and Support Center, introduced with Microsoft Windows Millennium Edition (Me), replaces Windows Help from earlier operating systems. The Help and Support Center provides an integrated ...help content. Back to Contents Page Microsoft® Windows® XP Features Dell™ OptiPlex™ GX260 Systems User's Guide Overview New User Interface Files and Settings Transfer Wizard ... operating system, Windows XP is available in addition to files resident on the hard drive. For home users, Windows XP brings the significantly increased stability and security inherent...

Service Manual
Page 36
... screws (two screws on each rail). If your replacement drive does not have the bracket rails attached, remove the rails from the computer. Removing the Hard Drive Installing a Hard Drive 1. Drive Bracket Rails 1 drive 2 bracket rails (2) 3 screws (4) 2 hard-drive cable 2. Press in on the tabs on each side of the drive, slide the drive toward the I/O panel, and remove it for installation...
... screws (two screws on each rail). If your replacement drive does not have the bracket rails attached, remove the rails from the computer. Removing the Hard Drive Installing a Hard Drive 1. Drive Bracket Rails 1 drive 2 bracket rails (2) 3 screws (4) 2 hard-drive cable 2. Press in on the tabs on each side of the drive, slide the drive toward the I/O panel, and remove it for installation...

Service Manual
Page 37
...: Match the colored strip on the cable with pin 1 on the drive (pin 1 is marked as "1"). 4. Check all connectors to the drive. Connect the power and hard-drive cables to be certain that they are installing a new floppy or CD/DVD drive rather than replacing a drive, remove the front-panel insert. Front-Panel Inserts If you hear...
...: Match the colored strip on the cable with pin 1 on the drive (pin 1 is marked as "1"). 4. Check all connectors to the drive. Connect the power and hard-drive cables to be certain that they are installing a new floppy or CD/DVD drive rather than replacing a drive, remove the front-panel insert. Front-Panel Inserts If you hear...


