Setup and Quick Reference Guide
Page 6
... getting started/setup, solving problems, and safety, regulatory, and warranty information about technical changes to reinstall drivers, run the Dell Diagnostics, or access your computer or advanced technical-reference material for my computer • My computer documentation • My device...also known as the ResourceCD) Documentation and drivers are already installed on your Dell™ OptiPlex™ computer. their chassis type equivalents are shown below: Regulatory Model Numbers and Chassis Types DHS = small desktop (SD) chassis DHP = small form-factor (SF) chassis DHM = small...
... getting started/setup, solving problems, and safety, regulatory, and warranty information about technical changes to reinstall drivers, run the Dell Diagnostics, or access your computer or advanced technical-reference material for my computer • My computer documentation • My device...also known as the ResourceCD) Documentation and drivers are already installed on your Dell™ OptiPlex™ computer. their chassis type equivalents are shown below: Regulatory Model Numbers and Chassis Types DHS = small desktop (SD) chassis DHP = small form-factor (SF) chassis DHM = small...
Setup and Quick Reference Guide
Page 7
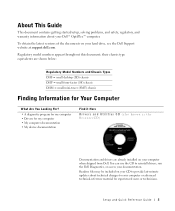
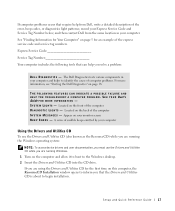
The product key for the devices that came with your computer. Microsoft Windows 2000 Double-click the User's Guides icon on your desktop. 6 Setup and Quick Reference Guide www.dell.com | support.dell.com What Are You Looking For? • Express Service Code and Service Tag • Microsoft® Windows® License Label Find...
The product key for the devices that came with your computer. Microsoft Windows 2000 Double-click the User's Guides icon on your desktop. 6 Setup and Quick Reference Guide www.dell.com | support.dell.com What Are You Looking For? • Express Service Code and Service Tag • Microsoft® Windows® License Label Find...
Setup and Quick Reference Guide
Page 15
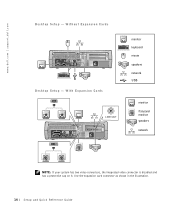
With Expansion Cards LINE OUT monitor keyboard mouse speakers network USB monitor flat-panel monitor speakers network ABCD NOTE: If your system has two video connectors, the integrated video connector is disabled and has a protective cap on it. www.dell.com | support.dell.com ABCD Desktop Setup - Use the expansion card connector as shown in the illustration. 14 Setup and Quick Reference Guide Without Expansion Cards Desktop Setup -
With Expansion Cards LINE OUT monitor keyboard mouse speakers network USB monitor flat-panel monitor speakers network ABCD NOTE: If your system has two video connectors, the integrated video connector is disabled and has a protective cap on it. www.dell.com | support.dell.com ABCD Desktop Setup - Use the expansion card connector as shown in the illustration. 14 Setup and Quick Reference Guide Without Expansion Cards Desktop Setup -
Setup and Quick Reference Guide
Page 18
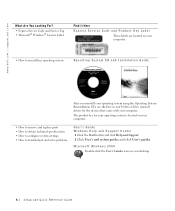
...on the computer and allow it to boot to the Windows desktop. 2 Insert the Drivers and Utilities CD into the CD drive. Setup and Quick Reference Guide 17 and then contact Dell from Dell, write a detailed description of audible beeps emitted by your computer...O U R User's Guide F O R M O R E I N F O R M A T I GH T S - Appear on page 18. Located on the front of computer problems. For more information, see "Starting the Dell Diagnostics" on your computer. If you are running the Windows operating system: NOTE: To access device drivers and user documentation, you must use the Drivers...
...on the computer and allow it to boot to the Windows desktop. 2 Insert the Drivers and Utilities CD into the CD drive. Setup and Quick Reference Guide 17 and then contact Dell from Dell, write a detailed description of audible beeps emitted by your computer...O U R User's Guide F O R M O R E I N F O R M A T I GH T S - Appear on page 18. Located on the front of computer problems. For more information, see "Starting the Dell Diagnostics" on your computer. If you are running the Windows operating system: NOTE: To access device drivers and user documentation, you must use the Drivers...

Setup and Quick Reference Guide
Page 20
... logo appears, continue to wait until you see the Windows desktop. When the DELL logo appears, press immediately. If you wait too long and the Windows logo appears, continue to wait until you see the Windows desktop. Then shut down your computer through the Start menu and try... again. 3 When the boot device list appears, highlight Boot to Utility Partition and press . 4 When the Dell Diagnostics Main Menu appears, select the test you receive...
... logo appears, continue to wait until you see the Windows desktop. When the DELL logo appears, press immediately. If you wait too long and the Windows logo appears, continue to wait until you see the Windows desktop. Then shut down your computer through the Start menu and try... again. 3 When the boot device list appears, highlight Boot to Utility Partition and press . 4 When the Dell Diagnostics Main Menu appears, select the test you receive...
User Guide
Page 1
Dell™ OptiPlex™ GX260 Systems User's Guide Documentation for Your Computer Finding Information for Your Computer Technical Specifications System Board Components Cleaning Your Computer Advanced Features LegacySelect Technology ... and DVI Adapter Cards Battery Memory PCI Cards and Serial Port Adapters Drives Microprocessor Telephony Applications Programming Interface (TAPI) Closing the Computer Cover Small Desktop Computer About Your Computer Front View Back View Inside Your Computer Attaching and Removing the Computer Stand Adding and Removing Parts Opening the Computer Cover...
Dell™ OptiPlex™ GX260 Systems User's Guide Documentation for Your Computer Finding Information for Your Computer Technical Specifications System Board Components Cleaning Your Computer Advanced Features LegacySelect Technology ... and DVI Adapter Cards Battery Memory PCI Cards and Serial Port Adapters Drives Microprocessor Telephony Applications Programming Interface (TAPI) Closing the Computer Cover Small Desktop Computer About Your Computer Front View Back View Inside Your Computer Attaching and Removing the Computer Stand Adding and Removing Parts Opening the Computer Cover...

User Guide
Page 5
...button, and then click Help and Support. 2. This site may not be available in all regions. online discussion with your desktop or click the Start button and then click Help and Support to Contents Page upgrade information for corporate, government, and education ..., including: technical support Documentation for my computer Knowledge Base - How to technical service and support questions Online discussions with other Dell customers Upgrades - Click the topic that describes your problem. 4. computer documentation, product specifications, and white papers Service call status...
...button, and then click Help and Support. 2. This site may not be available in all regions. online discussion with your desktop or click the Start button and then click Help and Support to Contents Page upgrade information for corporate, government, and education ..., including: technical support Documentation for my computer Knowledge Base - How to technical service and support questions Online discussions with other Dell customers Upgrades - Click the topic that describes your problem. 4. computer documentation, product specifications, and white papers Service call status...
User Guide
Page 8
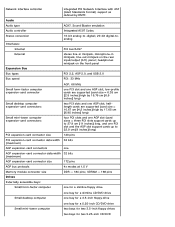
... interface controller integrated PCI Network Interface with ASF (Alert Standards Format) support as defined by 16.76 cm [6.6 inches] long) Small desktop computer expansion-card connectors: two PCI slots and one AGP slot; halflength cards are supported (card size = 6.35 cm [2.5 inches]...168 pins Drives Externally accessible bays: Small form-factor computer one for a slimline floppy drive one bay for a slimline CD/DVD drive Small desktop computer one bay for a 3.5-inch floppy drive Small mini-tower computer one AGP expansion-card connector data width 32 bits (maximum) AGP ...
... interface controller integrated PCI Network Interface with ASF (Alert Standards Format) support as defined by 16.76 cm [6.6 inches] long) Small desktop computer expansion-card connectors: two PCI slots and one AGP slot; halflength cards are supported (card size = 6.35 cm [2.5 inches]...168 pins Drives Externally accessible bays: Small form-factor computer one for a slimline floppy drive one bay for a slimline CD/DVD drive Small desktop computer one bay for a 3.5-inch floppy drive Small mini-tower computer one AGP expansion-card connector data width 32 bits (maximum) AGP ...
User Guide
Page 9
... enter a device for a 1-inch high IDE hard drive one 9-pin connector; 16550-compatible on the back I/O panel; Internally accessible bays: Small form-factor computer Small desktop computer Small mini-tower computer Ports Externally accessible: Serial (data terminal equipment [DTE]) Parallel Video Integrated network adapter Personal System/2 (PS/2)-style keyboard PS/2-compatible...
... enter a device for a 1-inch high IDE hard drive one 9-pin connector; 16550-compatible on the back I/O panel; Internally accessible bays: Small form-factor computer Small desktop computer Small mini-tower computer Ports Externally accessible: Serial (data terminal equipment [DTE]) Parallel Video Integrated network adapter Personal System/2 (PS/2)-style keyboard PS/2-compatible...
User Guide
Page 10
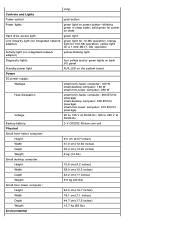
...the system board Power DC power supply: Wattage small form-factor computer: 160 W small desktop computer: 180 W small mini-tower computer: 250 W Heat dissipation small form-factor computer: 455 BTU/hr (average) small desktop computer: 500 BTU/hr (average) small mini-tower computer: 910 BTU/hr (average)...factor computer: Height 9.0 cm (3.57 inches) Width 31.9 cm (12.54 inches) Depth 35.4 cm (13.93 inches) Weight 6 kg (14 lbs) Small desktop computer: Height 10.6 cm (4.2 inches) Width 38.9 cm (15.3 inches) Depth 43.2 cm (17 inches) Weight 9.9 kg (22 lbs) Small mini-tower ...
...the system board Power DC power supply: Wattage small form-factor computer: 160 W small desktop computer: 180 W small mini-tower computer: 250 W Heat dissipation small form-factor computer: 455 BTU/hr (average) small desktop computer: 500 BTU/hr (average) small mini-tower computer: 910 BTU/hr (average)...factor computer: Height 9.0 cm (3.57 inches) Width 31.9 cm (12.54 inches) Depth 35.4 cm (13.93 inches) Weight 6 kg (14 lbs) Small desktop computer: Height 10.6 cm (4.2 inches) Width 38.9 cm (15.3 inches) Depth 43.2 cm (17 inches) Weight 9.9 kg (22 lbs) Small mini-tower ...
User Guide
Page 17
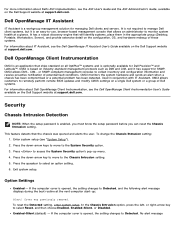
.... Used in the appropriate group (Desktop, Portable, Workstation, Server), and provide extensive detail on the configuration, OS, and hardware makeup of these systems. For information about IT Assistant, see the Dell OpenManage IT Assistant User's Guide available on a single Dell system or a group of potential fault... protocols such as DMI and CIM, and it is optionally available for Dell Precision™ and Latitude™. Press to the System Security option. 3. If the computer cover is based on all OptiPlex™ systems and is an easy-to monitor system health at a glance...
.... Used in the appropriate group (Desktop, Portable, Workstation, Server), and provide extensive detail on the configuration, OS, and hardware makeup of these systems. For information about IT Assistant, see the Dell OpenManage IT Assistant User's Guide available on a single Dell system or a group of potential fault... protocols such as DMI and CIM, and it is optionally available for Dell Precision™ and Latitude™. Press to the System Security option. 3. If the computer cover is based on all OptiPlex™ systems and is an easy-to monitor system health at a glance...

User Guide
Page 22
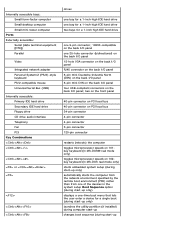
... use system setup, you must know the kind of all screens that came with your computer, or find this information, see the Windows desktop, then shut down your computer. Turn on or restart your computer. Information on the screen. The box at the top of floppy drive...If you can also type the appropriate value. The fields that you print the system setup screens (by the computer) appear less bright. Dell recommends that came with your operating system. NOTE: To ensure an orderly computer shutdown, consult the documentation that you cannot change appear bright ...
... use system setup, you must know the kind of all screens that came with your computer, or find this information, see the Windows desktop, then shut down your computer. Turn on or restart your computer. Information on the screen. The box at the top of floppy drive...If you can also type the appropriate value. The fields that you print the system setup screens (by the computer) appear less bright. Dell recommends that came with your operating system. NOTE: To ensure an orderly computer shutdown, consult the documentation that you cannot change appear bright ...
User Guide
Page 23
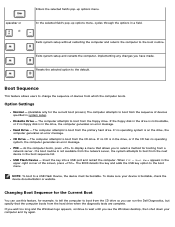
... can use this feature, for example, to tell the computer to boot from the CD drive so you can run the Dell Diagnostics, but specify that allows you see the Windows desktop, then shut down your device is in the boot sequence list. Exits system setup without restarting the computer and returns...
... can use this feature, for example, to tell the computer to boot from the CD drive so you can run the Dell Diagnostics, but specify that allows you see the Windows desktop, then shut down your device is in the boot sequence list. Exits system setup without restarting the computer and returns...
User Guide
Page 36
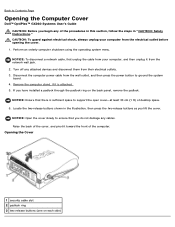
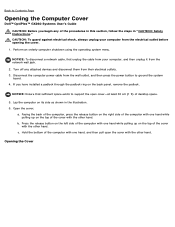
... 1 security cable slot 2 padlock ring 3 two release buttons (one on the back panel, remove the padlock. Back to Contents Page Opening the Computer Cover Dell™ OptiPlex™ GX260 Systems User's Guide CAUTION: Before you do not damage any cables. NOTICE: Ensure that you begin any of the procedures in this section, follow... sufficient space to support the open cover-at least 30 cm (1 ft) of the computer. Remove the computer stand, if it toward the front of desktop space. 6.
... 1 security cable slot 2 padlock ring 3 two release buttons (one on the back panel, remove the padlock. Back to Contents Page Opening the Computer Cover Dell™ OptiPlex™ GX260 Systems User's Guide CAUTION: Before you do not damage any cables. NOTICE: Ensure that you begin any of the procedures in this section, follow... sufficient space to support the open cover-at least 30 cm (1 ft) of the computer. Remove the computer stand, if it toward the front of desktop space. 6.
User Guide
Page 78
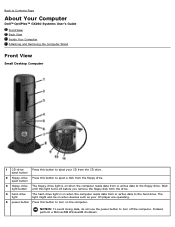
Back to Contents Page About Your Computer Dell™ OptiPlex™ GX260 Systems User's Guide Front View Back View Inside Your Computer Attaching and Removing the Computer Stand Front View Small Desktop Computer 1 CD-drive Press this button to eject your CD player are operating. 5 power button Press this button to turn on the computer...
Back to Contents Page About Your Computer Dell™ OptiPlex™ GX260 Systems User's Guide Front View Back View Inside Your Computer Attaching and Removing the Computer Stand Front View Small Desktop Computer 1 CD-drive Press this button to eject your CD player are operating. 5 power button Press this button to turn on the computer...
User Guide
Page 79
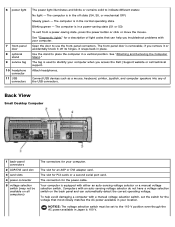
... most closely matches the AC power available in your location. The slot for the power cable. The computer is in a vertical position. Back View Small Desktop Computer 1 back-panel connectors 2 AGP/DVI card slot 3 card slots 4 power connector 5 voltage selection switch (may not be set the switch for ... hinges, it snaps back in Japan is in the normal operating state Blinking green - The slot for your computer. To help you access the Dell | Support website or call technical support. The computer is used to place the computer in a power-saving state (S1 or S3) To exit...
... most closely matches the AC power available in your location. The slot for the power cable. The computer is in a vertical position. Back View Small Desktop Computer 1 back-panel connectors 2 AGP/DVI card slot 3 card slots 4 power connector 5 voltage selection switch (may not be set the switch for ... hinges, it snaps back in Japan is in the normal operating state Blinking green - The slot for your computer. To help you access the Dell | Support website or call technical support. The computer is used to place the computer in a power-saving state (S1 or S3) To exit...
User Guide
Page 81
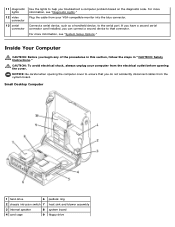
... opening the cover. For more information, see "System Setup Options." Inside Your Computer CAUTION: Before you troubleshoot a computer problem based on the diagnostic code. Small Desktop Computer 1 hard drive 6 2 chassis intrusion switch 7 3 internal speaker 8 4 card cage 9 padlock ring heat sink and blower assembly system board floppy drive 11 diagnostic lights 12...
... opening the cover. For more information, see "System Setup Options." Inside Your Computer CAUTION: Before you troubleshoot a computer problem based on the diagnostic code. Small Desktop Computer 1 hard drive 6 2 chassis intrusion switch 7 3 internal speaker 8 4 card cage 9 padlock ring heat sink and blower assembly system board floppy drive 11 diagnostic lights 12...
User Guide
Page 84
Back to Contents Page Adding and Removing Small Desktop Computer Parts Dell™ OptiPlex™ GX260 Systems User's Guide Opening the Computer Cover AGP and DVI Adapter Cards Battery Drives Memory Microprocessor PCI Cards and Serial Port Adapters Telephony Applications Programming Interface (TAPI) Closing the Computer Cover Back to Contents Page
Back to Contents Page Adding and Removing Small Desktop Computer Parts Dell™ OptiPlex™ GX260 Systems User's Guide Opening the Computer Cover AGP and DVI Adapter Cards Battery Drives Memory Microprocessor PCI Cards and Serial Port Adapters Telephony Applications Programming Interface (TAPI) Closing the Computer Cover Back to Contents Page
User Guide
Page 85
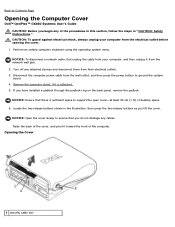
... shock, always unplug your computer, and then unplug it toward the front of desktop space. 6. Disconnect the computer power cable from the wall outlet, and then press the power button to Contents Page Opening the Computer Cover Dell™ OptiPlex™ GX260 Systems User's Guide CAUTION: Before you do not damage any attached devices...
... shock, always unplug your computer, and then unplug it toward the front of desktop space. 6. Disconnect the computer power cable from the wall outlet, and then press the power button to Contents Page Opening the Computer Cover Dell™ OptiPlex™ GX260 Systems User's Guide CAUTION: Before you do not damage any attached devices...
User Guide
Page 127
... menu. c. Turn off any of the cover with the other hand. NOTICE: Ensure that sufficient space exists to Contents Page Opening the Computer Cover Dell™ OptiPlex™ GX260 Systems User's Guide CAUTION: Before you have installed a padlock through the padlock ring on its side as shown in "CAUTION: Safety Instructions." Opening the... press the power button to ground the system board. 4. Hold the bottom of the computer with one hand while pulling up on the top of desktop space. 5.
... menu. c. Turn off any of the cover with the other hand. NOTICE: Ensure that sufficient space exists to Contents Page Opening the Computer Cover Dell™ OptiPlex™ GX260 Systems User's Guide CAUTION: Before you have installed a padlock through the padlock ring on its side as shown in "CAUTION: Safety Instructions." Opening the... press the power button to ground the system board. 4. Hold the bottom of the computer with one hand while pulling up on the top of desktop space. 5.


