
Setup and Quick Reference Guide
Page 11
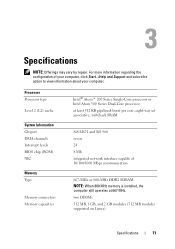
... may vary by region. two DIMMs 512 MB, 1 GB, and 2 GB modules (512 MB modules supported on Linux) Specifications 11 For more information regarding the configuration of 10/100/1000 Mbps communication 667-MHz or 800-MHz DDR2 SDRAM NOTE: When 800 MHz memory is installed, the computer still operates at...
... may vary by region. two DIMMs 512 MB, 1 GB, and 2 GB modules (512 MB modules supported on Linux) Specifications 11 For more information regarding the configuration of 10/100/1000 Mbps communication 667-MHz or 800-MHz DDR2 SDRAM NOTE: When 800 MHz memory is installed, the computer still operates at...
Setup and Quick Reference Guide
Page 14
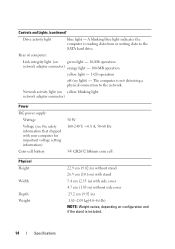
... detecting a physical connection to the SATA hard drive. A blinking blue light indicates the computer is included. 14 Specifications Rear of computer: Link integrity light (on configuration and if the stand is reading data from or writing data to the network. Network activity light (on yellow blinking light network adapter connector) Power...
... detecting a physical connection to the SATA hard drive. A blinking blue light indicates the computer is included. 14 Specifications Rear of computer: Link integrity light (on configuration and if the stand is reading data from or writing data to the network. Network activity light (on yellow blinking light network adapter connector) Power...
Setup and Quick Reference Guide
Page 20
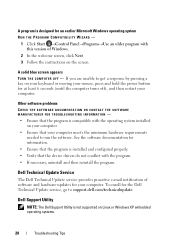
... instructions on your computer. • Ensure that your computer meets the minimum hardware requirements needed to support.dell.com/technicalupdate. Dell Support Utility NOTE: The Dell Support Utility is not supported on your keyboard or moving your mouse, press and hold the power button... for at least 6 seconds (until the computer turns off), and then restart your computer. See the software documentation for information. • Ensure that the program is installed and configured...
... instructions on your computer. • Ensure that your computer meets the minimum hardware requirements needed to support.dell.com/technicalupdate. Dell Support Utility NOTE: The Dell Support Utility is not supported on your keyboard or moving your mouse, press and hold the power button... for at least 6 seconds (until the computer turns off), and then restart your computer. See the software documentation for information. • Ensure that the program is installed and configured...
Setup and Quick Reference Guide
Page 26
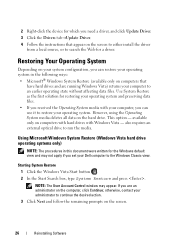
... only on computers with hard drives with your computer, you set your operating system. Restoring Your Operating System Depending on your system configuration, you can use it to restore your Dell computer to the Windows Classic view. NOTE: The User Account Control window may not apply if you can restore your operating...
... only on computers with hard drives with your computer, you set your operating system. Restoring Your Operating System Depending on your system configuration, you can use it to restore your Dell computer to the Windows Classic view. NOTE: The User Account Control window may not apply if you can restore your operating...
Dell™ OptiPlex™ FX160 Re-Imaging Guide
Page 3
...Environment (PE) system will erase all data from the DVD opens a utility that writes the FX160 flash card. Dell™ OptiPlex™ FX160 Re-Imaging Guide The Dell OptiPlex FX160 computer with an internal flash card hard drive is preloaded with Microsoft Windows Automation Installation Kit (...FX160 system image, click the Capture System Image button and follow the prompts to write the system image to highlight the DVD drive you attached. 5 Insert the bootable Windows update DVD into the DVD reader and press Enter. However, when system updates are released, or special configurations...
...Environment (PE) system will erase all data from the DVD opens a utility that writes the FX160 flash card. Dell™ OptiPlex™ FX160 Re-Imaging Guide The Dell OptiPlex FX160 computer with an internal flash card hard drive is preloaded with Microsoft Windows Automation Installation Kit (...FX160 system image, click the Capture System Image button and follow the prompts to write the system image to highlight the DVD drive you attached. 5 Insert the bootable Windows update DVD into the DVD reader and press Enter. However, when system updates are released, or special configurations...
Dell™ OptiPlex™ FX160 Re-Imaging Guide
Page 4
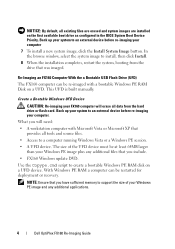
... image and any additional files that provides all existing files are erased and system images are installed on the first available boot drive as configured in the BIOS System Boot Device Priority. NOTE: Ensure that you have sufficient memory to install, then click Install. 8 When the ... data from the drive that was imaged. Re-Imaging an FX160 Computer With the a Bootable USB Flash Drive (UFD) The FX160 computer can be at least 64MB larger than your Windows PE image plus any additional applications. 4 Dell OptiPlex FX160 Re-Imaging Guide Back up your system to a computer running...
... image and any additional files that provides all existing files are erased and system images are installed on the first available boot drive as configured in the BIOS System Boot Device Priority. NOTE: Ensure that you have sufficient memory to install, then click Install. 8 When the ... data from the drive that was imaged. Re-Imaging an FX160 Computer With the a Bootable USB Flash Drive (UFD) The FX160 computer can be at least 64MB larger than your Windows PE image plus any additional applications. 4 Dell OptiPlex FX160 Re-Imaging Guide Back up your system to a computer running...
Dell™ OptiPlex™ FX160 Re-Imaging Guide
Page 7
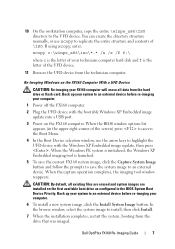
... prompts to save the system image to the UFD device. Back up your computer. 6 To install a new system image, click the Install System Image button. Dell OptiPlex FX160 Re-Imaging Guide 7 If using xcopy, enter: xcopy c:\winpe_x86\iso\*.* /s /e /f f:\ where c is the letter of the UFD device. 11 Remove the UFD device from the... xcopy to highlight the UFD device with the bootable Windows XP Embedded image update into a USB port. 3 Power on the first available boot drive as configured in the BIOS System Boot Device Priority.
... prompts to save the system image to the UFD device. Back up your computer. 6 To install a new system image, click the Install System Image button. Dell OptiPlex FX160 Re-Imaging Guide 7 If using xcopy, enter: xcopy c:\winpe_x86\iso\*.* /s /e /f f:\ where c is the letter of the UFD device. 11 Remove the UFD device from the... xcopy to highlight the UFD device with the bootable Windows XP Embedded image update into a USB port. 3 Power on the first available boot drive as configured in the BIOS System Boot Device Priority.

Dell™ OptiPlex™ FX160 Re-Imaging Guide
Page 11
... Altiris Deployment Server. 5 In the Boot Device selection window, use an automation partition instead of system updates including system image, application software, BIOS updates and configuration, etc. Dell OptiPlex FX160 Re-Imaging Guide 11 c In the Warning window, click Erase and Install Image. A Thin Client Image Tool window will open. CAUTION: When the disk...
... Altiris Deployment Server. 5 In the Boot Device selection window, use an automation partition instead of system updates including system image, application software, BIOS updates and configuration, etc. Dell OptiPlex FX160 Re-Imaging Guide 11 c In the Warning window, click Erase and Install Image. A Thin Client Image Tool window will open. CAUTION: When the disk...
Migrating to 2 GB Microsoft Windows XP Embedded Image Tech Sheet
Page 2
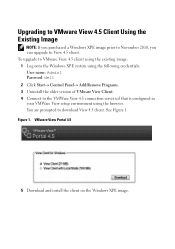
... XPE image prior to November 2010, you can upgrade to the VMWare View 4.5 connection server url that is configured in your VMWare View setup environment using the following credentials: User name: Admin1 Password: dell 2 Click Start Control PanelAdd/Remove Programs. 3 Uninstall the older version of VMware View Client...
... XPE image prior to November 2010, you can upgrade to the VMWare View 4.5 connection server url that is configured in your VMWare View setup environment using the following credentials: User name: Admin1 Password: dell 2 Click Start Control PanelAdd/Remove Programs. 3 Uninstall the older version of VMware View Client...
Migrating to 2 GB Microsoft Windows XP Embedded Image Tech Sheet
Page 3
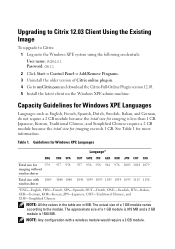
... a 1 GB module varies according to the module. The approximate size of a 1 GB module is 975 MB and a 2 GB module is less than 1 GB. NOTE: Any configuration with 1069 1040 1040 1041 1039 1039 1033 1054 1095 1115 1156 wireless driver *ENG-English, FRN-French, SPA-Spanish, DUT-Dutch, SWE-Swedish, ITN... 12.03 Client Using the Existing Image To upgrade to Citrix: 1 Log onto the Windows XPE system using the following credentials: User name: Admin1 Password: dell 2 Click Start Control PanelAdd/Remove Programs. 3 Uninstall the older version of Citrix online plug-in MB.
... a 1 GB module varies according to the module. The approximate size of a 1 GB module is 975 MB and a 2 GB module is less than 1 GB. NOTE: Any configuration with 1069 1040 1040 1041 1039 1039 1033 1054 1095 1115 1156 wireless driver *ENG-English, FRN-French, SPA-Spanish, DUT-Dutch, SWE-Swedish, ITN... 12.03 Client Using the Existing Image To upgrade to Citrix: 1 Log onto the Windows XPE system using the following credentials: User name: Admin1 Password: dell 2 Click Start Control PanelAdd/Remove Programs. 3 Uninstall the older version of Citrix online plug-in MB.


