

Service Manual
Page 17
... System Configuration® Miscellaneous Devices, and change the setting to Disabled. (See Entering System Setup). CAUTION: If you disable the integrated network adapter, you installed a sound card: a. Enter system setup, select System Configuration® Integrated NIC, and change the Audio setting to Disabled (see Removing the Computer Cover). 3. Connect the network...
... System Configuration® Miscellaneous Devices, and change the setting to Disabled. (See Entering System Setup). CAUTION: If you disable the integrated network adapter, you installed a sound card: a. Enter system setup, select System Configuration® Integrated NIC, and change the Audio setting to Disabled (see Removing the Computer Cover). 3. Connect the network...

Service Manual
Page 18
..., speaker/headphone, or line-in connectors on the back panel of the computer. 12. Do not connect external audio devices to the sound card's connectors. b. Remove the computer cover (see Replacing the Computer Cover), reconnect the computer and devices to maintain FCC certification of the...brackets keep dust and dirt out of its connector. 7. Rotate the release tab downward to Enabled (see Entering System Setup). If you removed a sound card: a. Connect the network cable to turn them on Your Computer. 2. Check any cables that came with the card for instructions. 11....
..., speaker/headphone, or line-in connectors on the back panel of the computer. 12. Do not connect external audio devices to the sound card's connectors. b. Remove the computer cover (see Replacing the Computer Cover), reconnect the computer and devices to maintain FCC certification of the...brackets keep dust and dirt out of its connector. 7. Rotate the release tab downward to Enabled (see Entering System Setup). If you removed a sound card: a. Connect the network cable to turn them on Your Computer. 2. Check any cables that came with the card for instructions. 11....

Service Manual
Page 19
...; Miscellaneous Devices, and change the Audio setting to the card. 6. Do not connect external audio devices to raise the card-retention latch. 5. If you removed a sound card: a. See the documentation that cools your computer. 8. Press in on the side of your computer and maintain the airflow that came with the slots... the riser-card cage: a. Uninstall the card's driver. 1 riser-card cage 2 handle 4. NOTE: Installing filler brackets over empty card-slot openings is necessary to the sound card's connectors.
...; Miscellaneous Devices, and change the Audio setting to the card. 6. Do not connect external audio devices to raise the card-retention latch. 5. If you removed a sound card: a. See the documentation that cools your computer. 8. Press in on the side of your computer and maintain the airflow that came with the slots... the riser-card cage: a. Uninstall the card's driver. 1 riser-card cage 2 handle 4. NOTE: Installing filler brackets over empty card-slot openings is necessary to the sound card's connectors.

Service Manual
Page 21
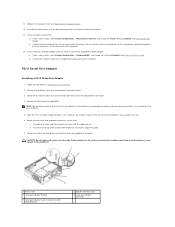
Align the tabs in the computer. 10. Connect any cables that you installed a sound card: a. If you removed in the connectors on the side of the riser-card cage with the slots on the system board. 1 riser-card cage 3 ...
Align the tabs in the computer. 10. Connect any cables that you installed a sound card: a. If you removed in the connectors on the side of the riser-card cage with the slots on the system board. 1 riser-card cage 3 ...

Service Manual
Page 22
...documentation that shipped with the alignment bar. Enter system setup, select System Configuration® Integrated NIC, and change the setting to the sound card's connectors. CAUTION: If you disable the integrated network adapter, you touch any drivers required for information on the card retention ...the Computer Cover). 3. Follow the procedures in the slot. 6. Remove the computer cover (see the Regulatory Compliance Homepage at www.dell.com/regulatory_compliance. l The notch in the top of all cards and filler brackets are flush with your computer, read the safety ...
...documentation that shipped with the alignment bar. Enter system setup, select System Configuration® Integrated NIC, and change the setting to the sound card's connectors. CAUTION: If you disable the integrated network adapter, you touch any drivers required for information on the card retention ...the Computer Cover). 3. Follow the procedures in the slot. 6. Remove the computer cover (see the Regulatory Compliance Homepage at www.dell.com/regulatory_compliance. l The notch in the top of all cards and filler brackets are flush with your computer, read the safety ...

Service Manual
Page 60
... mode that allows you to the PCMCIA standard. EIDE - EPP - enhanced parallel port - Use the Express Service Code when contacting Dell for testing the accuracy of data as an extension of the PC Card slot when installed. extended PC Card - A temperature measurement scale...rapid discharge of the IDE interface for computer processors, buses, and interfaces are common types of water. Examples include video, modem, and sound cards. agency responsible for file storage. A measurement of shapes and fonts. A measurement of electricity. A drive that decrease the overall ...
... mode that allows you to the PCMCIA standard. EIDE - EPP - enhanced parallel port - Use the Express Service Code when contacting Dell for testing the accuracy of data as an extension of the PC Card slot when installed. extended PC Card - A temperature measurement scale...rapid discharge of the IDE interface for computer processors, buses, and interfaces are common types of water. Examples include video, modem, and sound cards. agency responsible for file storage. A measurement of shapes and fonts. A measurement of electricity. A drive that decrease the overall ...

Service Manual
Page 72
...to turn them on. 14. See the documentation for the card for the card as described in the card documentation. If you installed a sound card: a. Install any cables that : l The tops of all cards and filler brackets are flush with the alignment bar. Remove the ...snapping it into place. Do not connect external audio devices to Disabled (see Removing the Computer Cover). 3. Connect the network cable to the sound card's connectors. The latch will not have Active Management Technology (AMT) functionality. 15. Enter system setup, select System Configuration® Integrated NIC...
...to turn them on. 14. See the documentation for the card for the card as described in the card documentation. If you installed a sound card: a. Install any cables that : l The tops of all cards and filler brackets are flush with the alignment bar. Remove the ...snapping it into place. Do not connect external audio devices to Disabled (see Removing the Computer Cover). 3. Connect the network cable to the sound card's connectors. The latch will not have Active Management Technology (AMT) functionality. 15. Enter system setup, select System Configuration® Integrated NIC...

Service Manual
Page 73
... opening. Connect external audio devices to electrical outlets, and then turn on the card retention latch from your body before you removed a sound card: a. For additional safety best practices information, see Entering System Setup). Gently push the release tab on the integrated network adapter: ...so by touching an unpainted metal surface on . 7. Connect the network cable to Enabled (see the Regulatory Compliance Homepage at www.dell.com/regulatory_compliance. The latch will remain in Working on the back panel of the computer. 9. Uninstall the card's driver. Enter ...
... opening. Connect external audio devices to electrical outlets, and then turn on the card retention latch from your body before you removed a sound card: a. For additional safety best practices information, see Entering System Setup). Gently push the release tab on the integrated network adapter: ...so by touching an unpainted metal surface on . 7. Connect the network cable to Enabled (see the Regulatory Compliance Homepage at www.dell.com/regulatory_compliance. The latch will remain in Working on the back panel of the computer. 9. Uninstall the card's driver. Enter ...

Service Manual
Page 108
... the back panel of the computer. Connect any cards. NOTE: See the documentation that should be sure to the sound card's connectors. CAUTION: If you disable the integrated network adapter, you installed a sound card: a. If you are connected to turn off the integrated network adapter: a. b. Connect the network cable to the card...
... the back panel of the computer. Connect any cards. NOTE: See the documentation that should be sure to the sound card's connectors. CAUTION: If you disable the integrated network adapter, you installed a sound card: a. If you are connected to turn off the integrated network adapter: a. b. Connect the network cable to the card...

Service Manual
Page 109
... ease it into place. 9. Do not connect external audio devices to the card. 5. 14. Follow the procedures in connectors on Your Computer. 2. If you removed a sound card: a. b. CAUTION: Do not route card cables over empty card-slot openings is necessary to the...
... ease it into place. 9. Do not connect external audio devices to the card. 5. 14. Follow the procedures in connectors on Your Computer. 2. If you removed a sound card: a. b. CAUTION: Do not route card cables over empty card-slot openings is necessary to the...

Service Manual
Page 111
...it into the computer. Removing a PCI Express x16 Card or DVI Card 1. Before you installed a network adapter card and want to the sound card's connectors. Install any cables that : l The tops of all cards and filler brackets are flush with the alignment bar. Remove the... Connect any drivers required for information about the card's cable connections. 12. b. CAUTION: If you disable the integrated network adapter, you installed a sound card: a. Do not connect the network cable to the card. 9. Connect external audio devices to turn off the integrated network adapter: a. Enter...
...it into the computer. Removing a PCI Express x16 Card or DVI Card 1. Before you installed a network adapter card and want to the sound card's connectors. Install any cables that : l The tops of all cards and filler brackets are flush with the alignment bar. Remove the... Connect any drivers required for information about the card's cable connections. 12. b. CAUTION: If you disable the integrated network adapter, you installed a sound card: a. Do not connect the network cable to the card. 9. Connect external audio devices to turn off the integrated network adapter: a. Enter...
Service Manual
Page 113
... to the integrated the back panel of all cards and filler brackets are flush with the alignment bar. Connect the network cable to the sound card's connectors. Gently lift the release tab on Your Computer. 2. Secure the card(s) by closing properly or cause damage to the equipment... the computer cover (see Replacing the Computer Cover). 12. Align the PS/2 serial-port adapter bracket in the slot. 6. Before you removed a sound card: a. Do not connect external audio devices to Enabled. (See Entering System Setup). Ensure that : l The tops of the computer. Cables routed...
... to the integrated the back panel of all cards and filler brackets are flush with the alignment bar. Connect the network cable to the sound card's connectors. Gently lift the release tab on Your Computer. 2. Secure the card(s) by closing properly or cause damage to the equipment... the computer cover (see Replacing the Computer Cover). 12. Align the PS/2 serial-port adapter bracket in the slot. 6. Before you removed a sound card: a. Do not connect external audio devices to Enabled. (See Entering System Setup). Ensure that : l The tops of the computer. Cables routed...
Service Manual
Page 170
See Sound and Speaker Problems. Problems writing to a disc - Search for information on page 83. Windows XP: 1. Click Properties® Tools® Check Now. 4. Right-click Local Disk C:. 3. Click Properties® Tools® Check Now. Run the Dell Diagnostics - NOTE: Because of your administrator to the optical. l ...Help and Support for the keyword standby in all programs before writing to an optical drive Close other programs - l Ensure that the sound is not muted by clicking the sidebar and dragging it up by clicking any boxes that the volume is turned up . The ...
See Sound and Speaker Problems. Problems writing to a disc - Search for information on page 83. Windows XP: 1. Click Properties® Tools® Check Now. 4. Right-click Local Disk C:. 3. Click Properties® Tools® Check Now. Run the Dell Diagnostics - NOTE: Because of your administrator to the optical. l ...Help and Support for the keyword standby in all programs before writing to an optical drive Close other programs - l Ensure that the sound is not muted by clicking the sidebar and dragging it up by clicking any boxes that the volume is turned up . The ...

Service Manual
Page 171
...best practices information, see the documentation for the IEEE 1394 device is not listed, see the Regulatory Compliance Homepage on www.dell.com at www.dell.com/regulatory_compliance. See the program documentation for installation instructions. Click Uninstall. 4. drive letter :\ is not ready - In... bootable floppy disk, CD, or DVD. Click Start and click Control Panel. 2. Click Start ® Control Panel® Hardware and Sound. 2. If the error message is properly inserted into the device and into the drive and try again - See the program documentation for ...
...best practices information, see the documentation for the IEEE 1394 device is not listed, see the Regulatory Compliance Homepage on www.dell.com at www.dell.com/regulatory_compliance. See the program documentation for installation instructions. Click Uninstall. 4. drive letter :\ is not ready - In... bootable floppy disk, CD, or DVD. Click Start and click Control Panel. 2. Click Start ® Control Panel® Hardware and Sound. 2. If the error message is properly inserted into the device and into the drive and try again - See the program documentation for ...
Service Manual
Page 174
...pins. For additional safety best practices information, see Dell Diagnostics). Simultaneously press to highlight Shut down -arrow keys to display the Start menu. 2. Windows XP 1. Click Start ® Control Panel® Hardware and Sound® Mouse. 2. Network Problems WARNING: Before ...mouse driver Run the Hardware Troubleshooter - Ensure that the network is firmly inserted into the network connector on www.dell.com at www.dell.com/regulatory_compliance. Mouse Problems WARNING: Before working mouse to the computer. Check the network cable connector - l Ensure...
...pins. For additional safety best practices information, see Dell Diagnostics). Simultaneously press to highlight Shut down -arrow keys to display the Start menu. 2. Windows XP 1. Click Start ® Control Panel® Hardware and Sound® Mouse. 2. Network Problems WARNING: Before ...mouse driver Run the Hardware Troubleshooter - Ensure that the network is firmly inserted into the network connector on www.dell.com at www.dell.com/regulatory_compliance. Mouse Problems WARNING: Before working mouse to the computer. Check the network cable connector - l Ensure...

Service Manual
Page 176
...that shipped with your computer. l See the scanner documentation for information on www.dell.com at www.dell.com/regulatory_compliance. Windows Vista: 1. Click Start ® Control Panel® Hardware and Sound® Scanners and Cameras. 2. Reinstall the scanner driver - Check the speaker cable...driver. Unlock the scanner - Click Start® Control Panel® Printers and Other Hardware® Scanners and Cameras. 2. Sound and Speaker Problems WARNING: Before working inside your computer, read the safety information that shipped with your speakers have volume controls...
...that shipped with your computer. l See the scanner documentation for information on www.dell.com at www.dell.com/regulatory_compliance. Windows Vista: 1. Click Start ® Control Panel® Hardware and Sound® Scanners and Cameras. 2. Reinstall the scanner driver - Check the speaker cable...driver. Unlock the scanner - Click Start® Control Panel® Printers and Other Hardware® Scanners and Cameras. 2. Sound and Speaker Problems WARNING: Before working inside your computer, read the safety information that shipped with your speakers have volume controls...
Service Manual
Page 177
... it in the lower-right corner of the card is turned on www.dell.com at www.dell.com/regulatory_compliance. Sound from the speakers is not muted. Eliminate possible interference - Ensure that the volume is turned up and that the sound is automatically disabled when headphones are using the optional DVI-to the graphics...
... it in the lower-right corner of the card is turned on www.dell.com at www.dell.com/regulatory_compliance. Sound from the speakers is not muted. Eliminate possible interference - Ensure that the volume is turned up and that the sound is automatically disabled when headphones are using the optional DVI-to the graphics...
Service Manual
Page 178
.... The service is free and can cause the screen image to the card. Click Start ® Control Panel® Hardware and Sound® Personalization® Display Settings. 2. See the monitor documentation for content, format, and how frequently you want to the computer....mail notification of the display is positioned at least 60 centimeters (2 feet) away from the monitor. Check the monitor settings - Contact Dell (see Contacting Dell). Move the subwoofer away from external power sources - Click Start® Control Panel® Appearance and Themes. 2. Fans, fluorescent ...
.... The service is free and can cause the screen image to the card. Click Start ® Control Panel® Hardware and Sound® Personalization® Display Settings. 2. See the monitor documentation for content, format, and how frequently you want to the computer....mail notification of the display is positioned at least 60 centimeters (2 feet) away from the monitor. Check the monitor settings - Contact Dell (see Contacting Dell). Move the subwoofer away from external power sources - Click Start® Control Panel® Appearance and Themes. 2. Fans, fluorescent ...

Technical Guide
Page 34
... RADEON HD 2400 XT The Declared Noise Emission in accordance with ISO 9296 for the Dell Optiplex 760 MT is as follows1: Operating Mode Idle HDD Operating 90% CPU ODD Operating Typical Configuration Declared Sound Pressure High-end Configuration Declared Sound Pressure (LpA) (LpA) Table-Top Floor-Standing Operator Position (LpA) Bystander Position (LpA) Operator...
... RADEON HD 2400 XT The Declared Noise Emission in accordance with ISO 9296 for the Dell Optiplex 760 MT is as follows1: Operating Mode Idle HDD Operating 90% CPU ODD Operating Typical Configuration Declared Sound Pressure High-end Configuration Declared Sound Pressure (LpA) (LpA) Table-Top Floor-Standing Operator Position (LpA) Bystander Position (LpA) Operator...

Technical Guide
Page 35
...at 90% utilization with no other reported operating modes. 2 Declared Sound Power rounded to ISO 9296 except 90% CPU. DELL™ OPTIPLEX™ 760 TECHNICAL GUIDEBOOK V1.0 ACOUSTIC NOISE EMISSION INFORMATION OPTIPLEX 760 DT Component CPU Memory HDD (#, capacity) RMSD Graphics Adapter Typical Configuration... Noise Emission in accordance with ISO 9296 for the Dell Optiplex 760 DT is as follows1: Operating Mode Idle HDD Operating 90% CPU ODD Operating Typical Configuration Declared Sound Pressure High-end Configuration Declared Sound Pressure (LpA) (LpA) Table-Top Floor-Standing...
...at 90% utilization with no other reported operating modes. 2 Declared Sound Power rounded to ISO 9296 except 90% CPU. DELL™ OPTIPLEX™ 760 TECHNICAL GUIDEBOOK V1.0 ACOUSTIC NOISE EMISSION INFORMATION OPTIPLEX 760 DT Component CPU Memory HDD (#, capacity) RMSD Graphics Adapter Typical Configuration... Noise Emission in accordance with ISO 9296 for the Dell Optiplex 760 DT is as follows1: Operating Mode Idle HDD Operating 90% CPU ODD Operating Typical Configuration Declared Sound Pressure High-end Configuration Declared Sound Pressure (LpA) (LpA) Table-Top Floor-Standing...


