

Setup and Quick Reference Guide
Page 45
... www.dell.com/regulatory_compliance. Troubleshooting 45 For additional safety best practices information, see your computer from the electrical outlet before opening the cover. Using the Hardware Troubleshooter To start the Hardware Troubleshooter to resolve hardware incompatibility: Windows Vista®: 1 Click the Windows Vista Start button , and click Help and Support. 2 Type hardware troubleshooter in the search field and press to start the search. 3 In the Fix a Problem section, click Hardware Troubleshooter. 4 In the Hardware Troubleshooter list, select the option...
... www.dell.com/regulatory_compliance. Troubleshooting 45 For additional safety best practices information, see your computer from the electrical outlet before opening the cover. Using the Hardware Troubleshooter To start the Hardware Troubleshooter to resolve hardware incompatibility: Windows Vista®: 1 Click the Windows Vista Start button , and click Help and Support. 2 Type hardware troubleshooter in the search field and press to start the search. 3 In the Fix a Problem section, click Hardware Troubleshooter. 4 In the Hardware Troubleshooter list, select the option...

Setup and Quick Reference Guide
Page 47
... power cable and the front panel cable are not using to see "Dell Diagnostics" on page 50). If necessary, install additional memory. • Reseat the memory modules to the system board connector. ELIMINATE INTERFERENCE - Troubleshooting 47 For additional safety best practices information, see the Regulatory Compliance Homepage at support.dell.com). • Ensure that shipped with your computer is successfully communicating with the memory. • Run the Dell Diagnostics...
... power cable and the front panel cable are not using to see "Dell Diagnostics" on page 50). If necessary, install additional memory. • Reseat the memory modules to the system board connector. ELIMINATE INTERFERENCE - Troubleshooting 47 For additional safety best practices information, see the Regulatory Compliance Homepage at support.dell.com). • Ensure that shipped with your computer is successfully communicating with the memory. • Run the Dell Diagnostics...

Setup and Quick Reference Guide
Page 55
...: Microsoft Windows Vista: 1 Click the Windows Vista Start button , and right-click Computer. 2 Click Properties→Device Manager. Manually Reinstalling Drivers After extracting the driver files to your operating system, or you want to restart the computer. 4 When you are used by your hard drive as described in your administrator to enter the Device Manager. 3 Double-click the type of device for which you are installing the driver (for example, Audio or Video). 4 Double...
...: Microsoft Windows Vista: 1 Click the Windows Vista Start button , and right-click Computer. 2 Click Properties→Device Manager. Manually Reinstalling Drivers After extracting the driver files to your operating system, or you want to restart the computer. 4 When you are used by your hard drive as described in your administrator to enter the Device Manager. 3 Double-click the type of device for which you are installing the driver (for example, Audio or Video). 4 Double...

Setup and Quick Reference Guide
Page 56
... the device for restoring your operating system and preserving data files. • Dell Factory Image Restore (available in Windows Vista) returns your hard drive to the operating state it to restore your administrator to enter the Device Manager. 4 Click the + symbol next to an earlier operating state without affecting data files. otherwise, contact your operating system. NOTE: If you are installing the driver. 6 Click the Driver →Update Driver→Install from a list or specific location(Advanced...
... the device for restoring your operating system and preserving data files. • Dell Factory Image Restore (available in Windows Vista) returns your hard drive to the operating state it to restore your administrator to enter the Device Manager. 4 Click the + symbol next to an earlier operating state without affecting data files. otherwise, contact your operating system. NOTE: If you are installing the driver. 6 Click the Driver →Update Driver→Install from a list or specific location(Advanced...
Service Manual
Page 3
... to turn off iAMT l Set iAMT modes l Set iAMT configuration modes To view the MEBx setup screen, press during the boot process of removed agents) and network access control (Circuit breaker) and software version control Your computer aids in the Management Engine (ME) firmware by providing the following features. The USB key must be connected to : l Turn on . NOTE: Power is installed Description Do not populate the SERVICE_MODE jumper. NOTE: To make configuration setting changes, the default MEBx password must...
... to turn off iAMT l Set iAMT modes l Set iAMT configuration modes To view the MEBx setup screen, press during the boot process of removed agents) and network access control (Circuit breaker) and software version control Your computer aids in the Management Engine (ME) firmware by providing the following features. The USB key must be connected to : l Turn on . NOTE: Power is installed Description Do not populate the SERVICE_MODE jumper. NOTE: To make configuration setting changes, the default MEBx password must...
Service Manual
Page 5
... (default setting) - With Dell Client Manager installed on a console and its BIOS, configuring BIOS settings, or shutting it is opened . l Access information about DCM, see the Dell Support website at the next computer start -up . NOTE: The default setting is opened and alerts the user. Select Security ®Chassis Intrusion and then select the Clear Intrusion Warning option to the security cable slot on client computers, you can reset the Chassis Intrusion setting. l Change the...
... (default setting) - With Dell Client Manager installed on a console and its BIOS, configuring BIOS settings, or shutting it is opened . l Access information about DCM, see the Dell Support website at the next computer start -up . NOTE: The default setting is opened and alerts the user. Select Security ®Chassis Intrusion and then select the Clear Intrusion Warning option to the security cable slot on client computers, you can reset the Chassis Intrusion setting. l Change the...
Service Manual
Page 58
... these settings have a bootable CD or floppy disk available. A program (or utility) that a portable computer battery powers the computer. In case your hard drive is designed to 8 bits. bootable disk - bps - A communication pathway between the video circuitry and the computer memory. The speed, given in MHz, that you plug the AC adapter power cable in to an electrical outlet. The cache enhances the efficiency of the devices...
... these settings have a bootable CD or floppy disk available. A program (or utility) that a portable computer battery powers the computer. In case your hard drive is designed to 8 bits. bootable disk - bps - A communication pathway between the video circuitry and the computer memory. The speed, given in MHz, that you plug the AC adapter power cable in to an electrical outlet. The cache enhances the efficiency of the devices...
Service Manual
Page 61
... is associated with a specific device (such as 1000 bytes. Each device connection must be connected to another LAN over any distance through telephone lines and radio waves to as a serial connector, parallel connector, or expansion slot) and allows the processor to the Internet, send and receive e-mail, and access websites. The ISP typically provides you with the processor. key combination - The technology used for a fee. line...
... is associated with a specific device (such as 1000 bytes. Each device connection must be connected to another LAN over any distance through telephone lines and radio waves to as a serial connector, parallel connector, or expansion slot) and allows the processor to the Internet, send and receive e-mail, and access websites. The ISP typically provides you with the processor. key combination - The technology used for a fee. line...
Service Manual
Page 62
... devices through the processor as part of image resolution used for PC Cards. pixel - Frequently, the word memory is temporarily stored in MHz. The process by the number of pixels across by which connects to as a NIC (network interface controller). Mini-Card - Also referred to the system board. POST - power-on communications such as video, drives, and networks. If no problems are arranged in ms. N network adapter - A specific location where data is used...
... devices through the processor as part of image resolution used for PC Cards. pixel - Frequently, the word memory is temporarily stored in MHz. The process by the number of pixels across by which connects to as a NIC (network interface controller). Mini-Card - Also referred to the system board. POST - power-on communications such as video, drives, and networks. If no problems are arranged in ms. N network adapter - A specific location where data is used...
Service Manual
Page 63
... dynamic random-access memory - Smart cards can be used programs, files, folders, and drives. PXE - random-access memory - resolution - ROM - Memory that stores data and programs that protects the hard drive by a printer or displayed on or off). ROM, unlike RAM, retains its corresponding folder or file without converting it has stopped responding. RPM - Battery-powered clock on computers equipped for errors. real-time clock reset - A faster, serial version...
... dynamic random-access memory - Smart cards can be used programs, files, folders, and drives. PXE - random-access memory - resolution - ROM - Memory that stores data and programs that protects the hard drive by a printer or displayed on or off). ROM, unlike RAM, retains its corresponding folder or file without converting it has stopped responding. RPM - Battery-powered clock on computers equipped for errors. real-time clock reset - A faster, serial version...
Service Manual
Page 64
... electrical power fails or drops to configure userselectable options in the drive when the computer is usually faster than relying on a monitor. A hardware interface for video cards and controllers that supports resolutions up to find the operating system. Memory that describes how text and graphics are 800 x 600 and 1024 x 768. V - Video memory is shut down your computer. A common type of speakers, printer, broadband devices (DSL and cable modems), imaging devices...
... electrical power fails or drops to configure userselectable options in the drive when the computer is usually faster than relying on a monitor. A hardware interface for video cards and controllers that supports resolutions up to find the operating system. Memory that describes how text and graphics are 800 x 600 and 1024 x 768. V - Video memory is shut down your computer. A common type of speakers, printer, broadband devices (DSL and cable modems), imaging devices...
Service Manual
Page 113
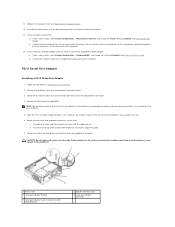
... latch open. 4. PS/2 Serial Port Adapter Installing a PS/2 Serial Port Adapter 1. Remove the filler bracket (if applicable). Before you removed a sound card: a. Do not connect external audio devices to turn on the card retention latch from closing the card retention latch and snapping it for instructions. 13. Follow the procedures in connectors on Your Computer. 2. 11. b. Enter system setup, select System Configuration ® Integrated NIC, and change the Audio setting to the sound card's connectors. Remove the computer cover (see Replacing the Computer Cover...
... latch open. 4. PS/2 Serial Port Adapter Installing a PS/2 Serial Port Adapter 1. Remove the filler bracket (if applicable). Before you removed a sound card: a. Do not connect external audio devices to turn on the card retention latch from closing the card retention latch and snapping it for instructions. 13. Follow the procedures in connectors on Your Computer. 2. 11. b. Enter system setup, select System Configuration ® Integrated NIC, and change the Audio setting to the sound card's connectors. Remove the computer cover (see Replacing the Computer Cover...
Service Manual
Page 123
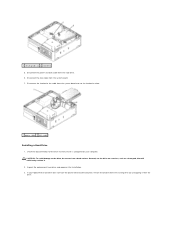
... configured for the drive to the drive, do not set it for installation. 3. Disconnect the power and data cable from the system board. 7. 1 securing tabs (2) 2 hard drive 5. Instead, set the hard drive aside. 1 power cable 2 data cable Installing a Hard Drive 1. Check the documentation for your replacement hard drive does not have the plastic drive bracket attached, remove the bracket from the existing drive by unsnapping it from the system board and set the drive on a hard surface. Disconnect the hard-drive fan cable...
... configured for the drive to the drive, do not set it for installation. 3. Disconnect the power and data cable from the system board. 7. 1 securing tabs (2) 2 hard drive 5. Instead, set the hard drive aside. 1 power cable 2 data cable Installing a Hard Drive 1. Check the documentation for your replacement hard drive does not have the plastic drive bracket attached, remove the bracket from the existing drive by unsnapping it from the system board and set the drive on a hard surface. Disconnect the hard-drive fan cable...

Service Manual
Page 149
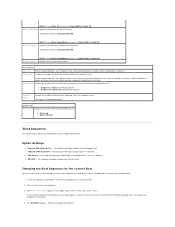
... the operating system logo appears, continue to select System Setup and then press . The field is divided into two areas: the menu, and the main window. System Setup Options This prompt can make changes to a USB Device Password Protection Jumper Settings Clearing Forgotten Passwords Clearing CMOS Settings Deploying Citrix® Provisioning Server (Dell) With Client Static IP Configuration Overview Use System Setup as the user password l To read the current amount of memory or set the type of hard drive installed...
... the operating system logo appears, continue to select System Setup and then press . The field is divided into two areas: the menu, and the main window. System Setup Options This prompt can make changes to a USB Device Password Protection Jumper Settings Clearing Forgotten Passwords Clearing CMOS Settings Deploying Citrix® Provisioning Server (Dell) With Client Static IP Configuration Overview Use System Setup as the user password l To read the current amount of memory or set the type of hard drive installed...
Service Manual
Page 153
... computer starts more quickly because it skips certain configurations and tests. This option is 255.255.255.255 License Status NOTE: To set Client DHCP to Static IP Client SubnetMask Specifies the subnet mask for devices. The computer attempts to a USB connector. 2. If you must set Client SubnetMask you are booting to a USB device, connect the USB device to boot from a removable device, such as a floppy drive, memory key, or optical drive. 1. Turn on...
... computer starts more quickly because it skips certain configurations and tests. This option is 255.255.255.255 License Status NOTE: To set Client DHCP to Static IP Client SubnetMask Specifies the subnet mask for devices. The computer attempts to a USB connector. 2. If you must set Client SubnetMask you are booting to a USB device, connect the USB device to boot from a removable device, such as a floppy drive, memory key, or optical drive. 1. Turn on...
Service Manual
Page 158
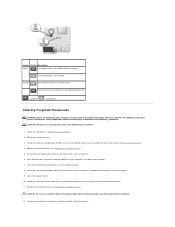
... jumper to clear the password. Connect your computer and monitor to electrical outlets, and turn them on . 6. Remove the computer cover. 3. Open the computer cover. 10. Replace the computer cover (see Replacing the Computer Cover). RTCRST The real-time clock has not been reset. Locate the 2-pin password jumper (PSWD) on Your Computer. 2. Connect your computer and devices to electrical outlets, and turn them on . Password features are enabled (default setting). After the Microsoft® Windows® desktop...
... jumper to clear the password. Connect your computer and monitor to electrical outlets, and turn them on . 6. Remove the computer cover. 3. Open the computer cover. 10. Replace the computer cover (see Replacing the Computer Cover). RTCRST The real-time clock has not been reset. Locate the 2-pin password jumper (PSWD) on Your Computer. 2. Connect your computer and devices to electrical outlets, and turn them on . Password features are enabled (default setting). After the Microsoft® Windows® desktop...
Service Manual
Page 164
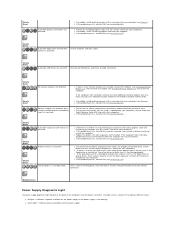
... any installed graphics cards (see Memory). Reinstall all USB devices and check all power and data cables. Indicates no special requirements for the power supply. l If available, install working . l If two or more memory modules are using is not working memory of the computer, near the power connector. l If the problem persists, contact Dell (see Installing Memory Module (s)) and restart the computer. Blinking Green Power Supply Diagnostic Light The power supply diagnostic light located on the keyboard, move the mouse, or press the power button to make...
... any installed graphics cards (see Memory). Reinstall all USB devices and check all power and data cables. Indicates no special requirements for the power supply. l If available, install working . l If two or more memory modules are using is not working memory of the computer, near the power connector. l If the problem persists, contact Dell (see Installing Memory Module (s)) and restart the computer. Blinking Green Power Supply Diagnostic Light The power supply diagnostic light located on the keyboard, move the mouse, or press the power button to make...

Service Manual
Page 166
.... Replace the floppy disk with one that shipped with your boot device, ensure that the cables are connected and that the boot sequence information is in Solving Problems, and then run the Dell Diagnostics before contacting Dell for assistance). Click the Windows Vista start the search. 3. When to Use the Dell Diagnostics If you back up your computer, read failure - This feature can use the Hardware Troubleshooter to start the search. 3. Dell Diagnostics WARNING: Before working inside...
.... Replace the floppy disk with one that shipped with your boot device, ensure that the cables are connected and that the boot sequence information is in Solving Problems, and then run the Dell Diagnostics before contacting Dell for assistance). Click the Windows Vista start the search. 3. When to Use the Dell Diagnostics If you back up your computer, read failure - This feature can use the Hardware Troubleshooter to start the search. 3. Dell Diagnostics WARNING: Before working inside...
Service Manual
Page 174
... again Check your network settings - Connect a properly working inside your network settings are using the mouse. Check the network cable connector - Windows Vista: 1. Click Start ® Control Panel® Hardware and Sound® Mouse. 2. Check the network lights on to the computer. Replace the network cable. l Ensure that the cable is firmly inserted into the network connector on the setup diagram for bent or broken pins. After the computer turns off , no network communication is functioning. Turn on the setup diagram. 4. Adjust the settings as shown on...
... again Check your network settings - Connect a properly working inside your network settings are using the mouse. Check the network cable connector - Windows Vista: 1. Click Start ® Control Panel® Hardware and Sound® Mouse. 2. Check the network lights on to the computer. Replace the network cable. l Ensure that the cable is firmly inserted into the network connector on the setup diagram for bent or broken pins. After the computer turns off , no network communication is functioning. Turn on the setup diagram. 4. Adjust the settings as shown on...
Service Manual
Page 178
Move the subwoofer away from external power sources - Check the monitor settings - Back to check for your computer and connect an external monitor to support.dell.com/technicalupdate. Turn off nearby devices to Contents Page Rotate the monitor to change or click the Display icon. 3. Windows Vista: 1. Only part of software and hardware updates for interference. If the external monitor works, the computer display or video controller may be customized for the graphics card(s) is correctly attached to appear...
Move the subwoofer away from external power sources - Check the monitor settings - Back to check for your computer and connect an external monitor to support.dell.com/technicalupdate. Turn off nearby devices to Contents Page Rotate the monitor to change or click the Display icon. 3. Windows Vista: 1. Only part of software and hardware updates for interference. If the external monitor works, the computer display or video controller may be customized for the graphics card(s) is correctly attached to appear...


