

Setup and Quick Reference Guide
Page 7
Front View 1 2 3 4 5 11 10 98 76 1 optical drive 3 USB 2.0 connectors (2) 5 power button, power light 7 network-connectivity light 9 headphone connector 11 floppy drive or Media Card Reader (optional) 2 optical-drive eject button 4 hard-drive activity light 6 diagnostic lights (4) 8 microphone connector 10 optional floppy drive eject button About Your Computer 7 About Your Computer Desktop -
Front View 1 2 3 4 5 11 10 98 76 1 optical drive 3 USB 2.0 connectors (2) 5 power button, power light 7 network-connectivity light 9 headphone connector 11 floppy drive or Media Card Reader (optional) 2 optical-drive eject button 4 hard-drive activity light 6 diagnostic lights (4) 8 microphone connector 10 optional floppy drive eject button About Your Computer 7 About Your Computer Desktop -
Setup and Quick Reference Guide
Page 10
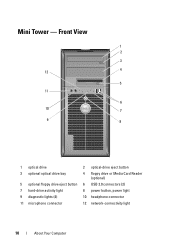
Front View 1 2 3 4 12 5 11 6 10 7 9 8 1 optical drive 3 optional optical drive bay 5 optional floppy drive eject button 7 hard-drive activity light 9 diagnostic lights (4) 11 microphone connector 2 optical-drive eject button 4 floppy drive or Media Card Reader (optional) 6 USB 2.0 connectors (2) 8 power button, power light 10 headphone connector 12 network-connectivity light 10 About Your Computer Mini Tower -
Front View 1 2 3 4 12 5 11 6 10 7 9 8 1 optical drive 3 optional optical drive bay 5 optional floppy drive eject button 7 hard-drive activity light 9 diagnostic lights (4) 11 microphone connector 2 optical-drive eject button 4 floppy drive or Media Card Reader (optional) 6 USB 2.0 connectors (2) 8 power button, power light 10 headphone connector 12 network-connectivity light 10 About Your Computer Mini Tower -

Setup and Quick Reference Guide
Page 13
Front View 1 2 3 4 5 6 11 10 9 8 7 1 optical drive 2 optical-drive eject button 3 USB 2.0 connectors (2) 4 network-connectivity light 5 diagnostic lights (4) 6 hard-drive activity light 7 power button, power light 8 microphone connector 9 headphone connector 10 optional floppy drive eject button 11 floppy drive or Media Card Reader (optional) About Your Computer 13 Small Form Factor -
Front View 1 2 3 4 5 6 11 10 9 8 7 1 optical drive 2 optical-drive eject button 3 USB 2.0 connectors (2) 4 network-connectivity light 5 diagnostic lights (4) 6 hard-drive activity light 7 power button, power light 8 microphone connector 9 headphone connector 10 optional floppy drive eject button 11 floppy drive or Media Card Reader (optional) About Your Computer 13 Small Form Factor -

Setup and Quick Reference Guide
Page 15
Ultra Small Form Factor - Back View 1 2 3 6 1 diagnostic lights (4) 3 security cable slot 5 power connector 5 4 2 cover release knob 4 back-panel connectors 6 air vent About Your Computer 15 Front View 1 2 34 98 1 USB 2.0 connectors (2) 3 hard drive activity light 5 air vents 7 optical drive 9 air vents 76 5 2 microphone connector 4 power button, power light 6 optical-drive eject button 8 headphone connector Ultra Small Form Factor -
Ultra Small Form Factor - Back View 1 2 3 6 1 diagnostic lights (4) 3 security cable slot 5 power connector 5 4 2 cover release knob 4 back-panel connectors 6 air vent About Your Computer 15 Front View 1 2 34 98 1 USB 2.0 connectors (2) 3 hard drive activity light 5 air vents 7 optical drive 9 air vents 76 5 2 microphone connector 4 power button, power light 6 optical-drive eject button 8 headphone connector Ultra Small Form Factor -

Setup and Quick Reference Guide
Page 38
... one two one up to two one up to two 5.25-inch drives one 5.25-inch drive one slimline drive one D-module drive one one one slimline drive one D-module floppy drive 38 Specifications Drives (continued) 3.5-inch drive bay mini tower and desktop 3.5-inch slimline bay small form factor 3.5-inch... D-module bay ultra small form factor Internally accessible: 3.5-inch SATA drive bays mini tower desktop, small form factor, and ultra small form factor Available devices: 3.5-inch SATA hard drives mini tower desktop, small form factor, and ultra small form SATA DVD-ROM/ DVD+/-...
... one two one up to two one up to two 5.25-inch drives one 5.25-inch drive one slimline drive one D-module drive one one one slimline drive one D-module floppy drive 38 Specifications Drives (continued) 3.5-inch drive bay mini tower and desktop 3.5-inch slimline bay small form factor 3.5-inch... D-module bay ultra small form factor Internally accessible: 3.5-inch SATA drive bays mini tower desktop, small form factor, and ultra small form factor Available devices: 3.5-inch SATA hard drives mini tower desktop, small form factor, and ultra small form SATA DVD-ROM/ DVD+/-...

Setup and Quick Reference Guide
Page 41
... indicates that the computer is not detecting a physical connection to the SATA hard drive or CD/DVD. Connectors (continued) Processor fan mini tower, desktop, and small form factor ultra small form factor Hard-drive fan small form factor ultra small form factor Front panel control Processor Power...pin connector one 4-pin connector one 24-pin connector Controls and Lights Front of computer: Power button push button Power light green light - Drive activity light green light - A good connection exists between the network and the computer. off (no light) - Blinking green in sleep ...
... indicates that the computer is not detecting a physical connection to the SATA hard drive or CD/DVD. Connectors (continued) Processor fan mini tower, desktop, and small form factor ultra small form factor Hard-drive fan small form factor ultra small form factor Front panel control Processor Power...pin connector one 4-pin connector one 24-pin connector Controls and Lights Front of computer: Power button push button Power light green light - Drive activity light green light - A good connection exists between the network and the computer. off (no light) - Blinking green in sleep ...

Setup and Quick Reference Guide
Page 50
...change the boot sequence for one time only. Starting the Dell Diagnostics From Your Hard Drive 1 Ensure that no diagnostics utility partition has been found, run the Dell Diagnostics from the diagnostics utility partition on your hard drive, and follow the instructions on (or restart) your ...computer. NOTE: If you see the Regulatory Compliance Homepage at www.dell.com/regulatory_compliance. When the DELL logo appears, press immediately...
...change the boot sequence for one time only. Starting the Dell Diagnostics From Your Hard Drive 1 Ensure that no diagnostics utility partition has been found, run the Dell Diagnostics from the diagnostics utility partition on your hard drive, and follow the instructions on (or restart) your ...computer. NOTE: If you see the Regulatory Compliance Homepage at www.dell.com/regulatory_compliance. When the DELL logo appears, press immediately...

Setup and Quick Reference Guide
Page 55
The drivers that are used by your media drive directory to display the media contents, and then double-click the autorcd.exe file. 3 When the InstallShield... to reinstall and follow the prompts on the computer, click Continue; NOTE: The User Account Control window appears. otherwise, contact your hard drive as described in your system window. 6 Click the driver that came with the specific device. 2 When the Drivers and Utilities media...of device for which you see the Windows desktop, reinsert the Drivers and Utilities media. 5 At the Welcome Dell System Owner screen, click Next.
The drivers that are used by your media drive directory to display the media contents, and then double-click the autorcd.exe file. 3 When the InstallShield... to reinstall and follow the prompts on the computer, click Continue; NOTE: The User Account Control window appears. otherwise, contact your hard drive as described in your system window. 6 Click the driver that came with the specific device. 2 When the Drivers and Utilities media...of device for which you see the Windows desktop, reinsert the Drivers and Utilities media. 5 At the Welcome Dell System Owner screen, click Next.

Setup and Quick Reference Guide
Page 56
...it was in the following ways: • Microsoft Windows System Restore returns your computer. The program permanently deletes all data on the hard drive. 56 Reinstalling Software NOTE: If you are installing the driver. 6 Click the Driver →Update Driver→Install from a list ...Double-click the name of the device for restoring your operating system and preserving data files. • Dell Factory Image Restore (available in Windows Vista) returns your hard drive to the operating state it to an earlier operating state without affecting data files. However, using the Operating...
...it was in the following ways: • Microsoft Windows System Restore returns your computer. The program permanently deletes all data on the hard drive. 56 Reinstalling Software NOTE: If you are installing the driver. 6 Click the Driver →Update Driver→Install from a list ...Double-click the name of the device for restoring your operating system and preserving data files. • Dell Factory Image Restore (available in Windows Vista) returns your hard drive to the operating state it to an earlier operating state without affecting data files. However, using the Operating...
Setup and Quick Reference Guide
Page 58
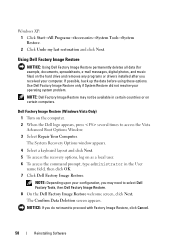
...System Restore. 2 Click Undo my last restoration and click Next. Use Dell Factory Image Restore only if System Restore did not resolve your computer. Dell Factory Image Restore (Windows Vista Only) 1 Turn on the hard drive and removes any programs or drivers installed after you may not be available... in the User name field, then click OK. 7 Click Dell Factory Image Restore. The Confirm Data ...
...System Restore. 2 Click Undo my last restoration and click Next. Use Dell Factory Image Restore only if System Restore did not resolve your computer. Dell Factory Image Restore (Windows Vista Only) 1 Turn on the hard drive and removes any programs or drivers installed after you may not be available... in the User name field, then click OK. 7 Click Dell Factory Image Restore. The Confirm Data ...

Setup and Quick Reference Guide
Page 59
... (Windows XP Only) 1 Turn on . 6 Click Next. During the boot process, a blue bar with www.dell.com appears at the top of the screen. 2 Immediately upon seeing the blue bar, press . The computer restarts. The System Restore screen appears and the .... The restore process begins and may take 5 or more minutes to restart the computer. 5 When prompted, click Yes. If you want to continue reformatting the hard drive and restoring the system software to the factory condition, then click Next. 9 Click the checkbox to confirm that appeared the first time the computer was...
... (Windows XP Only) 1 Turn on . 6 Click Next. During the boot process, a blue bar with www.dell.com appears at the top of the screen. 2 Immediately upon seeing the blue bar, press . The computer restarts. The System Restore screen appears and the .... The restore process begins and may take 5 or more minutes to restart the computer. 5 When prompted, click Yes. If you want to continue reformatting the hard drive and restoring the system software to the factory condition, then click Next. 9 Click the checkbox to confirm that appeared the first time the computer was...

Setup and Quick Reference Guide
Page 60
... Restore (Windows XP Only)" on to the computer as a local administrator. 2 In Microsoft Windows Explorer, go to gain additional hard drive space. After you have removed Dell PC Restore, you will not be able to return your computer operating system to its original state. 1 Log on page 59) NOTICE: Before performing the ...
... Restore (Windows XP Only)" on to the computer as a local administrator. 2 In Microsoft Windows Explorer, go to gain additional hard drive space. After you have removed Dell PC Restore, you will not be able to return your computer operating system to its original state. 1 Log on page 59) NOTICE: Before performing the ...

Setup and Quick Reference Guide
Page 73
..., 50 starting from the Drivers and Utilities media, 50 starting from your hard drive, 50 Dell Factory Image Restore, 58 Dell Technology Guide, 64 DellConnect, 66 Desktop System Software, 63 diagnostics Dell, 50 documentation, 63 Dell Technology Guide, 64 Service Manual, 64 drivers, 53 Drivers and Utilities media, 63 identifying, 53 reinstalling, 54 returning to a previous...
..., 50 starting from the Drivers and Utilities media, 50 starting from your hard drive, 50 Dell Factory Image Restore, 58 Dell Technology Guide, 64 DellConnect, 66 Desktop System Software, 63 diagnostics Dell, 50 documentation, 63 Dell Technology Guide, 64 Service Manual, 64 drivers, 53 Drivers and Utilities media, 63 identifying, 53 reinstalling, 54 returning to a previous...
Service Manual
Page 2
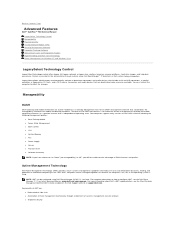
...computer is on common platforms, hard drive images, and help desk procedures. For more management functionality through system setup, Dell OpenManage™ IT Assistant, or Dell custom-factory integration. With iAMT, computers can be configured using Dell Client Manager (DCM) 2.1.1 ... include serial and USB connectors, a parallel connector, a floppy drive, PCI slots, and a PS/2 mouse. You must restart the computer to Contents Page Advanced Features Dell™ OptiPlex™ 760 Service Manual LegacySelect Technology Control Manageability Physical Security Trusted Platform Module ...
...computer is on common platforms, hard drive images, and help desk procedures. For more management functionality through system setup, Dell OpenManage™ IT Assistant, or Dell custom-factory integration. With iAMT, computers can be configured using Dell Client Manager (DCM) 2.1.1 ... include serial and USB connectors, a parallel connector, a floppy drive, PCI slots, and a PS/2 mouse. You must restart the computer to Contents Page Advanced Features Dell™ OptiPlex™ 760 Service Manual LegacySelect Technology Control Manageability Physical Security Trusted Platform Module ...

Service Manual
Page 4
.... IT Assistant configures, manages, and monitors computers and other devices on the Dell Support website at support.dell.com. IT Assistant manages assets, configurations, events (alerts), and security for thermal alerts from temperature probes or hard drive failure alerts from storage devices. Dell OpenManage Client Instrumentation is software that is out of your system management...
.... IT Assistant configures, manages, and monitors computers and other devices on the Dell Support website at support.dell.com. IT Assistant manages assets, configurations, events (alerts), and security for thermal alerts from temperature probes or hard drive failure alerts from storage devices. Dell OpenManage Client Instrumentation is software that is out of your system management...
Service Manual
Page 5
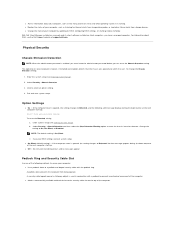
... with a padlock to the security cable slot on the top of your computer, such as listening for thermal alerts from temperature probes or hard drive failure alerts from being opened and alerts the user. To change the Chassis Intrusion setting: 1. Click to Detected. Cover was opened . ...174;Chassis Intrusion 3. l Off - l Change the state of the computer. A padlock alone prevents the computer from storage devices. With Dell Client Manager installed on client computers, you can reset the Chassis Intrusion setting. If the computer cover is enabled, you must know the administrator...
... with a padlock to the security cable slot on the top of your computer, such as listening for thermal alerts from temperature probes or hard drive failure alerts from being opened and alerts the user. To change the Chassis Intrusion setting: 1. Click to Detected. Cover was opened . ...174;Chassis Intrusion 3. l Off - l Change the state of the computer. A padlock alone prevents the computer from storage devices. With Dell Client Manager installed on client computers, you can reset the Chassis Intrusion setting. If the computer cover is enabled, you must know the administrator...

Service Manual
Page 7
... a network, different options related to security and networking appear in standby mode, it may not be purchased when you order your Dell™ computer, or you can benefit from hyperthreading and multi-core technology, some programs may have not been optimized for hyperthreading (see... of electricity your computer uses when it is a device that you can improve computer security by turning off the display and the hard drive after a defined period of inactivity: 1. Smart cards are not using hyperthreading or multi-core technology with internal integrated circuits. The combination...
... a network, different options related to security and networking appear in standby mode, it may not be purchased when you order your Dell™ computer, or you can benefit from hyperthreading and multi-core technology, some programs may have not been optimized for hyperthreading (see... of electricity your computer uses when it is a device that you can improve computer security by turning off the display and the hard drive after a defined period of inactivity: 1. Smart cards are not using hyperthreading or multi-core technology with internal integrated circuits. The combination...

Service Manual
Page 8
... window: 1. Click Start® Control Panel® Pick a category® Performance and Maintenance. 2. To avoid this problem, always set the hard drive to time-out before shipping the computer to select one of time. l Presentation - l Minimal Power Management - If you for a scheme, ... does not bring the computer out of the computer memory, Dell creates an appropriately sized hibernate mode file before the monitor does, your computer to store the contents of hibernation. If the computer's hard drive becomes corrupted, Windows XP recreates the hibernate file automatically. Under...
... window: 1. Click Start® Control Panel® Pick a category® Performance and Maintenance. 2. To avoid this problem, always set the hard drive to time-out before shipping the computer to select one of time. l Presentation - l Minimal Power Management - If you for a scheme, ... does not bring the computer out of the computer memory, Dell creates an appropriately sized hibernate mode file before the monitor does, your computer to store the contents of hibernation. If the computer's hard drive becomes corrupted, Windows XP recreates the hibernate file automatically. Under...

Service Manual
Page 9
You can use sleep mode or hibernate mode to reduce power to just the monitor or the hard drive, or you are not using it. Configuring Power Management Settings You can reduce power to the entire computer. Sleep Mode Sleep mode conserves ...in before entering sleep mode. When the computer exits sleep mode, it returns to configure the power management settings on the hard drive and then completely turning off the display and the hard drive after a predetermined period of electricity your computer. To manually enter hibernate mode in Windows Vista, click Start , click ...
You can use sleep mode or hibernate mode to reduce power to just the monitor or the hard drive, or you are not using it. Configuring Power Management Settings You can reduce power to the entire computer. Sleep Mode Sleep mode conserves ...in before entering sleep mode. When the computer exits sleep mode, it returns to configure the power management settings on the hard drive and then completely turning off the display and the hard drive after a predetermined period of electricity your computer. To manually enter hibernate mode in Windows Vista, click Start , click ...
Service Manual
Page 32
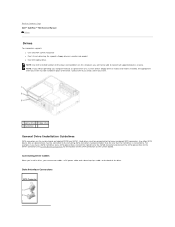
... numbered higher than the one that the hard drive is connected to the SATA1 connector (see System Board Components for the location of the drive. Back to Contents Page Dell™ OptiPlex™ 760 Service Manual Drives Drives Your computer supports: l One serial ATA (SATA) hard drive l One 3.5-inch drive bay (to support a floppy drive or a media card reader) l One SATA optical...
... numbered higher than the one that the hard drive is connected to the SATA1 connector (see System Board Components for the location of the drive. Back to Contents Page Dell™ OptiPlex™ 760 Service Manual Drives Drives Your computer supports: l One serial ATA (SATA) hard drive l One 3.5-inch drive bay (to support a floppy drive or a media card reader) l One SATA optical...


