Quick Reference Guide
Page 9
...-inch drive bay 2 5.25-inch drive bay 3 3.5-inch drive bay 4 USB 2.0 connectors (2) 5 LAN indicator light 6 diagnostic lights 7 power button 8 power light 9 hard-drive activity light 10 headphone connector 11 microphone connector Can contain an optical drive. Can contain an optional floppy drive or optional media card reader. Use the lights to.... It is turned off the computer by pressing the power button. The computer is recommended that typically remain connected, such as a wake device in the Windows Device Manager.
...-inch drive bay 2 5.25-inch drive bay 3 3.5-inch drive bay 4 USB 2.0 connectors (2) 5 LAN indicator light 6 diagnostic lights 7 power button 8 power light 9 hard-drive activity light 10 headphone connector 11 microphone connector Can contain an optical drive. Can contain an optional floppy drive or optional media card reader. Use the lights to.... It is turned off the computer by pressing the power button. The computer is recommended that typically remain connected, such as a wake device in the Windows Device Manager.
Quick Reference Guide
Page 14
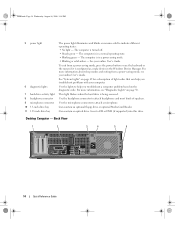
...speakers. Back View 1 2 3 4 5 6 14 Quick Reference Guide This light flickers when the hard drive is configured as a wake device in the Windows Device Manager. Insert a CD or DVD (if supported) into this drive. book.book Page 14 Wednesday, August 16, 2006 3:18 PM 5 power light... 6 diagnostic lights 7 hard-drive activity light 8 headphone connector 9 microphone connector 10 3.5-inch drive bay 11 5.25-inch drive bay The power light illuminates and blinks or remains solid to attach a microphone. The computer is ...
...speakers. Back View 1 2 3 4 5 6 14 Quick Reference Guide This light flickers when the hard drive is configured as a wake device in the Windows Device Manager. Insert a CD or DVD (if supported) into this drive. book.book Page 14 Wednesday, August 16, 2006 3:18 PM 5 power light... 6 diagnostic lights 7 hard-drive activity light 8 headphone connector 9 microphone connector 10 3.5-inch drive bay 11 5.25-inch drive bay The power light illuminates and blinks or remains solid to attach a microphone. The computer is ...

Quick Reference Guide
Page 18
... for a description of speakers. Can contain an optical drive. book.book Page 18 Wednesday, August 16, 2006 3:18 PM 7 power light 8 headphone connector 9 microphone connector 10 3.5-inch drive bay 11 5.25-inch drive bay The power light illuminates and blinks or remains solid to attach a microphone. The computer is turned off... about sleep modes and exiting from a power-saving mode, press the power button or use the keyboard or the mouse if it is in the Windows Device Manager.
... for a description of speakers. Can contain an optical drive. book.book Page 18 Wednesday, August 16, 2006 3:18 PM 7 power light 8 headphone connector 9 microphone connector 10 3.5-inch drive bay 11 5.25-inch drive bay The power light illuminates and blinks or remains solid to attach a microphone. The computer is turned off... about sleep modes and exiting from a power-saving mode, press the power button or use the keyboard or the mouse if it is in the Windows Device Manager.

Quick Reference Guide
Page 57
... Next. 7 Enter your name and organization (optional) in the Personalize Your Software screen, and click Next. 8 At the Computer Name and Administrator Password window, enter a name for your computer (or accept the one provided) and a password, and click Next. 9 If the Modem Dialing Information screen appears,... enter the requested information and click Next. 10 Enter the date, time, and time zone in the Date and Time Settings window, and click Next. 11 If the Networking Settings screen appears, click Typical and click Next. 12 If ...
... Next. 7 Enter your name and organization (optional) in the Personalize Your Software screen, and click Next. 8 At the Computer Name and Administrator Password window, enter a name for your computer (or accept the one provided) and a password, and click Next. 9 If the Modem Dialing Information screen appears,... enter the requested information and click Next. 10 Enter the date, time, and time zone in the Date and Time Settings window, and click Next. 11 If the Networking Settings screen appears, click Typical and click Next. 12 If ...


