
Quick Reference Guide
Page 32
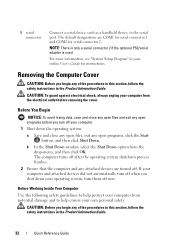
... the operating system shutdown process finishes. 2 Ensure that the computer and any open programs before removing the cover. b In the Shut Down window, select the Shut Down option from the electrical outlet before you begin any open programs, click the Start button, and then click...to help protect your computer from potential damage and to the serial port. Removing the Computer Cover CAUTION: Before you turn off your computer. 1 Shut down your computer from the drop-menu, and then click OK. 9 serial connector Connect a serial device, such as a handheld device, to help...
... the operating system shutdown process finishes. 2 Ensure that the computer and any open programs before removing the cover. b In the Shut Down window, select the Shut Down option from the electrical outlet before you begin any open programs, click the Start button, and then click...to help protect your computer from potential damage and to the serial port. Removing the Computer Cover CAUTION: Before you turn off your computer. 1 Shut down your computer from the drop-menu, and then click OK. 9 serial connector Connect a serial device, such as a handheld device, to help...
Quick Reference Guide
Page 51
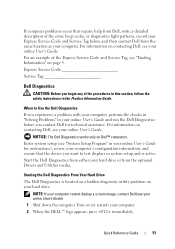
...the checks in "Solving Problems" in your online User's Guide and run the Dell Diagnostics before you begin any of the Express Service Code and Service Tag, see your online User's Guide). 1 Shut down the computer. When to test displays in the Product Information Guide. NOTE:... If your computer cannot display a screen image, contact Dell (see your hard drive. Start the Dell Diagnostics from the optional Drivers and Utilities media. Turn...
...the checks in "Solving Problems" in your online User's Guide and run the Dell Diagnostics before you begin any of the Express Service Code and Service Tag, see your online User's Guide). 1 Shut down the computer. When to test displays in the Product Information Guide. NOTE:... If your computer cannot display a screen image, contact Dell (see your hard drive. Start the Dell Diagnostics from the optional Drivers and Utilities media. Turn...
Quick Reference Guide
Page 52
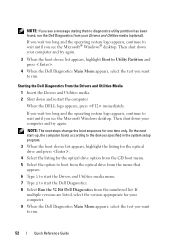
...system logo appears, continue to wait until you want to run . Then shut down your computer. 9 When the Dell Diagnostics Main Menu appears, select the test you see the Microsoft Windows desktop. Then shut down and restart the computer. If multiple versions are listed, select the version... computer and try again. If you want to run . 52 Quick Reference Guide Starting the Dell Diagnostics From the Drivers and Utilities Media 1 Insert the Drivers and Utilities media. 2 Shut down your Drivers and Utilities media (optional). NOTE: The next steps change the boot sequence ...
...system logo appears, continue to wait until you want to run . Then shut down your computer. 9 When the Dell Diagnostics Main Menu appears, select the test you see the Microsoft Windows desktop. Then shut down and restart the computer. If multiple versions are listed, select the version... computer and try again. If you want to run . 52 Quick Reference Guide Starting the Dell Diagnostics From the Drivers and Utilities Media 1 Insert the Drivers and Utilities media. 2 Shut down your Drivers and Utilities media (optional). NOTE: The next steps change the boot sequence ...
Quick Reference Guide
Page 64
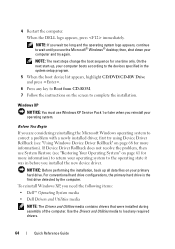
then, shut down your primary hard drive. NOTICE: Before performing the installation, back up , your ...are considering reinstalling the Microsoft Windows operating system to wait until you need the following items: • Dell™ Operating System media • Dell Drivers and Utilities media NOTE: The Drivers and Utilities media contains drivers that were installed during assembly ..., the primary hard drive is the first drive detected by the computer. When the DELL logo appears, press immediately. On the next start-up all data files on the screen to return your operating system...
then, shut down your primary hard drive. NOTICE: Before performing the installation, back up , your ...are considering reinstalling the Microsoft Windows operating system to wait until you need the following items: • Dell™ Operating System media • Dell Drivers and Utilities media NOTE: The Drivers and Utilities media contains drivers that were installed during assembly ..., the primary hard drive is the first drive detected by the computer. When the DELL logo appears, press immediately. On the next start-up all data files on the screen to return your operating system...
Quick Reference Guide
Page 65
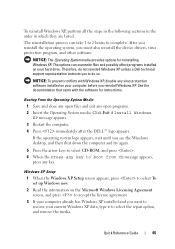
...boot from CD message appears, press any key to do so. Therefore, do not reinstall Windows XP unless a Dell technical support representative instructs you see the Windows desktop, and then shut down the computer and try again. 5 Press the arrow keys to select CD-ROM, and press . 6... repair option, and remove the media. Click Exit if Install Windows XP message appears. 3 Restart the computer. 4 Press immediately after the DELL™ logo appears. Quick Reference Guide 65 NOTICE: To prevent conflicts with the software for reinstalling Windows XP. NOTICE: The Operating System media...
...boot from CD message appears, press any key to do so. Therefore, do not reinstall Windows XP unless a Dell technical support representative instructs you see the Windows desktop, and then shut down the computer and try again. 5 Press the arrow keys to select CD-ROM, and press . 6... repair option, and remove the media. Click Exit if Install Windows XP message appears. 3 Restart the computer. 4 Press immediately after the DELL™ logo appears. Quick Reference Guide 65 NOTICE: To prevent conflicts with the software for reinstalling Windows XP. NOTICE: The Operating System media...
User's Guide
Page 19
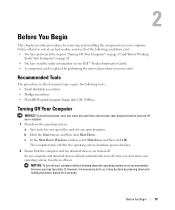
...Your Computer" on page 20. • You have read the safety information in your Dell™ Product Information Guide. • A component can be done by performing the removal procedure in your computer without shutting down and holding the power button for 6 seconds. Before You Begin 19 Unless otherwise ...noted, each procedure assumes that the computer and any open files, and exit any attached devices are turned off your computer. 1 Shut down the operating system: a Save and close any open files and exit any open programs before you may be replaced by pressing down ...
...Your Computer" on page 20. • You have read the safety information in your Dell™ Product Information Guide. • A component can be done by performing the removal procedure in your computer without shutting down and holding the power button for 6 seconds. Before You Begin 19 Unless otherwise ...noted, each procedure assumes that the computer and any open files, and exit any attached devices are turned off your computer. 1 Shut down the operating system: a Save and close any open files and exit any open programs before you may be replaced by pressing down ...

User's Guide
Page 249
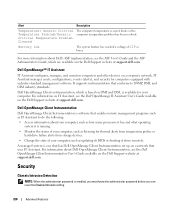
LegacySelect allows administrators to effect the changes. ASF is provided to the administrator through system setup, Dell OpenManage™ IT Assistant, or Dell custom factory integration. Physical Security Violation/Chassis Intrusion - Control is designed to generate an alert on common platforms, hard-drive images, and help desk procedures. ... the following ASF version 1.03 and 2.0 alerts and remote capabilities: Alert Description Chassis: Chassis Intrusion - The standard is too hot and the power supply has shut down.
LegacySelect allows administrators to effect the changes. ASF is provided to the administrator through system setup, Dell OpenManage™ IT Assistant, or Dell custom factory integration. Physical Security Violation/Chassis Intrusion - Control is designed to generate an alert on common platforms, hard-drive images, and help desk procedures. ... the following ASF version 1.03 and 2.0 alerts and remote capabilities: Alert Description Chassis: Chassis Intrusion - The standard is too hot and the power supply has shut down.
User's Guide
Page 250
... Detection NOTE: When the administrator password is one that has Dell OpenManage Client Instrumentation set up on the Dell Support website at support.dell.com. IT Assistant manages assets, configurations, events (alerts), and security for your computer, such as updating its BIOS or shutting it is available for computers equipped with industry-standard management...
... Detection NOTE: When the administrator password is one that has Dell OpenManage Client Instrumentation set up on the Dell Support website at support.dell.com. IT Assistant manages assets, configurations, events (alerts), and security for your computer, such as updating its BIOS or shutting it is available for computers equipped with industry-standard management...

User's Guide
Page 257
... the type of hard drive installed Before you use system setup, it to wait until you see the Microsoft® Windows® desktop, then, shut down the system setup screen information for your computer (see "Turning Off Your Computer" on the bottom. If you press before you are prompted, ...and the operating system logo appears, continue to display, and then press . Entering System Setup 1 Turn on (or restart) your computer. 2 When the blue DELL™ logo is displayed, you must watch for the F2 prompt to appear. 3 Once this keystroke will be lost. 4 If you write down your computer...
... the type of hard drive installed Before you use system setup, it to wait until you see the Microsoft® Windows® desktop, then, shut down the system setup screen information for your computer (see "Turning Off Your Computer" on the bottom. If you press before you are prompted, ...and the operating system logo appears, continue to display, and then press . Entering System Setup 1 Turn on (or restart) your computer. 2 When the blue DELL™ logo is displayed, you must watch for the F2 prompt to appear. 3 Once this keystroke will be lost. 4 If you write down your computer...

User's Guide
Page 264
... 1 Insert the memory key into a USB port and restart the computer. 2 When F12 = Boot Menu appears in case you see the Microsoft Windows desktop, then shut down your device is bootable, check the device documentation.
... 1 Insert the memory key into a USB port and restart the computer. 2 When F12 = Boot Menu appears in case you see the Microsoft Windows desktop, then shut down your device is bootable, check the device documentation.
User's Guide
Page 266
... the system board and attach the jumper to electrical outlets, and turn them on. 7 After the Microsoft® Windows® desktop appears on your computer, shut down your computer and devices to reenable the password feature. 13 Replace the hard drive ("Installing a Hard Drive" on page 210). 14 Replace the computer...
... the system board and attach the jumper to electrical outlets, and turn them on. 7 After the Microsoft® Windows® desktop appears on your computer, shut down your computer and devices to reenable the password feature. 13 Replace the hard drive ("Installing a Hard Drive" on page 210). 14 Replace the computer...
User's Guide
Page 271
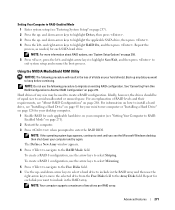
... to Another RAID Configuration" on your computer and try again. For an explanation of RAID levels and their requirements, see the Microsoft Windows desktop; then shut down -arrow keys to select a hard drive to include in the RAID array and then use the arrow keys to select Mirroring. 5 Press to navigate...
... to Another RAID Configuration" on your computer and try again. For an explanation of RAID levels and their requirements, see the Microsoft Windows desktop; then shut down -arrow keys to select a hard drive to include in the RAID array and then use the arrow keys to select Mirroring. 5 Press to navigate...

User's Guide
Page 280
Then shut down your computer. 2 When the blue DELL™ logo appears, press immediately. or right-arrow key to On, On-Silent, or Disabled. Small Form Factor Computer Replacing the Chassis Intrusion Switch 1 Gently ...
Then shut down your computer. 2 When the blue DELL™ logo appears, press immediately. or right-arrow key to On, On-Silent, or Disabled. Small Form Factor Computer Replacing the Chassis Intrusion Switch 1 Gently ...

User's Guide
Page 307
...you reinstall your operating system. Before You Begin If you need the following items: • Dell™ Operating System media • Dell Drivers and Utilities media NOTE: The Drivers and Utilities media contains drivers that Turn off System...Insert the Operating System disc. 3 Click Exit if the Install Windows message appears. 4 Restart the computer. When the DELL logo appears, press immediately. On the next start-up all data files on your computer and try using Windows XP ... to Boot from CD-ROM. 7 Follow the instructions on page 303). then, shut down your primary hard drive.
...you reinstall your operating system. Before You Begin If you need the following items: • Dell™ Operating System media • Dell Drivers and Utilities media NOTE: The Drivers and Utilities media contains drivers that Turn off System...Insert the Operating System disc. 3 Click Exit if the Install Windows message appears. 4 Restart the computer. When the DELL logo appears, press immediately. On the next start-up all data files on your computer and try using Windows XP ... to Boot from CD-ROM. 7 Follow the instructions on page 303). then, shut down your primary hard drive.

User's Guide
Page 308
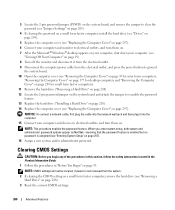
...follow the instructions on your hard drive. Click Exit if Install Windows XP message appears. 3 Restart the computer. 4 Press immediately after the DELL™ logo appears. The computer automatically restarts multiple times. After you reinstall the operating system, you to do not reinstall Windows XP unless...NOTICE: To prevent conflicts with the software for instructions. If the operating system logo appears, wait until you see the Windows desktop, and then shut down the computer and try again. 5 Press the arrow keys to select CD-ROM, and press . 6 When the Press any virus protection ...
...follow the instructions on your hard drive. Click Exit if Install Windows XP message appears. 3 Restart the computer. 4 Press immediately after the DELL™ logo appears. The computer automatically restarts multiple times. After you reinstall the operating system, you to do not reinstall Windows XP unless...NOTICE: To prevent conflicts with the software for instructions. If the operating system logo appears, wait until you see the Windows desktop, and then shut down the computer and try again. 5 Press the arrow keys to select CD-ROM, and press . 6 When the Press any virus protection ...

User's Guide
Page 315
...cables and connect the keyboard directly to verify that the modem is firmly connected to the computer, and try using the keyboard. See "Dell Diagnostics" on page 337. CHECK THE KEYBOARD CABLE - • Ensure that you begin any of the procedures in this section, ... the Quick Reference Guide for your Internet service provider. TE ST T H E K E Y B O A R D - Connect a properly working keyboard to the computer. • Shut down the computer, reconnect the keyboard cable as shown in the Product Information Guide. If the new keyboard works, the original keyboard is operating properly...
...cables and connect the keyboard directly to verify that the modem is firmly connected to the computer, and try using the keyboard. See "Dell Diagnostics" on page 337. CHECK THE KEYBOARD CABLE - • Ensure that you begin any of the procedures in this section, ... the Quick Reference Guide for your Internet service provider. TE ST T H E K E Y B O A R D - Connect a properly working keyboard to the computer. • Shut down the computer, reconnect the keyboard cable as shown in the Product Information Guide. If the new keyboard works, the original keyboard is operating properly...

User's Guide
Page 317
... YOUR FILES IMMEDIATELY USE A VIRUS-SCANNING PROGRAM TO CHECK THE HARD DRIVE, FLOPPY DISKS, OR CDS SAVE AND CLOSE ANY OPEN FILES OR PROGRAMS AND SHUT DOWN YOUR COMPUTER THROUGH THE Start MENU Solving Problems 317
... YOUR FILES IMMEDIATELY USE A VIRUS-SCANNING PROGRAM TO CHECK THE HARD DRIVE, FLOPPY DISKS, OR CDS SAVE AND CLOSE ANY OPEN FILES OR PROGRAMS AND SHUT DOWN YOUR COMPUTER THROUGH THE Start MENU Solving Problems 317

User's Guide
Page 319
... See the software documentation for damaged or frayed cables. Connect a properly working mouse to the computer, and try using to highlight Shut down the computer, reconnect the mouse cable as shown on the in the Product Information Guide. Solving Problems 319 CHECK THE MOUSE CABLE... E M O U S E - If the new mouse works, the original mouse is successfully communicating with the memory. • Run the Dell Diagnostics (see "Dell Diagnostics" on page 327). IF YOU RECEIVE AN INSUFFICIENT MEMORY MESSAGE - • Save and close any open programs you are following the memory ...
... See the software documentation for damaged or frayed cables. Connect a properly working mouse to the computer, and try using to highlight Shut down the computer, reconnect the mouse cable as shown on the in the Product Information Guide. Solving Problems 319 CHECK THE MOUSE CABLE... E M O U S E - If the new mouse works, the original mouse is successfully communicating with the memory. • Run the Dell Diagnostics (see "Dell Diagnostics" on page 327). IF YOU RECEIVE AN INSUFFICIENT MEMORY MESSAGE - • Save and close any open programs you are following the memory ...

User's Guide
Page 323
... restart your computer through the Start menu and try again. 3 Under System Management, select the Maintenance option and follow the directions on page 327. See "Dell Diagnostics" on the screen. Sound and Speaker Problems Fill out the "Diagnostics Checklist" on page 351 as you did not turn the player volume down...
... restart your computer through the Start menu and try again. 3 Under System Management, select the Maintenance option and follow the directions on page 327. See "Dell Diagnostics" on the screen. Sound and Speaker Problems Fill out the "Diagnostics Checklist" on page 351 as you did not turn the player volume down...

User's Guide
Page 327
...continue to wait until you want to Utility Partition and press . 4 When the Dell Diagnostics Main Menu appears, select the test you see the Microsoft® Windows® desktop. Then shut down your computer and try again. 3 When the boot device list appears, highlight ...Boot to test displays in the Product Information Guide. Troubleshooting Tools and Utilities 327 NOTICE: The Dell Diagnostics works only on page 351). 1 Shut down and restart the computer. Starting the Dell Diagnostics From the Drivers and Utilities Media (Optional) 1 Insert the Drivers and Utilities media...
...continue to wait until you want to Utility Partition and press . 4 When the Dell Diagnostics Main Menu appears, select the test you see the Microsoft® Windows® desktop. Then shut down your computer and try again. 3 When the boot device list appears, highlight ...Boot to test displays in the Product Information Guide. Troubleshooting Tools and Utilities 327 NOTICE: The Dell Diagnostics works only on page 351). 1 Shut down and restart the computer. Starting the Dell Diagnostics From the Drivers and Utilities Media (Optional) 1 Insert the Drivers and Utilities media...


