

User's Guide
Page 4
Optical Drive 78 Processor 83 Removing the Processor 83 Installing the Processor 85 Power Supply 89 Replacing the Power Supply 89 DC Power Connectors 91 4 Desktop Computer 97 About Your Desktop Computer 97 Front View 97 Back View 98 Back-Panel Connectors 99 Inside Your Computer 101 System ... 125 PCI, PCI Express Cards, and PS/2 Serial Port Adapters 135 PCI Cards 135 PCI Express and DVI Cards 146 PS/2 Serial Port Adapters 163 Power Supply 169 Replacing the Power Supply 169 DC Power Connectors 171 Removing the Computer Cover 177 4 Contents
Optical Drive 78 Processor 83 Removing the Processor 83 Installing the Processor 85 Power Supply 89 Replacing the Power Supply 89 DC Power Connectors 91 4 Desktop Computer 97 About Your Desktop Computer 97 Front View 97 Back View 98 Back-Panel Connectors 99 Inside Your Computer 101 System ... 125 PCI, PCI Express Cards, and PS/2 Serial Port Adapters 135 PCI Cards 135 PCI Express and DVI Cards 146 PS/2 Serial Port Adapters 163 Power Supply 169 Replacing the Power Supply 169 DC Power Connectors 171 Removing the Computer Cover 177 4 Contents

User's Guide
Page 5
...Your Computer 188 System Board Components 190 Small Form Factor Computer (Model # DCCY) Specifications 193 I/O Panel 199 Removing the I/O Panel 199 Replacing the I/O Panel 201 Removing the Computer Cover 203 Drives 205 General Installation Guidelines 205 Hard Drive 208 Optical Drive 215 Floppy Drive and Media...Cards, and PS/2 Serial Port Adapters 223 PCI Cards 223 PCI Express and DVI Cards 227 PS/2 Serial Port Adapters 233 Power Supply 237 Replacing the Power Supply 237 DC Power Connectors 239 Processor 243 Removing the Processor 243 Installing the Processor 245 Contents 5
...Your Computer 188 System Board Components 190 Small Form Factor Computer (Model # DCCY) Specifications 193 I/O Panel 199 Removing the I/O Panel 199 Replacing the I/O Panel 201 Removing the Computer Cover 203 Drives 205 General Installation Guidelines 205 Hard Drive 208 Optical Drive 215 Floppy Drive and Media...Cards, and PS/2 Serial Port Adapters 223 PCI Cards 223 PCI Express and DVI Cards 227 PS/2 Serial Port Adapters 233 Power Supply 237 Replacing the Power Supply 237 DC Power Connectors 239 Processor 243 Removing the Processor 243 Installing the Processor 245 Contents 5
User's Guide
Page 89
Power Supply Replacing the Power Supply CAUTION: Before you begin any of the computer chassis. Note the routing of the procedures in this section, follow the safety instructions located in the ... in "Before You Begin" on the computer chassis. 1 Follow the procedures in the computer chassis as you replace them to prevent them from being pinched or crimped. 3 Remove the four screws that attach the power supply to components inside your computer, discharge static electricity from the system board and the drives. You can...
Power Supply Replacing the Power Supply CAUTION: Before you begin any of the computer chassis. Note the routing of the procedures in this section, follow the safety instructions located in the ... in "Before You Begin" on the computer chassis. 1 Follow the procedures in the computer chassis as you replace them to prevent them from being pinched or crimped. 3 Remove the four screws that attach the power supply to components inside your computer, discharge static electricity from the system board and the drives. You can...

User's Guide
Page 90
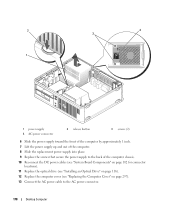
Mini Tower Computer 90 1 2 3 4 1 release button 4 AC power connector 2 power supply 3 screws (4) 5 Slide the power supply toward the front of the computer by approximately 1 inch. 6 Lift the power supply up and out of the computer. 7 Slide the replacement power supply into place. 8 Replace the screws that secure the power supply to the back of the computer chassis.
Mini Tower Computer 90 1 2 3 4 1 release button 4 AC power connector 2 power supply 3 screws (4) 5 Slide the power supply toward the front of the computer by approximately 1 inch. 6 Lift the power supply up and out of the computer. 7 Slide the replacement power supply into place. 8 Replace the screws that secure the power supply to the back of the computer chassis.

User's Guide
Page 169
... of your body before you replace them from the system board and drives. You can do so by touching an unpainted metal surface on the computer chassis. 1 Follow the procedures in the Product Information Guide. Power Supply Replacing the Power Supply CAUTION: Before you remove them... to prevent their being pinched or crimped. 3 Remove the two screws that attach the power supply to the back of the computer chassis. 4 Remove the optical drive...
... of your body before you replace them from the system board and drives. You can do so by touching an unpainted metal surface on the computer chassis. 1 Follow the procedures in the Product Information Guide. Power Supply Replacing the Power Supply CAUTION: Before you remove them... to prevent their being pinched or crimped. 3 Remove the two screws that attach the power supply to the back of the computer chassis. 4 Remove the optical drive...
User's Guide
Page 170
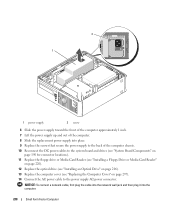
2 4 3 1 1 power supply 4 AC power connector 2 release button 3 screws (2) 6 Slide the power supply toward the front of the computer by approximately 1 inch. 7 Lift the power supply up and out of the computer. 8 Slide the replacement power supply into place. 9 Replace the screws that secure the power supply to the back of the computer chassis. 10 Reconnect the DC power cables (see "System Board Components" on page...
2 4 3 1 1 power supply 4 AC power connector 2 release button 3 screws (2) 6 Slide the power supply toward the front of the computer by approximately 1 inch. 7 Lift the power supply up and out of the computer. 8 Slide the replacement power supply into place. 9 Replace the screws that secure the power supply to the back of the computer chassis. 10 Reconnect the DC power cables (see "System Board Components" on page...
User's Guide
Page 237
Power Supply Replacing the Power Supply CAUTION: Before you begin any of your body before you touch any of the DC power cables underneath the tabs in the computer frame as you replace them from the system board and the drives. Small Form Factor Computer 237 Note the routing of the ...route these cables properly when you remove them to prevent their being pinched or crimped. 5 Remove the three screws that attach the power supply to components inside your computer, discharge static electricity from your computer's electronic components. You can do so by touching an unpainted metal...
Power Supply Replacing the Power Supply CAUTION: Before you begin any of your body before you touch any of the DC power cables underneath the tabs in the computer frame as you replace them from the system board and the drives. Small Form Factor Computer 237 Note the routing of the ...route these cables properly when you remove them to prevent their being pinched or crimped. 5 Remove the three screws that attach the power supply to components inside your computer, discharge static electricity from your computer's electronic components. You can do so by touching an unpainted metal...
User's Guide
Page 238
... optical drive (see "Installing an Optical Drive" on page 216). 13 Replace the computer cover (see "Replacing the Computer Cover" on page 297). 14 Connect the AC power cable to the back of the computer. 8 Slide the replacement power supply into the computer. 238 Small Form Factor Computer NOTICE: To connect a network cable, first plug the...
... optical drive (see "Installing an Optical Drive" on page 216). 13 Replace the computer cover (see "Replacing the Computer Cover" on page 297). 14 Connect the AC power cable to the back of the computer. 8 Slide the replacement power supply into the computer. 238 Small Form Factor Computer NOTICE: To connect a network cable, first plug the...


