

Quick Reference Guide
Page 20
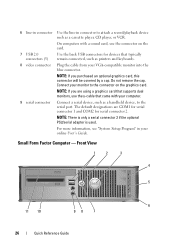
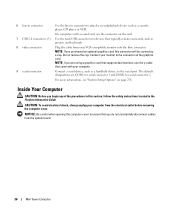
...the line-in connector to attach headphones and most speakers with a network connector card, use the connector on the card. 7 USB 2.0 connectors (5) Use the back USB connectors for devices that you are using a graphics card that supports dual monitors, use the y-cable that the network cable has been ... player, CD player, or VCR. Connect the other end of the network cable to the network adapter connector on the graphics card. It is transmitting or receiving network data. Connect your network. On computers with your VGA-compatible monitor into the network connector.
...the line-in connector to attach headphones and most speakers with a network connector card, use the connector on the card. 7 USB 2.0 connectors (5) Use the back USB connectors for devices that you are using a graphics card that supports dual monitors, use the y-cable that the network cable has been ... player, CD player, or VCR. Connect the other end of the network cable to the network adapter connector on the graphics card. It is transmitting or receiving network data. Connect your network. On computers with your VGA-compatible monitor into the network connector.
Quick Reference Guide
Page 26
... the back USB connectors for serial connector 2. The default designations are using a graphics card that came with a sound card, use the y-cable that supports dual monitors, use the connector on the graphics card. On computers with your VGA-compatible monitor into the blue connector. NOTE: If...from your computer. 9 serial connector Connect a serial device, such as a cassette player, CD player, or VCR. NOTE: If you purchased an optional graphics card, this connector will be covered by a cap. Small Form Factor Computer - Do not remove the cap. Front View 1 2 3 4 5 6...
... the back USB connectors for serial connector 2. The default designations are using a graphics card that came with a sound card, use the y-cable that supports dual monitors, use the connector on the graphics card. On computers with your VGA-compatible monitor into the blue connector. NOTE: If...from your computer. 9 serial connector Connect a serial device, such as a cassette player, CD player, or VCR. NOTE: If you purchased an optional graphics card, this connector will be covered by a cap. Small Form Factor Computer - Do not remove the cap. Front View 1 2 3 4 5 6...

Quick Reference Guide
Page 31
... line-in a steady "on the back panel of your VGA-compatible monitor into the network connector. NOTE: If you purchased an optional graphics card, this light appear to be covered by a cap. Connect the other end of the network cable to the network adapter connector on "...such as printers and keyboards. 8 video connector Plug the cable from your computer. Connect your network. On computers with a sound card, use the connector on the graphics card. If you use Category 3 wiring, force the network speed to 10 Mbps to ensure reliable operation. 4 network Flashes a ...
... line-in a steady "on the back panel of your VGA-compatible monitor into the network connector. NOTE: If you purchased an optional graphics card, this light appear to be covered by a cap. Connect the other end of the network cable to the network adapter connector on "...such as printers and keyboards. 8 video connector Plug the cable from your computer. Connect your network. On computers with a sound card, use the connector on the graphics card. If you use Category 3 wiring, force the network speed to 10 Mbps to ensure reliable operation. 4 network Flashes a ...
Quick Reference Guide
Page 38
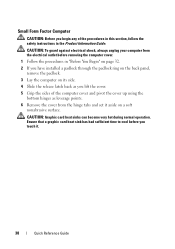
...: Before you lift the cover. 5 Grip the sides of the procedures in this section, follow the safety instructions in the Product Information Guide. Ensure that a graphic card heat sink has had sufficient time to cool before removing the computer cover. 1 Follow the procedures in "Before You Begin" on page 32. 2 If you... have installed a padlock through the padlock ring on the back panel, remove the padlock. 3 Lay the computer on a soft nonabrasive surface. CAUTION: Graphic card heat sinks can become very hot during normal operation.
...: Before you lift the cover. 5 Grip the sides of the procedures in this section, follow the safety instructions in the Product Information Guide. Ensure that a graphic card heat sink has had sufficient time to cool before removing the computer cover. 1 Follow the procedures in "Before You Begin" on page 32. 2 If you... have installed a padlock through the padlock ring on the back panel, remove the padlock. 3 Lay the computer on a soft nonabrasive surface. CAUTION: Graphic card heat sinks can become very hot during normal operation.

Quick Reference Guide
Page 57
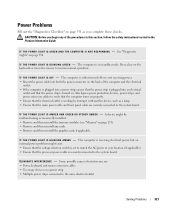
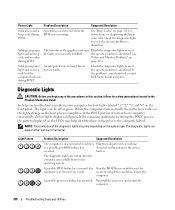
...additional module. A possible graphics card failure has occurred. • If the computer has a graphics card, remove the card, reinstall it and restart the computer (see your computer. • If the problem persists, contact Dell. For information on contacting Dell, see the online User...computer. • If the problem still exists, install a graphics card that you know works and restart the computer. • If the problem persists or the computer has integrated graphics, contact Dell for technical assistance. Light Pattern Problem Description Suggested Resolution Memory ...
...additional module. A possible graphics card failure has occurred. • If the computer has a graphics card, remove the card, reinstall it and restart the computer (see your computer. • If the problem persists, contact Dell. For information on contacting Dell, see the online User...computer. • If the problem still exists, install a graphics card that you know works and restart the computer. • If the problem persists or the computer has integrated graphics, contact Dell for technical assistance. Light Pattern Problem Description Suggested Resolution Memory ...
User's Guide
Page 26
...Be careful when opening the computer cover to ensure that you purchased an optional graphics card, this section, follow the safety instructions located in connector to the connector on the graphics card. CAUTION: To avoid electrical shock, always unplug your VGA-compatible monitor into the... blue connector. Do not remove the cap. On computers with a sound card, use the y-cable that typically remain connected, such...
...Be careful when opening the computer cover to ensure that you purchased an optional graphics card, this section, follow the safety instructions located in connector to the connector on the graphics card. CAUTION: To avoid electrical shock, always unplug your VGA-compatible monitor into the... blue connector. Do not remove the cap. On computers with a sound card, use the y-cable that typically remain connected, such...
User's Guide
Page 32
... chip. support for Atmel 1-Mb and 2-Mb EEPROM Capable of 10/100/1000 communication nVidia integrated video (DirectX 9.0c Shader Model 3.0 Graphics Processing Unit) or PCI Express x16 graphics card or DVI graphics card Sigma Tel 9200 CODEC (2.1 Channel Audio) 24-bit analog-to-digital; 24-bit digital-to-analog two SATA controllers supporting two...
... chip. support for Atmel 1-Mb and 2-Mb EEPROM Capable of 10/100/1000 communication nVidia integrated video (DirectX 9.0c Shader Model 3.0 Graphics Processing Unit) or PCI Express x16 graphics card or DVI graphics card Sigma Tel 9200 CODEC (2.1 Channel Audio) 24-bit analog-to-digital; 24-bit digital-to-analog two SATA controllers supporting two...

User's Guide
Page 39
... and pivot the cover up using the hinge tabs as shown in the illustration. 3 Locate the cover release latch shown in the illustration. Ensure that a graphic card heat sink has had sufficient time to cool before removing the computer cover. 1 Follow the procedures in the Product Information Guide. CAUTION...
... and pivot the cover up using the hinge tabs as shown in the illustration. 3 Locate the cover release latch shown in the illustration. Ensure that a graphic card heat sink has had sufficient time to cool before removing the computer cover. 1 Follow the procedures in the Product Information Guide. CAUTION...

User's Guide
Page 100
NOTE: Do not plug a telephone cable into the blue connector. If you purchased an optional graphics card, this light appear to ensure reliable operation. 4 network activity light Flashes a yellow light when the computer is transmitting or receiving network...amplifiers. NOTE: If you use the y-cable that typically remain connected, such as a handheld device, to the connector on the graphics card. The default designations are using a graphics card that supports dual monitors, use Category 5 wiring and connectors for your network. Connect the other end of the network cable to ...
NOTE: Do not plug a telephone cable into the blue connector. If you purchased an optional graphics card, this light appear to ensure reliable operation. 4 network activity light Flashes a yellow light when the computer is transmitting or receiving network...amplifiers. NOTE: If you use the y-cable that typically remain connected, such as a handheld device, to the connector on the graphics card. The default designations are using a graphics card that supports dual monitors, use Category 5 wiring and connectors for your network. Connect the other end of the network cable to ...
User's Guide
Page 106
...support as defined by DMTF Capable of 10/100/1000 communication nVidia integrated video (DirectX 9.0c Shader Model 3.0 Graphics Processing Unit) or PCI Express x16 graphics card or DVI graphics card Sigma Tel 9200 CODEC (2.1 Channel Audio) 24-bit analog-to-digital; 24-bit digital-to-analog SATA ... Gbps and 3.0 Gbps USB: 480 Mbps high speed, 12Mbps full speed, 1.2 Mbps low speed half-length, full-height cards supported with optional riser-card cage Computer Information Address bus width DMA channels Interrupt levels BIOS chip (NVRAM) NIC Video Type Audio Type Stereo conversion Controllers ...
...support as defined by DMTF Capable of 10/100/1000 communication nVidia integrated video (DirectX 9.0c Shader Model 3.0 Graphics Processing Unit) or PCI Express x16 graphics card or DVI graphics card Sigma Tel 9200 CODEC (2.1 Channel Audio) 24-bit analog-to-digital; 24-bit digital-to-analog SATA ... Gbps and 3.0 Gbps USB: 480 Mbps high speed, 12Mbps full speed, 1.2 Mbps low speed half-length, full-height cards supported with optional riser-card cage Computer Information Address bus width DMA channels Interrupt levels BIOS chip (NVRAM) NIC Video Type Audio Type Stereo conversion Controllers ...

User's Guide
Page 177
Then, slide the release latch back as you touch it. CAUTION: Graphic card heat sinks can become very hot during normal operation. Ensure that a graphic card heat sink has had sufficient time to cool before removing the computer cover. 1 Follow the procedures in "Before You Begin" on page 19. 2 If you ...
Then, slide the release latch back as you touch it. CAUTION: Graphic card heat sinks can become very hot during normal operation. Ensure that a graphic card heat sink has had sufficient time to cool before removing the computer cover. 1 Follow the procedures in "Before You Begin" on page 19. 2 If you ...
User's Guide
Page 188
... A high volume of network traffic may make this light appear to be covered by a cap. NOTE: If you purchased an optional graphics card, this section, follow the safety instructions in connector to ensure that you do not accidentally disconnect cables from the system board. 188 Small... typically remain connected, such as a cassette player, CD player, or VCR. Do not remove the cap. The default designations are using a graphics card that the network cable has been securely attached. A click indicates that supports dual monitors, use Category 3 wiring, force the network speed to 10...
... A high volume of network traffic may make this light appear to be covered by a cap. NOTE: If you purchased an optional graphics card, this section, follow the safety instructions in connector to ensure that you do not accidentally disconnect cables from the system board. 188 Small... typically remain connected, such as a cassette player, CD player, or VCR. Do not remove the cap. The default designations are using a graphics card that the network cable has been securely attached. A click indicates that supports dual monitors, use Category 3 wiring, force the network speed to 10...
User's Guide
Page 194
... 2.0 support as defined by DMTF Capable of 10/100/1000 communication nVidia integrated video (DirectX 9.0c Shader Model 3.0 Graphics Processing Unit), PCI Express x16 graphics card, or DVI graphics card. Sigma Tel 9200 CODEC (2.1 Channel Audio) 24-bit analog-to-digital; 24-bit digital-to-analog one SATA controller...Computer Information Interrupt levels BIOS chip (NVRAM) NIC Video Type Audio Type Stereo conversion Controllers Drives Expansion Bus Bus type Bus speed Cards PCI connectors card size connector size 24 8 Mb or 4 Mb NOTE: The AMD Phenom processor requires the 8-Mb NVRAM chip and is ...
... 2.0 support as defined by DMTF Capable of 10/100/1000 communication nVidia integrated video (DirectX 9.0c Shader Model 3.0 Graphics Processing Unit), PCI Express x16 graphics card, or DVI graphics card. Sigma Tel 9200 CODEC (2.1 Channel Audio) 24-bit analog-to-digital; 24-bit digital-to-analog one SATA controller...Computer Information Interrupt levels BIOS chip (NVRAM) NIC Video Type Audio Type Stereo conversion Controllers Drives Expansion Bus Bus type Bus speed Cards PCI connectors card size connector size 24 8 Mb or 4 Mb NOTE: The AMD Phenom processor requires the 8-Mb NVRAM chip and is ...

User's Guide
Page 203
...you lift the cover. 4 Grip the sides of the procedures in this section, follow the safety instructions in the illustration. Ensure that a graphic card heat sink has had sufficient time to cool before removing the computer cover. 1 Follow the procedures in "Before You Begin" on page 19.... touch it aside on the back panel, remove the padlock. 3 Locate the cover release latch shown in the Product Information Guide. CAUTION: Graphic card heat sinks can become very hot during normal operation. Removing the Computer Cover CAUTION: Before you have installed a padlock through the padlock ring...
...you lift the cover. 4 Grip the sides of the procedures in this section, follow the safety instructions in the illustration. Ensure that a graphic card heat sink has had sufficient time to cool before removing the computer cover. 1 Follow the procedures in "Before You Begin" on page 19.... touch it aside on the back panel, remove the padlock. 3 Locate the cover release latch shown in the Product Information Guide. CAUTION: Graphic card heat sinks can become very hot during normal operation. Removing the Computer Cover CAUTION: Before you have installed a padlock through the padlock ring...

User's Guide
Page 260
... if there are two video controllers available (PCI, Onboard, Auto, and PEG). The settings are Auto, 16MB, 32MB, 64MB, 128MB, or Off. NOTE: A PCI Express graphics card will be used. USB 0 through 5 (On default) Front USB Ports (On default) LPT Port Mode (PS/2 default) LPT Port Address Serial Port #1 (Auto default) Serial...
... if there are two video controllers available (PCI, Onboard, Auto, and PEG). The settings are Auto, 16MB, 32MB, 64MB, 128MB, or Off. NOTE: A PCI Express graphics card will be used. USB 0 through 5 (On default) Front USB Ports (On default) LPT Port Mode (PS/2 default) LPT Port Address Serial Port #1 (Auto default) Serial...

User's Guide
Page 292
...) B matched pair of memory modules in the other connectors. Current 32-bit operating systems, such as network connectors and SCSI controllers • PCI cards • Graphics card(s) • PCI Express cards (if applicable) 292 Memory Addressing Memory With 4-GB or Greater Configurations (32-bit Operating Systems Only) This computer supports a maximum of 8 GB of...
...) B matched pair of memory modules in the other connectors. Current 32-bit operating systems, such as network connectors and SCSI controllers • PCI cards • Graphics card(s) • PCI Express cards (if applicable) 292 Memory Addressing Memory With 4-GB or Greater Configurations (32-bit Operating Systems Only) This computer supports a maximum of 8 GB of...
User's Guide
Page 312
... static electricity from your body before you have reinstalled all cards except the graphics card (see "PCI, PCI Express Cards, and PS/2 Serial Port Adapters" on page 41 for mini tower computers, or "Removing a PCI Card" on the cards. For instructions on which cables should be replaced. 6 Repeat...the Computer Cover" on page 297), reconnect the computer and devices to 20 seconds, and then remove the computer cover (see "Dell Diagnostics" on . TEST THE GRAPHICS CARD - 1 Turn off the computer and devices, disconnect them on page 327). 5 If any of your computer's electronic components....
... static electricity from your body before you have reinstalled all cards except the graphics card (see "PCI, PCI Express Cards, and PS/2 Serial Port Adapters" on page 41 for mini tower computers, or "Removing a PCI Card" on the cards. For instructions on which cables should be replaced. 6 Repeat...the Computer Cover" on page 297), reconnect the computer and devices to 20 seconds, and then remove the computer cover (see "Dell Diagnostics" on . TEST THE GRAPHICS CARD - 1 Turn off the computer and devices, disconnect them on page 327). 5 If any of your computer's electronic components....
User's Guide
Page 321
... a key on properly. • Ensure that the electrical outlet is working by testing it with another device, such as you begin any cards. • Remove and then reinstall the graphics card, if applicable. The computer is either turned off or is not receiving power. • Reseat the power cable into both the power...
... a key on properly. • Ensure that the electrical outlet is working by testing it with another device, such as you begin any cards. • Remove and then reinstall the graphics card, if applicable. The computer is either turned off or is not receiving power. • Reseat the power cable into both the power...

User's Guide
Page 325
D I SA B L E D I G I N D O W S V O L U M E C O N T R O L - A D J U S T T H E W I T A L M O D E - CHECK THE MONITOR CABLE CONNECTION - • If you purchased a graphics card, ensure that the monitor is connected to the card. • Ensure that your monitor is properly connected (see the Quick Reference Guide that came with your computer). • If you are using a video extension ...
D I SA B L E D I G I N D O W S V O L U M E C O N T R O L - A D J U S T T H E W I T A L M O D E - CHECK THE MONITOR CABLE CONNECTION - • If you purchased a graphics card, ensure that the monitor is connected to the card. • Ensure that your monitor is properly connected (see the Quick Reference Guide that came with your computer). • If you are using a video extension ...
User's Guide
Page 330
..., follow the safety instructions located in the Product Information Guide. the Run the BIOS Recovery utility, wait for computer is not identified, contact Dell for instructions on the lights change as the boot process completes. Also, check the diagnostic lights to see "Video and Monitor Problems" on... occurred. Solid green power light and no beep code and no beep code but the computer locks up during POST The monitor or the graphics card may be off condition, Plug the computer into a working or a possible pre-BIOS failure has electrical outlet and press the power occurred....
..., follow the safety instructions located in the Product Information Guide. the Run the BIOS Recovery utility, wait for computer is not identified, contact Dell for instructions on the lights change as the boot process completes. Also, check the diagnostic lights to see "Video and Monitor Problems" on... occurred. Solid green power light and no beep code and no beep code but the computer locks up during POST The monitor or the graphics card may be off condition, Plug the computer into a working or a possible pre-BIOS failure has electrical outlet and press the power occurred....


