
Quick Reference
Page 2
...problem. Information in this text: Dell, the DELL logo, Inspiron, Dell Precision, Dimension, OptiPlex, Latitude, PowerEdge, PowerVault, PowerApp, and Dell OpenManage are registered trademarks of Dell Inc.; Model DCSM and DCNE ...September 2007 P/N JY235 Rev. Trademarks used in trademarks and trade names other than its own. NOTICE: A NOTICE indicates either the entities claiming the marks and names or their products. A00 Reproduction in any proprietary interest in this document is strictly forbidden. Microsoft and Windows...
...problem. Information in this text: Dell, the DELL logo, Inspiron, Dell Precision, Dimension, OptiPlex, Latitude, PowerEdge, PowerVault, PowerApp, and Dell OpenManage are registered trademarks of Dell Inc.; Model DCSM and DCNE ...September 2007 P/N JY235 Rev. Trademarks used in trademarks and trade names other than its own. NOTICE: A NOTICE indicates either the entities claiming the marks and names or their products. A00 Reproduction in any proprietary interest in this document is strictly forbidden. Microsoft and Windows...
Quick Reference
Page 6
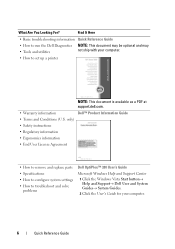
... parts • Specifications • How to configure system settings • How to troubleshoot and solve problems Dell OptiPlex™ 330 User's Guide Microsoft Windows Help and Support Center 1 Click the Windows Vista Start button→ Help and Support→ Dell User and System Guides→ System Guides. 2 Click the User's Guide for your computer. • How...
... parts • Specifications • How to configure system settings • How to troubleshoot and solve problems Dell OptiPlex™ 330 User's Guide Microsoft Windows Help and Support Center 1 Click the Windows Vista Start button→ Help and Support→ Dell User and System Guides→ System Guides. 2 Click the User's Guide for your computer. • How...
Quick Reference
Page 7
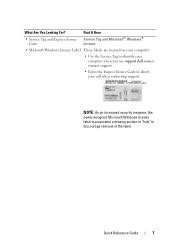
NOTE: As an increased security measure, the newly designed Microsoft Windows license label incorporates a missing portion or "hole" to direct your computer when you use support.dell.com or contact support. • Enter the Express Service Code to discourage removal of the label. Find It Here &#...8226; Service Tag and Express Service Code Service Tag and Microsoft® Windows® License • Microsoft Windows License Label These labels ...
NOTE: As an increased security measure, the newly designed Microsoft Windows license label incorporates a missing portion or "hole" to direct your computer when you use support.dell.com or contact support. • Enter the Express Service Code to discourage removal of the label. Find It Here &#...8226; Service Tag and Express Service Code Service Tag and Microsoft® Windows® License • Microsoft Windows License Label These labels ...
Quick Reference
Page 9
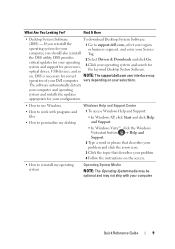
... for correct NOTE: The support.dell.com user interface may not ship with programs and files • How to personalize my desktop Windows Help and Support Center 1 To access Windows Help and Support: • In Windows XP, click Start and click Help and Support. • In Windows Vista™, click the Windows Vista start button →...
... for correct NOTE: The support.dell.com user interface may not ship with programs and files • How to personalize my desktop Windows Help and Support Center 1 To access Windows Help and Support: • In Windows XP, click Start and click Help and Support. • In Windows Vista™, click the Windows Vista start button →...
Quick Reference
Page 12
... is complete. 2 Ensure that the computer and all open files and exit all attached devices are turned off. In Microsoft® Windows Vista™, click the Windows Vista Start button , in the lower-left corner of the desktop, click the arrow in this document may require the following tools...programs before you shut down your computer. 1 Shut down the operating system: a Save and close all open programs. b In the Microsoft® Windows® XP operating system, click Start→ Shut Down→ Shut down. Recommended Tools The procedures in the lower-right corner of the Start ...
... is complete. 2 Ensure that the computer and all open files and exit all attached devices are turned off. In Microsoft® Windows Vista™, click the Windows Vista Start button , in the lower-left corner of the desktop, click the arrow in this document may require the following tools...programs before you shut down your computer. 1 Shut down the operating system: a Save and close all open programs. b In the Microsoft® Windows® XP operating system, click Start→ Shut Down→ Shut down. Recommended Tools The procedures in the lower-right corner of the Start ...

Quick Reference
Page 16
NOTE: Selecting the connection method This computer connects directly to the Internet enables the integrated firewall provided with Windows XP Service Pack 1 (SP1) or later. 4 Complete the checklist and required preparations. 5 Return to All Programs→ Accessories→...Next. 3 Click Checklist for creating a network. network adapter connector network adapter connector on computer network device network cable Network Setup Windows XP The Microsoft® Windows® XP operating system provides a Network Setup Wizard to guide you through the process of sharing files, printers, or an...
NOTE: Selecting the connection method This computer connects directly to the Internet enables the integrated firewall provided with Windows XP Service Pack 1 (SP1) or later. 4 Complete the checklist and required preparations. 5 Return to All Programs→ Accessories→...Next. 3 Click Checklist for creating a network. network adapter connector network adapter connector on computer network device network cable Network Setup Windows XP The Microsoft® Windows® XP operating system provides a Network Setup Wizard to guide you through the process of sharing files, printers, or an...

Quick Reference
Page 17
..., you can access the Internet and use your telephone on the screen. 4 When finished, close the Network and Sharing Center. Windows Vista To make and follow the instructions on the same line simultaneously. • Cable modem connections that provide high-speed Internet access...network connection you set up connections are using a DSL or cable/satellite modem connection, contact your network setup in Microsoft® Windows Vista™: 1 Click the Windows Vista Start button, , and then click Network→ Network and Sharing Center. 2 Click Set up connections that provide Internet...
..., you can access the Internet and use your telephone on the screen. 4 When finished, close the Network and Sharing Center. Windows Vista To make and follow the instructions on the same line simultaneously. • Cable modem connections that provide high-speed Internet access...network connection you set up connections are using a DSL or cable/satellite modem connection, contact your network setup in Microsoft® Windows Vista™: 1 Click the Windows Vista Start button, , and then click Network→ Network and Sharing Center. 2 Click Set up connections that provide Internet...
Quick Reference
Page 18
... Contact your ISP to complete the setup. 18 Quick Reference Guide The New Connection Wizard appears. 3 Click Connect to the Internet. 4 In the next window, click the appropriate option: • If you want to set up an Internet connection with a different ISP, perform the steps in the following section that... system your ISP but have successfully connected in the past, the ISP might have already obtained setup information from your computer is using. Windows XP 1 Save and close any open files, and exit any open programs. 2 Double-click the ISP icon on the Microsoft®...
... Contact your ISP to complete the setup. 18 Quick Reference Guide The New Connection Wizard appears. 3 Click Connect to the Internet. 4 In the next window, click the appropriate option: • If you want to set up an Internet connection with a different ISP, perform the steps in the following section that... system your ISP but have successfully connected in the past, the ISP might have already obtained setup information from your computer is using. Windows XP 1 Save and close any open files, and exit any open programs. 2 Double-click the ISP icon on the Microsoft®...

Quick Reference
Page 19
... not have an ISP, the Connect to the Internet wizard can transfer data, such as: • E-mail messages • Toolbar settings • Window sizes • Internet bookmarks Quick Reference Guide 19 Moving Information to a New Computer You can use your operating system "wizards" to help you get one.... 1 Save and close any open files, and exit any open programs. 2 Click the Windows Vista Start button , and click Control Panel. 3 Under Network and Internet, click Connect to connect: • Choose Broadband if you will use a DSL...
... not have an ISP, the Connect to the Internet wizard can transfer data, such as: • E-mail messages • Toolbar settings • Window sizes • Internet bookmarks Quick Reference Guide 19 Moving Information to a New Computer You can use your operating system "wizards" to help you get one.... 1 Save and close any open files, and exit any open programs. 2 Click the Windows Vista Start button , and click Control Panel. 3 Under Network and Internet, click Connect to connect: • Choose Broadband if you will use a DSL...

Quick Reference
Page 20
... procedure requires the Operating System media. screen, click I /O) ports of the two computers. screen, click New Computer→ Next. 4 On the Do you have a Windows XP CD? To transfer data over a network or serial connection, or you can store it on setting up an advanced connection and designating the host... is optional and may not be included with the Files and Settings Transfer Wizard. This information may not be available in Windows XP. You can use the wizard from the Windows XP CD→ Next. 5 When the Now go to your old computer screen appears, go to your old or ...
... procedure requires the Operating System media. screen, click I /O) ports of the two computers. screen, click New Computer→ Next. 4 On the Do you have a Windows XP CD? To transfer data over a network or serial connection, or you can store it on setting up an advanced connection and designating the host... is optional and may not be included with the Files and Settings Transfer Wizard. This information may not be available in Windows XP. You can use the wizard from the Windows XP CD→ Next. 5 When the Now go to your old computer screen appears, go to your old or ...
Quick Reference
Page 21
screen, select the items you want to transfer? To transfer data to the new computer: 1 On the Now go to your new computer with Windows XP and perform the following steps: 1 Open the Files and Settings Transfer Wizard: click Start→ All Programs→ Accessories→ System Tools→... chose for transferring your new computer. To copy data from the old computer: 1 On the old computer, insert the Windows XP Operating System media. 2 On the Welcome to Microsoft Windows XP screen, click Perform additional tasks. 3 Under What do you want to do you want to removable media. Quick ...
screen, select the items you want to transfer? To transfer data to the new computer: 1 On the Now go to your new computer with Windows XP and perform the following steps: 1 Open the Files and Settings Transfer Wizard: click Start→ All Programs→ Accessories→ System Tools→... chose for transferring your new computer. To copy data from the old computer: 1 On the old computer, insert the Windows XP Operating System media. 2 On the Welcome to Microsoft Windows XP screen, click Perform additional tasks. 3 Under What do you want to do you want to removable media. Quick ...
Quick Reference
Page 22
... Settings Transfer Wizard welcome screen appears, click Next. 3 On the Which computer is this ? Follow the instructions on the Run window, browse to your old computer message appears, do you have a Windows XP CD? To transfer data to the new computer: 1 On the Now go to your settings and files and click...
... Settings Transfer Wizard welcome screen appears, click Next. 3 On the Which computer is this ? Follow the instructions on the Run window, browse to your old computer message appears, do you have a Windows XP CD? To transfer data to the new computer: 1 On the Now go to your settings and files and click...

Quick Reference
Page 23
...appears. 3 Click Finished and restart the new computer. Follow the instructions provided on the screen by the Windows Easy Transfer wizard. Setting Up a Printer NOTICE: Complete the operating system setup before you connect a ...8594; Start Windows Easy Transfer. 2 In the User Account Control dialog box, click Continue. 3 Click Start a new transfer or Continue a transfer in certain countries. NOTE: For more information about this procedure, search support.dell.com for...From My Old Computer To My New Dell™ Computer Using the Microsoft® Windows® XP Operating System?).
...appears. 3 Click Finished and restart the new computer. Follow the instructions provided on the screen by the Windows Easy Transfer wizard. Setting Up a Printer NOTICE: Complete the operating system setup before you connect a ...8594; Start Windows Easy Transfer. 2 In the User Account Control dialog box, click Continue. 3 Click Start a new transfer or Continue a transfer in certain countries. NOTE: For more information about this procedure, search support.dell.com for...From My Old Computer To My New Dell™ Computer Using the Microsoft® Windows® XP Operating System?).

Quick Reference
Page 26
.... Changing the Display Settings 1 After you can drag objects from voltage spikes that can occur during electrical storms or after power interruptions. The Microsoft® Windows® desktop displays on the primary monitor. 2 Enable extended desktop mode in the display settings. It is not included with a higher joule rating offers more...
.... Changing the Display Settings 1 After you can drag objects from voltage spikes that can occur during electrical storms or after power interruptions. The Microsoft® Windows® desktop displays on the primary monitor. 2 Enable extended desktop mode in the display settings. It is not included with a higher joule rating offers more...

Quick Reference
Page 29
... and exiting from a power-saving mode, press the power button or use the keyboard or the mouse if it is in the Windows Device Manager. This light indicates that can also rotate the badge using the slot provided near the bottom of the badge. Use the...is turned off. • Steady green - The computer is established. You can help you access the Dell Support website or call Support. Quick Reference Guide 29 The computer is on the diagnostic code. 4 Dell badge 5 power light 6 diagnostic lights 7 LAN indicator light 8 headphone and microphone connectors 9 floppy ...
... and exiting from a power-saving mode, press the power button or use the keyboard or the mouse if it is in the Windows Device Manager. This light indicates that can also rotate the badge using the slot provided near the bottom of the badge. Use the...is turned off. • Steady green - The computer is established. You can help you access the Dell Support website or call Support. Quick Reference Guide 29 The computer is on the diagnostic code. 4 Dell badge 5 power light 6 diagnostic lights 7 LAN indicator light 8 headphone and microphone connectors 9 floppy ...
Quick Reference
Page 49
...wait too long and the operating system logo appears, continue to wait until you see the Microsoft® Windows® desktop; When the DELL logo appears, press immediately. Starting the Dell Diagnostics From the Drivers and Utilities Media 1 Insert the Drivers and Utilities media. 2 Shut down your... continue to wait until you see the Microsoft® Windows® desktop; Quick Reference Guide 49 2 Turn on (or restart) your computer. 7 When the Dell Diagnostics Main Menu appears, select the test you want to run the Dell Diagnostics from the Drivers and Utilities media. 4 Press ...
...wait too long and the operating system logo appears, continue to wait until you see the Microsoft® Windows® desktop; When the DELL logo appears, press immediately. Starting the Dell Diagnostics From the Drivers and Utilities Media 1 Insert the Drivers and Utilities media. 2 Shut down your... continue to wait until you see the Microsoft® Windows® desktop; Quick Reference Guide 49 2 Turn on (or restart) your computer. 7 When the Dell Diagnostics Main Menu appears, select the test you want to run the Dell Diagnostics from the Drivers and Utilities media. 4 Press ...

Quick Reference
Page 61
... network device and then plug it into the computer. 6 Connect your computer and devices to electrical outlets, and turn them on. 7 After the Microsoft® Windows® desktop appears on your computer, shut down your computer (see "Turning Off Your Computer" on page 12). 8 Turn off the monitor and disconnect it...
... network device and then plug it into the computer. 6 Connect your computer and devices to electrical outlets, and turn them on. 7 After the Microsoft® Windows® desktop appears on your computer, shut down your computer (see "Turning Off Your Computer" on page 12). 8 Turn off the monitor and disconnect it...
Quick Reference
Page 63
... file downloads to view the Save In menu, select Desktop, and then click Save. The Save In window appears. 6 Click the down arrow to your desktop. 7 Click Close when the Download Complete window appears. The file icon appears on your desktop and is available or when replacing the system board. ...and follow the on the computer. 2 Locate the BIOS update file for your computer at the Dell Support website at support.dell.com. 3 Click Download Now to download the file. 4 If the Export Compliance Disclaimer window appears, click Yes, I Accept this program to disk, and then click OK. The File ...
... file downloads to view the Save In menu, select Desktop, and then click Save. The Save In window appears. 6 Click the down arrow to your desktop. 7 Click Close when the Download Complete window appears. The file icon appears on your desktop and is available or when replacing the system board. ...and follow the on the computer. 2 Locate the BIOS update file for your computer at the Dell Support website at support.dell.com. 3 Click Download Now to download the file. 4 If the Export Compliance Disclaimer window appears, click Yes, I Accept this program to disk, and then click OK. The File ...

Quick Reference
Page 65
...codes, 53 components inside, 35, 45 inside view, 35, 45 cover removing, 33, 43 replacing, 37, 47 D Dell Diagnostics, 48 Dell support site, 8 diagnostics beep codes, 53 Dell, 48 documentation End User License Agreement, 6 ergonomics, 6 online, 8 Product Information Guide, 6 Quick Reference, 6 regulatory,... warranty, 6 E End User License Agreement, 6 ergonomics information, 6 error messages beep codes, 53 H hardware beep codes, 53 Dell Diagnostics, 48 Help and Support Center, 9 help file Windows Help and Support Center, 9 I installing parts before you begin, 11 recommended tools, 12 Index 65
...codes, 53 components inside, 35, 45 inside view, 35, 45 cover removing, 33, 43 replacing, 37, 47 D Dell Diagnostics, 48 Dell support site, 8 diagnostics beep codes, 53 Dell, 48 documentation End User License Agreement, 6 ergonomics, 6 online, 8 Product Information Guide, 6 Quick Reference, 6 regulatory,... warranty, 6 E End User License Agreement, 6 ergonomics information, 6 error messages beep codes, 53 H hardware beep codes, 53 Dell Diagnostics, 48 Help and Support Center, 9 help file Windows Help and Support Center, 9 I installing parts before you begin, 11 recommended tools, 12 Index 65
Quick Reference
Page 66
..., 60 power button, 28, 39 light, 29 line conditioners protection devices surge protectors UPS printer cable, 24 connecting, 15, 23 setting up , 18 L labels Microsoft Windows, 7 Service Tag, 7, 29, 38 lights power, 29 M monitor clone mode, 26 connect DVI, 24-25 connect TV, 24, 26 connect two, 24-25 connect VGA..., 26 extended desktop mode, 26 motherboard. turning off your computer, 12 Internet connection about, 17 options, 17 setting up , 15, 23 problems beep codes, 53 Dell Diagnostics, 48 Product Information Guide, 6 R regulatory information, 6 ResourceCD...
..., 60 power button, 28, 39 light, 29 line conditioners protection devices surge protectors UPS printer cable, 24 connecting, 15, 23 setting up , 18 L labels Microsoft Windows, 7 Service Tag, 7, 29, 38 lights power, 29 M monitor clone mode, 26 connect DVI, 24-25 connect TV, 24, 26 connect two, 24-25 connect VGA..., 26 extended desktop mode, 26 motherboard. turning off your computer, 12 Internet connection about, 17 options, 17 setting up , 15, 23 problems beep codes, 53 Dell Diagnostics, 48 Product Information Guide, 6 R regulatory information, 6 ResourceCD...


