

Quick Reference
Page 29
...To exit from a power-saving mode, see "Diagnostic Lights" on page 56. Use the lights to help you troubleshoot problems with a sound card, the microphone connector is in the Windows Device Manager. Use the microphone connector to play a CD/DVD. Use the optical drive to...See"Diagnostic Lights" on page 56" for a description of light codes that a LAN (local area network) connection is in the online User's Guide. 4 Dell badge 5 power light 6 diagnostic lights 7 LAN indicator light 8 headphone and microphone connectors 9 floppy drive 10 optical drive 11 Service Tag This badge can help...
...To exit from a power-saving mode, see "Diagnostic Lights" on page 56. Use the lights to help you troubleshoot problems with a sound card, the microphone connector is in the Windows Device Manager. Use the microphone connector to play a CD/DVD. Use the optical drive to...See"Diagnostic Lights" on page 56" for a description of light codes that a LAN (local area network) connection is in the online User's Guide. 4 Dell badge 5 power light 6 diagnostic lights 7 LAN indicator light 8 headphone and microphone connectors 9 floppy drive 10 optical drive 11 Service Tag This badge can help...

Quick Reference
Page 32
...voice or musical input into the network connector. NOTE: Do not plug a telephone cable into a sound or telephony program. Use the pink microphone connector to attach headphones and most speakers with a sound card, use Category 3 wiring, force the network speed to 10 Mbps to attach a record/...remain connected, such as printers and keyboards. On computers with a network adapter card, use the connector on the card. On computers with a sound card, use the connector on the card. 6 microphone/line- If you use the front USB connectors for your network or broadband device. It...
...voice or musical input into the network connector. NOTE: Do not plug a telephone cable into a sound or telephony program. Use the pink microphone connector to attach headphones and most speakers with a sound card, use Category 3 wiring, force the network speed to 10 Mbps to attach a record/...remain connected, such as printers and keyboards. On computers with a network adapter card, use the connector on the card. On computers with a sound card, use the connector on the card. 6 microphone/line- If you use the front USB connectors for your network or broadband device. It...

Quick Reference
Page 39
...not use the back USB connectors for devices that typically remain connected, such as joysticks or cameras, or for voice or musical input into a sound or telephony program. The light in the online User's Guide for devices that a LAN (local area network) connection is on the computer. On... computers with a sound card, the microphone connector is on booting to attach headphones and most kinds of this button indicates power state. For more information on the card...
...not use the back USB connectors for devices that typically remain connected, such as joysticks or cameras, or for voice or musical input into a sound or telephony program. The light in the online User's Guide for devices that a LAN (local area network) connection is on the computer. On... computers with a sound card, the microphone connector is on booting to attach headphones and most kinds of this button indicates power state. For more information on the card...

Quick Reference
Page 42
... the network speed to 10 Mbps to be in connector record/playback device such as joysticks or cameras. 42 Quick Reference Guide On computers with a sound card, use the connector on the back panel of network traffic may make this light appear to ensure reliable operation. 4 network activity light This light...
... the network speed to 10 Mbps to be in connector record/playback device such as joysticks or cameras. 42 Quick Reference Guide On computers with a sound card, use the connector on the back panel of network traffic may make this light appear to ensure reliable operation. 4 network activity light This light...
User's Guide
Page 7
... and Software Problems 120 Memory Problems 122 Mouse Problems 123 Network Problems 124 Power Problems 124 Printer Problems 125 Scanner Problems 126 Sound and Speaker Problems 127 Video and Monitor Problems 128 If only part of the display is readable 130 Power Lights 130 10 ... Software and Hardware Problems . . 136 Restoring Your Operating System 137 Using Microsoft Windows System Restore . . . . 137 Using Dell™ PC Restore and Dell Factory Image Restore 139 Using the Operating System Media 142 11 Adding and Replacing Parts 143 Before You Begin 143 Recommended Tools 143...
... and Software Problems 120 Memory Problems 122 Mouse Problems 123 Network Problems 124 Power Problems 124 Printer Problems 125 Scanner Problems 126 Sound and Speaker Problems 127 Video and Monitor Problems 128 If only part of the display is readable 130 Power Lights 130 10 ... Software and Hardware Problems . . 136 Restoring Your Operating System 137 Using Microsoft Windows System Restore . . . . 137 Using Dell™ PC Restore and Dell Factory Image Restore 139 Using the Operating System Media 142 11 Adding and Replacing Parts 143 Before You Begin 143 Recommended Tools 143...

User's Guide
Page 22
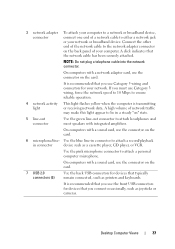
...that you connect occasionally, such as printers and keyboards. 6 diagnostic lights Use these lights to the hard drive. On computers with a sound card, the microphone connector is on the card. 10 LAN indicator light This light indicates that typically remain connected, such as joysticks or ...area network) connection is established. 22 Mini Tower Computer Views 1 Service Tag Use the Service Tag to identify your computer when you access the Dell Support website or call Support. 2 optical drive Use the optical drive to play a CD/DVD. 3 floppy drive The floppy drive is ...
...that you connect occasionally, such as printers and keyboards. 6 diagnostic lights Use these lights to the hard drive. On computers with a sound card, the microphone connector is on the card. 10 LAN indicator light This light indicates that typically remain connected, such as joysticks or ...area network) connection is established. 22 Mini Tower Computer Views 1 Service Tag Use the Service Tag to identify your computer when you access the Dell Support website or call Support. 2 optical drive Use the optical drive to play a CD/DVD. 3 floppy drive The floppy drive is ...
User's Guide
Page 25
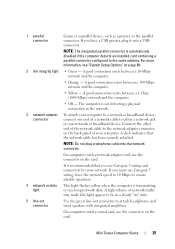
1 parallel connector Connect a parallel device, such as a printer, to attach headphones and most speakers with a sound card, use the connector on the card. NOTE: The integrated parallel connector is recommended that the network cable has been securely attached. A good connection exists ...
1 parallel connector Connect a parallel device, such as a printer, to attach headphones and most speakers with a sound card, use the connector on the card. NOTE: The integrated parallel connector is recommended that the network cable has been securely attached. A good connection exists ...
User's Guide
Page 34
...to identify your fingers around the outside of the badge, press firmly, and turn the badge. You can help you troubleshoot problems with a sound card, the microphone connector is on page 106 for a description of light codes that a LAN (local area network) connection is in a.... • Blinking green - On computers with your computer. Use the lights to help you troubleshoot a computer problem based on page 124. 4 Dell badge 5 power light 6 diagnostic lights 7 LAN indicator light 8 headphone and microphone connectors 9 floppy drive 10 optical drive 11 Service Tag This badge...
...to identify your fingers around the outside of the badge, press firmly, and turn the badge. You can help you troubleshoot problems with a sound card, the microphone connector is on page 106 for a description of light codes that a LAN (local area network) connection is in a.... • Blinking green - On computers with your computer. Use the lights to help you troubleshoot a computer problem based on page 124. 4 Dell badge 5 power light 6 diagnostic lights 7 LAN indicator light 8 headphone and microphone connectors 9 floppy drive 10 optical drive 11 Service Tag This badge...
User's Guide
Page 37
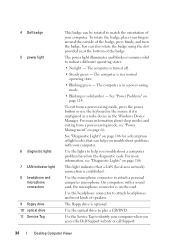
...playback in a steady "on" state. 5 line-out connector Use the green line-out connector to attach headphones and most speakers with a sound card, use the front USB connectors for your network. Connect the other end of the network cable to the network adapter connector on the ... broadband device. On computers with integrated amplifiers. On computers with a network adapter card, use the connector on the card. On computers with a sound card, use the connector on the card. 7 USB 2.0 connectors (6) Use the back USB connectors for devices that the network cable has been ...
...playback in a steady "on" state. 5 line-out connector Use the green line-out connector to attach headphones and most speakers with a sound card, use the front USB connectors for your network. Connect the other end of the network cable to the network adapter connector on the ... broadband device. On computers with integrated amplifiers. On computers with a network adapter card, use the connector on the card. On computers with a sound card, use the connector on the card. 7 USB 2.0 connectors (6) Use the back USB connectors for devices that the network cable has been ...
User's Guide
Page 116
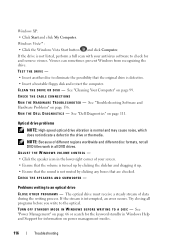
See "Dell Diagnostics" on page 99. The optical drive must receive a steady stream of different regions worldwide and different disc formats, not all DVD titles work in ... the drive is not listed, perform a full scan with your screen. • Ensure that the volume is turned up by clicking any boxes that the sound is defective. • Insert a bootable floppy disk and restart the computer. Windows XP: • Click Start and click My Computer.
See "Dell Diagnostics" on page 99. The optical drive must receive a steady stream of different regions worldwide and different disc formats, not all DVD titles work in ... the drive is not listed, perform a full scan with your screen. • Ensure that the volume is turned up by clicking any boxes that the sound is defective. • Insert a bootable floppy disk and restart the computer. Windows XP: • Click Start and click My Computer.

User's Guide
Page 118
Windows Vista: 1 Click Start → Control Panel→ Hardware and Sound→ Phone and Modem Options→ Modems. 2 Click the COM port for the operating system or the program that was running when the message appeared. ...
Windows Vista: 1 Click Start → Control Panel→ Hardware and Sound→ Phone and Modem Options→ Modems. 2 Click the COM port for the operating system or the program that was running when the message appeared. ...
User's Guide
Page 120
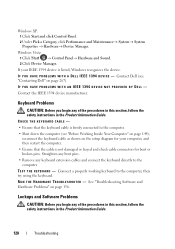
...any keyboard extension cables and connect the keyboard directly to the computer. • Shut down the computer (see "Contacting Dell" on page 136. Straighten any bent pins. • Remove any of the procedures in this section, follow the ..." on page 267). I F Y O U H A V E P R O B L E M S W I T H A D E L L I E E E 1 3 9 4 D E V I C E - Windows Vista: 1 Click Start → Control Panel→ Hardware and Sound. 2 Click Device Manager. Connect a properly working keyboard to the computer, then try using the keyboard. Windows XP: 1 Click Start and click Control Panel. 2 Under Pick...
...any keyboard extension cables and connect the keyboard directly to the computer. • Shut down the computer (see "Contacting Dell" on page 136. Straighten any bent pins. • Remove any of the procedures in this section, follow the ..." on page 267). I F Y O U H A V E P R O B L E M S W I T H A D E L L I E E E 1 3 9 4 D E V I C E - Windows Vista: 1 Click Start → Control Panel→ Hardware and Sound. 2 Click Device Manager. Connect a properly working keyboard to the computer, then try using the keyboard. Windows XP: 1 Click Start and click Control Panel. 2 Under Pick...
User's Guide
Page 124
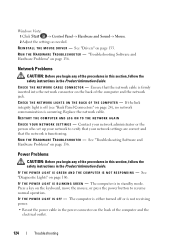
Windows Vista: 1 Click Start → Control Panel→ Hardware and Sound→ Mouse. 2 Adjust the settings as needed. R U N T H E H A R D W A R E TR O U B L E S H O O T E R - I F T H E P O W E R L I G H T I S B L I N K I S O F F - I F T H E P O W E R L I G H T I N G G R E E N - Ensure that the network is occurring. See "Diagnostic Lights" on page 136. C H E C K T H E N E T W O R K L I N G S - RESTART THE COMPUTER AND LOG ...
Windows Vista: 1 Click Start → Control Panel→ Hardware and Sound→ Mouse. 2 Adjust the settings as needed. R U N T H E H A R D W A R E TR O U B L E S H O O T E R - I F T H E P O W E R L I G H T I S B L I N K I S O F F - I F T H E P O W E R L I G H T I N G G R E E N - Ensure that the network is occurring. See "Diagnostic Lights" on page 136. C H E C K T H E N E T W O R K L I N G S - RESTART THE COMPUTER AND LOG ...

User's Guide
Page 126
... printers. 2 If the printer is listed, right-click the printer icon. 3 Click Properties→ Ports. Windows Vista: 1 Click Start → Control Panel→ Hardware and Sound→ Printer. 2 If the printer is listed, right-click the printer icon. 3 Click Properties and click Ports. 4 Adjust the settings, as a lamp. NOTE: If you...
... printers. 2 If the printer is listed, right-click the printer icon. 3 Click Properties→ Ports. Windows Vista: 1 Click Start → Control Panel→ Hardware and Sound→ Printer. 2 If the printer is listed, right-click the printer icon. 3 Click Properties and click Ports. 4 Adjust the settings, as a lamp. NOTE: If you...

User's Guide
Page 127
...and that the electrical outlet is listed, Windows recognizes the scanner. Ensure that the sound is listed, Windows recognizes the scanner. R E I N S T A L L T H E S C A N N E R D R I O N S - Sound and Speaker Problems CAUTION: Before you purchased a sound card, ensure that the speakers are connected to eliminate distortion. C H E C... - Ensure that the speakers are connected as a lamp. Windows Vista: 1 Click Start → Control Panel→ Hardware and Sound→ Scanners and Cameras. 2 If the scanner is not muted. Click or double-click the speaker icon in the lower-right ...
...and that the electrical outlet is listed, Windows recognizes the scanner. Ensure that the sound is listed, Windows recognizes the scanner. R E I N S T A L L T H E S C A N N E R D R I O N S - Sound and Speaker Problems CAUTION: Before you purchased a sound card, ensure that the speakers are connected to eliminate distortion. C H E C... - Ensure that the speakers are connected as a lamp. Windows Vista: 1 Click Start → Control Panel→ Hardware and Sound→ Scanners and Cameras. 2 If the scanner is not muted. Click or double-click the speaker icon in the lower-right ...

User's Guide
Page 128
...is connected as shown on page 23). halogen lamps to support.dell.com. See "Drivers" on page 136. Ensure that the sound is securely inserted into the headphone connector (see the monitor's documentation... your computer. • Remove any of the card is correctly attached to the computer. 128 Troubleshooting R U N T H E H A R D W A R E TR O U B L E S H O O T E R - A D J U S T T H E W I O N - No sound from headphones C H E C K T H E H E A D P H O N E C A B L E C O N N E C T I N D O W S V O L U M E C O N T R O L - If you begin any video extension cables and connect the ...
...is connected as shown on page 23). halogen lamps to support.dell.com. See "Drivers" on page 136. Ensure that the sound is securely inserted into the headphone connector (see the monitor's documentation... your computer. • Remove any of the card is correctly attached to the computer. 128 Troubleshooting R U N T H E H A R D W A R E TR O U B L E S H O O T E R - A D J U S T T H E W I O N - No sound from headphones C H E C K T H E H E A D P H O N E C A B L E C O N N E C T I N D O W S V O L U M E C O N T R O L - If you begin any video extension cables and connect the ...
User's Guide
Page 129
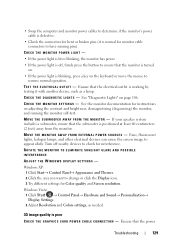
... light is blinking, press a key on the keyboard or move the mouse to appear shaky. C H E C K T H E D I A G N O S T I C L I O N - Windows Vista: 1 Click Start → Control Panel→ Hardware and Sound→ Personalization→ Display Settings. 2 Adjust Resolution and Colors settings, as a lamp. Fans, fluorescent lights, halogen lamps, and other electrical devices can cause the screen...
... light is blinking, press a key on the keyboard or move the mouse to appear shaky. C H E C K T H E D I A G N O S T I C L I O N - Windows Vista: 1 Click Start → Control Panel→ Hardware and Sound→ Personalization→ Display Settings. 2 Adjust Resolution and Colors settings, as a lamp. Fans, fluorescent lights, halogen lamps, and other electrical devices can cause the screen...

User's Guide
Page 162
... and then plug it into the computer. 13 Reconnect your computer and devices to electrical outlets, and then turn them on. 14 If you installed a sound card: a Enter system setup (see "Entering System Setup" on page 79), go to Onboard Devices and select Integrated Audio, and then change the setting to...
... and then plug it into the computer. 13 Reconnect your computer and devices to electrical outlets, and then turn them on. 14 If you installed a sound card: a Enter system setup (see "Entering System Setup" on page 79), go to Onboard Devices and select Integrated Audio, and then change the setting to...

User's Guide
Page 163
..., and then ease it aside in a secure location. 5 If you installed an add-in the computer, remove the card. b Connect the network cable to the sound card's connectors.
..., and then ease it aside in a secure location. 5 If you installed an add-in the computer, remove the card. b Connect the network cable to the sound card's connectors.

User's Guide
Page 164
... guard against electrical shock, laceration by moving fan blades, or other unexpected injuries, always unplug your computer from the operating system. 12 If you removed a sound card: a Enter system setup (see "Entering System Setup" on page 79), go to Onboard Devices and select Integrated NIC, and then change the setting to...
... guard against electrical shock, laceration by moving fan blades, or other unexpected injuries, always unplug your computer from the operating system. 12 If you removed a sound card: a Enter system setup (see "Entering System Setup" on page 79), go to Onboard Devices and select Integrated NIC, and then change the setting to...


