
Quick Reference
Page 11
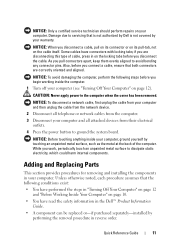
...outlets. 4 Press the power button to the computer when the cover has been removed. NOTICE: Before touching anything inside the computer. 1 Turn off your computer. NOTICE: Only a certified service technician should perform repairs on the cable itself. if you disconnect the cable. Unless otherwise ... cable, pull on its connector or on its pull-tab, not on your computer (see "Turning Off Your Computer" on page 10. • You have read the safety information in the Dell™ Product Information Guide. • A component can be replaced or-if purchased separately-installed ...
...outlets. 4 Press the power button to the computer when the cover has been removed. NOTICE: Before touching anything inside the computer. 1 Turn off your computer. NOTICE: Only a certified service technician should perform repairs on the cable itself. if you disconnect the cable. Unless otherwise ... cable, pull on its connector or on its pull-tab, not on your computer (see "Turning Off Your Computer" on page 10. • You have read the safety information in the Dell™ Product Information Guide. • A component can be replaced or-if purchased separately-installed ...
Quick Reference
Page 12
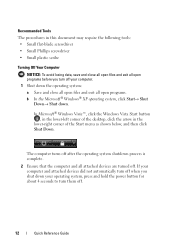
...of the Start menu as shown below, and then click Shut Down. The computer turns off after the operating system shutdown process is complete. 2 Ensure that the computer and all attached devices are turned off. Recommended Tools The procedures in the lower-right corner of the desktop, click...the arrow in this document may require the following tools: • Small flat-blade screwdriver • Small Phillips screwdriver • Small plastic scribe Turning Off Your Computer NOTICE: To avoid losing data, save and close all open files and exit all open programs. b In the Microsoft® ...
...of the Start menu as shown below, and then click Shut Down. The computer turns off after the operating system shutdown process is complete. 2 Ensure that the computer and all attached devices are turned off. Recommended Tools The procedures in the lower-right corner of the desktop, click...the arrow in this document may require the following tools: • Small flat-blade screwdriver • Small Phillips screwdriver • Small plastic scribe Turning Off Your Computer NOTICE: To avoid losing data, save and close all open files and exit all open programs. b In the Microsoft® ...

Quick Reference
Page 26
... computer. 3 Connect the other , effectively doubling the amount of different devices. 26 Quick Reference Guide In extended desktop mode, you connect the monitor(s) or TV, turn on the computer. Carefully read the device warranty when choosing a surge protector. Compare joule ratings to your computer. Changing the Display Settings 1 After you can...
... computer. 3 Connect the other , effectively doubling the amount of different devices. 26 Quick Reference Guide In extended desktop mode, you connect the monitor(s) or TV, turn on the computer. Carefully read the device warranty when choosing a surge protector. Compare joule ratings to your computer. Changing the Display Settings 1 After you can...
Quick Reference
Page 28
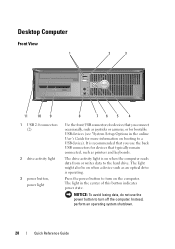
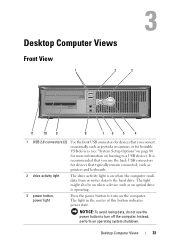
...3 11 10 9 1 USB 2.0 connectors (2) 2 drive activity light 3 power button, power light 8 76 5 4 Use the front USB connectors for more information on booting to turn off the computer. Press the power button to a USB device). The drive activity light is on when the computer reads data from or writes data... to turn on the computer. Instead, perform an operating system shutdown. 28 Quick Reference Guide The light in the online User's Guide for devices that...
...3 11 10 9 1 USB 2.0 connectors (2) 2 drive activity light 3 power button, power light 8 76 5 4 Use the front USB connectors for more information on booting to turn off the computer. Press the power button to a USB device). The drive activity light is on when the computer reads data from or writes data... to turn on the computer. Instead, perform an operating system shutdown. 28 Quick Reference Guide The light in the online User's Guide for devices that...

Quick Reference
Page 29
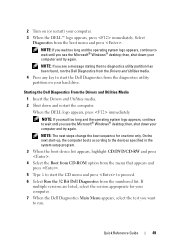
...in the Windows Device Manager. See"Diagnostic Lights" on page 56" for a description of light codes that a LAN (local area network) connection is turned off. • Steady green - Can contain an optional floppy drive. You can also rotate the badge using the slot provided near the bottom of the...from a power-saving mode, press the power button or use the keyboard or the mouse if it is on page 56. Quick Reference Guide 29 4 Dell badge 5 power light 6 diagnostic lights 7 LAN indicator light 8 headphone and microphone connectors 9 floppy drive 10 optical drive 11 Service Tag This badge ...
...in the Windows Device Manager. See"Diagnostic Lights" on page 56" for a description of light codes that a LAN (local area network) connection is turned off. • Steady green - Can contain an optional floppy drive. You can also rotate the badge using the slot provided near the bottom of the...from a power-saving mode, press the power button or use the keyboard or the mouse if it is on page 56. Quick Reference Guide 29 4 Dell badge 5 power light 6 diagnostic lights 7 LAN indicator light 8 headphone and microphone connectors 9 floppy drive 10 optical drive 11 Service Tag This badge ...

Quick Reference
Page 39
... headphone connector to attach a personal computer microphone for more information, see "Diagnostic Lights" on page 56. 7 power button, power light Press the power button to turn on the card. 10 LAN indicator light This light indicates that you troubleshoot a computer problem based on when the computer reads data from or writes...
... headphone connector to attach a personal computer microphone for more information, see "Diagnostic Lights" on page 56. 7 power button, power light Press the power button to turn on the card. 10 LAN indicator light This light indicates that you troubleshoot a computer problem based on when the computer reads data from or writes...
Quick Reference
Page 49
... and restart the computer. then, shut down your computer. 3 When the DELL™ logo appears, press immediately. Quick Reference Guide 49 When the DELL logo appears, press immediately. 2 Turn on your computer. 7 When the Dell Diagnostics Main Menu appears, select the test you want to run the... Dell Diagnostics from the Drivers and Utilities media. 4 Press any key...
... and restart the computer. then, shut down your computer. 3 When the DELL™ logo appears, press immediately. Quick Reference Guide 49 When the DELL logo appears, press immediately. 2 Turn on your computer. 7 When the Dell Diagnostics Main Menu appears, select the test you want to run the... Dell Diagnostics from the Drivers and Utilities media. 4 Press any key...
Quick Reference
Page 51
... for all devices attached to indicate different states: • If the power light is off, the computer is either turned off or is not receiving power. - To exit the Dell Diagnostics and restart the computer, close the test screen to return to the Main Menu screen. Reseat the power cable ...CAUTION: Before you to customize the test by changing the test settings. 5 When the tests are complete, close the Main Menu screen. 6 Remove the Dell Drivers and Utilities media (if applicable). Quick Reference Guide 51 The power button light (bi-color LED) located on your computer. The...
... for all devices attached to indicate different states: • If the power light is off, the computer is either turned off or is not receiving power. - To exit the Dell Diagnostics and restart the computer, close the test screen to return to the Main Menu screen. Reseat the power cable ...CAUTION: Before you to customize the test by changing the test settings. 5 When the tests are complete, close the Main Menu screen. 6 Remove the Dell Drivers and Utilities media (if applicable). Quick Reference Guide 51 The power button light (bi-color LED) located on your computer. The...

Quick Reference
Page 52
... into a power strip, ensure that the power strip is plugged into an electrical outlet and that the display is not responding: - Ensure that the computer turns on . - Ensure the display is connected and powered on the keyboard, move the mouse, or press the power button to verify that the electrical outlet...
... into a power strip, ensure that the power strip is plugged into an electrical outlet and that the display is not responding: - Ensure that the computer turns on . - Ensure the display is connected and powered on the keyboard, move the mouse, or press the power button to verify that the electrical outlet...
Quick Reference
Page 60
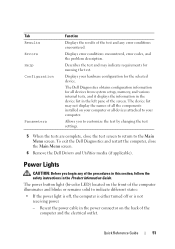
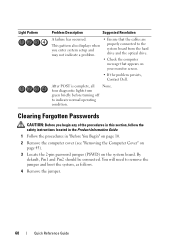
... password jumper (PSWD) on your monitor screen. • If the problem persists, Contact Dell. You will need to indicate normal operating condition. Light Pattern Problem Description Suggested Resolution A failure has occurred. four diagnostic lights turn green briefly before turning off to remove the jumper and boot the system, as follows. 4 Remove the jumper...
... password jumper (PSWD) on your monitor screen. • If the problem persists, Contact Dell. You will need to indicate normal operating condition. Light Pattern Problem Description Suggested Resolution A failure has occurred. four diagnostic lights turn green briefly before turning off to remove the jumper and boot the system, as follows. 4 Remove the jumper...

Quick Reference
Page 61
... cable, first plug the cable into the network device and then plug it into the computer. 6 Connect your computer and devices to electrical outlets, and turn them on. 7 After the Microsoft® Windows® desktop appears on your computer, shut down your computer (see... "Turning Off Your Computer" on page 12). 8 Turn off the monitor and disconnect it from the electrical outlet. 9 Disconnect the computer power cable from the electrical outlet, and press the power button to ...
... cable, first plug the cable into the network device and then plug it into the computer. 6 Connect your computer and devices to electrical outlets, and turn them on. 7 After the Microsoft® Windows® desktop appears on your computer, shut down your computer (see... "Turning Off Your Computer" on page 12). 8 Turn off the monitor and disconnect it from the electrical outlet. 9 Disconnect the computer power cable from the electrical outlet, and press the power button to ...

Quick Reference
Page 62
... plug the cable into the network wall jack and then plug it into the computer. 13 Connect your computer and devices to electrical outlets, and turn them on. NOTICE: To connect a network cable, first plug the cable into the computer. 6 Connect your User's Guide), both system and ... "Entering System Setup" in "Before You Begin" on page 60). d Remove the jumper plug from the electrical outlet to electrical outlets, and turn them on the RTCRST pins and wait approximately 5 seconds. NOTE: The computer must be disconnected from the RTCRST pins and place it into the network...
... plug the cable into the network wall jack and then plug it into the computer. 13 Connect your computer and devices to electrical outlets, and turn them on. NOTICE: To connect a network cable, first plug the cable into the computer. 6 Connect your User's Guide), both system and ... "Entering System Setup" in "Before You Begin" on page 60). d Remove the jumper plug from the electrical outlet to electrical outlets, and turn them on the RTCRST pins and wait approximately 5 seconds. NOTE: The computer must be disconnected from the RTCRST pins and place it into the network...
Quick Reference
Page 63
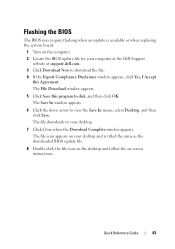
The file icon appears on your desktop and is available or when replacing the system board. 1 Turn on -screen instructions. Quick Reference Guide 63 The File Download window appears. 5 Click Save this Agreement. Flashing the BIOS The BIOS may require flashing when ...-click the file icon on the desktop and follow the on the computer. 2 Locate the BIOS update file for your computer at the Dell Support website at support.dell.com. 3 Click Download Now to download the file. 4 If the Export Compliance Disclaimer window appears, click Yes, I Accept this program to disk, and...
The file icon appears on your desktop and is available or when replacing the system board. 1 Turn on -screen instructions. Quick Reference Guide 63 The File Download window appears. 5 Click Save this Agreement. Flashing the BIOS The BIOS may require flashing when ...-click the file icon on the desktop and follow the on the computer. 2 Locate the BIOS update file for your computer at the Dell Support website at support.dell.com. 3 Click Download Now to download the file. 4 If the Export Compliance Disclaimer window appears, click Yes, I Accept this program to disk, and...
Quick Reference
Page 66
turning off your computer, 12 Internet connection about, 17 options, 17 setting up , 15, 23 problems beep codes, 53 Dell Diagnostics, 48 Product Information Guide, 6 R regulatory information, 6 ResourceCD Dell Diagnostics, 48 66 Index See system board N network Network Setup Wizard, 16 Network Setup Wizard, 16 O operating system reinstalling, 9 Operating System CD, 9 P password clearing, 60...
turning off your computer, 12 Internet connection about, 17 options, 17 setting up , 15, 23 problems beep codes, 53 Dell Diagnostics, 48 Product Information Guide, 6 R regulatory information, 6 ResourceCD Dell Diagnostics, 48 66 Index See system board N network Network Setup Wizard, 16 Network Setup Wizard, 16 O operating system reinstalling, 9 Operating System CD, 9 P password clearing, 60...

User's Guide
Page 8
Turning Off Your Computer 143 Before Working Inside Your Computer 144 12 Mini Tower Computer Parts 147 Removing the Computer Cover 147 Inside View of Your ...
Turning Off Your Computer 143 Before Working Inside Your Computer 144 12 Mini Tower Computer Parts 147 Removing the Computer Cover 147 Inside View of Your ...

User's Guide
Page 22
... is recommended that typically remain connected, such as printers and keyboards. 6 diagnostic lights Use these lights to help you use the power button to turn on the computer. NOTICE: To avoid losing data, do not use the back USB connectors for more information, see "Diagnostic Lights" on page ... the computer. It is established. 22 Mini Tower Computer Views 1 Service Tag Use the Service Tag to identify your computer when you access the Dell Support website or call Support. 2 optical drive Use the optical drive to play a CD/DVD. 3 floppy drive The floppy drive is optional....
... is recommended that typically remain connected, such as printers and keyboards. 6 diagnostic lights Use these lights to help you use the power button to turn on the computer. NOTICE: To avoid losing data, do not use the back USB connectors for more information, see "Diagnostic Lights" on page ... the computer. It is established. 22 Mini Tower Computer Views 1 Service Tag Use the Service Tag to identify your computer when you access the Dell Support website or call Support. 2 optical drive Use the optical drive to play a CD/DVD. 3 floppy drive The floppy drive is optional....
User's Guide
Page 33
... Computer Views 33 NOTICE: To avoid losing data, do not use the back USB connectors for devices that you use the power button to turn on booting to turn off the computer. Instead, perform an operating system shutdown. It is recommended that you connect occasionally, such as joysticks or cameras, or for...
... Computer Views 33 NOTICE: To avoid losing data, do not use the back USB connectors for devices that you use the power button to turn on booting to turn off the computer. Instead, perform an operating system shutdown. It is recommended that you connect occasionally, such as joysticks or cameras, or for...
User's Guide
Page 34
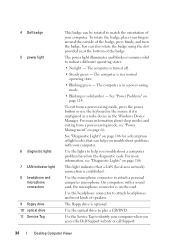
...troubleshoot a computer problem based on page 106 for a description of the badge, press firmly, and turn the badge. Use the headphone connector to attach headphones and most kinds of the badge. 4 Dell badge 5 power light 6 diagnostic lights 7 LAN indicator light 8 headphone and microphone connectors 9 ... troubleshoot problems with a sound card, the microphone connector is in a normal operating state. • Blinking green - The floppy drive is turned off. • Steady green - You can also rotate the badge using the slot provided near the bottom of speakers. On computers with...
...troubleshoot a computer problem based on page 106 for a description of the badge, press firmly, and turn the badge. Use the headphone connector to attach headphones and most kinds of the badge. 4 Dell badge 5 power light 6 diagnostic lights 7 LAN indicator light 8 headphone and microphone connectors 9 ... troubleshoot problems with a sound card, the microphone connector is in a normal operating state. • Blinking green - The floppy drive is turned off. • Steady green - You can also rotate the badge using the slot provided near the bottom of speakers. On computers with...
User's Guide
Page 57
See the documentation that it is turned on the screen by the Windows Easy Transfer wizard. Follow the instructions provided on . 1 Complete the operating system setup if you purchase a cable separately, ensure ... toner or ink cartridge. If you purchased a printer cable at the same time you connect a printer to the computer. For technical assistance, refer to the Dell™ Knowledge Base document may arrive in progress. Connecting a USB Printer NOTE: You can connect USB devices while the computer is compatible with a printer cable...
See the documentation that it is turned on the screen by the Windows Easy Transfer wizard. Follow the instructions provided on . 1 Complete the operating system setup if you purchase a cable separately, ensure ... toner or ink cartridge. If you purchased a printer cable at the same time you connect a printer to the computer. For technical assistance, refer to the Dell™ Knowledge Base document may arrive in progress. Connecting a USB Printer NOTE: You can connect USB devices while the computer is compatible with a printer cable...

User's Guide
Page 58
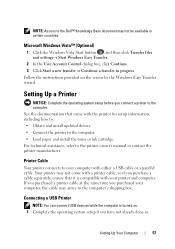
... window appears, click Cancel. The USB connectors fit only one way. 1 2 3 1 USB connector on computer 3 USB printer cable 2 USB connector on printer 3 Turn on the printer and then turn on the computer. 4 Depending on the computer and the printer. 2 Attach the USB printer cable to the USB connectors on your computer's operating...
... window appears, click Cancel. The USB connectors fit only one way. 1 2 3 1 USB connector on computer 3 USB printer cable 2 USB connector on printer 3 Turn on the printer and then turn on the computer. 4 Depending on the computer and the printer. 2 Attach the USB printer cable to the USB connectors on your computer's operating...


