Quick Reference Guide
Page 3
... - Back-Panel Connectors 18 Removing the Computer Cover 19 Before You Begin 20 Mini Tower Computer 21 Desktop Computer 23 Inside Your Computer 24 Mini Tower Computer 24 Desktop Computer 27 Solving Problems 30 Dell Diagnostics 30 System Lights 33 Diagnostic Lights 34 Beep Codes 37 Resolving Software and Hardware Incompatibilities 38 Using...
... - Back-Panel Connectors 18 Removing the Computer Cover 19 Before You Begin 20 Mini Tower Computer 21 Desktop Computer 23 Inside Your Computer 24 Mini Tower Computer 24 Desktop Computer 27 Solving Problems 30 Dell Diagnostics 30 System Lights 33 Diagnostic Lights 34 Beep Codes 37 Resolving Software and Hardware Incompatibilities 38 Using...

Quick Reference Guide
Page 5
...your computer. Documentation and drivers are already installed on your CD to provide the most current updates about technical changes to run the Dell Diagnostics (see "Reinstalling Drivers and Utilities" in certain countries. You can be optional and may not ship with your computer or ...advanced technicalreference material for my computer • My computer documentation • My device documentation • Desktop System Software (DSS) Find It Here Drivers and Utilities CD (also known as ResourceCD) NOTE: The Drivers and Utilities CD may be...
...your computer. Documentation and drivers are already installed on your CD to provide the most current updates about technical changes to run the Dell Diagnostics (see "Reinstalling Drivers and Utilities" in certain countries. You can be optional and may not ship with your computer or ...advanced technicalreference material for my computer • My computer documentation • My device documentation • Desktop System Software (DSS) Find It Here Drivers and Utilities CD (also known as ResourceCD) NOTE: The Drivers and Utilities CD may be...
Quick Reference Guide
Page 7
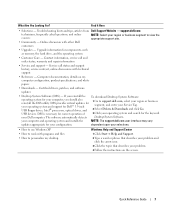
... Solutions - Certified drivers, patches, and software updates • Desktop System Software (DSS) - support.dell.com technicians, frequently asked questions, and online NOTE: Select your region or business segment to support.dell.com, select your region or business segment, and enter your ... DSS utility. The software automatically detects Desktop System Software. Troubleshooting hints and tips, articles from Dell Support Website - USB devices. your computer and operating system and installs the NOTE: The support.dell.com user interface may vary updates appropriate...
... Solutions - Certified drivers, patches, and software updates • Desktop System Software (DSS) - support.dell.com technicians, frequently asked questions, and online NOTE: Select your region or business segment to support.dell.com, select your region or business segment, and enter your ... DSS utility. The software automatically detects Desktop System Software. Troubleshooting hints and tips, articles from Dell Support Website - USB devices. your computer and operating system and installs the NOTE: The support.dell.com user interface may vary updates appropriate...
Quick Reference Guide
Page 16
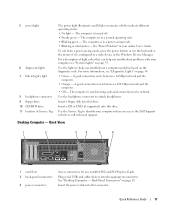
... activity light This light flickers when the hard drive is recommended that you press the power button the computer will perform an operating system shutdown. 4 Dell badge This badge can also rotate the badge using the slot provided near the bottom of the badge. 16 Quick Reference Guide You can be... cameras, or for bootable USB devices (see your online User's Guide for more information about booting to a USB device). Instead, perform an operating system shutdown. Desktop Computer -
... activity light This light flickers when the hard drive is recommended that you press the power button the computer will perform an operating system shutdown. 4 Dell badge This badge can also rotate the badge using the slot provided near the bottom of the badge. 16 Quick Reference Guide You can be... cameras, or for bootable USB devices (see your online User's Guide for more information about booting to a USB device). Instead, perform an operating system shutdown. Desktop Computer -
Quick Reference Guide
Page 17
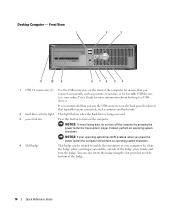
... with your computer when you troubleshoot a computer problem based on page 34. • Green - For more information, see "System Lights" on page 18. Desktop Computer - Insert a CD or DVD (if supported) into the appropriate connector. The computer is in the Windows Device Manager. The computer is configured as a... lights 7 link integrity light 8 headphone connector 9 floppy drive 10 CD/DVD drive 11 location of light codes that can help you access the Dell Support website or call technical support. See "Desktop Computer - The computer is turned off. • Steady green -
... with your computer when you troubleshoot a computer problem based on page 34. • Green - For more information, see "System Lights" on page 18. Desktop Computer - Insert a CD or DVD (if supported) into the appropriate connector. The computer is in the Windows Device Manager. The computer is configured as a... lights 7 link integrity light 8 headphone connector 9 floppy drive 10 CD/DVD drive 11 location of light codes that can help you access the Dell Support website or call technical support. See "Desktop Computer - The computer is turned off. • Steady green -
Quick Reference Guide
Page 18
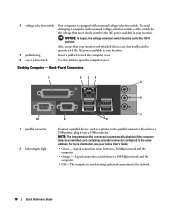
To avoid damaging a computer with a manual voltage-selection switch, set to the 115-V position. Desktop Computer - A good connection exists between a 100-Mbps network and the computer. • Off - A good connection exists between a 10-Mbps network and the computer. • Orange - ...
To avoid damaging a computer with a manual voltage-selection switch, set to the 115-V position. Desktop Computer - A good connection exists between a 100-Mbps network and the computer. • Off - A good connection exists between a 10-Mbps network and the computer. • Orange - ...

Quick Reference Guide
Page 21
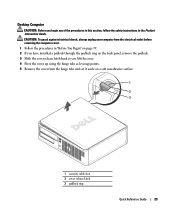
...). Quick Reference Guide 21 5 Remove the computer cover: • Remove the mini tower computer cover (see "Mini Tower Computer" on page 21). • Remove the desktop computer cover (see "Desktop Computer" on a soft nonabrasive surface.
...). Quick Reference Guide 21 5 Remove the computer cover: • Remove the mini tower computer cover (see "Mini Tower Computer" on page 21). • Remove the desktop computer cover (see "Desktop Computer" on a soft nonabrasive surface.
Quick Reference Guide
Page 23
... guard against electrical shock, always unplug your computer from the electrical outlet before removing the computer cover. 1 Follow the procedures in the Product Information Guide. Desktop Computer CAUTION: Before you begin any of the procedures in this section, follow the safety instructions in "Before You Begin" on page 19. 2 If you...
... guard against electrical shock, always unplug your computer from the electrical outlet before removing the computer cover. 1 Follow the procedures in the Product Information Guide. Desktop Computer CAUTION: Before you begin any of the procedures in this section, follow the safety instructions in "Before You Begin" on page 19. 2 If you...

Quick Reference Guide
Page 27
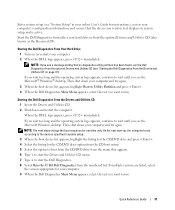
The real-time clock is being reset (jumpered temporarily). Jumper PSWD Setting 1 RTCRST 1 Description Password features are disabled. Password features are enabled (default setting). The real-time clock has been enabled (default setting). jumpered Desktop Computer unjumpered 2 1 3 4 6 5 1 drive bay (CD/DVD, floppy, 4 card slots and hard drive) 2 power supply 5 heat sink assembly 3 system board 6 front I/O panel Quick Reference Guide 27
The real-time clock is being reset (jumpered temporarily). Jumper PSWD Setting 1 RTCRST 1 Description Password features are disabled. Password features are enabled (default setting). The real-time clock has been enabled (default setting). jumpered Desktop Computer unjumpered 2 1 3 4 6 5 1 drive bay (CD/DVD, floppy, 4 card slots and hard drive) 2 power supply 5 heat sink assembly 3 system board 6 front I/O panel Quick Reference Guide 27
Quick Reference Guide
Page 31
... If you wait too long and the operating system logo appears, continue to wait until you see the Microsoft® Windows® desktop. Starting the Dell Diagnostics From Your Hard Drive 1 Turn on page 31). Quick Reference Guide 31 If you wait too long and the operating system ...continue to wait until you see the Microsoft Windows desktop. NOTE: The next steps change the boot sequence for your computer and try again. 3 When the boot device list appears, highlight Boot to Utility Partition and press . 4 When the Dell Diagnostics Main Menu appears, select the test you want...
... If you wait too long and the operating system logo appears, continue to wait until you see the Microsoft® Windows® desktop. Starting the Dell Diagnostics From Your Hard Drive 1 Turn on page 31). Quick Reference Guide 31 If you wait too long and the operating system ...continue to wait until you see the Microsoft Windows desktop. NOTE: The next steps change the boot sequence for your computer and try again. 3 When the boot device list appears, highlight Boot to Utility Partition and press . 4 When the Dell Diagnostics Main Menu appears, select the test you want...

Quick Reference Guide
Page 41
If the operating system logo appears, wait until you see the Windows desktop, and then shut down the computer and try again. 5 Press the arrow keys to select CD-ROM, and press . 6 When the Press any key to .... 4 If you are unsure of your settings, accept the default selections. Quick Reference Guide 41 The computer automatically restarts multiple times. 4 Press immediately after the DELL logo appears. NOTICE: Do not press any key when the following message appears: Press any key to boot from CD message appears, press any key...
If the operating system logo appears, wait until you see the Windows desktop, and then shut down the computer and try again. 5 Press the arrow keys to select CD-ROM, and press . 6 When the Press any key to .... 4 If you are unsure of your settings, accept the default selections. Quick Reference Guide 41 The computer automatically restarts multiple times. 4 Press immediately after the DELL logo appears. NOTICE: Do not press any key when the following message appears: Press any key to boot from CD message appears, press any key...
Quick Reference Guide
Page 42
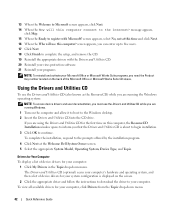
... Drivers for Your Computer To display a list of the Microsoft Office or Microsoft Works Suite CD sleeve. screen appears, select No, not at the Welcome Dell System Owner screen. 5 Select the appropriate System Model, Operating System, Device Type, and Topic. message appears, click Skip. 15 When the Ready to the Windows...
... Drivers for Your Computer To display a list of the Microsoft Office or Microsoft Works Suite CD sleeve. screen appears, select No, not at the Welcome Dell System Owner screen. 5 Select the appropriate System Model, Operating System, Device Type, and Topic. message appears, click Skip. 15 When the Ready to the Windows...
User Guide
Page 5
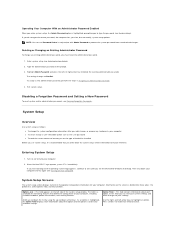
.... Disabling a Forgotten Password and Setting a New Password To reset system and/or administrator passwords, see System Setup). When the blue DELL™ logo appears, press immediately. This field contains information about that you write down the system setup screen information for your computer ... in Assigning an Administrator Password. 4. This field appears on the left - Enter system setup (see the Microsoft® Windows® desktop. In this field you wait too long and the operating system logo appears, continue to make changes to highlight an option. If you...
.... Disabling a Forgotten Password and Setting a New Password To reset system and/or administrator passwords, see System Setup). When the blue DELL™ logo appears, press immediately. This field contains information about that you write down the system setup screen information for your computer ... in Assigning an Administrator Password. 4. This field appears on the left - Enter system setup (see the Microsoft® Windows® desktop. In this field you wait too long and the operating system logo appears, continue to make changes to highlight an option. If you...

User Guide
Page 6
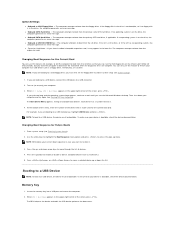
... not during system startup. This setting determines whether integrated drive errors are Off, Internal, USB, and Read Only. (Internal default) Drive 0 through Drive 3 for the desktop, mini tower, and small form computers and Drive 0 though Drive 5 for the hard drives. Key Functions - This field appears below the Option Field and lists...
... not during system startup. This setting determines whether integrated drive errors are Off, Internal, USB, and Read Only. (Internal default) Drive 0 through Drive 3 for the desktop, mini tower, and small form computers and Drive 0 though Drive 5 for the hard drives. Key Functions - This field appears below the Option Field and lists...
User Guide
Page 9
...an error message. You can also use this feature to a USB device, the device must be bootable. Enter system setup (see the Microsoft Windows desktop. Use the arrow keys to highlight the Boot Sequence menu option and press to the boot menu. To ensure that is on the Drivers and...Insert the memory key into a USB port and restart the computer. 2. The computer attempts to be used for the Current Boot You can run the Dell Diagnostics on the drive, the computer generates an error message. Booting to a USB Device NOTE: To boot to a USB device, the device must first...
...an error message. You can also use this feature to a USB device, the device must be bootable. Enter system setup (see the Microsoft Windows desktop. Use the arrow keys to highlight the Boot Sequence menu option and press to the boot menu. To ensure that is on the Drivers and...Insert the memory key into a USB port and restart the computer. 2. The computer attempts to be used for the Current Boot You can run the Dell Diagnostics on the drive, the computer generates an error message. Booting to a USB Device NOTE: To boot to a USB device, the device must first...

User Guide
Page 10
... the password. RTCRST The real-time clock has not been reset. Connect your computer (see Replacing the Computer Cover). 4. After the Microsoft® Windows® desktop appears on . 5. NOTICE: This process erases both the system and administrator passwords. 1. jumpered unjumpered 3. Turn off the monitor and disconnect it from pins 1 and 2 to...
... the password. RTCRST The real-time clock has not been reset. Connect your computer (see Replacing the Computer Cover). 4. After the Microsoft® Windows® desktop appears on . 5. NOTICE: This process erases both the system and administrator passwords. 1. jumpered unjumpered 3. Turn off the monitor and disconnect it from pins 1 and 2 to...

User Guide
Page 13
... is inserted between the battery and the socket before you begin any of your computer's electronic components. Back to Contents Page Battery Dell™ OptiPlex™ 320 User's Guide CAUTION: Before you touch any of the procedures in this case, you may need to replace the battery, reenter ...the securing tabs at the negative side of the connector. 1 system battery 2 positive side of the connector. The battery can operate your desktop computer, see Entering System Setup). The battery may damage the system board by prying off or unplugged from the electrical outlet for your ...
... is inserted between the battery and the socket before you begin any of your computer's electronic components. Back to Contents Page Battery Dell™ OptiPlex™ 320 User's Guide CAUTION: Before you touch any of the procedures in this case, you may need to replace the battery, reenter ...the securing tabs at the negative side of the connector. 1 system battery 2 positive side of the connector. The battery can operate your desktop computer, see Entering System Setup). The battery may damage the system board by prying off or unplugged from the electrical outlet for your ...

User Guide
Page 16
.... 2. Disconnect any static electricity that came with the stand). Back to Contents Page l For your mini tower computer, see: Removing the Computer Cover l For your desktop computer, see the documentation that could harm internal components.
.... 2. Disconnect any static electricity that came with the stand). Back to Contents Page l For your mini tower computer, see: Removing the Computer Cover l For your desktop computer, see the documentation that could harm internal components.

User Guide
Page 19
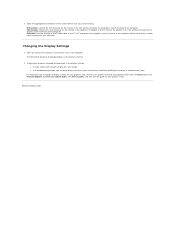
..., or that supports dual monitors, follow the safety instructions located in system setup (see System Setup). 3. Back to Contents Page Connecting Multiple Monitors Dell™ OptiPlex™ 320 User's Guide Before Connecting Mutiple Monitors or a Monitor and a Television to Your Computer Connecting Two to Three Monitors Using Surround View Connecting Dual Monitors... Television to a Graphics Card Changing the Display Settings CAUTION: Before you must purchase an S-video cable, which is available at most consumer electronics stores. For a desktop computer, see Back-Panel Connectors.
..., or that supports dual monitors, follow the safety instructions located in system setup (see System Setup). 3. Back to Contents Page Connecting Multiple Monitors Dell™ OptiPlex™ 320 User's Guide Before Connecting Mutiple Monitors or a Monitor and a Television to Your Computer Connecting Two to Three Monitors Using Surround View Connecting Dual Monitors... Television to a Graphics Card Changing the Display Settings CAUTION: Before you must purchase an S-video cable, which is available at most consumer electronics stores. For a desktop computer, see Back-Panel Connectors.
User Guide
Page 20
... to the DVI (white) connector on the graphics card in the back of viewable work space. The Microsoft® Windows® desktop displays on the computer. l In extended desktop mode, you can drag objects from one end of the S-video cable to the DVI (white) connector on your graphics card). ...3. Back to the S-video input connector on the graphics card in the back of the computer. Enable clone mode or extended desktop mode in the Help and Support Center (click the Start button, click Help and Support, click User and system guides, click Device guides, and...
... to the DVI (white) connector on the graphics card in the back of viewable work space. The Microsoft® Windows® desktop displays on the computer. l In extended desktop mode, you can drag objects from one end of the S-video cable to the DVI (white) connector on your graphics card). ...3. Back to the S-video input connector on the graphics card in the back of the computer. Enable clone mode or extended desktop mode in the Help and Support Center (click the Start button, click Help and Support, click User and system guides, click Device guides, and...


