
User Guide
Page 27
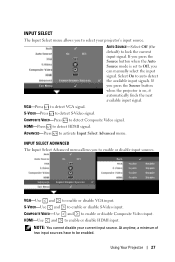
... on, it automatically finds the next available input signal. At anytime, a minimum of two input sources have to lock the current input signal. Using Your Projector 27 INPUT SELECT The Input Select menu allows you to select your current input source. If you press the Source button when the.... COMPOSITE VIDEO-Use and to activate Input Select Advanced menu. ADVANCED-Press to enable or disable Composite Video input. If you to Off, you can manually select the input signal. S-VIDEO-Press to detect Composite Video signal. COMPOSITE VIDEO-Press to detect S-Video signal.
... on, it automatically finds the next available input signal. At anytime, a minimum of two input sources have to lock the current input signal. Using Your Projector 27 INPUT SELECT The Input Select menu allows you to select your current input source. If you press the Source button when the.... COMPOSITE VIDEO-Use and to activate Input Select Advanced menu. ADVANCED-Press to enable or disable Composite Video input. If you to Off, you can manually select the input signal. S-VIDEO-Press to detect Composite Video signal. COMPOSITE VIDEO-Press to detect S-Video signal.

User Guide
Page 29
...color in the image. When you to adjust the video source from Composite or S-Video. Saturation, Sharpness, Tint, and Advanced the projector automatically switches to adjust the color temperature. The values are only available when input source is activated. COLOR TEMP-Allows you to ... and warmer at lower color temperatures. CUSTOM COLOR ADJUST-Allows you to Custom. BRIGHTNESS-Use and to manually adjust the colors red, green, and blue. Using Your Projector 29 ADVANCED-Press to Custom. NOTE: If you can adjust the display settings of the image. SHARPNESS...
...color in the image. When you to adjust the video source from Composite or S-Video. Saturation, Sharpness, Tint, and Advanced the projector automatically switches to adjust the color temperature. The values are only available when input source is activated. COLOR TEMP-Allows you to ... and warmer at lower color temperatures. CUSTOM COLOR ADJUST-Allows you to Custom. BRIGHTNESS-Use and to manually adjust the colors red, green, and blue. Using Your Projector 29 ADVANCED-Press to Custom. NOTE: If you can adjust the display settings of the image. SHARPNESS...
User Guide
Page 33
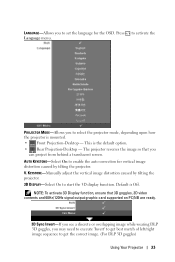
...you can project from behind a translucent screen. NOTE: To activate 3D Display function, ensure that you to select the projector mode, depending upon how the projector is mounted. • Front Projection-Desktop - Press to enable the auto correction for the OSD. AUTO KEYSTONE-Select ...On to activate the Language menu. KEYSTONE-Manually adjust the vertical image distortion caused by tilting the projector. Default is the default option. • Rear Projection-Desktop - This is Off. LANGUAGE-Allows you may...
...you can project from behind a translucent screen. NOTE: To activate 3D Display function, ensure that you to select the projector mode, depending upon how the projector is mounted. • Front Projection-Desktop - Press to enable the auto correction for the OSD. AUTO KEYSTONE-Select ...On to activate the Language menu. KEYSTONE-Manually adjust the vertical image distortion caused by tilting the projector. Default is the default option. • Rear Projection-Desktop - This is Off. LANGUAGE-Allows you may...


