Quick Reference Guide
Page 11
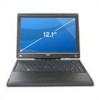
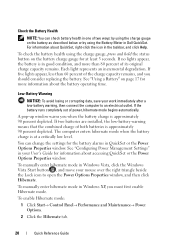
Find It Here • Information on tablet features and Dell QuickSet Help functionality, network activity, the Power To view Dell QuickSet Help, press the Management Wizard, hotkeys, and QuickSet tablet settings button (see "Removing the Battery" on the operating system you reinstall your operating system, use the ... Operating System Media The operating system is located in your Tablet-PC's main battery bay (see "Front other items controlled by Dell QuickSet View" on your Tablet-PC. Quick Reference Guide 11 To reinstall your media varies based on page 22). NOTE: The...
Find It Here • Information on tablet features and Dell QuickSet Help functionality, network activity, the Power To view Dell QuickSet Help, press the Management Wizard, hotkeys, and QuickSet tablet settings button (see "Removing the Battery" on the operating system you reinstall your operating system, use the ... Operating System Media The operating system is located in your Tablet-PC's main battery bay (see "Front other items controlled by Dell QuickSet View" on your Tablet-PC. Quick Reference Guide 11 To reinstall your media varies based on page 22). NOTE: The...

Quick Reference Guide
Page 12
... need to turn on the computer (see "Front View" on the computer and to the electrical outlet. 4 Open the computer display and press the power button to complete the setup of your Tablet-PC is in the Product Information Guide. 1 Unpack the accessories box. 2 Set aside the contents of the procedures...
... need to turn on the computer (see "Front View" on the computer and to the electrical outlet. 4 Open the computer display and press the power button to complete the setup of your Tablet-PC is in the Product Information Guide. 1 Unpack the accessories box. 2 Set aside the contents of the procedures...

Quick Reference Guide
Page 13
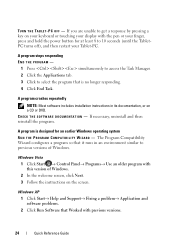
Front View 1 2 18 17 16 15 3 14 13 4 12 5 11 10 6 9 7 8 1 grip 2 display 3 ambient light sensor (with Dual-bulb 4 device status lights CCFL LCD option only) 5 digital array microphone 6 biometric reader 7 touch pad 8 touch pad buttons 9 track stick buttons 10 keyboard 11 track stick 12 rotating hinge 13 digital array microphone 15 Windows® security button 14 power button 16 screen rotate button 17 QuickSet tablet settings button 18 e-mail application shortcut button Quick Reference Guide 13
Front View 1 2 18 17 16 15 3 14 13 4 12 5 11 10 6 9 7 8 1 grip 2 display 3 ambient light sensor (with Dual-bulb 4 device status lights CCFL LCD option only) 5 digital array microphone 6 biometric reader 7 touch pad 8 touch pad buttons 9 track stick buttons 10 keyboard 11 track stick 12 rotating hinge 13 digital array microphone 15 Windows® security button 14 power button 16 screen rotate button 17 QuickSet tablet settings button 18 e-mail application shortcut button Quick Reference Guide 13

Quick Reference Guide
Page 15
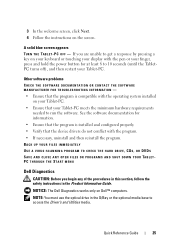
Right Side View 12 3 4 5 67 8 1 wireless radio on/off switch 3 USB connector 5 Secure Digital (SD) card slot 7 microphone connector 2 Wi-Fi Catcher™ button 4 ExpressCard slot 6 headphones connector 8 security cable slot Back View 1 2 3 45 6 1 AC adapter connector 3 tablet back button 5 network connector 7 rotating hinge 9 pen tether slot 78 9 2 video connector 4 scroll control button 6 powered USB connector 8 tablet grip Quick Reference Guide 15
Right Side View 12 3 4 5 67 8 1 wireless radio on/off switch 3 USB connector 5 Secure Digital (SD) card slot 7 microphone connector 2 Wi-Fi Catcher™ button 4 ExpressCard slot 6 headphones connector 8 security cable slot Back View 1 2 3 45 6 1 AC adapter connector 3 tablet back button 5 network connector 7 rotating hinge 9 pen tether slot 78 9 2 video connector 4 scroll control button 6 powered USB connector 8 tablet grip Quick Reference Guide 15
Quick Reference Guide
Page 17
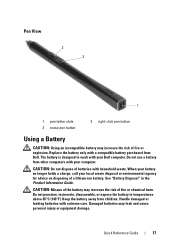
... chemical burn. Keep the battery away from other computers with your computer. Pen View 2 3 1 1 pen tether slots 3 erase pen button 2 right-click pen button Using a Battery CAUTION: Using an incompatible battery may leak and cause personal injury or equipment damage. The battery is designed to temperatures above ... advice on disposing of fire or explosion. Quick Reference Guide 17 When your battery no longer holds a charge, call your Dell computer. Replace the battery only with extreme care. Handle damaged or leaking batteries with a compatible battery purchased from...
... chemical burn. Keep the battery away from other computers with your computer. Pen View 2 3 1 1 pen tether slots 3 erase pen button 2 right-click pen button Using a Battery CAUTION: Using an incompatible battery may leak and cause personal injury or equipment damage. The battery is designed to temperatures above ... advice on disposing of fire or explosion. Quick Reference Guide 17 When your battery no longer holds a charge, call your Dell computer. Replace the battery only with extreme care. Handle damaged or leaking batteries with a compatible battery purchased from...
Quick Reference Guide
Page 19
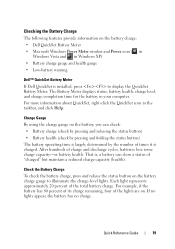
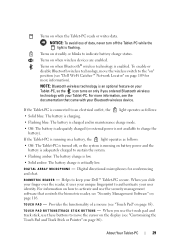
...computer. That is, a battery can check: • Battery charge (check by pressing and releasing the status button) • Battery health (check by pressing and holding the status button) The battery operating time is largely determined by the number of "charged" but maintain a reduced charge capacity ...to display the QuickSet Battery Meter. Check the Battery Charge To check the battery charge, press and release the status button on the battery charge: • Dell QuickSet Battery Meter • Microsoft Windows Power Meter window and Power icon ( in Windows Vista and in Windows XP)...
...computer. That is, a battery can check: • Battery charge (check by pressing and releasing the status button) • Battery health (check by pressing and holding the status button) The battery operating time is largely determined by the number of "charged" but maintain a reduced charge capacity ...to display the QuickSet Battery Meter. Check the Battery Charge To check the battery charge, press and release the status button on the battery charge: • Dell QuickSet Battery Meter • Microsoft Windows Power Meter window and Power icon ( in Windows Vista and in Windows XP)...
Quick Reference Guide
Page 20
..." on the battery charge gauge for at a critically low level. To manually enter hibernate mode in Windows Vista, click the Windows Vista Start button , and move your User's Guide for information about accessing QuickSet or the Power Options Properties window. If two batteries are installed, the low-...the settings for the battery alarms in QuickSet or the Power Options Properties window. To check the battery health using the Battery Meter in Dell QuickSet. To manually enter hibernate mode in the taskbar, and click Help. A pop-up window warns you when the battery charge ...
..." on the battery charge gauge for at a critically low level. To manually enter hibernate mode in Windows Vista, click the Windows Vista Start button , and move your User's Guide for information about accessing QuickSet or the Power Options Properties window. If two batteries are installed, the low-...the settings for the battery alarms in QuickSet or the Power Options Properties window. To check the battery health using the Battery Meter in Dell QuickSet. To manually enter hibernate mode in the taskbar, and click Help. A pop-up window warns you when the battery charge ...
Quick Reference Guide
Page 21
... stick. Quick Reference Guide 21 To enter Hibernate mode: 1 Type the key sequence. 2 Select Shut Down→ Hibernate. NOTE: With Dell™ ExpressCharge™, when the computer is connected to 100 percent in the Power Options Properties window or the QuickSet Power Management Wizard, you...checks the battery charge and temperature. The computer may also use one of the following methods to enter hibernate mode: • Press the power button. • Close the display. • Press . Charge time is hot from overcharging. If the battery is longer with your computer. ...
... stick. Quick Reference Guide 21 To enter Hibernate mode: 1 Type the key sequence. 2 Select Shut Down→ Hibernate. NOTE: With Dell™ ExpressCharge™, when the computer is connected to 100 percent in the Power Options Properties window or the QuickSet Power Management Wizard, you...checks the battery charge and temperature. The computer may also use one of the following methods to enter hibernate mode: • Press the power button. • Close the display. • Press . Charge time is hot from overcharging. If the battery is longer with your computer. ...
Quick Reference Guide
Page 24
... this version of Windows. If you are unable to select the program that Worked with the pen or your finger, press and hold the power button for an earlier Windows operating system R U N T H E P R O G R A M C O M P A T I B I L I T Y W I O N - A program crashes repeatedly NOTE: Most software includes installation instructions in an environment similar to 10 seconds (until the TabletPC...
... this version of Windows. If you are unable to select the program that Worked with the pen or your finger, press and hold the power button for an earlier Windows operating system R U N T H E P R O G R A M C O M P A T I B I L I T Y W I O N - A program crashes repeatedly NOTE: Most software includes installation instructions in an environment similar to 10 seconds (until the TabletPC...
Quick Reference Guide
Page 25
... FOR TROUBLESHOOTING INFORMATION - • Ensure that the program is installed and configured properly. • Verify that your Tablet-PC. NOTICE: The Dell Diagnostics works only on the screen. See the software documentation for at least 8 to 10 seconds (until the TabletPC turns off), and then ... your Tablet-PC. • Ensure that the device drivers do not conflict with the pen or your finger, press and hold the power button for information. • Ensure that the program is compatible with the operating system installed on your keyboard or touching your display with the program...
... FOR TROUBLESHOOTING INFORMATION - • Ensure that the program is installed and configured properly. • Verify that your Tablet-PC. NOTICE: The Dell Diagnostics works only on the screen. See the software documentation for at least 8 to 10 seconds (until the TabletPC turns off), and then ... your Tablet-PC. • Ensure that the device drivers do not conflict with the pen or your finger, press and hold the power button for information. • Ensure that the program is compatible with the operating system installed on your keyboard or touching your display with the program...

Quick Reference Guide
Page 28
... the system. This typically can take an hour or more thorough check of the problem you select Test System to 20 minutes. 7 When the Dell Diagnostics Main Menu appears, select the test you want . NOTE: It is recommended that you are having. This typically can take 10 to run...Tree Function Performs a quick test of devices in the system. This option allows you want to run . Dell Diagnostics Main Menu 1 After the Dell Diagnostics loads and the Main Menu appears, click the button for the option you to be run a more . Use to test a specific device or customize the ...
... the system. This typically can take an hour or more thorough check of the problem you select Test System to 20 minutes. 7 When the Dell Diagnostics Main Menu appears, select the test you want . NOTE: It is recommended that you are having. This typically can take 10 to run...Tree Function Performs a quick test of devices in the system. This option allows you want to run . Dell Diagnostics Main Menu 1 After the Dell Diagnostics loads and the Main Menu appears, click the button for the option you to be run a more . Use to test a specific device or customize the ...
User's Guide
Page 2
... document to refer to either trademarks or registered trademarks of Dell Inc.; Other trademarks and trade names may be used by Bluetooth SIG, Inc. Dell Inc. Reproduction in this text: Dell, the DELL logo, Latitude, TravelLite, Wi-Fi Catcher, and ExpressCharge, are trademarks of... entities claiming the marks and names or their products. and the Windows Vista start button are registered trademarks of Dell Inc. disclaims any manner whatsoever without notice. © 2007-2008 Dell Inc. All rights reserved. TouchStrip is a trademark of Zvetco Biometrics, LLC; Microsoft...
... document to refer to either trademarks or registered trademarks of Dell Inc.; Other trademarks and trade names may be used by Bluetooth SIG, Inc. Dell Inc. Reproduction in this text: Dell, the DELL logo, Latitude, TravelLite, Wi-Fi Catcher, and ExpressCharge, are trademarks of... entities claiming the marks and names or their products. and the Windows Vista start button are registered trademarks of Dell Inc. disclaims any manner whatsoever without notice. © 2007-2008 Dell Inc. All rights reserved. TouchStrip is a trademark of Zvetco Biometrics, LLC; Microsoft...

User's Guide
Page 20
...; How to reinstall drivers for the devices that came with your Tablet-PC's main battery bay (see "Front other items controlled by Dell QuickSet View" on the operating system you reinstall your operating system, use the Operating System media. What Are You Looking For? Find ...It Here • Information on tablet features and Dell QuickSet Help functionality, network activity, the Power To view Dell QuickSet Help, press the Management Wizard, hotkeys, and QuickSet tablet settings button (see "Removing the Main Battery" on the Microsoft® Windows® ...
...; How to reinstall drivers for the devices that came with your Tablet-PC's main battery bay (see "Front other items controlled by Dell QuickSet View" on the operating system you reinstall your operating system, use the Operating System media. What Are You Looking For? Find ...It Here • Information on tablet features and Dell QuickSet Help functionality, network activity, the Power To view Dell QuickSet Help, press the Management Wizard, hotkeys, and QuickSet tablet settings button (see "Removing the Main Battery" on the Microsoft® Windows® ...

User's Guide
Page 28
... enable or disable the sensor (see "Using the Display" on page 88). 7 touch pad 9 track stick buttons 11 track stick 13 digital array microphone 15 Windows® security button 17 QuickSet tablet settings button 8 touch pad buttons 10 keyboard 12 rotating hinge 14 power button 16 screen rotate button 18 e-mail application shortcut button G RI P - A M B I E N T L I G H T S E N S O R - D IS PL...
... enable or disable the sensor (see "Using the Display" on page 88). 7 touch pad 9 track stick buttons 11 track stick 13 digital array microphone 15 Windows® security button 17 QuickSet tablet settings button 8 touch pad buttons 10 keyboard 12 rotating hinge 14 power button 16 screen rotate button 18 e-mail application shortcut button G RI P - A M B I E N T L I G H T S E N S O R - D IS PL...
User's Guide
Page 29
... U T T O N S / T R A C K S T I C R EA D E R - When you slide your finger over the reader, it uses your unique fingerprint to charge the battery). NOTICE: To avoid loss of a mouse (see "Dell Wi-Fi Catcher™ Network Locator" on page 116. Turns on when Bluetooth® wireless technology is critically low. Turns on when wireless devices are... so the icon turns on when the Tablet-PC reads or writes data. For information on how to activate and use these buttons to move the wireless switch to sustain the system. • Flashing amber: The battery charge is low. • Solid amber...
... U T T O N S / T R A C K S T I C R EA D E R - When you slide your finger over the reader, it uses your unique fingerprint to charge the battery). NOTICE: To avoid loss of a mouse (see "Dell Wi-Fi Catcher™ Network Locator" on page 116. Turns on when Bluetooth® wireless technology is critically low. Turns on when wireless devices are... so the icon turns on when the Tablet-PC reads or writes data. For information on how to activate and use these buttons to move the wireless switch to sustain the system. • Flashing amber: The battery charge is low. • Solid amber...

User's Guide
Page 30
...see "Using a Keyboard" on page 77). See "Turning Off Your Tablet-PC" on page 62 for more information. Q U I C K S E T T A B L E T S E T T I T Y B U T T O N - See "Using Tablet Buttons" on page 62 for instructions on the Tablet-PC, and blinks when the Tablet-PC is in notebook mode. P O W E R B U T T O N - W I N D O W S S E C U R I N G B U T T O N...82. See "Using Tablet Mode" on page 86). Access Dell QuickSet to transform the PC into tablet mode. If the Tablet-PC stops responding, press and hold the power button until the Tablet-PC turns off your e-mail application. The ...
...see "Using a Keyboard" on page 77). See "Turning Off Your Tablet-PC" on page 62 for more information. Q U I C K S E T T A B L E T S E T T I T Y B U T T O N - See "Using Tablet Buttons" on page 62 for instructions on the Tablet-PC, and blinks when the Tablet-PC is in notebook mode. P O W E R B U T T O N - W I N D O W S S E C U R I N G B U T T O N...82. See "Using Tablet Mode" on page 86). Access Dell QuickSet to transform the PC into tablet mode. If the Tablet-PC stops responding, press and hold the power button until the Tablet-PC turns off your e-mail application. The ...

User's Guide
Page 34
... toward the front of the Tablet-PC, the switch is off switch 3 USB connector 5 Secure Digital (SD) card slot 7 microphone connector 2 Wi-Fi Catcher™ button 4 ExpressCard slot 6 headphones connector 8 security cable slot W I R E L E S S R A D I O O N / O F F S W I C A T C H E R ™ B U T T O N - F I T C H - Scans for a wireless...109). You can scan for WLAN networks (see "Dell Wi-Fi Catcher™ Network Locator" on page 109). When enabled through Dell QuickSet, this switch can also use it to rapidly turn off switch 2 Wi-Fi Catcher™ button B A C K L I T W I -...
... toward the front of the Tablet-PC, the switch is off switch 3 USB connector 5 Secure Digital (SD) card slot 7 microphone connector 2 Wi-Fi Catcher™ button 4 ExpressCard slot 6 headphones connector 8 security cable slot W I R E L E S S R A D I O O N / O F F S W I C A T C H E R ™ B U T T O N - F I T C H - Scans for a wireless...109). You can scan for WLAN networks (see "Dell Wi-Fi Catcher™ Network Locator" on page 109). When enabled through Dell QuickSet, this switch can also use it to rapidly turn off switch 2 Wi-Fi Catcher™ button B A C K L I T W I -...

User's Guide
Page 36
Back View 1 2 3 45 6 1 AC adapter connector 3 tablet back button 5 network connector 7 rotating hinge 9 pen tether slot 78 9 2 video connector 4 scroll control button 6 powered USB connector 8 tablet grip 36 About Your Tablet-PC S E C U R I T Y C A B L E S L O T - Lets you attach a commercially available antitheft device to the Tablet-PC (see "Security Cable Lock" on page 111).
Back View 1 2 3 45 6 1 AC adapter connector 3 tablet back button 5 network connector 7 rotating hinge 9 pen tether slot 78 9 2 video connector 4 scroll control button 6 powered USB connector 8 tablet grip 36 About Your Tablet-PC S E C U R I T Y C A B L E S L O T - Lets you attach a commercially available antitheft device to the Tablet-PC (see "Security Cable Lock" on page 111).

User's Guide
Page 38
... while in tablet mode. R O T A T I N G H I N G E - See "Using the Scroll Control" on page 62. VIDEO CONNECTOR Connects video devices, such as a monitor. T A B L E T B A C K B U TT O N - See "Using the Back Button" on page 62.
... while in tablet mode. R O T A T I N G H I N G E - See "Using the Scroll Control" on page 62. VIDEO CONNECTOR Connects video devices, such as a monitor. T A B L E T B A C K B U TT O N - See "Using the Back Button" on page 62.

User's Guide
Page 41
... battery charge (see "Memory" on page 42 and "Communications" on your Tablet-PC to the Battery Slice" on page 74). Pen View 1 2 3 1 right-click pen button 2 erase pen button 3 pen tether slots About Your Tablet-PC 41
... battery charge (see "Memory" on page 42 and "Communications" on your Tablet-PC to the Battery Slice" on page 74). Pen View 1 2 3 1 right-click pen button 2 erase pen button 3 pen tether slots About Your Tablet-PC 41


