
User's Guide
Page 10
... Removing the Hinge Cover 174 Installing the Hinge Cover 175 Keyboard 175 Removing the Keyboard 176 Installing the Keyboard 177 Coin-Cell Battery 177 Removing the Coin-cell Battery 178 Installing the Coin-Cell Battery 178 Display Assembly 179 Removing the Display Assembly 179 Installing the Display Assembly 182 Palm Rest 186 Removing the Palm Rest...
... Removing the Hinge Cover 174 Installing the Hinge Cover 175 Keyboard 175 Removing the Keyboard 176 Installing the Keyboard 177 Coin-Cell Battery 177 Removing the Coin-cell Battery 178 Installing the Coin-Cell Battery 178 Display Assembly 179 Removing the Display Assembly 179 Installing the Display Assembly 182 Palm Rest 186 Removing the Palm Rest...

User's Guide
Page 46
...size UPEK TCS3 TouchStrip™ strip sensor with CMOS active capacitive pixel-sensing technology 248 x 2 pixels Battery Type Dimensions: Depth Height Width Weight Voltage Charge time (approximate) 4-cell "smart" lithium ion (28 WHr) 6-cell "smart" lithium ion (42 WHr) 96.84 mm (3.81 inches) 13.7 mm (0.54 inch)... 264.27 mm (10.4 inches) 0.26 kg (0.57 lb) (4 cell) 0.34 kg (0.74 lb) (6 cell) 11.1 VDC 4 hours (with computer off...
...size UPEK TCS3 TouchStrip™ strip sensor with CMOS active capacitive pixel-sensing technology 248 x 2 pixels Battery Type Dimensions: Depth Height Width Weight Voltage Charge time (approximate) 4-cell "smart" lithium ion (28 WHr) 6-cell "smart" lithium ion (42 WHr) 96.84 mm (3.81 inches) 13.7 mm (0.54 inch)... 264.27 mm (10.4 inches) 0.26 kg (0.57 lb) (4 cell) 0.34 kg (0.74 lb) (6 cell) 11.1 VDC 4 hours (with computer off...

User's Guide
Page 48
...) 29.85 mm (1.2 inches) (system closed/DLV standard configuration) 297.0 mm (11.7 inches) 218.6 mm (8.6 inches) 1.62 kg (3.57 lb) (with 4-cell battery/LED standard configuration) 1.93 kg (4.25 lb) (with 6-cell battery/DLV standard configuration) Environmental Temperature range: Operating Storage Relative humidity (maximum): Operating Storage Maximum vibration (using a random-vibration spectrum that simulates...
...) 29.85 mm (1.2 inches) (system closed/DLV standard configuration) 297.0 mm (11.7 inches) 218.6 mm (8.6 inches) 1.62 kg (3.57 lb) (with 4-cell battery/LED standard configuration) 1.93 kg (4.25 lb) (with 6-cell battery/DLV standard configuration) Environmental Temperature range: Operating Storage Relative humidity (maximum): Operating Storage Maximum vibration (using a random-vibration spectrum that simulates...

User's Guide
Page 177
... the track stick cable connector on the system board and press the track stick-cable locking arm down to hold the cable in place. Coin-Cell Battery CAUTION: Before performing the following procedures, follow the safety instructions in your Product Information Guide. Adding and Replacing Parts 177
... the track stick cable connector on the system board and press the track stick-cable locking arm down to hold the cable in place. Coin-Cell Battery CAUTION: Before performing the following procedures, follow the safety instructions in your Product Information Guide. Adding and Replacing Parts 177
User's Guide
Page 178
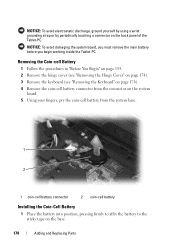
NOTICE: To avoid damaging the system board, you must remove the main battery before you begin working inside the Tablet-PC. Removing the Coin-cell Battery 1 Follow the procedures in "Before You Begin" on page 155. 2 Remove the hinge cover (see "Removing the Hinge Cover" ... connector on the system board. 5 Using your fingers, pry the coin-cell battery from the system base. 1 2 1 coin-cell battery connector 2 coin-cell battery Installing the Coin-Cell Battery 1 Place the battery into position, pressing firmly to affix the battery to the sticky tape on the back panel of the Tablet-PC. NOTICE...
NOTICE: To avoid damaging the system board, you must remove the main battery before you begin working inside the Tablet-PC. Removing the Coin-cell Battery 1 Follow the procedures in "Before You Begin" on page 155. 2 Remove the hinge cover (see "Removing the Hinge Cover" ... connector on the system board. 5 Using your fingers, pry the coin-cell battery from the system base. 1 2 1 coin-cell battery connector 2 coin-cell battery Installing the Coin-Cell Battery 1 Place the battery into position, pressing firmly to affix the battery to the sticky tape on the back panel of the Tablet-PC. NOTICE...

User's Guide
Page 179
..." on the back panel of the Tablet-PC. Adding and Replacing Parts 179 NOTICE: To avoid damaging the system board, you must remove the main battery before you begin working inside the Tablet-PC. Display Assembly CAUTION: Before performing the following procedures, follow the safety instructions in "Before You Begin" on... Mini-Cards (see "Installing the Hinge Cover" on page 175). Removing the Display Assembly 1 Follow the procedures in your Product Information Guide. 2 Connect the coin-cell battery connector to disconnect the display cable from the system board.
..." on the back panel of the Tablet-PC. Adding and Replacing Parts 179 NOTICE: To avoid damaging the system board, you must remove the main battery before you begin working inside the Tablet-PC. Display Assembly CAUTION: Before performing the following procedures, follow the safety instructions in "Before You Begin" on... Mini-Cards (see "Installing the Hinge Cover" on page 175). Removing the Display Assembly 1 Follow the procedures in your Product Information Guide. 2 Connect the coin-cell battery connector to disconnect the display cable from the system board.


