
Service Manual
Page 3
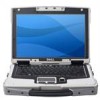
DellTM XFR D630 Fully Rugged Notebook Service Manual Table of Contents 1 BEFORE YOU BEGIN ...6 1.1 RECOMMENDED TOOLS ...6 1.2 TURNING OFF YOUR COMPUTER 6 1.3 BEFORE WORKING INSIDE YOUR COMPUTER 6 1.4 SCREW CHART ...8 2 XBAY DEVICES ...13 3 HARD DRIVE...14 4 STYLUS, TETHER AND CLIP (DIRECTVUE TOUCH SCREEN DISPLAY OPTION) ... 17 4.1 REPLACING THE STYLUS CLIP 17 4.2 REPLACING THE STYLUS 19 5 HANDLE...19 5.1 REMOVING...
DellTM XFR D630 Fully Rugged Notebook Service Manual Table of Contents 1 BEFORE YOU BEGIN ...6 1.1 RECOMMENDED TOOLS ...6 1.2 TURNING OFF YOUR COMPUTER 6 1.3 BEFORE WORKING INSIDE YOUR COMPUTER 6 1.4 SCREW CHART ...8 2 XBAY DEVICES ...13 3 HARD DRIVE...14 4 STYLUS, TETHER AND CLIP (DIRECTVUE TOUCH SCREEN DISPLAY OPTION) ... 17 4.1 REPLACING THE STYLUS CLIP 17 4.2 REPLACING THE STYLUS 19 5 HANDLE...19 5.1 REMOVING...

Service Manual
Page 4
DellTM XFR D630 Fully Rugged Notebook Service Manual 10.10 INSTALLING THE DISPLAY LATCH 68 11 INTERNAL CARD WITH BLUETOOTH® WIRELESS TECHNOLOGY 68 11.1 REMOVING THE BLUETOOTH&#... 95 22.2 INSTALLING THE SYSTEM BOARD 98 23 FLASHING THE BIOS 101 23.1 FLASHING THE BIOS FROM A CD 101 23.2 FLASHING THE BIOS FROM THE HARD DRIVE 101 Page 4 of 106 Revision A01
DellTM XFR D630 Fully Rugged Notebook Service Manual 10.10 INSTALLING THE DISPLAY LATCH 68 11 INTERNAL CARD WITH BLUETOOTH® WIRELESS TECHNOLOGY 68 11.1 REMOVING THE BLUETOOTH&#... 95 22.2 INSTALLING THE SYSTEM BOARD 98 23 FLASHING THE BIOS 101 23.1 FLASHING THE BIOS FROM A CD 101 23.2 FLASHING THE BIOS FROM THE HARD DRIVE 101 Page 4 of 106 Revision A01

Service Manual
Page 14
... metal housing of the hard drive. DellTM XFR D630 Fully Rugged Notebook Service Manual 1 Optical drive 2 Device Latch release 4. To install a device, push the new device into the XBay until it clicks into place. 3 Hard Drive CAUTION: If you remove the hard drive from sources other than Dell. Turn the computer over and locate the hard disk drive compartment using the figure...
... metal housing of the hard drive. DellTM XFR D630 Fully Rugged Notebook Service Manual 1 Optical drive 2 Device Latch release 4. To install a device, push the new device into the XBay until it clicks into place. 3 Hard Drive CAUTION: If you remove the hard drive from sources other than Dell. Turn the computer over and locate the hard disk drive compartment using the figure...

Service Manual
Page 16
... the original packaging for storing or shipping the hard drive. If you use excessive force, you may damage the connector. DellTM XFR D630 Fully Rugged Notebook Service Manual 5. Locate the tab on the hard disk drive and pull it in removing the hard disk drive from the motherboard. 7. Remove the new drive from the computer. 6. NOTICE: Use firm and...
... the original packaging for storing or shipping the hard drive. If you use excessive force, you may damage the connector. DellTM XFR D630 Fully Rugged Notebook Service Manual 5. Locate the tab on the hard disk drive and pull it in removing the hard disk drive from the motherboard. 7. Remove the new drive from the computer. 6. NOTICE: Use firm and...
Service Manual
Page 17
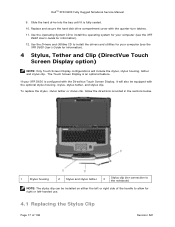
... install the operating system for your computer (see the XFR D630 User's Guide for information). 12. Replace and secure the hard disk drive compartment cover with the optional stylus housing, stylus, stylus tether, and stylus clip. If your XFR D630 is configured with the DirectVue Touch Screen Display, it ...to install the drivers and utilities for your computer (see the XFR D630 User's Guide for connection to the notebook) NOTE: The stylus clip can be equipped with the quarter-turn latches. 11. Slide the hard drive into the bay until it will include the stylus, stylus housing,...
... install the operating system for your computer (see the XFR D630 User's Guide for information). 12. Replace and secure the hard disk drive compartment cover with the optional stylus housing, stylus, stylus tether, and stylus clip. If your XFR D630 is configured with the DirectVue Touch Screen Display, it ...to install the drivers and utilities for your computer (see the XFR D630 User's Guide for connection to the notebook) NOTE: The stylus clip can be equipped with the quarter-turn latches. 11. Slide the hard drive into the bay until it will include the stylus, stylus housing,...
Service Manual
Page 95
... which is also visible on a barcode label on the back of the computer). Follow the instructions in the XFR D630 User's Guide. Remove the hard disk drive (see XBay Devices). 260H 8. Remove any installed media bay device (see Installing the Display Assembly). 258H 6. ...Removing the Modem). 27H 9. Remove the modem (see Memory). 267H 7. Remove any installed wireless communications cards (see Keyboards). 259H 7. DellTM XFR D630 Fully Rugged Notebook Service Manual 5. Replace the keyboard (see WWAN, FCM & SIM Cards, Wireless 269H 270H Local Area Network (WLAN) Cards...
... which is also visible on a barcode label on the back of the computer). Follow the instructions in the XFR D630 User's Guide. Remove the hard disk drive (see XBay Devices). 260H 8. Remove any installed media bay device (see Installing the Display Assembly). 258H 6. ...Removing the Modem). 27H 9. Remove the modem (see Memory). 267H 7. Remove any installed wireless communications cards (see Keyboards). 259H 7. DellTM XFR D630 Fully Rugged Notebook Service Manual 5. Replace the keyboard (see WWAN, FCM & SIM Cards, Wireless 269H 270H Local Area Network (WLAN) Cards...
Service Manual
Page 100
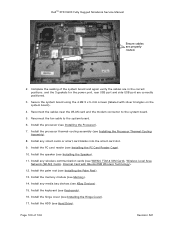
...281H 11. Install the HDD (see Keyboards). 28H 16. Reconnect the fan cable to the system board. 5. Install the keyboard (see Hard Drive). 290H Page 100 of the system board and again verify the cables are in the correct positions, and the 3 gaskets for the power ...Installing the Processor Thermal-Cooling 279H Assembly). 8. Reconnect the cables near the WLAN card and the modem connector to the system board. 6. DellTM XFR D630 Fully Rugged Notebook Service Manual Ensure cables are correctly positioned. 3. Secure the system board using the 4 M2.5 x 5-mm screws (labeled with...
...281H 11. Install the HDD (see Keyboards). 28H 16. Reconnect the fan cable to the system board. 5. Install the keyboard (see Hard Drive). 290H Page 100 of the system board and again verify the cables are in the correct positions, and the 3 gaskets for the power ...Installing the Processor Thermal-Cooling 279H Assembly). 8. Reconnect the cables near the WLAN card and the modem connector to the system board. 6. DellTM XFR D630 Fully Rugged Notebook Service Manual Ensure cables are correctly positioned. 3. Secure the system board using the 4 M2.5 x 5-mm screws (labeled with...
Service Manual
Page 101
...Dell Customer Support before inserting the CD. 2. When the flash update is provided with the new system board, flash the BIOS from the hard drive. 23.1 Flashing the BIOS From a CD 1. Remove the flash BIOS-update program CD from a CD before attempting to reset the computer defaults. 5. DellTM XFR D630...CD, flash the BIOS from the CD. Ensure that accompanied the replacement system board to boot from the drive and restart the computer. 23.2 Flashing the BIOS From the Hard Drive 1. Page 101 of 106 Revision A01 If a BIOS-update program CD is complete, the computer will ...
...Dell Customer Support before inserting the CD. 2. When the flash update is provided with the new system board, flash the BIOS from the hard drive. 23.1 Flashing the BIOS From a CD 1. Remove the flash BIOS-update program CD from a CD before attempting to reset the computer defaults. 5. DellTM XFR D630...CD, flash the BIOS from the CD. Ensure that accompanied the replacement system board to boot from the drive and restart the computer. 23.2 Flashing the BIOS From the Hard Drive 1. Page 101 of 106 Revision A01 If a BIOS-update program CD is complete, the computer will ...
User Guide
Page 7
... Diagnostic Lights 99 Diagnostic Light Codes During POST 99 Dell™ Technical Update Service 101 Dell Diagnostics 101 When to Use the Dell Diagnostics 102 Starting the Dell Diagnostics From Your Hard Drive 102 Starting the Dell Diagnostics from the Drivers and Utilities Media 103 Dell Diagnostics Main Menu 104 Dell Support Utility 105 Accessing the Dell Support Utility 105 7
... Diagnostic Lights 99 Diagnostic Light Codes During POST 99 Dell™ Technical Update Service 101 Dell Diagnostics 101 When to Use the Dell Diagnostics 102 Starting the Dell Diagnostics From Your Hard Drive 102 Starting the Dell Diagnostics from the Drivers and Utilities Media 103 Dell Diagnostics Main Menu 104 Dell Support Utility 105 Accessing the Dell Support Utility 105 7
User Guide
Page 8
... Icon 106 Double-Clicking the Dell Support Icon 106 Drive Problems 106 Media drive problems 107 If you cannot eject the CD, CD-RW, DVD, or DVD+RW drive tray 107 If you hear an unfamiliar scraping or grinding sound 108 Hard drive problems 108 E-Mail, Modem, and Internet Problems 108 Error Messages 110 IEEE 1394...
... Icon 106 Double-Clicking the Dell Support Icon 106 Drive Problems 106 Media drive problems 107 If you cannot eject the CD, CD-RW, DVD, or DVD+RW drive tray 107 If you hear an unfamiliar scraping or grinding sound 108 Hard drive problems 108 E-Mail, Modem, and Internet Problems 108 Error Messages 110 IEEE 1394...
User Guide
Page 10
... Technology 154 Coin-Cell Battery 156 Memory 157 Wireless Local Area Network (WLAN) Card 163 Mobile Broadband Card 166 Subscriber Identity Module (SIM) Card 169 Hard Drive 170 Media Bay 173 Removing Media Bay Devices 173 FCM (Flash Cache Module 174 10
... Technology 154 Coin-Cell Battery 156 Memory 157 Wireless Local Area Network (WLAN) Card 163 Mobile Broadband Card 166 Subscriber Identity Module (SIM) Card 169 Hard Drive 170 Media Bay 173 Removing Media Bay Devices 173 FCM (Flash Cache Module 174 10
User Guide
Page 17
... the operating system for for processors, optical drives, USB devices, and so on your Dell computer. Contact information, service call status and support history, service contract, online discussions with other Dell customers • Upgrades - the NSS utility...dell.com, select your computer configuration, product region or business segment, and enter specifications, and white papers your computer • Reference - The software automatically detects your computer and operating system and installs the updates appropriate for components, such as memory, the hard drive...
... the operating system for for processors, optical drives, USB devices, and so on your Dell computer. Contact information, service call status and support history, service contract, online discussions with other Dell customers • Upgrades - the NSS utility...dell.com, select your computer configuration, product region or business segment, and enter specifications, and white papers your computer • Reference - The software automatically detects your computer and operating system and installs the updates appropriate for components, such as memory, the hard drive...
User Guide
Page 25
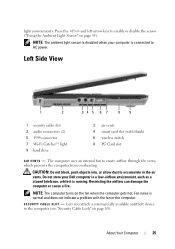
... allow dust to accumulate in a low-airflow environment, such as a closed briefcase, while it is running. NOTE: The ambient light sensor is disabled when your Dell computer in the air vents. Do not store your computer is normal and does not indicate a problem with blank) 6 wireless switch 8 PC Card slot A I T Y C A .... Left Side View 1 2 345 6 7 89 1 security cable slot 3 audio connectors (2) 5 1394 connector 7 Wi-Fi Catcher™ light 9 hard drive 2 air vents 4 smart card slot (with the fan or the computer. S E C U R I R V E N T S - light environments.
... allow dust to accumulate in a low-airflow environment, such as a closed briefcase, while it is running. NOTE: The ambient light sensor is disabled when your Dell computer in the air vents. Do not store your computer is normal and does not indicate a problem with blank) 6 wireless switch 8 PC Card slot A I T Y C A .... Left Side View 1 2 345 6 7 89 1 security cable slot 3 audio connectors (2) 5 1394 connector 7 Wi-Fi Catcher™ light 9 hard drive 2 air vents 4 smart card slot (with the fan or the computer. S E C U R I R V E N T S - light environments.

User Guide
Page 28
D E V I A B A Y - Press the latch release to eject any device installed in media bay 3 USB connectors (2) 2 media-bay device latch release M E D I C E L A T C H R E L EA S E - Supports a floppy or an optical drive, second battery, second hard drive, or a Dell TravelLite™ module (see "Using Multimedia" on page 73). Back View 12 3 4 5 6 7 28 About Your Computer USB CONNECTORS Connect USB devices, such as a mouse, keyboard, or printer. Right Side View 1 2 3 1 optical drive in the media bay.
D E V I A B A Y - Press the latch release to eject any device installed in media bay 3 USB connectors (2) 2 media-bay device latch release M E D I C E L A T C H R E L EA S E - Supports a floppy or an optical drive, second battery, second hard drive, or a Dell TravelLite™ module (see "Using Multimedia" on page 73). Back View 12 3 4 5 6 7 28 About Your Computer USB CONNECTORS Connect USB devices, such as a mouse, keyboard, or printer. Right Side View 1 2 3 1 optical drive in the media bay.
User Guide
Page 32
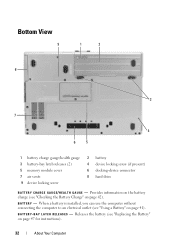
... charge gauge/health gauge 3 battery-bay latch releases (2) 5 memory module cover 7 air vents 9 device locking screw 2 battery 4 device locking screw (if present) 6 docking-device connector 8 hard drive B A T T E R Y C H A R G E G A U G E / H E A L T H G A U G E - Releases the battery (see "Replacing the Battery" on page 41...
... charge gauge/health gauge 3 battery-bay latch releases (2) 5 memory module cover 7 air vents 9 device locking screw 2 battery 4 device locking screw (if present) 6 docking-device connector 8 hard drive B A T T E R Y C H A R G E G A U G E / H E A L T H G A U G E - Releases the battery (see "Replacing the Battery" on page 41...
User Guide
Page 45
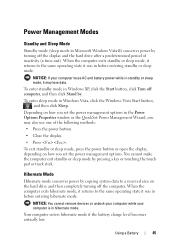
To enter sleep mode in Microsoft Windows Vista®) conserves power by turning off the display and the hard drive after a predetermined period of the following methods: • Press the power button. • Close the display. • Press . Your computer enters hibernate mode if the ... on how you set the power management options. To exit standby or sleep mode, press the power button or open the display, depending on the hard drive and then completely turning off computer, and then click Stand by pressing a key or touching the touch pad or track stick. NOTICE: You cannot remove...
To enter sleep mode in Microsoft Windows Vista®) conserves power by turning off the display and the hard drive after a predetermined period of the following methods: • Press the power button. • Close the display. • Press . Your computer enters hibernate mode if the ... on how you set the power management options. To exit standby or sleep mode, press the power button or open the display, depending on the hard drive and then completely turning off computer, and then click Stand by pressing a key or touching the touch pad or track stick. NOTICE: You cannot remove...
User Guide
Page 75
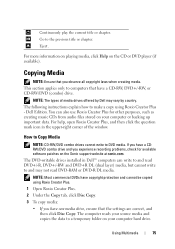
...; computers can also use Roxio Creator Plus for available software patches on your computer hard drive. The DVD-writable drives installed in the upper-right corner of media drives offered by Dell may not read DVD-RAM or DVD-R DL media. The computer reads your computer or backing up ...important data. Continuously play the current title or chapter. Using Multimedia 75 Dell Edition. If you have a CDRW/DVD combo drive and you experience recording problems, check for other purposes, such as creating music CDs from audio files stored on...
...; computers can also use Roxio Creator Plus for available software patches on your computer hard drive. The DVD-writable drives installed in the upper-right corner of media drives offered by Dell may not read DVD-RAM or DVD-R DL media. The computer reads your computer or backing up ...important data. Continuously play the current title or chapter. Using Multimedia 75 Dell Edition. If you have a CDRW/DVD combo drive and you experience recording problems, check for other purposes, such as creating music CDs from audio files stored on...
User Guide
Page 88
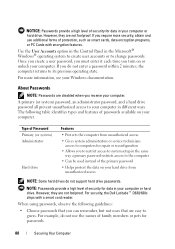
...hard drive. Type of Password Primary (or system) Administrator Hard drive Features • Protects the computer from unauthorized access NOTE: Some hard drives do not support hard drive passwords. NOTE: Passwords provide a high level of passwords available on or unlock your computer. For security, the Dell Latitude™ D630...not foolproof. However, they are not foolproof. A primary (or system) password, an administrator password, and a hard drive password all prevent unauthorized access to change passwords. Use the User Accounts option in the Control Panel in the Microsoft...
...hard drive. Type of Password Primary (or system) Administrator Hard drive Features • Protects the computer from unauthorized access NOTE: Some hard drives do not support hard drive passwords. NOTE: Passwords provide a high level of passwords available on or unlock your computer. For security, the Dell Latitude™ D630...not foolproof. However, they are not foolproof. A primary (or system) password, an administrator password, and a hard drive password all prevent unauthorized access to change passwords. Use the User Accounts option in the Control Panel in the Microsoft...
User Guide
Page 89
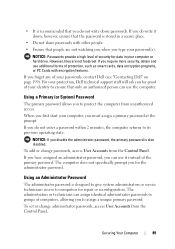
...computers, allowing you for data in a secure place. • Do not share passwords with encryption features. For your protection, Dell technical support staff will ask you type your identity to ensure that you can assign identical administrator passwords to groups of the primary... passwords. Using an Administrator Password The administrator password is stored in your passwords, contact Dell (see "Contacting Dell" on page 199). NOTICE: Passwords provide a high level of your computer or hard drive. If you must assign a primary password at the prompt. If you have assigned an...
...computers, allowing you for data in a secure place. • Do not share passwords with encryption features. For your protection, Dell technical support staff will ask you type your identity to ensure that you can assign identical administrator passwords to groups of the primary... passwords. Using an Administrator Password The administrator password is stored in your passwords, contact Dell (see "Contacting Dell" on page 199). NOTICE: Passwords provide a high level of your computer or hard drive. If you must assign a primary password at the prompt. If you have assigned an...

User Guide
Page 90
...contact your system administrator or contact Dell (see "System Setup Program" on your password (with no more than eight characters) and press . If the hard drive password is enabled, you must enter it does not provide access to the hard drive when a hard drive password is assigned. The Configure Setup...Whenever you are prompted to enter the primary password, you to restrict access to system setup in system setup. Using a Hard Drive Password The hard drive password helps protect the data on page 135). If you enter the wrong password, a message tells you set an administrator ...
...contact your system administrator or contact Dell (see "System Setup Program" on your password (with no more than eight characters) and press . If the hard drive password is enabled, you must enter it does not provide access to the hard drive when a hard drive password is assigned. The Configure Setup...Whenever you are prompted to enter the primary password, you to restrict access to system setup in system setup. Using a Hard Drive Password The hard drive password helps protect the data on page 135). If you enter the wrong password, a message tells you set an administrator ...


