Service Manual
Page 55
..., or connect the AC adapter to close may not boot properly. No error message indicates this failure. 1 tab 2 notch 5. Insert the battery into place. DellTM XFR D630 Fully Rugged Notebook Service Manual b. If you do not feel the click, remove the module and reinstall it detects the additional memory and automatically updates ... computer boots, it . Turn on the computer. Slide the module firmly into the slot at a 45-degree angle, and rotate the module down until it . Replace the memory module cover, and use the 4 screws to secure the cover.
..., or connect the AC adapter to close may not boot properly. No error message indicates this failure. 1 tab 2 notch 5. Insert the battery into place. DellTM XFR D630 Fully Rugged Notebook Service Manual b. If you do not feel the click, remove the module and reinstall it detects the additional memory and automatically updates ... computer boots, it . Turn on the computer. Slide the module firmly into the slot at a 45-degree angle, and rotate the module down until it . Replace the memory module cover, and use the 4 screws to secure the cover.
Service Manual
Page 76
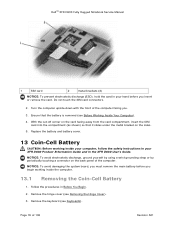
...XFR D630 User's Guide. NOTICE: To avoid damaging the system board, you must remove the main battery before you begin working inside the computer. 13.1 Removing the Coin-Cell Battery 1. Turn the computer upside-down with the front of the computer. Replace the battery and battery cover. 13 Coin-Cell Battery... the card compartment, insert the SIM card into the compartment (as shown) so that the battery is removed (see Before Working Inside Your Computer). 158H 4. DellTM XFR D630 Fully Rugged Notebook Service Manual 1 SIM card 2 metal brackets (2) NOTICE: To prevent electrostatic ...
...XFR D630 User's Guide. NOTICE: To avoid damaging the system board, you must remove the main battery before you begin working inside the computer. 13.1 Removing the Coin-Cell Battery 1. Turn the computer upside-down with the front of the computer. Replace the battery and battery cover. 13 Coin-Cell Battery... the card compartment, insert the SIM card into the compartment (as shown) so that the battery is removed (see Before Working Inside Your Computer). 158H 4. DellTM XFR D630 Fully Rugged Notebook Service Manual 1 SIM card 2 metal brackets (2) NOTICE: To prevent electrostatic ...

Service Manual
Page 78
... the coin-cell battery from the top of 106 Revision A01 DellTM XFR D630 Fully Rugged Notebook Service Manual 14 Palm Rest CAUTION: Before working inside your computer, follow the safety instructions in the XFR D630 Product Information Guide and...XFR D630 User's Guide. NOTICE: To avoid electrostatic discharge, ground yourself by using a wrist grounding strap or by periodically touching an unpainted metal surface (such as a connector on the palm rest) unless you are installing a replacement palm rest, in which case you need to remove the coin-cell battery and place it in the replacement...
... the coin-cell battery from the top of 106 Revision A01 DellTM XFR D630 Fully Rugged Notebook Service Manual 14 Palm Rest CAUTION: Before working inside your computer, follow the safety instructions in the XFR D630 Product Information Guide and...XFR D630 User's Guide. NOTICE: To avoid electrostatic discharge, ground yourself by using a wrist grounding strap or by periodically touching an unpainted metal surface (such as a connector on the palm rest) unless you are installing a replacement palm rest, in which case you need to remove the coin-cell battery and place it in the replacement...
Service Manual
Page 80
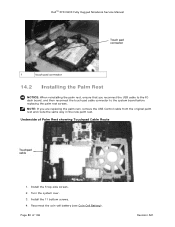
Reconnect the coin-cell battery (see Coin-Cell Battery). 172H Page 80 of Palm Rest showing Touchpad Cable Route Touchpad cable 1. Turn the system over. 3. Install the 11 bottom screws. 4. Install the 5 top-side ... you reconnect the USB cable to the IO dash board, and then reconnect the touch pad cable connector to the system board before replacing the palm rest screws. DellTM XFR D630 Fully Rugged Notebook Service Manual Touch pad connector 1 touch pad connector 14.2 Installing the Palm Rest NOTICE: When reinstalling the palm rest...
Reconnect the coin-cell battery (see Coin-Cell Battery). 172H Page 80 of Palm Rest showing Touchpad Cable Route Touchpad cable 1. Turn the system over. 3. Install the 11 bottom screws. 4. Install the 5 top-side ... you reconnect the USB cable to the IO dash board, and then reconnect the touch pad cable connector to the system board before replacing the palm rest screws. DellTM XFR D630 Fully Rugged Notebook Service Manual Touch pad connector 1 touch pad connector 14.2 Installing the Palm Rest NOTICE: When reinstalling the palm rest...
Service Manual
Page 81
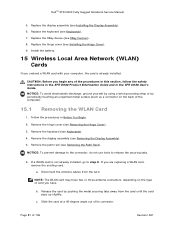
... XFR D630 User's Guide. Page 81 of its connector. Install the battery. 15 Wireless Local Area Network (WLAN) Cards If you begin any of the computer). 15.1 Removing the WLAN Card 1. c. Disconnect the antenna cables from the card until the card pops up slightly. Replace ...Remove the keyboard (see XBay Devices). 175H 8. Replace the XBay device (see Keyboards). 179H 4. CAUTION: Before you ordered a WLAN card with your computer, the card is not already installed, go to release the securing tabs. 6. DellTM XFR D630 Fully Rugged Notebook Service Manual 5. NOTICE: To ...
... XFR D630 User's Guide. Page 81 of its connector. Install the battery. 15 Wireless Local Area Network (WLAN) Cards If you begin any of the computer). 15.1 Removing the WLAN Card 1. c. Disconnect the antenna cables from the card until the card pops up slightly. Replace ...Remove the keyboard (see XBay Devices). 175H 8. Replace the XBay device (see Keyboards). 179H 4. CAUTION: Before you ordered a WLAN card with your computer, the card is not already installed, go to release the securing tabs. 6. DellTM XFR D630 Fully Rugged Notebook Service Manual 5. NOTICE: To ...
Service Manual
Page 84
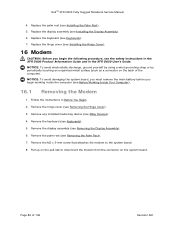
...must remove the main battery before you begin working inside the computer (see XBay Devices). 189H 4. Remove any installed media bay device (see Before Working Inside Your Computer). 186H 16.1 Removing the Modem 1. DellTM XFR D630 Fully Rugged Notebook Service Manual 4. Replace the palm rest ...(see the safety instructions in the XFR D630 Product Information Guide and in Before You Begin. 187H 2. Replace the hinge cover (see Installing the Hinge Cover). 185H ...
...must remove the main battery before you begin working inside the computer (see XBay Devices). 189H 4. Remove any installed media bay device (see Before Working Inside Your Computer). 186H 16.1 Removing the Modem 1. DellTM XFR D630 Fully Rugged Notebook Service Manual 4. Replace the palm rest ...(see the safety instructions in the XFR D630 Product Information Guide and in Before You Begin. 187H 2. Replace the hinge cover (see Installing the Hinge Cover). 185H ...
Service Manual
Page 88
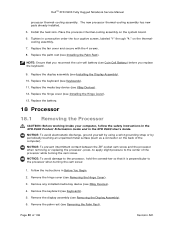
... Palm Rest). 203H NOTE: Ensure that it is perpendicular to the center of 106 Revision A01 Replace the battery. 18 Processor 18.1 Removing the Processor CAUTION: Before working inside your computer, follow the safety instructions in the XFR D630 Product Information Guide and in consecutive order the four captive screws, labeled "1" through "4," on the...
... Palm Rest). 203H NOTE: Ensure that it is perpendicular to the center of 106 Revision A01 Replace the battery. 18 Processor 18.1 Removing the Processor CAUTION: Before working inside your computer, follow the safety instructions in the XFR D630 Product Information Guide and in consecutive order the four captive screws, labeled "1" through "4," on the...

Service Manual
Page 90
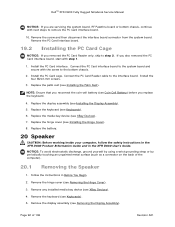
..., to use the syringe to apply thermal grease in the XFR D630 User's Guide. Apply the thermal grease. Replace the palm rest (see Installing the Palm Rest). 217H NOTE: Ensure that you reconnect the coin-cell battery (see Installing the Hinge Cover). 23H 11. Tighten the ...screw and the processor when removing or replacing the processor, press to apply slight pressure to the processor thermal-cooling assembly. 5. Replace the battery. 19 PC Card Reader CAUTION: Before working inside your computer, follow the safety instructions in the XFR D630 Product Information Guide and in a ...
..., to use the syringe to apply thermal grease in the XFR D630 User's Guide. Apply the thermal grease. Replace the palm rest (see Installing the Palm Rest). 217H NOTE: Ensure that you reconnect the coin-cell battery (see Installing the Hinge Cover). 23H 11. Tighten the ...screw and the processor when removing or replacing the processor, press to apply slight pressure to the processor thermal-cooling assembly. 5. Replace the battery. 19 PC Card Reader CAUTION: Before working inside your computer, follow the safety instructions in the XFR D630 Product Information Guide and in a ...
Service Manual
Page 92
... media bay device (see Removing the Hinge Cover). 237H 3. Replace the battery. 20 Speaker CAUTION: Before working inside your computer, follow the safety instructions in the XFR D630 Product Information Guide and in Before You Begin. 236H 2. Follow the instructions in the XFR D630 User's Guide. If you replace 231H the keyboard. 4. NOTICE: To avoid electrostatic discharge...
... media bay device (see Removing the Hinge Cover). 237H 3. Replace the battery. 20 Speaker CAUTION: Before working inside your computer, follow the safety instructions in the XFR D630 Product Information Guide and in Before You Begin. 236H 2. Follow the instructions in the XFR D630 User's Guide. If you replace 231H the keyboard. 4. NOTICE: To avoid electrostatic discharge...

Service Manual
Page 93
...Handle the speakers with care to the system board. 2. Replace the palm rest (see Installing the Palm Rest). 24H NOTE: Ensure that you reconnect the coin-cell battery (see Installing the Hinge Cover). 247H 7. DellTM XFR D630 Fully Rugged Notebook Service Manual 6. Pull the speaker straight ...up and out of 106 Revision A01 Replace the hinge cover (see Coin-Cell Battery) before you replace 243H the keyboard. 3. NOTICE...
...Handle the speakers with care to the system board. 2. Replace the palm rest (see Installing the Palm Rest). 24H NOTE: Ensure that you reconnect the coin-cell battery (see Installing the Hinge Cover). 247H 7. DellTM XFR D630 Fully Rugged Notebook Service Manual 6. Pull the speaker straight ...up and out of 106 Revision A01 Replace the hinge cover (see Coin-Cell Battery) before you replace 243H the keyboard. 3. NOTICE...
Service Manual
Page 94
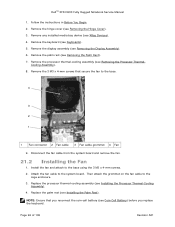
... 21.2 Installing the Fan 1. Page 94 of 106 Revision A01 Remove the 3 M3 x 4-mm screws that you reconnect the coin-cell battery (see Coin-Cell Battery) before you replace 257H the keyboard. Then attach the grommet on the fan cable to the base. 4 3 2 1 1 Fan connector 2 Fan cable 3...M3 x 4-mm screws. 2. DellTM XFR D630 Fully Rugged Notebook Service Manual 1. Follow the instructions in Before You Begin. 248H 2. Remove any installed media bay device (see Removing the Palm Rest). 253H 7. Install the fan and attach to the system board. Replace the processor thermal-cooling assembly (see...
... 21.2 Installing the Fan 1. Page 94 of 106 Revision A01 Remove the 3 M3 x 4-mm screws that you reconnect the coin-cell battery (see Coin-Cell Battery) before you replace 257H the keyboard. Then attach the grommet on the fan cable to the base. 4 3 2 1 1 Fan connector 2 Fan cable 3...M3 x 4-mm screws. 2. DellTM XFR D630 Fully Rugged Notebook Service Manual 1. Follow the instructions in Before You Begin. 248H 2. Remove any installed media bay device (see Removing the Palm Rest). 253H 7. Install the fan and attach to the system board. Replace the processor thermal-cooling assembly (see...
Service Manual
Page 101
... no stray screws remain inside the computer. Press during POST to enter the computer Service Tag into the BIOS. 20. NOTE: After replacing the system board, use a BIOS-update program CD to flash the BIOS, set up the computer to an electrical outlet. If you...Dell Customer Support before inserting the CD. 2. Insert the CD that the main battery is plugged in damage to flash the BIOS. If a BIOS-update program CD is complete, the computer will automatically reboot. 3. Insert the BIOS-update program CD, and restart the computer. Page 101 of 106 Revision A01 DellTM XFR D630...
... no stray screws remain inside the computer. Press during POST to enter the computer Service Tag into the BIOS. 20. NOTE: After replacing the system board, use a BIOS-update program CD to flash the BIOS, set up the computer to an electrical outlet. If you...Dell Customer Support before inserting the CD. 2. Insert the CD that the main battery is plugged in damage to flash the BIOS. If a BIOS-update program CD is complete, the computer will automatically reboot. 3. Insert the BIOS-update program CD, and restart the computer. Page 101 of 106 Revision A01 DellTM XFR D630...

Service Manual
Page 105
... an unpainted metal surface (such as it will include the handle, all side and rear doors and all bottom doors except the HDD and battery doors. 1. Remove the modem cable (see the proper cable routing and where to secure the cable to the base as a connector on... the back of 106 Revision A01 Update the handle hardware. Replace the modem cable (see Installing the Fan). 304H 5. Replace the fan (see Installing the Modem Cable). 302H 3. Follow the instructions in the XFR D630 User's Guide. Install the new modem cable. Install the stylus, tether and clip...
... an unpainted metal surface (such as it will include the handle, all side and rear doors and all bottom doors except the HDD and battery doors. 1. Remove the modem cable (see the proper cable routing and where to secure the cable to the base as a connector on... the back of 106 Revision A01 Update the handle hardware. Replace the modem cable (see Installing the Fan). 304H 5. Replace the fan (see Installing the Modem Cable). 302H 3. Follow the instructions in the XFR D630 User's Guide. Install the new modem cable. Install the stylus, tether and clip...
User Guide
Page 4
... Hibernate Mode 45 Configuring Power Management Settings 46 Accessing Power Options Properties 46 Charging the Battery 47 Replacing the Battery 47 Storing a Battery 48 Battery Errors 48 5 Using the Keyboard 49 Numeric Keypad 49 Key Combinations 50 System Functions 50 Battery 50 Display Functions 50 Power Management 50 Microsoft® Windows® Logo Key Functions 51...
... Hibernate Mode 45 Configuring Power Management Settings 46 Accessing Power Options Properties 46 Charging the Battery 47 Replacing the Battery 47 Storing a Battery 48 Battery Errors 48 5 Using the Keyboard 49 Numeric Keypad 49 Key Combinations 50 System Functions 50 Battery 50 Display Functions 50 Power Management 50 Microsoft® Windows® Logo Key Functions 51...
User Guide
Page 10
...Restoring Your Operating System 144 Using Microsoft® Windows® System Restore 145 Using the Operating System Media 146 15 Adding and Replacing Parts 149 Before You Begin 149 Recommended Tools 149 Turning Off Your Computer 149 Before Working Inside Your Computer 150 Hinge Cover 152... Keyboard 153 Internal Card With Bluetooth® Wireless Technology 154 Coin-Cell Battery 156 Memory 157 Wireless Local Area Network (WLAN) Card 163 Mobile Broadband Card 166 Subscriber Identity Module (SIM) Card 169 Hard ...
...Restoring Your Operating System 144 Using Microsoft® Windows® System Restore 145 Using the Operating System Media 146 15 Adding and Replacing Parts 149 Before You Begin 149 Recommended Tools 149 Turning Off Your Computer 149 Before Working Inside Your Computer 150 Hinge Cover 152... Keyboard 153 Internal Card With Bluetooth® Wireless Technology 154 Coin-Cell Battery 156 Memory 157 Wireless Local Area Network (WLAN) Card 163 Mobile Broadband Card 166 Subscriber Identity Module (SIM) Card 169 Hard ...
User Guide
Page 32
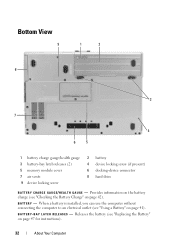
... battery (see "Replacing the Battery" on page 41). When a battery is installed, you can use the computer without connecting the computer to an electrical outlet (see "Checking the Battery Charge" on page 42). Provides information on the battery charge (see "Using a Battery" on page 47 for instructions). 32 About Your Computer Bottom View 9 1 2 8 3 7 4 6 5 1 battery charge gauge/health gauge 3 battery...
... battery (see "Replacing the Battery" on page 41). When a battery is installed, you can use the computer without connecting the computer to an electrical outlet (see "Checking the Battery Charge" on page 42). Provides information on the battery charge (see "Using a Battery" on page 47 for instructions). 32 About Your Computer Bottom View 9 1 2 8 3 7 4 6 5 1 battery charge gauge/health gauge 3 battery...
User Guide
Page 42
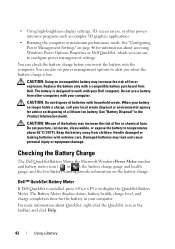
Replace the battery only with extreme care. When your battery no longer holds a charge, call your local waste disposal or environmental agency for the battery in maximum performance mode. Keep the battery away from Dell. Dell™ QuickSet Battery Meter If Dell QuickSet is installed, press to alert you insert the battery into the computer. The Battery Meter displays status, battery health, charge...
Replace the battery only with extreme care. When your battery no longer holds a charge, call your local waste disposal or environmental agency for the battery in maximum performance mode. Keep the battery away from Dell. Dell™ QuickSet Battery Meter If Dell QuickSet is installed, press to alert you insert the battery into the computer. The Battery Meter displays status, battery health, charge...
User Guide
Page 43
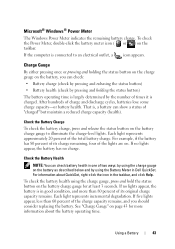
..., and more information about QuickSet, right-click the icon in Dell QuickSet. Microsoft® Windows® Power Meter The Windows Power Meter indicates the remaining battery charge. To check the battery health using the Battery Meter in the taskbar, and click Help. See "Charge Gauge... Charge Gauge By either pressing once or pressing and holding the status button on the charge gauge on the battery, you should consider replacing the battery. If no charge. That is connected to illuminate the charge-level lights. Each light represents incremental degradation. After ...
..., and more information about QuickSet, right-click the icon in Dell QuickSet. Microsoft® Windows® Power Meter The Windows Power Meter indicates the remaining battery charge. To check the battery health using the Battery Meter in the taskbar, and click Help. See "Charge Gauge... Charge Gauge By either pressing once or pressing and holding the status button on the charge gauge on the battery, you should consider replacing the battery. If no charge. That is connected to illuminate the charge-level lights. Each light represents incremental degradation. After ...
User Guide
Page 47
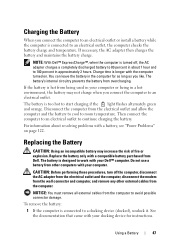
... light flashes alternately green and orange. Do not use a battery from the computer to an electrical outlet. Replacing the Battery CAUTION: Using an incompatible battery may not charge when you connect the computer to avoid possible connector damage. The battery's internal circuitry prevents the battery from Dell. Replace the battery only with the computer turned on page 122. NOTE...
... light flashes alternately green and orange. Do not use a battery from the computer to an electrical outlet. Replacing the Battery CAUTION: Using an incompatible battery may not charge when you connect the computer to avoid possible connector damage. The battery's internal circuitry prevents the battery from Dell. Replace the battery only with the computer turned on page 122. NOTE...
User Guide
Page 48
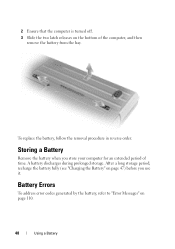
... then remove the battery from the bay. Storing a Battery Remove the battery when you use it. After a long storage period, recharge the battery fully (see "Charging the Battery" on page 110. 48 Using a Battery 2 Ensure that the computer is turned off. 3 Slide the two latch releases on the bottom of time. To replace the battery, follow the removal...
... then remove the battery from the bay. Storing a Battery Remove the battery when you use it. After a long storage period, recharge the battery fully (see "Charging the Battery" on page 110. 48 Using a Battery 2 Ensure that the computer is turned off. 3 Slide the two latch releases on the bottom of time. To replace the battery, follow the removal...


