Intel Responsiveness Technologies Guide
Page 19
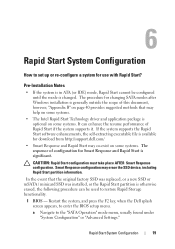
... scope of this document, however, "Appendix B" on page 40 provides suggested methods that the original factory SSD was replaced, or a new SSD or mSATA / minicard SSD was installed, or the Rapid Start partition is otherwise erased, the following procedure can enhance the resume ...Advanced Settings." If the system supports the Rapid Start software enhancements, the self-extracting executable file is available for download from http://support.dell.com/ • Smart Response and Rapid Start may erase the SSD device, including Rapid Start partition information. Smart Response configuration may ...
... scope of this document, however, "Appendix B" on page 40 provides suggested methods that the original factory SSD was replaced, or a new SSD or mSATA / minicard SSD was installed, or the Rapid Start partition is otherwise erased, the following procedure can enhance the resume ...Advanced Settings." If the system supports the Rapid Start software enhancements, the self-extracting executable file is available for download from http://support.dell.com/ • Smart Response and Rapid Start may erase the SSD device, including Rapid Start partition information. Smart Response configuration may ...

Intel Responsiveness Technologies Guide
Page 23
5 After selecting "Shrink", a new unallocated 8 GB partition will appear with a black bar above it on the right side. Rapid Start System Configuration 23
5 After selecting "Shrink", a new unallocated 8 GB partition will appear with a black bar above it on the right side. Rapid Start System Configuration 23

Intel Responsiveness Technologies Guide
Page 26
e Type "list partition", and press Enter. The color of the bar above the 8 GB partition in the Disk Management window will turn from black to the disk with a *, as in the command window, a new 8 GB partition will be listed, marked with 8 GB free. d Type "create partition primary", and press Enter. Dell Setup Guide c Type "list disk", and press Enter. A * should appear next to blue, the text will say "Raw / Healthy (Primary Partition)", and in this screenshot: 26 Intel Responsiveness Technologies -
e Type "list partition", and press Enter. The color of the bar above the 8 GB partition in the Disk Management window will turn from black to the disk with a *, as in the command window, a new 8 GB partition will be listed, marked with 8 GB free. d Type "create partition primary", and press Enter. Dell Setup Guide c Type "list disk", and press Enter. A * should appear next to blue, the text will say "Raw / Healthy (Primary Partition)", and in this screenshot: 26 Intel Responsiveness Technologies -
Latitude E-Family Re-Imaging Guide
Page 2
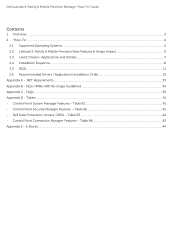
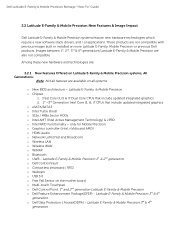
Dell Latitude E-Family & Mobile Precision Reimage "How-To" Guide Contents 1 Overview...3 2 "How-To" ...4 2.1 Supported Operating Systems ...4 2.2 Latitude E-Family & Mobile Precision New Features & Image Impact 5 2.3 Latest Drivers / Applications and Utilities...7 2.4 Installation Sequence...8 2.5 BIOS...11 2.6 Recommended Drivers / Applications Installation Order 13 Appendix A - .... - Table B4...43 Appendix E - Control Point Connection Manager Features - Tables...41 - Table B2...42 - E-Docks...44 Dell Data Protection | Access, DDPA - Table B3...42 - FAQs...39 Appendix D -
Dell Latitude E-Family & Mobile Precision Reimage "How-To" Guide Contents 1 Overview...3 2 "How-To" ...4 2.1 Supported Operating Systems ...4 2.2 Latitude E-Family & Mobile Precision New Features & Image Impact 5 2.3 Latest Drivers / Applications and Utilities...7 2.4 Installation Sequence...8 2.5 BIOS...11 2.6 Recommended Drivers / Applications Installation Order 13 Appendix A - .... - Table B4...43 Appendix E - Control Point Connection Manager Features - Tables...41 - Table B2...42 - E-Docks...44 Dell Data Protection | Access, DDPA - Table B3...42 - FAQs...39 Appendix D -
Latitude E-Family Re-Imaging Guide
Page 3
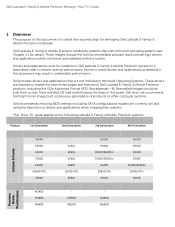
...their systems. This "How-To" guide applies to enable the new technologies and features of Dell Latitude E-Family & Mobile Precision products, including the 512e Advanced Format HDD (See appendix -B). Dell Latitude E-Family & Mobile Precision Reimage "How-To" Guide 1 ...E6530 M2400 M4400 M6400 M4500 M6500 M4600 M6600 Precision Mobile WorkStations Dell does not recommend starting from a clean hand installed OS load and following the steps in Microsoft Operating Systems. These drivers are tested and validated with Microsoft operating systems (see Chapter 2.1 for reimaging Dell Latitude...
...their systems. This "How-To" guide applies to enable the new technologies and features of Dell Latitude E-Family & Mobile Precision products, including the 512e Advanced Format HDD (See appendix -B). Dell Latitude E-Family & Mobile Precision Reimage "How-To" Guide 1 ...E6530 M2400 M4400 M6400 M4500 M6500 M4600 M6600 Precision Mobile WorkStations Dell does not recommend starting from a clean hand installed OS load and following the steps in Microsoft Operating Systems. These drivers are tested and validated with Microsoft operating systems (see Chapter 2.1 for reimaging Dell Latitude...
Latitude E-Family Re-Imaging Guide
Page 5
... Point, 1st and 2nd generation Latitude E-Family & Mobile Precision o Dell Feature Enhancement Package(DFEP) - Latitude E-Family & Mobile Precision 3rd & 4th generation o Dell Data Protection | Access(DDPA) - Latitude E-Family & Mobile Precision o Chipset 1. Latitude E-Family & Mobile Precision 3rd & 4th generation Dell Latitude E-Family & Mobile Precision Reimage "How-To" Guide 2.2 Latitude E-Family & Mobile Precision New Features & Image Impact Dell Latitude E-Family & Mobile Precision systems feature...
... Point, 1st and 2nd generation Latitude E-Family & Mobile Precision o Dell Feature Enhancement Package(DFEP) - Latitude E-Family & Mobile Precision 3rd & 4th generation o Dell Data Protection | Access(DDPA) - Latitude E-Family & Mobile Precision o Chipset 1. Latitude E-Family & Mobile Precision 3rd & 4th generation Dell Latitude E-Family & Mobile Precision Reimage "How-To" Guide 2.2 Latitude E-Family & Mobile Precision New Features & Image Impact Dell Latitude E-Family & Mobile Precision systems feature...
Latitude E-Family Re-Imaging Guide
Page 30
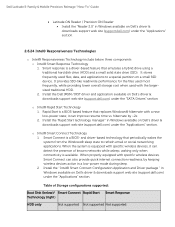
... equipped with a new low-power state; Table of known networks while asleep, waking only when connectivity is a driver-based feature that periodically wakes the system from the Windows® sleep state to a special partition on a small SSD device. Dell Latitude E-Family & Mobile... Precision Reimage "How-To" Guide Latitude ON Reader / Precision ON Reader Install the "Reader 2.0" in Windows available on Dell's driver & downloads support web site (support.dell.com) under the "Applications" section....
... equipped with a new low-power state; Table of known networks while asleep, waking only when connectivity is a driver-based feature that periodically wakes the system from the Windows® sleep state to a special partition on a small SSD device. Dell Latitude E-Family & Mobile... Precision Reimage "How-To" Guide Latitude ON Reader / Precision ON Reader Install the "Reader 2.0" in Windows available on Dell's driver & downloads support web site (support.dell.com) under the "Applications" section....
Latitude E-Family Re-Imaging Guide
Page 37
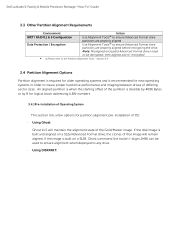
...for partition alignment pre-installation of the Gold/Master image. Section 3.4 3.4 Partition Alignment Options Partition alignment is required for new operating systems in order to any drive. - Using Ghost: Ghost 11.5 will remain aligned. If the disk image... refer to ensure Advanced Format drive partitions are properly aligned Data Protection / Encryption Use Alignment Tools(1) to the Partition Alignment Tools - Dell Latitude E-Family & Mobile Precision Reimage "How-To" Guide 3.3 Other Partition Alignment Requirements Environment Action IRRT / RAID 0,1 & 5 Configuration Use...
...for partition alignment pre-installation of the Gold/Master image. Section 3.4 3.4 Partition Alignment Options Partition alignment is required for new operating systems in order to any drive. - Using Ghost: Ghost 11.5 will remain aligned. If the disk image... refer to ensure Advanced Format drive partitions are properly aligned Data Protection / Encryption Use Alignment Tools(1) to the Partition Alignment Tools - Dell Latitude E-Family & Mobile Precision Reimage "How-To" Guide 3.3 Other Partition Alignment Requirements Environment Action IRRT / RAID 0,1 & 5 Configuration Use...
Owners Manual
Page 72
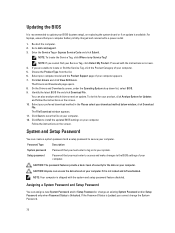
... need an update. Setup password Password that you cannot find the Service Tag, click the Product Category of your computer appears. 7. Go to dell.com/support. 3. NOTE: If you must enter to log on screen. 4. click Download File. Click Run to install the updated BIOS settings... follow the instructions on your computer. Re-start the computer. 2. Choose the Product Type from the list. 6. CAUTION: Anyone can assign a new System Password and/or Setup Password or change the System Password. 72 If the Password Status is fully charged and connected to a power outlet 1....
... need an update. Setup password Password that you cannot find the Service Tag, click the Product Category of your computer appears. 7. Go to dell.com/support. 3. NOTE: If you must enter to log on screen. 4. click Download File. Click Run to install the updated BIOS settings... follow the instructions on your computer. Re-start the computer. 2. Choose the Product Type from the list. 6. CAUTION: Anyone can assign a new System Password and/or Setup Password or change the System Password. 72 If the Password Status is fully charged and connected to a power outlet 1....

Owners Manual
Page 73
... letters are allowed: space Re-enter the system password when prompted. 4. You cannot delete or change the System and/or Setup password, re-enter the new password when promoted. In the System BIOS or System Setup screen, select System Security and press . Select System Password , enter your system password and press...
... letters are allowed: space Re-enter the system password when prompted. 4. You cannot delete or change the System and/or Setup password, re-enter the new password when promoted. In the System BIOS or System Setup screen, select System Security and press . Select System Password , enter your system password and press...


