User Manual
Page 2
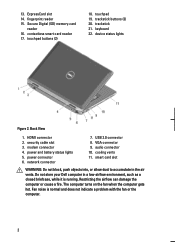
... cable slot 3. USB 2.0 connector 8. Do not store your Dell computer in the air vents. touchpad 19. modem connector 4. Restricting the airflow can damage the computer or cause a fire. Secure Digital (SD) memory-card reader 16. trackstick buttons (3) 20. Back View 1. audio connector 10. touchpad buttons (2) 18. power connector 6. The computer turns on the...
... cable slot 3. USB 2.0 connector 8. Do not store your Dell computer in the air vents. touchpad 19. modem connector 4. Restricting the airflow can damage the computer or cause a fire. Secure Digital (SD) memory-card reader 16. trackstick buttons (3) 20. Back View 1. audio connector 10. touchpad buttons (2) 18. power connector 6. The computer turns on the...
User Manual
Page 3
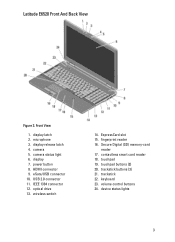
... ExpressCard slot 15. trackstick 22. microphone 3. fingerprint reader 16. touchpad buttons (2) 20. optical drive 13. wireless switch 14. Secure Digital (SD) memory-card reader 17. contactless smart card reader 18. touchpad 19. device status lights 3 camera status light 6. eSata/USB ...connector 10. USB 2.0 connector 11. volume control buttons 24. Front View 1. camera 5. trackstick buttons (3) 21. Latitude E6520 Front And Back View Figure 3. ...
... ExpressCard slot 15. trackstick 22. microphone 3. fingerprint reader 16. touchpad buttons (2) 20. optical drive 13. wireless switch 14. Secure Digital (SD) memory-card reader 17. contactless smart card reader 18. touchpad 19. device status lights 3 camera status light 6. eSata/USB ...connector 10. USB 2.0 connector 11. volume control buttons 24. Front View 1. camera 5. trackstick buttons (3) 21. Latitude E6520 Front And Back View Figure 3. ...

Owners Manual
Page 66
Using a plastic scribe, gently pry out the top right corner of the palm rest and run along the scribe to the right side of the palm rest to release the snaps. 66 Release and disconnect the LED, smart card, touchpad, RFID, and ExpressCard cable from the system board. 16. 15.
Using a plastic scribe, gently pry out the top right corner of the palm rest and run along the scribe to the right side of the palm rest to release the snaps. 66 Release and disconnect the LED, smart card, touchpad, RFID, and ExpressCard cable from the system board. 16. 15.
Owners Manual
Page 68
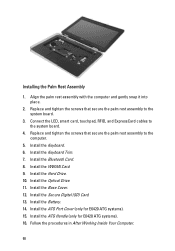
... to the system board. 3. Install the Keyboard. 6. Install the Optical Drive. 11. Install the Base Cover. 12. Connect the LED, smart card, touchpad, RFID, and ExpressCard cables to the computer. 5. Install the Keyboard Trim. 7. Install the Battery. 14. Install the Secure Digital (SD) Card. 13.... 2. Follow the procedures in After Working Inside Your Computer. 68 Install the ATG Port Cover (only for E6420 ATG systems). 16. Install the ATG Handle (only for E6420 ATG systems). 15. Replace and tighten the screws that secure the palm rest assembly to the system board. ...
... to the system board. 3. Install the Keyboard. 6. Install the Optical Drive. 11. Install the Base Cover. 12. Connect the LED, smart card, touchpad, RFID, and ExpressCard cables to the computer. 5. Install the Keyboard Trim. 7. Install the Battery. 14. Install the Secure Digital (SD) Card. 13.... 2. Follow the procedures in After Working Inside Your Computer. 68 Install the ATG Port Cover (only for E6420 ATG systems). 16. Install the ATG Handle (only for E6420 ATG systems). 15. Replace and tighten the screws that secure the palm rest assembly to the system board. ...

Owners Manual
Page 124
... Operating angle Refresh rate Minimum Viewing angles: Latitude E6420 Horizontal Vertical Latitude E6420 ATG Horizontal Vertical Pixel pitch Keyboard Number of keys Layout Touchpad Active Area: X-axis Y-axis Battery Type Dimensions: 4-cell and 6-cell 124 730 nits 0° (closed) to 135° 60 Hz +/- 40° +10°/-30&#... keys, Brazil: 87 keys, and Japan: 90 keys QWERTY/AZERTY/Kanji 80.00 mm 40.70 mm • 4-cell "smart" lithium ion (available only with Latitude E6420 only) • 6-cell "smart" lithium ion • 9-cell "smart" lithium ion
... Operating angle Refresh rate Minimum Viewing angles: Latitude E6420 Horizontal Vertical Latitude E6420 ATG Horizontal Vertical Pixel pitch Keyboard Number of keys Layout Touchpad Active Area: X-axis Y-axis Battery Type Dimensions: 4-cell and 6-cell 124 730 nits 0° (closed) to 135° 60 Hz +/- 40° +10°/-30&#... keys, Brazil: 87 keys, and Japan: 90 keys QWERTY/AZERTY/Kanji 80.00 mm 40.70 mm • 4-cell "smart" lithium ion (available only with Latitude E6420 only) • 6-cell "smart" lithium ion • 9-cell "smart" lithium ion
Owners Manual
Page 138
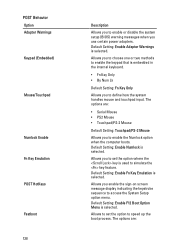
...to simulate the key feature. The options are : The options are : • Serial Mouse • PS2 Mouse • Touchpad/PS-2 Mouse Default Setting: Touchpad/PS-2 Mouse Allows you enable the sign-on screen message display indicating the keystroke sequence to access the System Setup option menu.... the computer boots. Allows to set the option where the key is selected. POST Behavior Option Adapter Warnings Keypad (Embedded) Mouse/Touchpad Numlock Enable Fn Key Emulation POST HotKeys Fastboot 138 Description Allows you to enable or disable the system setup (BIOS) warning messages ...
...to simulate the key feature. The options are : The options are : • Serial Mouse • PS2 Mouse • Touchpad/PS-2 Mouse Default Setting: Touchpad/PS-2 Mouse Allows you enable the sign-on screen message display indicating the keystroke sequence to access the System Setup option menu.... the computer boots. Allows to set the option where the key is selected. POST Behavior Option Adapter Warnings Keypad (Embedded) Mouse/Touchpad Numlock Enable Fn Key Emulation POST HotKeys Fastboot 138 Description Allows you to enable or disable the system setup (BIOS) warning messages ...


