
Service Manual
Page 3
Dell™ Latitude™ E6400 XFR Service Manual Table of Contents 1 TROUBLESHOOTING...7 1.1 TROUBLESHOOTING TOOLS ...7 1.1.1 Diagnostic Lights...7 1.1.2 Hardware Troubleshooter ...8 1.1.3 Dell Diagnostics ...8 1.1.4 Error Messages ...12 1.2 SOLVING PROBLEMS...12 1.2.1 Battery Problems ...13 1.2.2 Drive Problems...13 1.2.3 IEEE 1394 Device Problems...14 1.2.4 Lockups and Software Problems ...14 1.2.5 Memory Problems ...16 1.2.6 Power Problems ...16 1.2.7 Sound and Speaker Problems...16 1.2.8 Video and Display Problems ...17 1.3 DELL TECHNICAL UPDATE SERVICE ...17 1.4 DELL SUPPORT UTILITY ...
Dell™ Latitude™ E6400 XFR Service Manual Table of Contents 1 TROUBLESHOOTING...7 1.1 TROUBLESHOOTING TOOLS ...7 1.1.1 Diagnostic Lights...7 1.1.2 Hardware Troubleshooter ...8 1.1.3 Dell Diagnostics ...8 1.1.4 Error Messages ...12 1.2 SOLVING PROBLEMS...12 1.2.1 Battery Problems ...13 1.2.2 Drive Problems...13 1.2.3 IEEE 1394 Device Problems...14 1.2.4 Lockups and Software Problems ...14 1.2.5 Memory Problems ...16 1.2.6 Power Problems ...16 1.2.7 Sound and Speaker Problems...16 1.2.8 Video and Display Problems ...17 1.3 DELL TECHNICAL UPDATE SERVICE ...17 1.4 DELL SUPPORT UTILITY ...
Service Manual
Page 4
Dell™ Latitude™ E6400 XFR Service Manual 9.2 REPLACING THE RF PASSTHRU BOARD ...31 10 FAN ASSEMBLY ...32 10.1 REMOVING THE FAN ASSEMBLY ...32 10.2 REPLACING THE FAN ASSEMBLY ...33 11 PROCESSOR HEATSINK ASSEMBLY...33 11.1 REMOVING THE PROCESSOR HEATSINK ASSEMBLY ...33 11.2 REPLACING THE PROCESSOR HEATSINK ASSEMBLY ...34 12 PROCESSOR MODULE ...34 12.1 REMOVING THE PROCESSOR MODULE...34 12.2 REPLACING THE PROCESSOR MODULE ...35 13 MEMORY ...36 13.1 REMOVING A MEMORY MODULE ...37 13.2 REPLACING A MEMORY MODULE...37...
Dell™ Latitude™ E6400 XFR Service Manual 9.2 REPLACING THE RF PASSTHRU BOARD ...31 10 FAN ASSEMBLY ...32 10.1 REMOVING THE FAN ASSEMBLY ...32 10.2 REPLACING THE FAN ASSEMBLY ...33 11 PROCESSOR HEATSINK ASSEMBLY...33 11.1 REMOVING THE PROCESSOR HEATSINK ASSEMBLY ...33 11.2 REPLACING THE PROCESSOR HEATSINK ASSEMBLY ...34 12 PROCESSOR MODULE ...34 12.1 REMOVING THE PROCESSOR MODULE...34 12.2 REPLACING THE PROCESSOR MODULE ...35 13 MEMORY ...36 13.1 REMOVING A MEMORY MODULE ...37 13.2 REPLACING A MEMORY MODULE...37...
Service Manual
Page 7
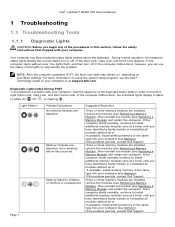
... problem. If the problem persists, contact Dell Support. If the computer malfunctions, however, you can use the status of the lights to initialize or memory is unsupported. If the computer malfunctions, the individual lights display a status of the Num Lock, Caps Lock, and Scroll Lock features. If available, install working memory of the same type into your computer (see Replacing a Memory Module) and restart the computer. Dell™ Latitude™ E6400 XFR Service Manual 1 Troubleshooting 1.1 Troubleshooting Tools 1.1.1 Diagnostic Lights...
... problem. If the problem persists, contact Dell Support. If the computer malfunctions, however, you can use the status of the lights to initialize or memory is unsupported. If the computer malfunctions, the individual lights display a status of the Num Lock, Caps Lock, and Scroll Lock features. If available, install working memory of the same type into your computer (see Replacing a Memory Module) and restart the computer. Dell™ Latitude™ E6400 XFR Service Manual 1 Troubleshooting 1.1 Troubleshooting Tools 1.1.1 Diagnostic Lights...
Service Manual
Page 8
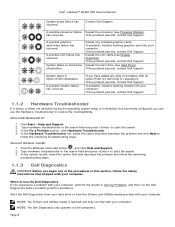
... Hard Drive). Dell™ Latitude™ E6400 XFR Service Manual System board failure has occurred. Type hardware troubleshooter in hardware with your computer. Page 8 has occurred. When to follow the safety instructions that best describes the problem and click Next to Use the Dell Diagnostics If you have added any installed graphics cards. In the Hardware Troubleshooter list, select the option that shipped with an option ROM, try removing or reseating it. Click Start→ Help and Support. 2. Type hardware troubleshooter...
... Hard Drive). Dell™ Latitude™ E6400 XFR Service Manual System board failure has occurred. Type hardware troubleshooter in hardware with your computer. Page 8 has occurred. When to follow the safety instructions that best describes the problem and click Next to Use the Dell Diagnostics If you have added any installed graphics cards. In the Hardware Troubleshooter list, select the option that shipped with an option ROM, try removing or reseating it. Click Start→ Help and Support. 2. Type hardware troubleshooter...
Service Manual
Page 9
Dell™ Latitude™ E6400 XFR Service Manual Starting the Dell Diagnostics From Your Hard Drive Before running the Dell Diagnostics, enter system setup to review your hard drive. 4. NOTE: If the computer is active. NOTE: If you see Starting the Dell Diagnostics From the Drivers and Utilities Media). NOTE: It is recommended that no diagnostics utility partition has been found , run the Dell Diagnostics from your Drivers and Utilities media (see a message stating that the device you see the...
Dell™ Latitude™ E6400 XFR Service Manual Starting the Dell Diagnostics From Your Hard Drive Before running the Dell Diagnostics, enter system setup to review your hard drive. 4. NOTE: If the computer is active. NOTE: If you see Starting the Dell Diagnostics From the Drivers and Utilities Media). NOTE: It is recommended that no diagnostics utility partition has been found , run the Dell Diagnostics from your Drivers and Utilities media (see a message stating that the device you see the...

Service Manual
Page 10
...). 8. To avoid possible keyboard failure, press and release in system setup. 5. NOTE: Using the one-time boot menu changes the boot sequence for the current boot only. Remove the Drivers and Utilities media from the CD/DVD If you wait too long and the operating system logo appears, continue to wait until you want to select the test you see Dell Diagnostics Main Menu). Dell™ Latitude™ E6400 XFR Service Manual 1.
...). 8. To avoid possible keyboard failure, press and release in system setup. 5. NOTE: Using the one-time boot menu changes the boot sequence for the current boot only. Remove the Drivers and Utilities media from the CD/DVD If you wait too long and the operating system logo appears, continue to wait until you want to select the test you see Dell Diagnostics Main Menu). Dell™ Latitude™ E6400 XFR Service Manual 1.
Service Manual
Page 11
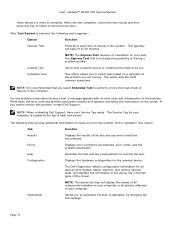
... is located at the top of devices in the system. The following menu appears: Option Function Express Test Performs a quick test of the screen. The Service Tag for your Service Tag ready. Configuration Displays the hardware configuration for all components installed on your computer. For any error conditions encountered. NOTE: When contacting Dell Support, have your computer is recommended that you cannot resolve the problem, contact Dell Support. Dell™ Latitude™ E6400 XFR Service Manual...
... is located at the top of devices in the system. The following menu appears: Option Function Express Test Performs a quick test of the screen. The Service Tag for your Service Tag ready. Configuration Displays the hardware configuration for all components installed on your computer. For any error conditions encountered. NOTE: When contacting Dell Support, have your computer is recommended that you cannot resolve the problem, contact Dell Support. Dell™ Latitude™ E6400 XFR Service Manual...
Service Manual
Page 12
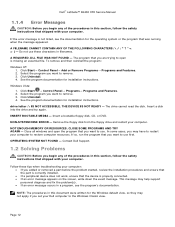
... Windows Classic view. To remove and then reinstall the program: Windows XP: 1. Click Start → Control Panel→ Programs→ Programs and Features. 2. Click Uninstall. 4. If so, run the program that shipped with your computer. Dell™ Latitude™ E6400 XFR Service Manual 1.1.4 Error Messages CAUTION: Before you begin any of the procedures in this section, follow the safety instructions that you want to use...
... Windows Classic view. To remove and then reinstall the program: Windows XP: 1. Click Start → Control Panel→ Programs→ Programs and Features. 2. Click Uninstall. 4. If so, run the program that shipped with your computer. Dell™ Latitude™ E6400 XFR Service Manual 1.1.4 Error Messages CAUTION: Before you begin any of the procedures in this section, follow the safety instructions that you want to use...
Service Manual
Page 13
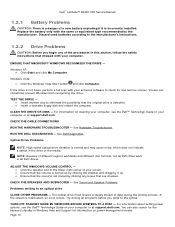
... disc formats, not all DVD titles work in all programs before you begin any boxes that are checked. You can sometimes prevent Windows from recognizing the drive. ENSURE THAT MICROSOFT WINDOWS RECOGNIZES THE DRIVE - See Sound and Speaker Problems. Problems writing to check for information on power management modes. RUN THE DELL DIAGNOSTICS - See Dell Diagnostics. Optical Drive Problems NOTE: High-speed optical drive vibration is incorrectly installed. Dell™ Latitude™ E6400 XFR Service Manual 1.2.1 Battery Problems...
... disc formats, not all DVD titles work in all programs before you begin any boxes that are checked. You can sometimes prevent Windows from recognizing the drive. ENSURE THAT MICROSOFT WINDOWS RECOGNIZES THE DRIVE - See Sound and Speaker Problems. Problems writing to check for information on power management modes. RUN THE DELL DIAGNOSTICS - See Dell Diagnostics. Optical Drive Problems NOTE: High-speed optical drive vibration is incorrectly installed. Dell™ Latitude™ E6400 XFR Service Manual 1.2.1 Battery Problems...
Service Manual
Page 14
... Now. 4. Windows Vista: 1. Windows XP: 5. Contact Dell Support. Contact the IEEE 1394 device manufacturer. 1.2.4 Lockups and Software Problems CAUTION: Before you begin any of the procedures in this section, follow the safety instructions that shipped with your computer. The User Account Control window may appear. If you begin any of bad sectors and click Start. Dell™ Latitude™ E6400 XFR Service Manual Hard Drive Problems RUN CHECK DISK - Right-click Local Disk C:. 3. ENSURE...
... Now. 4. Windows Vista: 1. Windows XP: 5. Contact Dell Support. Contact the IEEE 1394 device manufacturer. 1.2.4 Lockups and Software Problems CAUTION: Before you begin any of the procedures in this section, follow the safety instructions that shipped with your computer. The User Account Control window may appear. If you begin any of bad sectors and click Start. Dell™ Latitude™ E6400 XFR Service Manual Hard Drive Problems RUN CHECK DISK - Right-click Local Disk C:. 3. ENSURE...
Service Manual
Page 15
.... Dell™ Latitude™ E6400 XFR Service Manual The computer stops responding NOTICE: You may lose data if you are unable to get a response by pressing a key on your keyboard or moving your mouse, press and hold the power button for at least 8 to 10 seconds (until the computer turns off ), and then restart your computer. A Program Crashes Repeatedly NOTE: Most software includes installation instructions...
.... Dell™ Latitude™ E6400 XFR Service Manual The computer stops responding NOTICE: You may lose data if you are unable to get a response by pressing a key on your keyboard or moving your mouse, press and hold the power button for at least 8 to 10 seconds (until the computer turns off ), and then restart your computer. A Program Crashes Repeatedly NOTE: Most software includes installation instructions...
Service Manual
Page 16
... the Windows volume setting. Page 16 Save and close any open files and exit any open programs you are not using is successfully communicating with the memory. Ensure that you are following the memory installation guidelines (see if that resolves the problem. See the software documentation for your computer at support.dell.com. Run the Dell Diagnostics (see Dell Diagnostics). Dell™ Latitude™ E6400 XFR Service Manual...
... the Windows volume setting. Page 16 Save and close any open files and exit any open programs you are not using is successfully communicating with the memory. Ensure that you are following the memory installation guidelines (see if that resolves the problem. See the software documentation for your computer at support.dell.com. Run the Dell Diagnostics (see Dell Diagnostics). Dell™ Latitude™ E6400 XFR Service Manual...
Service Manual
Page 17
... CABLE CONNECTION - See the Setup and Features Information Guide for troubleshooting purposes. NOTICE: If your computing environment. See Diagnostic Lights. ADJUST THE WINDOWS DISPLAY SETTINGS - Click Start→ Control Panel→ Appearance and Themes. 2. Windows Vista: 1. Only Part of the procedures in a safe and secure location. Use this section, follow the safety instructions that the headphone cable is not necessary when installing additional graphics cards; Turn on the taskbar or from the Start button. Contact Dell Support. 1.3 Dell Technical Update Service...
... CABLE CONNECTION - See the Setup and Features Information Guide for troubleshooting purposes. NOTICE: If your computing environment. See Diagnostic Lights. ADJUST THE WINDOWS DISPLAY SETTINGS - Click Start→ Control Panel→ Appearance and Themes. 2. Windows Vista: 1. Only Part of the procedures in a safe and secure location. Use this section, follow the safety instructions that the headphone cable is not necessary when installing additional graphics cards; Turn on the taskbar or from the Start button. Contact Dell Support. 1.3 Dell Technical Update Service...
Service Manual
Page 19
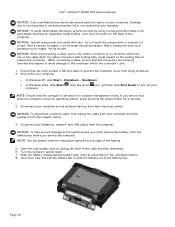
... your computer. Dell™ Latitude™ E6400 XFR Service Manual NOTICE: Only a certified service technician should perform repairs on the cable itself. Open the rear battery door by its strain-relief loop, not on your warranty. Do not touch the components or contacts on a card. NOTE: See the battery removal instructions adhered to prevent the computer cover from their electrical outlets. When connecting a cable, ensure that the work surface is...
... your computer. Dell™ Latitude™ E6400 XFR Service Manual NOTICE: Only a certified service technician should perform repairs on the cable itself. Open the rear battery door by its strain-relief loop, not on your warranty. Do not touch the components or contacts on a card. NOTE: See the battery removal instructions adhered to prevent the computer cover from their electrical outlets. When connecting a cable, ensure that the work surface is...
Service Manual
Page 20
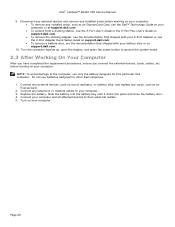
... E-Port Adapter Quick Setup Guide on support.dell.com. To remove a battery slice, see the documentation that shipped with your computer. Slide the battery into the battery bay until it clicks into place and close the battery door. 4. Do not use only the battery designed for other Dell computers. 1. Connect your computer. 3. Dell™ Latitude™ E6400 XFR Service Manual 9. Page 20 Turn on your battery slice or on support.dell.com. 10. Disconnect any external devices...
... E-Port Adapter Quick Setup Guide on support.dell.com. To remove a battery slice, see the documentation that shipped with your computer. Slide the battery into the battery bay until it clicks into place and close the battery door. 4. Do not use only the battery designed for other Dell computers. 1. Connect your computer. 3. Dell™ Latitude™ E6400 XFR Service Manual 9. Page 20 Turn on your battery slice or on support.dell.com. 10. Disconnect any external devices...
Service Manual
Page 28
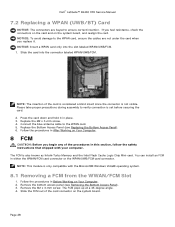
... the card into the slot labeled WPAN/UWB/FCM. 1. Replace the M2 x 3-mm screw. 4. Page 28 Connect the blue antenna cable to ensure correct insertion. Dell™ Latitude™ E6400 XFR Service Manual 7.2 Replacing a WPAN (UWB/BT) Card NOTICE: The connectors are not under the card when you replace it in this section, follow the safety instructions that shipped with the Microsoft® Windows Vista® operating system. 8.1 Removing a FCM...
... the card into the slot labeled WPAN/UWB/FCM. 1. Replace the M2 x 3-mm screw. 4. Page 28 Connect the blue antenna cable to ensure correct insertion. Dell™ Latitude™ E6400 XFR Service Manual 7.2 Replacing a WPAN (UWB/BT) Card NOTICE: The connectors are not under the card when you replace it in this section, follow the safety instructions that shipped with the Microsoft® Windows Vista® operating system. 8.1 Removing a FCM...
Service Manual
Page 49
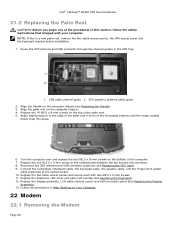
.... Replace the display assembly, LCD cable channel covers and bottom access panel (see Replacing the Keyboard). 12. Dell™ Latitude™ E6400 XFR Service Manual 21.2 Replacing the Palm Rest CAUTION: Before you begin any of the procedures in this is a new palm rest, remove the two cable access panels, the GPS access panel and the keyboard bracket before installation. 1. Route the GPS antenna and USB connector through the channel guides in front of the mousepad buttons until...
.... Replace the display assembly, LCD cable channel covers and bottom access panel (see Replacing the Keyboard). 12. Dell™ Latitude™ E6400 XFR Service Manual 21.2 Replacing the Palm Rest CAUTION: Before you begin any of the procedures in this is a new palm rest, remove the two cable access panels, the GPS access panel and the keyboard bracket before installation. 1. Route the GPS antenna and USB connector through the channel guides in front of the mousepad buttons until...
Service Manual
Page 54
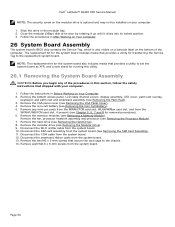
... WPAN/UWB/FCM card slot, if present (see Removing the Hard Drive). 8. Close the modular (XBay) disk drive door by rotating it up until it clicks into its locked position. 3. Remove the bottom access panel, LCD cable channel covers, display assembly, LED cover, palm rest overlay, keyboard, and palm rest and smartcard assembly (see Removing a Memory Module). Remove the hard drive (see Chapter 5, 6, 7 and 8 for running this section, follow the safety instructions that shipped with...
... WPAN/UWB/FCM card slot, if present (see Removing the Hard Drive). 8. Close the modular (XBay) disk drive door by rotating it up until it clicks into its locked position. 3. Remove the bottom access panel, LCD cable channel covers, display assembly, LED cover, palm rest overlay, keyboard, and palm rest and smartcard assembly (see Removing a Memory Module). Remove the hard drive (see Chapter 5, 6, 7 and 8 for running this section, follow the safety instructions that shipped with...
Service Manual
Page 57
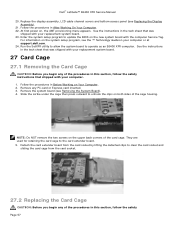
... update the BIOS on your replacement system board. 27 Card Cage 27.1 Removing the Card Cage CAUTION: Before you begin any PC-card or Express-card inserted. 3. Replace the display assembly, LCD cable channel covers and bottom access panel (see the ™ Technology Guide on the new system board with your computer. 1. Remove the system board (see Removing the System Board). 4. They are used for retaining the card cage to operate as an E6400 XFR computer. Enter the system setup...
... update the BIOS on your replacement system board. 27 Card Cage 27.1 Removing the Card Cage CAUTION: Before you begin any PC-card or Express-card inserted. 3. Replace the display assembly, LCD cable channel covers and bottom access panel (see the ™ Technology Guide on the new system board with your computer. 1. Remove the system board (see Removing the System Board). 4. They are used for retaining the card cage to operate as an E6400 XFR computer. Enter the system setup...

Setup and Features Information Tech Sheet
Page 14
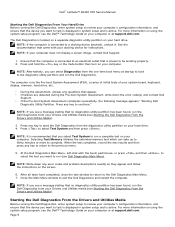
... does not blink to make sure that the utility can work accurately. You can press the Clear button to indicate time elapsed. In addition, a time line bar is shown in the bottom of the window to clear the window. Draw Test This function is used for 9 or 25 points calibration is accessed in the Setting tab. You can use the stylus or finger touch to indicate the...
... does not blink to make sure that the utility can work accurately. You can press the Clear button to indicate time elapsed. In addition, a time line bar is shown in the bottom of the window to clear the window. Draw Test This function is used for 9 or 25 points calibration is accessed in the Setting tab. You can use the stylus or finger touch to indicate the...


