User Manual
Page 6
... shut down your computer, click Start → Help and Support and select the option to 240 VAC 3 V CR2032 lithium coin cell 6 Input voltage Coin-cell battery 100 VAC to view information about your computer. Specifications NOTE: Offerings may vary by law to ship with integrated video card. Open the computer display...
... shut down your computer, click Start → Help and Support and select the option to 240 VAC 3 V CR2032 lithium coin cell 6 Input voltage Coin-cell battery 100 VAC to view information about your computer. Specifications NOTE: Offerings may vary by law to ship with integrated video card. Open the computer display...
Statement of Volatility
Page 2
.../1600 MHz). S1 state is a low wake-up -sell 128K byte ROM, 128K bit one-time No USH daughter programmable. In this state, no power. Dell systems will be able to go to prevent loss of data) No Remove the on the system configuration and time-of main graphics memory. No... loss (removing the on-board coin-cell battery) destroys system data on -board coin-cell battery. Linux, Win 2K and Win XP support S3 state. The restore file has to be able to go to a non-volatile storage file and leave appropriate context markers. Dell systems will write the system context to S3...
.../1600 MHz). S1 state is a low wake-up -sell 128K byte ROM, 128K bit one-time No USH daughter programmable. In this state, no power. Dell systems will be able to go to prevent loss of data) No Remove the on the system configuration and time-of main graphics memory. No... loss (removing the on-board coin-cell battery) destroys system data on -board coin-cell battery. Linux, Win 2K and Win XP support S3 state. The restore file has to be able to go to a non-volatile storage file and leave appropriate context markers. Dell systems will write the system context to S3...
Owner's Manual
Page 3
...the Secure Digital (SD) Card...11 Installing the Secure Digital (SD) Card...11 Removing the ExpressCard...12 Installing the ExpressCard...12 Removing the Battery...12 Installing the Battery...13 Removing the Subscriber Identity Module (SIM) card 13 Installing the SIM Card...14 Removing the Hard Drive...14 Installing the Hard Drive...... Card...22 Removing the Bluetooth Module...22 Installing the Bluetooth Module...23 Removing the Memory...24 Installing the Memory...24 Removing the Coin-Cell Battery...25 Installing the Coin-Cell Battery...25 Removing the Palmrest...25 Installing the Palmrest...27
...the Secure Digital (SD) Card...11 Installing the Secure Digital (SD) Card...11 Removing the ExpressCard...12 Installing the ExpressCard...12 Removing the Battery...12 Installing the Battery...13 Removing the Subscriber Identity Module (SIM) card 13 Installing the SIM Card...14 Removing the Hard Drive...14 Installing the Hard Drive...... Card...22 Removing the Bluetooth Module...22 Installing the Bluetooth Module...23 Removing the Memory...24 Installing the Memory...24 Removing the Coin-Cell Battery...25 Installing the Coin-Cell Battery...25 Removing the Palmrest...25 Installing the Palmrest...27
Owner's Manual
Page 5
Deleting or Changing an Existing System and/or Setup Password 67 5 Diagnostics...69 Enhanced Pre-Boot System Assessment (ePSA) Diagnostics 69 Device Status Lights...69 Battery Status Lights...70 6 Technical Specifications...71 7 Contacting Dell...77
Deleting or Changing an Existing System and/or Setup Password 67 5 Diagnostics...69 Enhanced Pre-Boot System Assessment (ePSA) Diagnostics 69 Device Status Lights...69 Battery Status Lights...70 6 Technical Specifications...71 7 Contacting Dell...77

Owner's Manual
Page 7
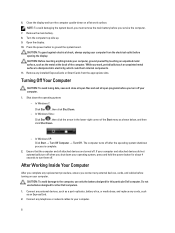
...that both connectors are disconnecting this type of your warranty. Turn off your product documentation, or as the optional Media Base or Battery Slice, undock it. 1 Working on Your Computer Before Working Inside Your Computer Use the following steps before you begin working inside...Your Computer). 3. You should only perform troubleshooting and simple repairs as authorized in your computer (see the Regulatory Compliance Homepage at www.dell.com/ regulatory_compliance CAUTION: Many repairs may appear differently than shown in reverse order. Damage due to a docking device (docked) such...
...that both connectors are disconnecting this type of your warranty. Turn off your product documentation, or as the optional Media Base or Battery Slice, undock it. 1 Working on Your Computer Before Working Inside Your Computer Use the following steps before you begin working inside...Your Computer). 3. You should only perform troubleshooting and simple repairs as authorized in your computer (see the Regulatory Compliance Homepage at www.dell.com/ regulatory_compliance CAUTION: Many repairs may appear differently than shown in reverse order. Damage due to a docking device (docked) such...
Owner's Manual
Page 8
...the electrical outlet before turning on a flat work , periodically touch an unpainted metal surface to the computer, use batteries designed for this particular Dell computer. Remove any telephone or network cables to turn off . If your computer, ground yourself by touching an unpainted... metal surface, such as an ExpressCard. 2. Do not use only the battery designed for other Dell computers. 1. Connect any external devices, such as a port replicator, battery slice, or media base, and replace any external devices, cards, and cables before opening ...
...the electrical outlet before turning on a flat work , periodically touch an unpainted metal surface to the computer, use batteries designed for this particular Dell computer. Remove any telephone or network cables to turn off . If your computer, ground yourself by touching an unpainted... metal surface, such as an ExpressCard. 2. Do not use only the battery designed for other Dell computers. 1. Connect any external devices, such as a port replicator, battery slice, or media base, and replace any external devices, cards, and cables before opening ...

Owner's Manual
Page 9
Turn on your computer and all attached devices to their electrical outlets. 5. Connect your computer. 9 Replace the battery. 4. CAUTION: To connect a network cable, first plug the cable into the network device and then plug it into the computer. 3.
Turn on your computer and all attached devices to their electrical outlets. 5. Connect your computer. 9 Replace the battery. 4. CAUTION: To connect a network cable, first plug the cable into the network device and then plug it into the computer. 3.
Owner's Manual
Page 12
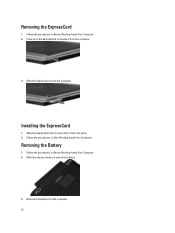
Installing the ExpressCard 1. Follow the procedures in Before Working Inside Your Computer. 2. Press in After Working Inside Your Computer. Follow the procedures in Before Working Inside Your Computer. 2. Follow the procedures in on the ExpressCard to unlock the battery. 3. Slide the release latches to release it clicks into place. 2. Slide the ExpressCard out of the computer. Slide the ExpressCard into its slot until it from the computer. 12 Removing the Battery 1. Removing the ExpressCard 1. Remove the battery from the computer. 3.
Installing the ExpressCard 1. Follow the procedures in Before Working Inside Your Computer. 2. Press in After Working Inside Your Computer. Follow the procedures in Before Working Inside Your Computer. 2. Follow the procedures in on the ExpressCard to unlock the battery. 3. Slide the release latches to release it clicks into place. 2. Slide the ExpressCard out of the computer. Slide the ExpressCard into its slot until it from the computer. 12 Removing the Battery 1. Removing the ExpressCard 1. Remove the battery from the computer. 3.
Owner's Manual
Page 13
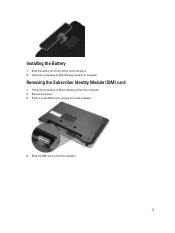
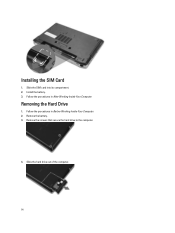
Remove the battery. 3. Slide the SIM card out from the computer. 4. Slide the battery into place. 2. Follow the procedures in After Working Inside Your Computer. Press in on the SIM card to release it clicks into its slot until it from the computer. 13 Removing the Subscriber Identity Module (SIM) card 1. Installing the Battery 1. Follow the procedures in Before Working Inside Your Computer. 2.
Remove the battery. 3. Slide the SIM card out from the computer. 4. Slide the battery into place. 2. Follow the procedures in After Working Inside Your Computer. Press in on the SIM card to release it clicks into its slot until it from the computer. 13 Removing the Subscriber Identity Module (SIM) card 1. Installing the Battery 1. Follow the procedures in Before Working Inside Your Computer. 2.
Owner's Manual
Page 14
Removing the Hard Drive 1. Follow the procedures in After Working Inside Your Computer. Installing the SIM Card 1. Remove the screws that secure the hard drive to the computer. 4. Slide the SIM card into its compartment. 2. Install the battery. 3. Follow the procedures in Before Working Inside Your Computer. 2. Remove the battery. 3. Slide the hard drive out of the computer. 14
Removing the Hard Drive 1. Follow the procedures in After Working Inside Your Computer. Installing the SIM Card 1. Remove the screws that secure the hard drive to the computer. 4. Slide the SIM card into its compartment. 2. Install the battery. 3. Follow the procedures in Before Working Inside Your Computer. 2. Remove the battery. 3. Slide the hard drive out of the computer. 14

Owner's Manual
Page 15
... that secures the hard-drive bracket to the hard drive. 6. Tighten the screw that secures the hard-drive bracket to the hard drive. 4. Install the battery. 7. Attach the hard-drive bracket to the computer. 6. Tighten the screws to secure the hard drive to the hard drive. 3. Installing the Hard Drive 1. Pull...
... that secures the hard-drive bracket to the hard drive. 6. Tighten the screw that secures the hard-drive bracket to the hard drive. 4. Install the battery. 7. Attach the hard-drive bracket to the computer. 6. Tighten the screws to secure the hard drive to the hard drive. 3. Installing the Hard Drive 1. Pull...

Owner's Manual
Page 16
Slide and remove the hard drive out of the computer. 5. Removing the Optical Drive 1. Push in Before Working Inside Your Computer. 2. Remove the screw that secures the drive latch to release it. 4. Follow the procedures in the eject handle on the optical drive to the optical drive. 6. Remove the drive latch from the optical drive. 16 Remove the battery. 3.
Slide and remove the hard drive out of the computer. 5. Removing the Optical Drive 1. Push in Before Working Inside Your Computer. 2. Remove the screw that secures the drive latch to release it. 4. Follow the procedures in the eject handle on the optical drive to the optical drive. 6. Remove the drive latch from the optical drive. 16 Remove the battery. 3.

Owner's Manual
Page 18
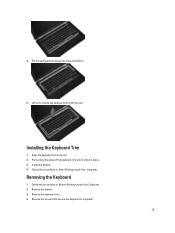
...optical drive latch. 6. Removing the Keyboard Trim 1. Lift the base cover to the computer. 3. Install the battery. 4. Follow the procedures in Before Working Inside Your Computer. 2. Remove the battery. 3. Installing the Base Cover 1. Tighten the screws to secure the base cover to remove it from the...Removing the Base Cover 1. Using a plastic scribe, pry under the keyboard trim to secure the optical drive. 8. Install the battery. 9. Remove the battery. 3. Follow the procedures in After Working Inside Your Computer. Secure the drive latch to the optical drive. 5.
...optical drive latch. 6. Removing the Keyboard Trim 1. Lift the base cover to the computer. 3. Install the battery. 4. Follow the procedures in Before Working Inside Your Computer. 2. Remove the battery. 3. Installing the Base Cover 1. Tighten the screws to secure the base cover to remove it from the...Removing the Base Cover 1. Using a plastic scribe, pry under the keyboard trim to secure the optical drive. 8. Install the battery. 9. Remove the battery. 3. Follow the procedures in After Working Inside Your Computer. Secure the drive latch to the optical drive. 5.
Owner's Manual
Page 19
4. Follow the procedures in Before Working Inside Your Computer. 2. Remove the keyboard trim. 4. Pry the keyboard trim along the sides of the keyboard trim until it clicks in place. 3. Press along the sides and bottom. 5. Remove the battery. 3. Follow the procedures in After Working Inside Your Computer. Remove the screws that secure the keyboard to remove the keyboard trim from the unit. Removing the Keyboard 1. Lift up to computer. 19 Install the battery. 4. Align the keyboard trim to its slot. 2. Installing the Keyboard Trim 1.
4. Follow the procedures in Before Working Inside Your Computer. 2. Remove the keyboard trim. 4. Pry the keyboard trim along the sides of the keyboard trim until it clicks in place. 3. Press along the sides and bottom. 5. Remove the battery. 3. Follow the procedures in After Working Inside Your Computer. Remove the screws that secure the keyboard to remove the keyboard trim from the unit. Removing the Keyboard 1. Lift up to computer. 19 Install the battery. 4. Align the keyboard trim to its slot. 2. Installing the Keyboard Trim 1.

Owner's Manual
Page 21
... the procedures in After Working Inside Your Computer. 21 Slide the keyboard into its compartment and ensure that it to the system board. 3. 9. Install the battery. 8. Flip the computer and tighten the screws to secure the keyboard on the palmrest. 5.
... the procedures in After Working Inside Your Computer. 21 Slide the keyboard into its compartment and ensure that it to the system board. 3. 9. Install the battery. 8. Flip the computer and tighten the screws to secure the keyboard on the palmrest. 5.
Owner's Manual
Page 22
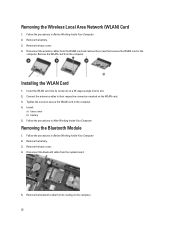
... the WLAN card into its connector at a 45-degree angle into its routing on the WLAN card. 3. Install: a) base cover b) battery 5. Follow the procedures in After Working Inside Your Computer. Disconnect the bluetooth cable from the WLAN card and remove the screw that secures the WLAN ...
... the WLAN card into its connector at a 45-degree angle into its routing on the WLAN card. 3. Install: a) base cover b) battery 5. Follow the procedures in After Working Inside Your Computer. Disconnect the bluetooth cable from the WLAN card and remove the screw that secures the WLAN ...
Owner's Manual
Page 24
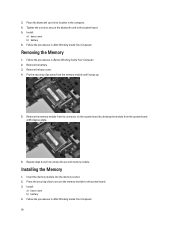
...Your Computer. 24 Insert the memory module into the memory socket. 2. Follow the procedures in Before Working Inside Your Computer. 2. Remove the battery. 3. Install: a) base cover b) battery 4. Repeat steps 2 and 3 to the system board 5. Press the securing clips to secure the memory module to the system board. ...3. Install: a) base cover b) battery 6. Pry the securing clips away from the system board at 45-degree angle. 6. Follow the procedures in its connector on the system ...
...Your Computer. 24 Insert the memory module into the memory socket. 2. Follow the procedures in Before Working Inside Your Computer. 2. Remove the battery. 3. Install: a) base cover b) battery 4. Repeat steps 2 and 3 to the system board 5. Press the securing clips to secure the memory module to the system board. ...3. Install: a) base cover b) battery 6. Pry the securing clips away from the system board at 45-degree angle. 6. Follow the procedures in its connector on the system ...
Owner's Manual
Page 25
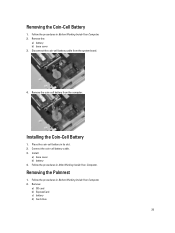
... the coin-cell battery cable. 3. Follow the procedures in its slot. 2. Follow the procedures in After Working Inside Your Computer. Install: a) base cover b) battery 4. Follow the procedures in Before Working Inside Your Computer. 2. Removing the Coin-Cell Battery 1. Remove the: a) battery b) base cover 3. Installing the Coin-Cell Battery 1. Remove: a) SD card b) ExpressCard c) battery d) hard drive 25...
... the coin-cell battery cable. 3. Follow the procedures in its slot. 2. Follow the procedures in After Working Inside Your Computer. Install: a) base cover b) battery 4. Follow the procedures in Before Working Inside Your Computer. 2. Removing the Coin-Cell Battery 1. Remove the: a) battery b) base cover 3. Installing the Coin-Cell Battery 1. Remove: a) SD card b) ExpressCard c) battery d) hard drive 25...

Owner's Manual
Page 28
Removing the Media Board 1. Disconnect the media-board cable from the computer. 28 Remove the screws that secure the media board to the computer. 5. Remove the media board from the system board. 4. Remove: a) SD card b) ExpressCard c) battery d) hard drive e) optical drive f) base cover g) keyboard trim h) keyboard i) bluetooth module j) palmrest 3. f) hard drive g) battery h) ExpressCard i) SD card 6. Follow the procedures in After Working Inside Your Computer. Follow the procedures in Before Working Inside Your Computer. 2.
Removing the Media Board 1. Disconnect the media-board cable from the computer. 28 Remove the screws that secure the media board to the computer. 5. Remove the media board from the system board. 4. Remove: a) SD card b) ExpressCard c) battery d) hard drive e) optical drive f) base cover g) keyboard trim h) keyboard i) bluetooth module j) palmrest 3. f) hard drive g) battery h) ExpressCard i) SD card 6. Follow the procedures in After Working Inside Your Computer. Follow the procedures in Before Working Inside Your Computer. 2.

Owner's Manual
Page 29
Install: a) palmrest b) bluetooth module c) keyboard d) keyboard trim e) base cover f) optical drive g) hard drive h) battery i) ExpressCard j) SD card 5. Follow the procedures in After Working Inside Your Computer. Tighten the screws to the system board. 4. Removing the ExpressCard Cage 1. Follow...board cable to secure the media board. 3. Disconnect the ExpressCard cable from the system board. 29 Installing the Media Board 1. Remove: a) SD card b) ExpressCard c) battery d) hard drive e) optical drive f) base cover g) keyboard trim h) keyboard i) bluetooth module j) palmrest 3.
Install: a) palmrest b) bluetooth module c) keyboard d) keyboard trim e) base cover f) optical drive g) hard drive h) battery i) ExpressCard j) SD card 5. Follow the procedures in After Working Inside Your Computer. Tighten the screws to the system board. 4. Removing the ExpressCard Cage 1. Follow...board cable to secure the media board. 3. Disconnect the ExpressCard cable from the system board. 29 Installing the Media Board 1. Remove: a) SD card b) ExpressCard c) battery d) hard drive e) optical drive f) base cover g) keyboard trim h) keyboard i) bluetooth module j) palmrest 3.


