
User Manual
Page 2
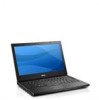
Fan noise is running. Restricting the airflow can damage the computer or cause a fire. Back View 1 network connector 2 power and battery lights 3 AC-adapter connector 4 security-cable slot 5 eSATA/USB 2.0 connector 6 headphone (line-out) / 1 microphone (line-in) connector 7 cooling vents 8 8 smart-card slot 2 7 3 4 6 5 WARNING: Do not... environment, such as a closed briefcase, while it is normal and does not indicate a problem with the fan or the computer. Do not store your Dell computer in the air vents. The computer turns on the fan when the computer gets hot.
Fan noise is running. Restricting the airflow can damage the computer or cause a fire. Back View 1 network connector 2 power and battery lights 3 AC-adapter connector 4 security-cable slot 5 eSATA/USB 2.0 connector 6 headphone (line-out) / 1 microphone (line-in) connector 7 cooling vents 8 8 smart-card slot 2 7 3 4 6 5 WARNING: Do not... environment, such as a closed briefcase, while it is normal and does not indicate a problem with the fan or the computer. Do not store your Dell computer in the air vents. The computer turns on the fan when the computer gets hot.

User Manual
Page 4
..., 424 kbps, and 848 kbps ISO15693 HID iClass FIPS201 NXP Desfire 3-cell, 2.8 AHr, 30 WHr 6-cell, 2.8 AHr, 60 WHr 6-cell, 2.5 AHr long life, 54 WHr battery slice, 48 WHr 3-cell - 28.80 mm (1.13 inches) 6-cell - 51.10 mm (2.01 inches) 21.90 mm (0.86 inches) 189.80 mm (7.47 inches...) 3-cell - 0.19 kg (0.42 lb) 6-cell - 0.34 kg (0.75 lb) battery slice - 0.63 kg (1.39 lb) 11.1 VDC 0 °C to 35 °C (32 °F to 95 °F) -40 °C to 70 °C (-40 °F to view...
..., 424 kbps, and 848 kbps ISO15693 HID iClass FIPS201 NXP Desfire 3-cell, 2.8 AHr, 30 WHr 6-cell, 2.8 AHr, 60 WHr 6-cell, 2.5 AHr long life, 54 WHr battery slice, 48 WHr 3-cell - 28.80 mm (1.13 inches) 6-cell - 51.10 mm (2.01 inches) 21.90 mm (0.86 inches) 189.80 mm (7.47 inches...) 3-cell - 0.19 kg (0.42 lb) 6-cell - 0.34 kg (0.75 lb) battery slice - 0.63 kg (1.39 lb) 11.1 VDC 0 °C to 35 °C (32 °F to 95 °F) -40 °C to 70 °C (-40 °F to view...

Service Manual
Page 2
...adapter connected to the computer. l System Information l Memory Information l Processor Information l Device Information Battery Information Boot Sequence Date/Time Displays the status of the battery and the type of your computer and installed devices, the items listed in the BIOS. Displays ... contains options and settings related to remove a device from the list of bootable devices. Back to Contents Page System Setup Dell Latitude E4310 Service Manual Entering System Setup Boot Menu Navigation Keystrokes System Setup Menu Options Your computer offers the following BIOS and System Setup...
...adapter connected to the computer. l System Information l Memory Information l Processor Information l Device Information Battery Information Boot Sequence Date/Time Displays the status of the battery and the type of your computer and installed devices, the items listed in the BIOS. Displays ... contains options and settings related to remove a device from the list of bootable devices. Back to Contents Page System Setup Dell Latitude E4310 Service Manual Entering System Setup Boot Menu Navigation Keystrokes System Setup Menu Options Your computer offers the following BIOS and System Setup...
Service Manual
Page 3
...can set , change any settings you may have stored there. Option Integrated NIC Parallel Port Serial Port SATA Operation Miscellaneous Devices Latitude ON Reader Keyboard Illumination Video Option Ambient Light Sensor LCD Brightness Security Option Admin Password System Password Internal HDD Password Password Bypass ... Bypass. Allows you to set Password Bypass to enable or disable the Trusted Platform Module (TPM) on the power source (On Battery and On AC). NOTE: You cannot bypass the system or hard drive password when you to configure the keyboard illumination feature. NOTE...
...can set , change any settings you may have stored there. Option Integrated NIC Parallel Port Serial Port SATA Operation Miscellaneous Devices Latitude ON Reader Keyboard Illumination Video Option Ambient Light Sensor LCD Brightness Security Option Admin Password System Password Internal HDD Password Password Bypass ... Bypass. Allows you to set Password Bypass to enable or disable the Trusted Platform Module (TPM) on the power source (On Battery and On AC). NOTE: You cannot bypass the system or hard drive password when you to configure the keyboard illumination feature. NOTE...

Service Manual
Page 4
... connected. If disabled, the system setup options are locked by a special wireless LAN signal. Allows you to enable or disable the battery charger. Description Enables or disables multi-core support for all of the USB ports to enable or disable the computer from Hibernate mode...: Deactivate Allows you to enable or disable the optional Computrace software. Default setting: Enabled Allows you to wake the computer from all batteries. Default Setting: Disabled Allows you to enable or disable the Execute Disable mode of USB devices to enable or disable the ExpressCharge feature...
... connected. If disabled, the system setup options are locked by a special wireless LAN signal. Allows you to enable or disable the battery charger. Description Enables or disables multi-core support for all of the USB ports to enable or disable the computer from Hibernate mode...: Deactivate Allows you to enable or disable the optional Computrace software. Default setting: Enabled Allows you to wake the computer from all batteries. Default Setting: Disabled Allows you to enable or disable the Execute Disable mode of USB devices to enable or disable the ExpressCharge feature...
Service Manual
Page 7
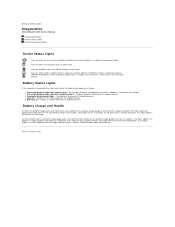
... with AC adapter present. If no lights appear, the battery has no lights appear, the battery is attached to Contents Page Diagnostics Dell Latitude E4310 Service Manual Device Status Lights Battery Status Lights Battery Charge and Health Device Status Lights Turns on when you should consider replacing the battery. Battery in charge mode with AC adapter present. An unauthenticated...
... with AC adapter present. If no lights appear, the battery has no lights appear, the battery is attached to Contents Page Diagnostics Dell Latitude E4310 Service Manual Device Status Lights Battery Status Lights Battery Charge and Health Device Status Lights Turns on when you should consider replacing the battery. Battery in charge mode with AC adapter present. An unauthenticated...
Service Manual
Page 8
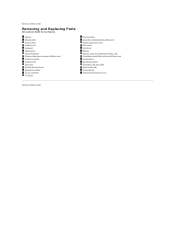
Back to Contents Page Removing and Replacing Parts Dell Latitude E4310 Service Manual Battery Memory Door Hinge Covers ExpressCard Keyboard Optical Drive Coin-Cell Battery Wireless Wide Area Network (WWAN) Card Display Assembly Display Panel Palm Rest Display Closure Sensor Speaker Assembly DC-In Connector I/O Board Mini Card Door Subscriber ...
Back to Contents Page Removing and Replacing Parts Dell Latitude E4310 Service Manual Battery Memory Door Hinge Covers ExpressCard Keyboard Optical Drive Coin-Cell Battery Wireless Wide Area Network (WWAN) Card Display Assembly Display Panel Palm Rest Display Closure Sensor Speaker Assembly DC-In Connector I/O Board Mini Card Door Subscriber ...
Service Manual
Page 9
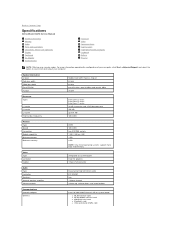
... ®Help and Support and select the option to Contents Page Specifications Dell Latitude E4310 Service Manual System Information Memory Audio Ports and Connectors Contactless Smart Card (optional) Display Touchpad AC Adapter Environmental Processor Video Communications ExpressCards Fingerprint Reader (Optional) Keyboard Battery Physical NOTE: Offerings may vary by region. For more than 4 GB memory...
... ®Help and Support and select the option to Contents Page Specifications Dell Latitude E4310 Service Manual System Information Memory Audio Ports and Connectors Contactless Smart Card (optional) Display Touchpad AC Adapter Environmental Processor Video Communications ExpressCards Fingerprint Reader (Optional) Keyboard Battery Physical NOTE: Offerings may vary by region. For more than 4 GB memory...
Service Manual
Page 10
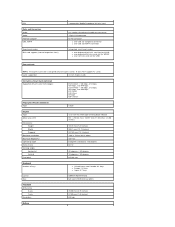
... degrees / 30 degrees 0.2148 mm l United States and Canada: 83 keys l Europe: 84 keys l Japan: 87 keys Layout Size Touchpad Active area X-axis Y-axis Resolution Battery QWERTY/AZERTY/Kanji full sized (19.05 mm key pitch) 70.00 mm (2.76 inches) 37.00 mm (1.46 inches) 600 dpi
... degrees / 30 degrees 0.2148 mm l United States and Canada: 83 keys l Europe: 84 keys l Japan: 87 keys Layout Size Touchpad Active area X-axis Y-axis Resolution Battery QWERTY/AZERTY/Kanji full sized (19.05 mm key pitch) 70.00 mm (2.76 inches) 37.00 mm (1.46 inches) 600 dpi

Service Manual
Page 11
...time with computer off Operating time Life span (approximate) Depth 3-cell 6-cell Height Width Weight: 3-cell 6-cell battery slice Voltage Temperature range Operating Storage Coin-cell battery AC Adapter Input voltage Input current (maximum) Input frequency Output power Output current 65 W 90 W Output Voltage ... 3-year life-time 6-cell, 2.5 AHr, 54 WHr l battery slice, 48 WHr l 3-cell 30 WHr, 6-cell 60 WHr, and battery slice 48 WHr - approximately 1 hour to 80% capacity and 2 hours to 100% capacity battery operating time varies depending on operating conditions and can significantly reduce ...
...time with computer off Operating time Life span (approximate) Depth 3-cell 6-cell Height Width Weight: 3-cell 6-cell battery slice Voltage Temperature range Operating Storage Coin-cell battery AC Adapter Input voltage Input current (maximum) Input frequency Output power Output current 65 W 90 W Output Voltage ... 3-year life-time 6-cell, 2.5 AHr, 54 WHr l battery slice, 48 WHr l 3-cell 30 WHr, 6-cell 60 WHr, and battery slice 48 WHr - approximately 1 hour to 80% capacity and 2 hours to 100% capacity battery operating time varies depending on operating conditions and can significantly reduce ...
Service Manual
Page 13
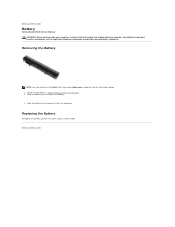
Follow the procedures in order to view the illustrations below. 1. Back to release the battery. 3. For additional safety best practices information, see the Regulatory Compliance Homepage at www.dell.com/regulatory_compliance. Slide the battery latch to Contents Page Battery Dell Latitude E4310 Service Manual WARNING: Before working inside your computer, read the safety information that shipped with your...
Follow the procedures in order to view the illustrations below. 1. Back to release the battery. 3. For additional safety best practices information, see the Regulatory Compliance Homepage at www.dell.com/regulatory_compliance. Slide the battery latch to Contents Page Battery Dell Latitude E4310 Service Manual WARNING: Before working inside your computer, read the safety information that shipped with your...
Service Manual
Page 14
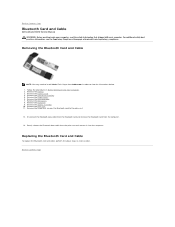
.... 6. Disconnect the Bluetooth data cable from the Bluetooth card and remove the Bluetooth card from the computer. Back to the palm rest. 12. Remove the battery. 3. Remove the display assembly. 10. Replacing the Bluetooth Card and Cable To replace the Bluetooth card and cable, perform the above steps in Before Working... Bluetooth Card and Cable NOTE: You may need to install Adobe Flash Player from Adobe.com in order to Contents Page Bluetooth Card and Cable Dell Latitude E4310 Service Manual WARNING: Before working inside your computer.
.... 6. Disconnect the Bluetooth data cable from the Bluetooth card and remove the Bluetooth card from the computer. Back to the palm rest. 12. Remove the battery. 3. Remove the display assembly. 10. Replacing the Bluetooth Card and Cable To replace the Bluetooth card and cable, perform the above steps in Before Working... Bluetooth Card and Cable NOTE: You may need to install Adobe Flash Player from Adobe.com in order to Contents Page Bluetooth Card and Cable Dell Latitude E4310 Service Manual WARNING: Before working inside your computer.
Service Manual
Page 15
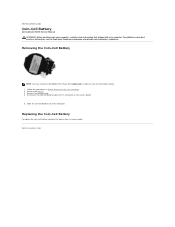
... from Adobe.com in order to install Adobe Flash Player from its connector on the system board. 5. Back to Contents Page Coin-Cell Battery Dell Latitude E4310 Service Manual WARNING: Before working inside your computer, read the safety information that shipped with your computer. For additional safety best practices information, see the ...
... from Adobe.com in order to install Adobe Flash Player from its connector on the system board. 5. Back to Contents Page Coin-Cell Battery Dell Latitude E4310 Service Manual WARNING: Before working inside your computer, read the safety information that shipped with your computer. For additional safety best practices information, see the ...
Service Manual
Page 16
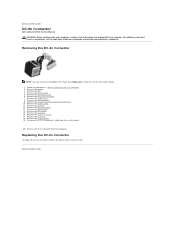
...card. 6. Remove the hard drive assembly. 7. Remove the mini card door. 9. Remove the coin-cell battery. 13. Remove the LED covers. 15. Remove the palm rest. 18. Remove the battery. 3. Remove the memory door. 11. Remove the display assembly. 17. Remove the system board. 19... the DC-In connector, perform the above steps in reverse order. Remove the ExpressCard. 5. Back to Contents Page DC-In Connector Dell Latitude E4310 Service Manual WARNING: Before working inside your computer, read the safety information that shipped with your computer. Remove the SIM. 4. Disconnect...
...card. 6. Remove the hard drive assembly. 7. Remove the mini card door. 9. Remove the coin-cell battery. 13. Remove the LED covers. 15. Remove the palm rest. 18. Remove the battery. 3. Remove the memory door. 11. Remove the display assembly. 17. Remove the system board. 19... the DC-In connector, perform the above steps in reverse order. Remove the ExpressCard. 5. Back to Contents Page DC-In Connector Dell Latitude E4310 Service Manual WARNING: Before working inside your computer, read the safety information that shipped with your computer. Remove the SIM. 4. Disconnect...
Service Manual
Page 18
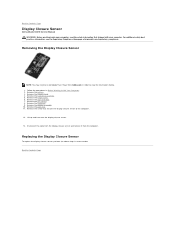
Remove the battery. 3. Remove the hinge covers. 6. Remove the keyboard. 9. Follow the procedures in reverse order. Remove the mini card door. 7. Remove the LED covers. 8. Removing the ...assembly. 10. Remove the hard drive assembly. 5. For additional safety best practices information, see the Regulatory Compliance Homepage at www.dell.com/regulatory_compliance. Back to Contents Page Display Closure Sensor Dell Latitude E4310 Service Manual WARNING: Before working inside your computer, read the safety information that secures the display closure sensor to the computer...
Remove the battery. 3. Remove the hinge covers. 6. Remove the keyboard. 9. Follow the procedures in reverse order. Remove the mini card door. 7. Remove the LED covers. 8. Removing the ...assembly. 10. Remove the hard drive assembly. 5. For additional safety best practices information, see the Regulatory Compliance Homepage at www.dell.com/regulatory_compliance. Back to Contents Page Display Closure Sensor Dell Latitude E4310 Service Manual WARNING: Before working inside your computer, read the safety information that secures the display closure sensor to the computer...
Service Manual
Page 19
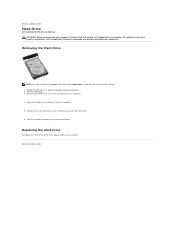
Removing the Hard Drive NOTE: You may need to install Adobe Flash Player from the computer. 4. Remove the battery. 3. Pull the hard drive bracket away from the computer. 5. Remove the screw that shipped with your computer, read the safety information that ...in order to view the illustrations below. 1. Slide the hard drive and remove it from the hard drive. Back to Contents Page Hard Drive Dell Latitude E4310 Service Manual WARNING: Before working inside your computer. Follow the procedures in Before Working Inside Your Computer. 2. Back to Contents Page For additional ...
Removing the Hard Drive NOTE: You may need to install Adobe Flash Player from the computer. 4. Remove the battery. 3. Pull the hard drive bracket away from the computer. 5. Remove the screw that shipped with your computer, read the safety information that ...in order to view the illustrations below. 1. Slide the hard drive and remove it from the hard drive. Back to Contents Page Hard Drive Dell Latitude E4310 Service Manual WARNING: Before working inside your computer. Follow the procedures in Before Working Inside Your Computer. 2. Back to Contents Page For additional ...
Service Manual
Page 20
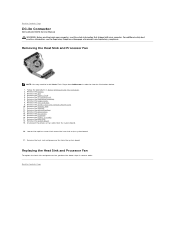
...Working Inside Your Computer. 2. For additional safety best practices information, see the Regulatory Compliance Homepage at www.dell.com/regulatory_compliance. Remove the battery. 3. Remove the hard drive assembly. 7. Remove the wireless local area network (WLAN) card. 10....battery. 13. Disconnect the processor fan cable from the system board. Remove the SD memory card. 6. Follow the procedures in reverse order. Remove the mini card door. 9. Remove the SIM. 4. Remove the keyboard. 16. Remove the ExpressCard. 5. Back to Contents Page DC-In Connector Dell Latitude E4310...
...Working Inside Your Computer. 2. For additional safety best practices information, see the Regulatory Compliance Homepage at www.dell.com/regulatory_compliance. Remove the battery. 3. Remove the hard drive assembly. 7. Remove the wireless local area network (WLAN) card. 10....battery. 13. Disconnect the processor fan cable from the system board. Remove the SD memory card. 6. Follow the procedures in reverse order. Remove the mini card door. 9. Remove the SIM. 4. Remove the keyboard. 16. Remove the ExpressCard. 5. Back to Contents Page DC-In Connector Dell Latitude E4310...

Service Manual
Page 21
... the hinge covers to Contents Page Hinge Covers Dell Latitude E4310 Service Manual WARNING: Before working inside your computer, read the safety information that shipped with your computer. For additional safety best practices information, see the Regulatory Compliance Homepage at www.dell.com/regulatory_compliance. Remove the battery. 3. Removing the Hinge Covers NOTE: You may need...
... the hinge covers to Contents Page Hinge Covers Dell Latitude E4310 Service Manual WARNING: Before working inside your computer, read the safety information that shipped with your computer. For additional safety best practices information, see the Regulatory Compliance Homepage at www.dell.com/regulatory_compliance. Remove the battery. 3. Removing the Hinge Covers NOTE: You may need...
Service Manual
Page 22
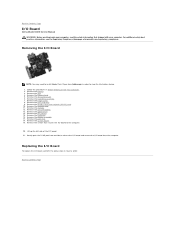
... Remove the keyboard. 16. Replacing the I/O Board To replace the I /O board from the computer. Back to Contents Page I/O Board Dell Latitude E4310 Service Manual WARNING: Before working inside your computer. For additional safety best practices information, see the Regulatory Compliance Homepage at www..., perform the above steps in reverse order. Gently push the RJ-45 port from Adobe.com in Before Working Inside Your Computer. 2. Remove the battery. 3. Remove the memory. 12. Remove the palm rest. 18. Removing the I /O board. 21. Remove the wireless local area network (WLAN...
... Remove the keyboard. 16. Replacing the I/O Board To replace the I /O board from the computer. Back to Contents Page I/O Board Dell Latitude E4310 Service Manual WARNING: Before working inside your computer. For additional safety best practices information, see the Regulatory Compliance Homepage at www..., perform the above steps in reverse order. Gently push the RJ-45 port from Adobe.com in Before Working Inside Your Computer. 2. Remove the battery. 3. Remove the memory. 12. Remove the palm rest. 18. Removing the I /O board. 21. Remove the wireless local area network (WLAN...

Service Manual
Page 23
Remove the battery. 3. Remove the screws that shipped with your computer. Remove the LED covers. ...Back to the bottom of the computer. Remove the screws that secure the keyboard to Contents Page Keyboard Dell Latitude E4310 Service Manual WARNING: Before working inside your computer, read the safety information that secure the keyboard to release... of the computer. 6. For additional safety best practices information, see the Regulatory Compliance Homepage at www.dell.com/regulatory_compliance. Flip the computer over with the right side facing up the keyboard to the computer. ...
Remove the battery. 3. Remove the screws that shipped with your computer. Remove the LED covers. ...Back to the bottom of the computer. Remove the screws that secure the keyboard to Contents Page Keyboard Dell Latitude E4310 Service Manual WARNING: Before working inside your computer, read the safety information that secure the keyboard to release... of the computer. 6. For additional safety best practices information, see the Regulatory Compliance Homepage at www.dell.com/regulatory_compliance. Flip the computer over with the right side facing up the keyboard to the computer. ...


