User Manual
Page 1
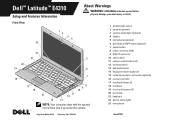
... the optional microphone only if you order the camera. 1 ambient-light sensor 2 camera (optional) 3 camera-status light (optional) 4 display 5 microphone (optional) 6 Dell Latitude ON™ button (optional) 7 power button 8 video connector (VGA) 9 USB 2.0 connector 10 optical drive 11 volume-control buttons (3) 12 wireless switch 13 ExpressCard slot 14 fingerprint reader (optional) 15 contactless smart-card reader (optional) 16 memory-card slot 17 touchpad buttons (2) 18 touchpad 19 track-stick buttons (3) 20 track stick 21 keyboard 22 device-status lights 23 microphone Regulatory Model...
... the optional microphone only if you order the camera. 1 ambient-light sensor 2 camera (optional) 3 camera-status light (optional) 4 display 5 microphone (optional) 6 Dell Latitude ON™ button (optional) 7 power button 8 video connector (VGA) 9 USB 2.0 connector 10 optical drive 11 volume-control buttons (3) 12 wireless switch 13 ExpressCard slot 14 fingerprint reader (optional) 15 contactless smart-card reader (optional) 16 memory-card slot 17 touchpad buttons (2) 18 touchpad 19 track-stick buttons (3) 20 track stick 21 keyboard 22 device-status lights 23 microphone Regulatory Model...
Service Manual
Page 1
..., or death. All rights reserved. disclaims any proprietary interest in any references in this material in trademarks and trade names other than its own. Dell Latitude E4310 Service Manual Working on Your Computer Removing and Replacing Parts Specifications Diagnostics System Setup Notes, Cautions, and Warnings NOTE: A NOTE indicates important information that helps you purchased a Dell n Series computer, any manner whatsoever without notice. © 2010...
..., or death. All rights reserved. disclaims any proprietary interest in any references in this material in trademarks and trade names other than its own. Dell Latitude E4310 Service Manual Working on Your Computer Removing and Replacing Parts Specifications Diagnostics System Setup Notes, Cautions, and Warnings NOTE: A NOTE indicates important information that helps you purchased a Dell n Series computer, any manner whatsoever without notice. © 2010...

Service Manual
Page 2
... To change the boot order of the device. Back to Contents Page System Setup Dell Latitude E4310 Service Manual Entering System Setup Boot Menu Navigation Keystrokes System Setup Menu Options Your computer offers the following BIOS and System Setup options: l Access System Setup by pressing + Entering System Setup Press to enter System Setup and make any changes to integrated system devices. If you are also included in this key, press when the keyboard lights first flash. This menu is useful when you have trouble entering System Setup using this...
... To change the boot order of the device. Back to Contents Page System Setup Dell Latitude E4310 Service Manual Entering System Setup Boot Menu Navigation Keystrokes System Setup Menu Options Your computer offers the following BIOS and System Setup options: l Access System Setup by pressing + Entering System Setup Press to enter System Setup and make any changes to integrated system devices. If you are also included in this key, press when the keyboard lights first flash. This menu is useful when you have trouble entering System Setup using this...
Service Manual
Page 3
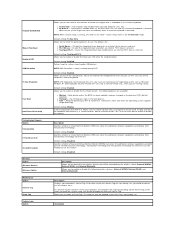
...the power source (On Battery and On AC). NOTE: Successful password changes take place immediately and require a system restart. The HDD password travels with the hard drive, so the HDD is enabled, the following devices: l External USB Port l Microphone l eSATA Ports l Media Card l Internal Modem l Fixed Bay l ExpressCard l Hard Drive Free Fall Protection l Camera and Microphone Default setting: All are : Disabled, AT, PS2, and ECP Default Setting: AT Allows you to configure the Ambient Light Sensor. Default Setting: Disabled Allows you to enable of disable changes to set, change...
...the power source (On Battery and On AC). NOTE: Successful password changes take place immediately and require a system restart. The HDD password travels with the hard drive, so the HDD is enabled, the following devices: l External USB Port l Microphone l eSATA Ports l Media Card l Internal Modem l Fixed Bay l ExpressCard l Hard Drive Free Fall Protection l Camera and Microphone Default setting: All are : Disabled, AT, PS2, and ECP Default Setting: AT Allows you to configure the Ambient Light Sensor. Default Setting: Disabled Allows you to enable of disable changes to set, change...

Service Manual
Page 4
... enabled in the TPM. Description Enables or disables multi-core support for all of the USB ports to be powered on automatically. Options are locked by a special wireless LAN signal. Default setting: Disabled Allows you to be powered on by special LAN or wireless LAN signals. Wake-up signal from entering system setup when an Administrator password is connected to use certain power adapters. l Disabled - NOTE: ExpressCharge may not be powered on by this setting and must turn on LAN...
... enabled in the TPM. Description Enables or disables multi-core support for all of the USB ports to be powered on automatically. Options are locked by a special wireless LAN signal. Default setting: Disabled Allows you to be powered on by special LAN or wireless LAN signals. Wake-up signal from entering system setup when an Administrator password is connected to use certain power adapters. l Disabled - NOTE: ExpressCharge may not be powered on by this setting and must turn on LAN...
Service Manual
Page 5
... Windows XP. Description Displays your computer, the computer will be able to determine the wireless devices that will automatically bring up the Service Tag screen when you are running a DOS). The keypad is enabled when (1) the Num Lock LED is attached. Disable the integrated touch pad when an external Serial mouse is present. NOTE: USB keyboards cannot emulate the key if you to use this feature Default setting: Disabled. Allows users to enter the Service...
... Windows XP. Description Displays your computer, the computer will be able to determine the wireless devices that will automatically bring up the Service Tag screen when you are running a DOS). The keypad is enabled when (1) the Num Lock LED is attached. Disable the integrated touch pad when an external Serial mouse is present. NOTE: USB keyboards cannot emulate the key if you to use this feature Default setting: Disabled. Allows users to enter the Service...
Service Manual
Page 7
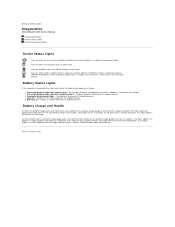
... battery light operates as follows: l Alternately blinking amber light and blue light - Turns on when wireless function wireless local area network (WLAN) or WiMAX or wireless wide area network (WWAN) or Bluetooth or Ultra-wide band (UWB) cards is connected to your laptop. Temporary battery failure with AC adapter present. Battery in charge mode with AC adapter present. Each light represents approximately 20 percent of its original charge capacity remains. Back to indicate battery charge status. Use the wireless switch to...
... battery light operates as follows: l Alternately blinking amber light and blue light - Turns on when wireless function wireless local area network (WLAN) or WiMAX or wireless wide area network (WWAN) or Bluetooth or Ultra-wide band (UWB) cards is connected to your laptop. Temporary battery failure with AC adapter present. Battery in charge mode with AC adapter present. Each light represents approximately 20 percent of its original charge capacity remains. Back to indicate battery charge status. Use the wireless switch to...
Service Manual
Page 8
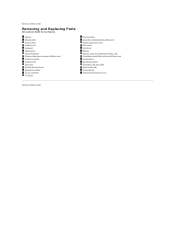
... to Contents Page Removing and Replacing Parts Dell Latitude E4310 Service Manual Battery Memory Door Hinge Covers ExpressCard Keyboard Optical Drive Coin-Cell Battery Wireless Wide Area Network (WWAN) Card Display Assembly Display Panel Palm Rest Display Closure Sensor Speaker Assembly DC-In Connector I/O Board Mini Card Door Subscriber Identity Module (SIM) Card Secure Digital (SD) Card LED Covers Hard Drive Memory Wireless Local Area Network (WLAN) Card Ultra-Wide Band(UWB)/Latitude ON Flash Card Display Bezel Microphone Board Bluetooth Card and Cable Smart Card Cage System Board Heat Sink...
... to Contents Page Removing and Replacing Parts Dell Latitude E4310 Service Manual Battery Memory Door Hinge Covers ExpressCard Keyboard Optical Drive Coin-Cell Battery Wireless Wide Area Network (WWAN) Card Display Assembly Display Panel Palm Rest Display Closure Sensor Speaker Assembly DC-In Connector I/O Board Mini Card Door Subscriber Identity Module (SIM) Card Secure Digital (SD) Card LED Covers Hard Drive Memory Wireless Local Area Network (WLAN) Card Ultra-Wide Band(UWB)/Latitude ON Flash Card Display Bezel Microphone Board Bluetooth Card and Cable Smart Card Cage System Board Heat Sink...
Service Manual
Page 9
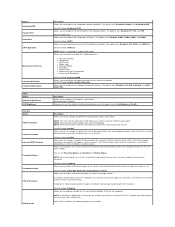
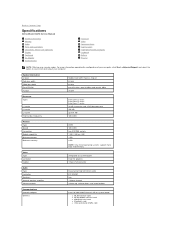
... your computer, click Start ®Help and Support and select the option to Contents Page Specifications Dell Latitude E4310 Service Manual System Information Memory Audio Ports and Connectors Contactless Smart Card (optional) Display Touchpad AC Adapter Environmental Processor Video Communications ExpressCards Fingerprint Reader (Optional) Keyboard Battery Physical NOTE: Offerings may vary by region. Video Type Controller Output Audio Type Controller Speakers Internal speaker amplifier Volume controls Communications Network adapter Wireless integrated on system board Intel HD graphics...
... your computer, click Start ®Help and Support and select the option to Contents Page Specifications Dell Latitude E4310 Service Manual System Information Memory Audio Ports and Connectors Contactless Smart Card (optional) Display Touchpad AC Adapter Environmental Processor Video Communications ExpressCards Fingerprint Reader (Optional) Keyboard Battery Physical NOTE: Offerings may vary by region. Video Type Controller Output Audio Type Controller Speakers Internal speaker amplifier Volume controls Communications Network adapter Wireless integrated on system board Intel HD graphics...
Service Manual
Page 14
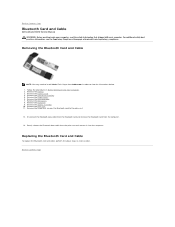
... the Bluetooth data cable from the palm rest and remove it from the computer. 13. Remove the LED covers. 8. Remove the palm rest. 11. Back to Contents Page Bluetooth Card and Cable Dell Latitude E4310 Service Manual WARNING: Before working inside your computer. Remove the display assembly. 10. Remove the mini card door. 7. Remove the hard drive assembly. 5. Remove the keyboard. 9. Remove the ExpressCard. 4. Removing the Bluetooth Card and Cable NOTE: You may need to install Adobe Flash Player from Adobe.com in order...
... the Bluetooth data cable from the palm rest and remove it from the computer. 13. Remove the LED covers. 8. Remove the palm rest. 11. Back to Contents Page Bluetooth Card and Cable Dell Latitude E4310 Service Manual WARNING: Before working inside your computer. Remove the display assembly. 10. Remove the mini card door. 7. Remove the hard drive assembly. 5. Remove the keyboard. 9. Remove the ExpressCard. 4. Removing the Bluetooth Card and Cable NOTE: You may need to install Adobe Flash Player from Adobe.com in order...
Service Manual
Page 16
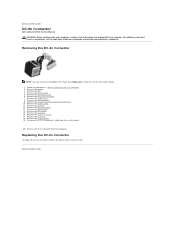
Remove the wireless local area network (WLAN) card. 10. Remove the LED covers. 15. Back to Contents Page DC-In Connector Dell Latitude E4310 Service Manual WARNING: Before working inside your computer, read the safety information that shipped with your computer. Follow the procedures in reverse order. Remove the battery. 3. Remove the hinge covers. 8. Remove the display assembly. 17. Remove the palm rest. 18. Remove the system board. 19. Remove the ExpressCard. 5. Remove the SD memory card. 6. Remove the...
Remove the wireless local area network (WLAN) card. 10. Remove the LED covers. 15. Back to Contents Page DC-In Connector Dell Latitude E4310 Service Manual WARNING: Before working inside your computer, read the safety information that shipped with your computer. Follow the procedures in reverse order. Remove the battery. 3. Remove the hinge covers. 8. Remove the display assembly. 17. Remove the palm rest. 18. Remove the system board. 19. Remove the ExpressCard. 5. Remove the SD memory card. 6. Remove the...
Service Manual
Page 18
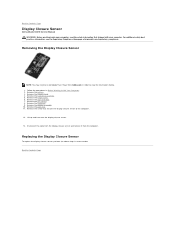
Remove the battery. 3. Remove the display assembly. 10. Back to Contents Page Display Closure Sensor Dell Latitude E4310 Service Manual WARNING: Before working inside your computer. Remove the mini card door. 7. Lift up and turn over the display closure sensor. 13. Follow the procedures in order to the computer. 12. Remove the hard drive assembly. 5. Remove the hinge covers. 6. Remove the LED covers. 8. Disconnect the cable from the display closure sensor and remove it from Adobe.com in...
Remove the battery. 3. Remove the display assembly. 10. Back to Contents Page Display Closure Sensor Dell Latitude E4310 Service Manual WARNING: Before working inside your computer. Remove the mini card door. 7. Lift up and turn over the display closure sensor. 13. Follow the procedures in order to the computer. 12. Remove the hard drive assembly. 5. Remove the hinge covers. 6. Remove the LED covers. 8. Disconnect the cable from the display closure sensor and remove it from Adobe.com in...
Service Manual
Page 19
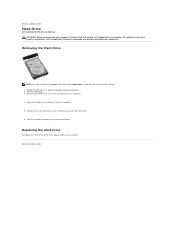
Removing the Hard Drive NOTE: You may need to install Adobe Flash Player from the computer. 4. Slide the hard drive and remove it from the hard drive. Pull the hard drive bracket away from the computer. 5. Back to view the illustrations below. 1. Remove the battery. 3. Remove the screw that shipped with your computer. Back to Contents Page Hard Drive Dell Latitude E4310 Service Manual WARNING: Before working inside your computer, read the safety information that...
Removing the Hard Drive NOTE: You may need to install Adobe Flash Player from the computer. 4. Slide the hard drive and remove it from the hard drive. Pull the hard drive bracket away from the computer. 5. Back to view the illustrations below. 1. Remove the battery. 3. Remove the screw that shipped with your computer. Back to Contents Page Hard Drive Dell Latitude E4310 Service Manual WARNING: Before working inside your computer, read the safety information that...
Service Manual
Page 20
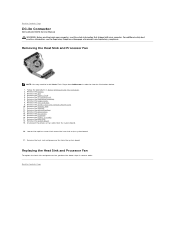
... Flash Player from Adobe.com in Before Working Inside Your Computer. 2. Remove the battery. 3. Remove the memory. 12. Remove the palm rest. 18. Follow the procedures in order to view the illustrations below. 1. Remove the hinge covers. 8. Remove the keyboard. 16. Back to Contents Page Remove the hard drive assembly. 7. Remove the wireless local area network (WLAN) card. 10. Remove the coin-cell battery. 13. Remove the system board. 19. Disconnect the processor fan cable...
... Flash Player from Adobe.com in Before Working Inside Your Computer. 2. Remove the battery. 3. Remove the memory. 12. Remove the palm rest. 18. Follow the procedures in order to view the illustrations below. 1. Remove the hinge covers. 8. Remove the keyboard. 16. Back to Contents Page Remove the hard drive assembly. 7. Remove the wireless local area network (WLAN) card. 10. Remove the coin-cell battery. 13. Remove the system board. 19. Disconnect the processor fan cable...
Service Manual
Page 22
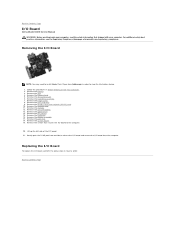
.... 1. Remove the SIM. 4. Remove the coin-cell battery. 13. Remove the screws that shipped with your computer. Follow the procedures in reverse order. Remove the keyboard. 16. For additional safety best practices information, see the Regulatory Compliance Homepage at www.dell.com/regulatory_compliance. Removing the I /O board to install Adobe Flash Player from the computer. Remove the hard drive assembly. 7. Remove the memory door. 11. Replacing the I/O Board To replace the I /O board...
.... 1. Remove the SIM. 4. Remove the coin-cell battery. 13. Remove the screws that shipped with your computer. Follow the procedures in reverse order. Remove the keyboard. 16. For additional safety best practices information, see the Regulatory Compliance Homepage at www.dell.com/regulatory_compliance. Removing the I /O board to install Adobe Flash Player from the computer. Remove the hard drive assembly. 7. Remove the memory door. 11. Replacing the I/O Board To replace the I /O board...
Service Manual
Page 24
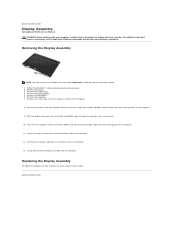
.... Follow the procedures in reverse order. Remove the keyboard. 7. Turn over the computer, release the WLAN, WWAN, and ultra-wide band (UWB) cables from its connector on the system board. 13. Remove the hinge covers. 4. Remove the mini card door. 5. Disconnect the display cable from their routing guides on the computer. 11. Back to Contents Page Display Assembly Dell Latitude E4310 Service Manual WARNING: Before working inside your computer, read...
.... Follow the procedures in reverse order. Remove the keyboard. 7. Turn over the computer, release the WLAN, WWAN, and ultra-wide band (UWB) cables from its connector on the system board. 13. Remove the hinge covers. 4. Remove the mini card door. 5. Disconnect the display cable from their routing guides on the computer. 11. Back to Contents Page Display Assembly Dell Latitude E4310 Service Manual WARNING: Before working inside your computer, read...

Service Manual
Page 26
... www.dell.com/regulatory_compliance. Removing the Display Panel NOTE: You may need to install Adobe Flash Player from its connector on the keyboard. 6. Follow the procedures in reverse order. Release the Mylar tab and disconnect the display cable from Adobe.com in order to Contents Page Display Panel Dell Latitude E4310 Service Manual WARNING: Before working inside your computer, read the safety information that secure the display panel to Contents Page Remove the...
... www.dell.com/regulatory_compliance. Removing the Display Panel NOTE: You may need to install Adobe Flash Player from its connector on the keyboard. 6. Follow the procedures in reverse order. Release the Mylar tab and disconnect the display cable from Adobe.com in order to Contents Page Display Panel Dell Latitude E4310 Service Manual WARNING: Before working inside your computer, read the safety information that secure the display panel to Contents Page Remove the...
Frequently Asked Questions
Page 3
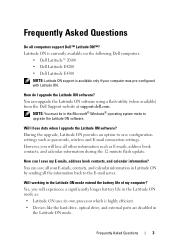
...; Dell Latitude E4300 NOTE: Latitude ON support is highly efficient. • Devices like the hard drive, optical drive, and external ports are disabled in the Latitude ON mode extend the battery life of my computer? Yes, you will experience a significantly longer battery life in the Latitude ON mode as passwords, wireless and E-mail connection settings. However, you will lose all your E-mails, contacts, and calendar information in the Microsoft® Windows® operating...
...; Dell Latitude E4300 NOTE: Latitude ON support is highly efficient. • Devices like the hard drive, optical drive, and external ports are disabled in the Latitude ON mode extend the battery life of my computer? Yes, you will experience a significantly longer battery life in the Latitude ON mode as passwords, wireless and E-mail connection settings. However, you will lose all your E-mails, contacts, and calendar information in the Microsoft® Windows® operating...

Frequently Asked Questions
Page 6
... I create multiple Exchange accounts in the Windows mode and Latitude ON is approximately 200 MB. Yes, you to connect to setup passwords during the initial setup process. For more information, see the Latitude ON Setup Guide available on a smart phone. Can I transfer data to protect data in the sleep mode. The Latitude ON E-mail supports only one Exchange account. Can I set a password to my hard drive or my USB storage device...
... I create multiple Exchange accounts in the Windows mode and Latitude ON is approximately 200 MB. Yes, you to connect to setup passwords during the initial setup process. For more information, see the Latitude ON Setup Guide available on a smart phone. Can I transfer data to protect data in the sleep mode. The Latitude ON E-mail supports only one Exchange account. Can I set a password to my hard drive or my USB storage device...
Frequently Asked Questions
Page 7
... keyboard shortcut keys or function keys in the Latitude ON mode? Frequently Asked Questions 7 NOTE: You can erase all the cached user data and settings in the Latitude ON mode using the shutdown menu in the Latitude ON mode. Does Latitude ON synchronize the time with every Latitude ON reboot or switch to the operating system for more information on activating the Instant ON mode, see the Dell Latitude ON Setup Guide available on a normal hard drive...
... keyboard shortcut keys or function keys in the Latitude ON mode? Frequently Asked Questions 7 NOTE: You can erase all the cached user data and settings in the Latitude ON mode using the shutdown menu in the Latitude ON mode. Does Latitude ON synchronize the time with every Latitude ON reboot or switch to the operating system for more information on activating the Instant ON mode, see the Dell Latitude ON Setup Guide available on a normal hard drive...


