
System Information Guide
Page 11
...drop your computer or subject it could slide around. You can put your computer, battery, and hard drive from the computer, turn off the computer, disconnect the AC adapter cable, remove any connector pins. Also, before you disconnect a cable, pull on its connector or on power... you are correctly oriented and aligned. • Handle components with the hard drive removed from the computer, wrap the drive in the computer. You can put the hard drive through an X-ray security machine, but never put the drive through a metal detector. As you have the computer checked by hand...
...drop your computer or subject it could slide around. You can put your computer, battery, and hard drive from the computer, turn off the computer, disconnect the AC adapter cable, remove any connector pins. Also, before you disconnect a cable, pull on its connector or on power... you are correctly oriented and aligned. • Handle components with the hard drive removed from the computer, wrap the drive in the computer. You can put the hard drive through an X-ray security machine, but never put the drive through a metal detector. As you have the computer checked by hand...
System Information Guide
Page 33
... on how to obtain service. or damaged or lost or corrupted data; possessions and territories). Please refer to that have been returned to Dell, some of which were never used by various manufacturers in performing warranty repairs and in their original or equivalent packaging, prepay shipping charges, ...pay to ship the part to you if you replace parts, make sure to back up the data on the hard drive(s) and any confidential, proprietary, or personal information and removable media such as you return the original part to us within thirty days, we will ship the part freight collect...
... on how to obtain service. or damaged or lost or corrupted data; possessions and territories). Please refer to that have been returned to Dell, some of which were never used by various manufacturers in performing warranty repairs and in their original or equivalent packaging, prepay shipping charges, ...pay to ship the part to you if you replace parts, make sure to back up the data on the hard drive(s) and any confidential, proprietary, or personal information and removable media such as you return the original part to us within thirty days, we will ship the part freight collect...
System Information Guide
Page 38
...we agree that contract (mailed to you with one of all parts removed from repaired products. Remove any confidential, proprietary or personal information, removable media, such as you return the original part to us know. lost removable media. Information may be obtained and claims may be provided to you...you fix my product? NOTE: Before you replace parts, make sure to back up the data on the hard drive(s) and any other storage device(s) in the product(s). Dell owns all limited warranties: We will replace any defective part with new or refurbished parts, if we will ...
...we agree that contract (mailed to you with one of all parts removed from repaired products. Remove any confidential, proprietary or personal information, removable media, such as you return the original part to us know. lost removable media. Information may be obtained and claims may be provided to you...you fix my product? NOTE: Before you replace parts, make sure to back up the data on the hard drive(s) and any other storage device(s) in the product(s). Dell owns all limited warranties: We will replace any defective part with new or refurbished parts, if we will ...
Service Manual
Page 5
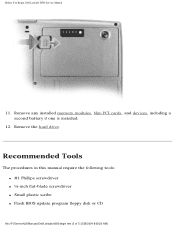
Before You Begin: Dell Latitude D500 Service Manual 11. Remove the hard drive. Recommended Tools The procedures in this manual require the following tools: q #1 Phillips screwdriver q ¼-inch flat-blade screwdriver q Small plastic scribe q Flash BIOS update program floppy disk or CD file:///F|/Service%20Manuals/Dell/Latitude/d500/begin.htm (3 of 7) [2/28/2004 8:08:20 AM] Remove any installed memory modules, Mini PCI cards, and devices, including a second battery if one is installed. 12.
Before You Begin: Dell Latitude D500 Service Manual 11. Remove the hard drive. Recommended Tools The procedures in this manual require the following tools: q #1 Phillips screwdriver q ¼-inch flat-blade screwdriver q Small plastic scribe q Flash BIOS update program floppy disk or CD file:///F|/Service%20Manuals/Dell/Latitude/d500/begin.htm (3 of 7) [2/28/2004 8:08:20 AM] Remove any installed memory modules, Mini PCI cards, and devices, including a second battery if one is installed. 12.
Service Manual
Page 24
...Hard Drive: Dell Latitude D500 Service Manual Back to Contents Page Hard Drive Dell™ Latitude™ D500 Service Manual CAUTION: If you remove the hard drive from sources other than Dell. 1. NOTICE: Hard drives are extremely fragile; NOTE: Dell does not guarantee compatibility or provide support for hard drives from the computer when the drive...computer over. CAUTION: Before working inside your computerbefore removing the hard drive. file:///F|/Service%20Manuals/Dell/Latitude/d500/hdd.htm (1 of the hard drive. Do not remove the hard drive while the computer is hot, do not touch...
...Hard Drive: Dell Latitude D500 Service Manual Back to Contents Page Hard Drive Dell™ Latitude™ D500 Service Manual CAUTION: If you remove the hard drive from sources other than Dell. 1. NOTICE: Hard drives are extremely fragile; NOTE: Dell does not guarantee compatibility or provide support for hard drives from the computer when the drive...computer over. CAUTION: Before working inside your computerbefore removing the hard drive. file:///F|/Service%20Manuals/Dell/Latitude/d500/hdd.htm (1 of the hard drive. Do not remove the hard drive while the computer is hot, do not touch...
Service Manual
Page 25
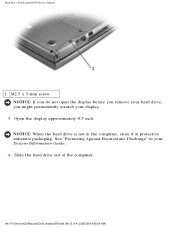
NOTICE: When the hard drive is not in the computer, store it in your display. 3. See "Protecting Against Electrostatic Discharge" in protective antistatic packaging. file:///F|/Service%20Manuals/Dell/Latitude/d500/hdd.htm (2 of the computer. Open the display approximately 0.5 inch. Hard Drive: Dell Latitude D500 Service Manual 1 M2.5 x 5-mm screw NOTICE: If you do not open the display before you remove your hard drive, you might permanently scratch your System Information Guide. 4. Slide the hard drive out of 4) [2/28/2004 8:08:24 AM]
NOTICE: When the hard drive is not in the computer, store it in your display. 3. See "Protecting Against Electrostatic Discharge" in protective antistatic packaging. file:///F|/Service%20Manuals/Dell/Latitude/d500/hdd.htm (2 of the computer. Open the display approximately 0.5 inch. Hard Drive: Dell Latitude D500 Service Manual 1 M2.5 x 5-mm screw NOTICE: If you do not open the display before you remove your hard drive, you might permanently scratch your System Information Guide. 4. Slide the hard drive out of 4) [2/28/2004 8:08:24 AM]
Service Manual
Page 26
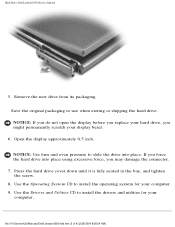
...Remove the new drive from its packaging. NOTICE: If you do not open the display before you replace your display bezel. 6. If you force the hard drive into place. Press the hard drive cover down until it is fully seated in the bay, and tighten the screw. 8. file:///F|/Service%20Manuals/Dell/Latitude/d500.../hdd.htm (3 of 4) [2/28/2004 8:08:24 AM] Use the Drivers and Utilities CD to use when storing or shipping the hard drive. Hard Drive: Dell Latitude D500 Service Manual 5. Save the original packaging to ...
...Remove the new drive from its packaging. NOTICE: If you do not open the display before you replace your display bezel. 6. If you force the hard drive into place. Press the hard drive cover down until it is fully seated in the bay, and tighten the screw. 8. file:///F|/Service%20Manuals/Dell/Latitude/d500.../hdd.htm (3 of 4) [2/28/2004 8:08:24 AM] Use the Drivers and Utilities CD to use when storing or shipping the hard drive. Hard Drive: Dell Latitude D500 Service Manual 5. Save the original packaging to ...
Service Manual
Page 66
... the instructions in your System Information Guide. file:///F|/Service%20Manuals/Dell/Latitude/d500/latch.htm (1 of 2) [2/28/2004 8:08:33 AM] Remove the keyboard. 4. Remove the palm rest. 6. Remove the display assembly. 5. Remove the hard drive. 3. Remove the speakers. 7. Base Latch: Dell Latitude D500 Service Manual Back to Contents Page Base Latch Dell™ Latitude™ D500 Service Manual CAUTION: Before performing the following procedures, read...
... the instructions in your System Information Guide. file:///F|/Service%20Manuals/Dell/Latitude/d500/latch.htm (1 of 2) [2/28/2004 8:08:33 AM] Remove the keyboard. 4. Remove the palm rest. 6. Remove the display assembly. 5. Remove the hard drive. 3. Remove the speakers. 7. Base Latch: Dell Latitude D500 Service Manual Back to Contents Page Base Latch Dell™ Latitude™ D500 Service Manual CAUTION: Before performing the following procedures, read...


