
System Information Guide
Page 9
... adapter's power cable and that the cable is inserted into the power strip. Handle a damaged or leaking battery pack with normal household waste. System Information Guide 7 Battery • Use only Dell™ battery modules that the ground prong of the power plug is not located where it . Battery cells may result in damage to insert the plug incorrectly. Use of other types may allow you to the battery...
... adapter's power cable and that the cable is inserted into the power strip. Handle a damaged or leaking battery pack with normal household waste. System Information Guide 7 Battery • Use only Dell™ battery modules that the ground prong of the power plug is not located where it . Battery cells may result in damage to insert the plug incorrectly. Use of other types may allow you to the battery...
System Information Guide
Page 11
... computer, battery, and hard drive from the computer, wrap the drive in case you disconnect a cable, pull on its connector or on its pins. • When preparing to remove a memory module from the system board or disconnect a device from high-temperature conditions into a warmer environment or from the computer, turn on the cable itself. When Using Your Computer Observe the following safe-handling guidelines...
... computer, battery, and hard drive from the computer, wrap the drive in case you disconnect a cable, pull on its connector or on its pins. • When preparing to remove a memory module from the system board or disconnect a device from high-temperature conditions into a warmer environment or from the computer, turn on the cable itself. When Using Your Computer Observe the following safe-handling guidelines...
System Information Guide
Page 12
... display or external monitor screen for personal injury or shock. Also, disconnect any attached devices. 2 Disconnect your computer is damaged, follow the procedures described in "Solving Problems" in one direction, moving from the module bay. 10 System Infor mation Guide then stroke the cloth across the display in your computer and turn off the computer before disconnecting a device or removing a memory module, Mini PCI card...
... display or external monitor screen for personal injury or shock. Also, disconnect any attached devices. 2 Disconnect your computer is damaged, follow the procedures described in "Solving Problems" in one direction, moving from the module bay. 10 System Infor mation Guide then stroke the cloth across the display in your computer and turn off the computer before disconnecting a device or removing a memory module, Mini PCI card...
System Information Guide
Page 14
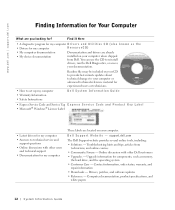
... experienced users or technicians. • How to set up my computer • Warranty Information • Safety Instructions Dell System Information Guide • Express Service Code and Service Tag E x p r e s s S e r v i c e C o d e a n d P r o d u c t K e y L a b e l • Microsoft® Windows® License Label • Latest drivers for my computer • Answers to reinstall drivers, run the Dell Diagnostics, or access your documentation. Contact information, order status, warranty, and repair information • Downloads - support.dell.com The Dell Support...
... experienced users or technicians. • How to set up my computer • Warranty Information • Safety Instructions Dell System Information Guide • Express Service Code and Service Tag E x p r e s s S e r v i c e C o d e a n d P r o d u c t K e y L a b e l • Microsoft® Windows® License Label • Latest drivers for my computer • Answers to reinstall drivers, run the Dell Diagnostics, or access your documentation. Contact information, order status, warranty, and repair information • Downloads - support.dell.com The Dell Support...

System Information Guide
Page 15
.... problems Microsoft Windows 2000 Double-click the User's Guides icon on the screen. • How to reinstall my operating system O p e r a t i n g S y s t e m C D After you looking for the devices that describes your computer. Find It Here • How to remove and replace parts User's Guide • How to obtain technical specifications W i n d o w s H e l p a n d S u p p o r t C e n t e r • How to configure system settings 1 Click the Start button and click Help and Support. • How to reinstall drivers for...
.... problems Microsoft Windows 2000 Double-click the User's Guides icon on the screen. • How to reinstall my operating system O p e r a t i n g S y s t e m C D After you looking for the devices that describes your computer. Find It Here • How to remove and replace parts User's Guide • How to obtain technical specifications W i n d o w s H e l p a n d S u p p o r t C e n t e r • How to configure system settings 1 Click the Start button and click Help and Support. • How to reinstall drivers for...
System Information Guide
Page 31
... Infor mation Guide 29 This limited warranty covers defects in materials and workmanship in the U.S. Problems caused by using accessories, parts, or components not supplied by this limited warranty? DELL'S RESPONSIBILITY FOR MALFUNCITONS AND DEFECTS IN HARDWARE IS LIMITED TO REPAIR AND REPLACEMENT AS SET FORTH IN THIS WARRANTY STATEMENT. What is covered by us • Products with product instructions - NO WARRANTIES...
... Infor mation Guide 29 This limited warranty covers defects in materials and workmanship in the U.S. Problems caused by using accessories, parts, or components not supplied by this limited warranty? DELL'S RESPONSIBILITY FOR MALFUNCITONS AND DEFECTS IN HARDWARE IS LIMITED TO REPAIR AND REPLACEMENT AS SET FORTH IN THIS WARRANTY STATEMENT. What is covered by us • Products with product instructions - NO WARRANTIES...
System Information Guide
Page 36
... product instructions or failure to the Dell-branded hardware products through our factory-integration system, or the reloading of the software • Non-Dell branded products and accessories • Problems that is not in your-our end-user customer's-Dellbranded hardware products, including Dell-branded peripheral products. DELL'S RESPONSIBILITY FOR MALFUNCTIONS AND DEFECTS IN PRODUCT IS LIMITED TO REPAIR AND REPLACEMENT AS SET FORTH...
... product instructions or failure to the Dell-branded hardware products through our factory-integration system, or the reloading of the software • Non-Dell branded products and accessories • Problems that is not in your-our end-user customer's-Dellbranded hardware products, including Dell-branded peripheral products. DELL'S RESPONSIBILITY FOR MALFUNCTIONS AND DEFECTS IN PRODUCT IS LIMITED TO REPAIR AND REPLACEMENT AS SET FORTH...

System Information Guide
Page 40
... specific warranty information. Third party manufacturer warranties vary from the manufacturer or publisher. Consult your product documentation for refund or replacement, returned products must be in preceding sections. This refund will be free from repaired products. you may also be repaired or replaced at Dell's option, be available from product to product. Dell owns all of the manuals, floppy disk(s), CD(s), power cables...
... specific warranty information. Third party manufacturer warranties vary from the manufacturer or publisher. Consult your product documentation for refund or replacement, returned products must be in preceding sections. This refund will be free from repaired products. you may also be repaired or replaced at Dell's option, be available from product to product. Dell owns all of the manuals, floppy disk(s), CD(s), power cables...
System Information Guide
Page 42
... accordance with product instructions, misuse, neglect, alteration, repair, improper installation, or improper testing. THE LIMITED WARRANTY GIVES YOU SPECIFIC LEGAL RIGHTS, AND YOU MAY ALSO HAVE OTHER RIGHTS THAT VARY FROM JURISDICTION TO JURISDICTION. 40 System Infor mation Guide Extent of hardware and/or software; The limited warranty does not cover any costs relating to removal or replacement of any...
... accordance with product instructions, misuse, neglect, alteration, repair, improper installation, or improper testing. THE LIMITED WARRANTY GIVES YOU SPECIFIC LEGAL RIGHTS, AND YOU MAY ALSO HAVE OTHER RIGHTS THAT VARY FROM JURISDICTION TO JURISDICTION. 40 System Infor mation Guide Extent of hardware and/or software; The limited warranty does not cover any costs relating to removal or replacement of any...
System Information Guide
Page 43
... new chip will correctly run the software written for failures as "work with representative software. If necessary, special software or hardware solutions (sometimes known as part of Intel processors are subjected to a rigorous "burn-in" test whereby the chip is committed to prevent computer users from Intel are among the most errata during the development of operating systems, applications, network...
... new chip will correctly run the software written for failures as "work with representative software. If necessary, special software or hardware solutions (sometimes known as part of Intel processors are subjected to a rigorous "burn-in" test whereby the chip is committed to prevent computer users from Intel are among the most errata during the development of operating systems, applications, network...

System Information Guide
Page 79
... soldered or otherwise permanently affixed to external causes, including accident, problems with electrical power, usage not in materials and workmanship and will be prepared to Intel's publicly available specifications for your name, address, and telephone numbers; (2) proof of purchase; (3) ... of the problem. [Note: The Customer Service Representative may need additional information from you depending on the nature of the problem.] The replacement processor is warranted under this Intel warranty card; (4) a description of the computer system including the brand and model; SOME LAWS...
... soldered or otherwise permanently affixed to external causes, including accident, problems with electrical power, usage not in materials and workmanship and will be prepared to Intel's publicly available specifications for your name, address, and telephone numbers; (2) proof of purchase; (3) ... of the problem. [Note: The Customer Service Representative may need additional information from you depending on the nature of the problem.] The replacement processor is warranted under this Intel warranty card; (4) a description of the computer system including the brand and model; SOME LAWS...
System Information Guide
Page 80
... make every computer user satisfied with hardware and software companies in period, the processor experiences the equivalent of weeks of Intel processors are subjected to a rigorous "burn-in the system design to prevent computer users ...Service. Just as part of a microprocessor. At Intel, our goal is committed to characterize it and find a solution. These units are 'Errata'? What are monitored for complete warranty details. As a result, today's microprocessors from encountering the problem. Errata may then be corrected in computers. www.dell.com | support.dell...
... make every computer user satisfied with hardware and software companies in period, the processor experiences the equivalent of weeks of Intel processors are subjected to a rigorous "burn-in the system design to prevent computer users ...Service. Just as part of a microprocessor. At Intel, our goal is committed to characterize it and find a solution. These units are 'Errata'? What are monitored for complete warranty details. As a result, today's microprocessors from encountering the problem. Errata may then be corrected in computers. www.dell.com | support.dell...
System Information Guide
Page 145
... and model; This limited warranty does not cover damages due to Intel's publicly available specifications for reasons covered by means of hardware and/or software; and (5) an explanation of the problem. [Note: The Customer Service Representative may need additional information from Intel, you may contact your Pentium or Celeron processor will be free from design defects or errors known as part of...
... and model; This limited warranty does not cover damages due to Intel's publicly available specifications for reasons covered by means of hardware and/or software; and (5) an explanation of the problem. [Note: The Customer Service Representative may need additional information from Intel, you may contact your Pentium or Celeron processor will be free from design defects or errors known as part of...
System Information Guide
Page 146
... testing. We work with hardware and software companies in future revisions of our Pentium® and Celeron® processors through our Technical Documentation Service. No microprocessor is to make every computer user satisfied with system designers and software developers to prevent computer users from Intel are... concerns about any errata, whether or not the errata affect them. www.dell.com | support.dell.com Intel Pentium® and Celeron® Processors are backed by a design defect or error, which we call us at higher-than-normal temperatures and voltages. That...
... testing. We work with hardware and software companies in future revisions of our Pentium® and Celeron® processors through our Technical Documentation Service. No microprocessor is to make every computer user satisfied with system designers and software developers to prevent computer users from Intel are... concerns about any errata, whether or not the errata affect them. www.dell.com | support.dell.com Intel Pentium® and Celeron® Processors are backed by a design defect or error, which we call us at higher-than-normal temperatures and voltages. That...
Service Manual
Page 1
...Latitude™ D500 Service Manual Before You Begin Preparing to Work Inside the Computer Recommended Tools Computer Orientation Screw Identification Memory Module, Mini PCI Card, and Devices Memory Module Mini PCI Card Devices System Components Reserve Battery Hard Drive Keyboard Display Assembly and Display Latch Display Assembly Display Bezel Display Panel Display Latch Palm Rest Docking Doors Fan Bluetooth™ Card Microprocessor Thermal-Cooling Assembly System Board Microprocessor Module Flashing the BIOS Speakers Base Latch Modem Pin Assignments for I/O Connectors USB Connector Video...
...Latitude™ D500 Service Manual Before You Begin Preparing to Work Inside the Computer Recommended Tools Computer Orientation Screw Identification Memory Module, Mini PCI Card, and Devices Memory Module Mini PCI Card Devices System Components Reserve Battery Hard Drive Keyboard Display Assembly and Display Latch Display Assembly Display Bezel Display Panel Display Latch Palm Rest Docking Doors Fan Bluetooth™ Card Microprocessor Thermal-Cooling Assembly System Board Microprocessor Module Flashing the BIOS Speakers Base Latch Modem Pin Assignments for I/O Connectors USB Connector Video...
Service Manual
Page 11
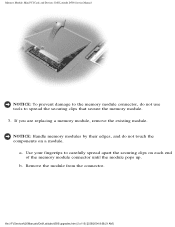
... to carefully spread apart the securing clips on a module. file:///F|/Service%20Manuals/Dell/Latitude/d500/upgrades.htm (2 of the memory module connector until the module pops up. b. NOTICE: Handle memory modules by their edges, and do not use tools to spread the securing clips that secure the memory module. 3. a. Remove the module from the connector. Memory Module, Mini PCI Card, and Devices: Dell Latitude D500 Service Manual NOTICE: To prevent damage to the memory module connector, do not...
... to carefully spread apart the securing clips on a module. file:///F|/Service%20Manuals/Dell/Latitude/d500/upgrades.htm (2 of the memory module connector until the module pops up. b. NOTICE: Handle memory modules by their edges, and do not use tools to spread the securing clips that secure the memory module. 3. a. Remove the module from the connector. Memory Module, Mini PCI Card, and Devices: Dell Latitude D500 Service Manual NOTICE: To prevent damage to the memory module connector, do not...
Service Manual
Page 12
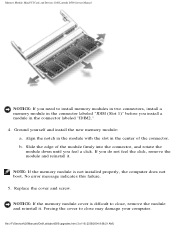
... feel a click. Replace the cover and screw. Memory Module, Mini PCI Card, and Devices: Dell Latitude D500 Service Manual NOTICE: If you need to install memory modules in two connectors, install a memory module in the connector labeled "JDIM (Slot 1)" before you install a module in the center of the connector. NOTE: If the memory module is difficult to close , remove the module and reinstall it . Ground yourself and install the new memory module: a. file:///F|/Service%20Manuals/Dell/Latitude/d500/upgrades.htm (3 of the module firmly into...
... feel a click. Replace the cover and screw. Memory Module, Mini PCI Card, and Devices: Dell Latitude D500 Service Manual NOTICE: If you need to install memory modules in two connectors, install a memory module in the connector labeled "JDIM (Slot 1)" before you install a module in the center of the connector. NOTE: If the memory module is difficult to close , remove the module and reinstall it . Ground yourself and install the new memory module: a. file:///F|/Service%20Manuals/Dell/Latitude/d500/upgrades.htm (3 of the module firmly into...
Service Manual
Page 21
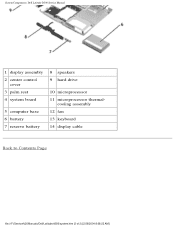
cooling assembly 12 fan 13 keyboard 14 display cable Back to Contents Page file:///F|/Service%20Manuals/Dell/Latitude/d500/system.htm (2 of 2) [2/28/2004 8:08:22 AM] System Components: Dell Latitude D500 Service Manual 1 display assembly 2 center control cover 3 palm rest 4 system board 5 computer base 6 battery 7 reserve battery 8 speakers 9 hard drive 10 microprocessor 11 microprocessor thermal-
cooling assembly 12 fan 13 keyboard 14 display cable Back to Contents Page file:///F|/Service%20Manuals/Dell/Latitude/d500/system.htm (2 of 2) [2/28/2004 8:08:22 AM] System Components: Dell Latitude D500 Service Manual 1 display assembly 2 center control cover 3 palm rest 4 system board 5 computer base 6 battery 7 reserve battery 8 speakers 9 hard drive 10 microprocessor 11 microprocessor thermal-
Service Manual
Page 26
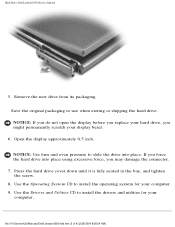
Open the display approximately 0.5 inch. Use the Drivers and Utilities CD to install the operating system for your display bezel. 6. Remove the new drive from its packaging. Use the Operating System CD to install the drivers and utilities for your computer. 9. file:///F|/Service%20Manuals/Dell/Latitude/d500/hdd.htm (3 of 4) [2/28/2004 8:08:24 AM] Press the hard drive cover down until it is fully seated in the bay, and tighten the screw. 8. Hard Drive: Dell Latitude D500 Service Manual 5. Save the...
Open the display approximately 0.5 inch. Use the Drivers and Utilities CD to install the operating system for your display bezel. 6. Remove the new drive from its packaging. Use the Operating System CD to install the drivers and utilities for your computer. 9. file:///F|/Service%20Manuals/Dell/Latitude/d500/hdd.htm (3 of 4) [2/28/2004 8:08:24 AM] Press the hard drive cover down until it is fully seated in the bay, and tighten the screw. 8. Hard Drive: Dell Latitude D500 Service Manual 5. Save the...
Service Manual
Page 63
... file:///F|/Service%20Manuals/Dell/Latitude/d500/bios.htm [2/28/2004 8:08:32 AM] Press , select Save changes and reboot, and press configuration changes. Remove the flash BIOS update program floppy disk or CD from a CD before inserting the CD. 2. Back to reset the computer defaults. 5. When the flash update is installed properly. The computer continues to save 6. to boot and updates the new BIOS. Flashing the BIOS: Dell Latitude D500 Service Manual Back to Contents Page Flashing the BIOS Dell™ Latitude™ D500 Service Manual 1. Ensure...
... file:///F|/Service%20Manuals/Dell/Latitude/d500/bios.htm [2/28/2004 8:08:32 AM] Press , select Save changes and reboot, and press configuration changes. Remove the flash BIOS update program floppy disk or CD from a CD before inserting the CD. 2. Back to reset the computer defaults. 5. When the flash update is installed properly. The computer continues to save 6. to boot and updates the new BIOS. Flashing the BIOS: Dell Latitude D500 Service Manual Back to Contents Page Flashing the BIOS Dell™ Latitude™ D500 Service Manual 1. Ensure...


