Setup and Features Information Tech Sheet
Page 4
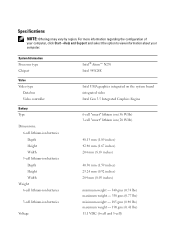
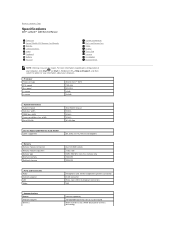
... Width Weight 6-cell lithium-ion batteries 3-cell lithium-ion batteries Voltage Intel® Atom™ N270 Intel 945GSE Intel UMA graphics integrated on the system board integrated video Intel Gen 3.5 Integrated Graphics Engine 6-cell "smart" lithium ion (56 WHr) 3-cell "smart" lithium ion (28 WHr) 48.13 mm (1.89 inches) 42...
... Width Weight 6-cell lithium-ion batteries 3-cell lithium-ion batteries Voltage Intel® Atom™ N270 Intel 945GSE Intel UMA graphics integrated on the system board integrated video Intel Gen 3.5 Integrated Graphics Engine 6-cell "smart" lithium ion (56 WHr) 3-cell "smart" lithium ion (28 WHr) 48.13 mm (1.89 inches) 42...
Service Manual
Page 4
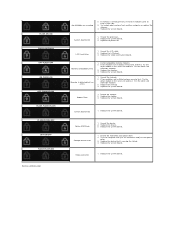
.... 3. Test the computer with just the hard drive and just the optical drive. 3. Replace the system board. Replace the system board. Replace the system board. Replace the system board. System board error 1. Option ROM Error 1. Replace the device. 3. If memory is causing the failure. 4. Reseat ...the processor. 2. Memory is detected but has errors 1. Storage device error 1. Replace the system board. Modem Error 1. FLASH-ON-ON FLASH-ON-FLASH OFF-FLASH-OFF ON-FLASH-ON OFF-FLASH-FLASH FLASH-FLASH-FLASH FLASH-FLASH...
.... 3. Test the computer with just the hard drive and just the optical drive. 3. Replace the system board. Replace the system board. Replace the system board. Replace the system board. System board error 1. Option ROM Error 1. Replace the device. 3. If memory is causing the failure. 4. Reseat ...the processor. 2. Memory is detected but has errors 1. Storage device error 1. Replace the system board. Modem Error 1. FLASH-ON-ON FLASH-ON-FLASH OFF-FLASH-OFF ON-FLASH-ON OFF-FLASH-FLASH FLASH-FLASH-FLASH FLASH-FLASH...
Service Manual
Page 5
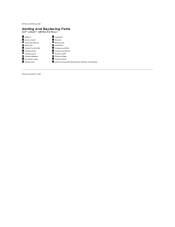
Back to Contents Page Adding and Replacing Parts Dell™ Latitude™ 2100 Service Manual Battery Access Panel Coin-Cell Battery Heat Sink Hard Drive Bracket Display Bezel Display Panel Display Brackets DC Power Cable Hinge Cover Keyboard Memory WLAN Card Hard Drive Display Assembly Display LED Board Display Cable Display Hinges System Board Internal Card With Bluetooth® Wireless Technology Back to Contents Page
Back to Contents Page Adding and Replacing Parts Dell™ Latitude™ 2100 Service Manual Battery Access Panel Coin-Cell Battery Heat Sink Hard Drive Bracket Display Bezel Display Panel Display Brackets DC Power Cable Hinge Cover Keyboard Memory WLAN Card Hard Drive Display Assembly Display LED Board Display Cable Display Hinges System Board Internal Card With Bluetooth® Wireless Technology Back to Contents Page
Service Manual
Page 8
... click Start (or Start in Windows® XP)® Help and Support, and then select the option to Contents Page Specifications Dell™ Latitude™ 2100 Service Manual Processor Secure Digital (SD) Memory Card Reader Memory Communications Audio Keyboard Battery Physical System Information Ports and Connectors Video Display ...three 4-pin USB 2.0-compliant connectors VGA Communications Modem Network adapter Wireless external (optional) 10/100/1000 Ethernet LAN on system board WLAN half Mini-Card, WPAN Bluetooth® wireless technology Back to view information about your computer.
... click Start (or Start in Windows® XP)® Help and Support, and then select the option to Contents Page Specifications Dell™ Latitude™ 2100 Service Manual Processor Secure Digital (SD) Memory Card Reader Memory Communications Audio Keyboard Battery Physical System Information Ports and Connectors Video Display ...three 4-pin USB 2.0-compliant connectors VGA Communications Modem Network adapter Wireless external (optional) 10/100/1000 Ethernet LAN on system board WLAN half Mini-Card, WPAN Bluetooth® wireless technology Back to view information about your computer.
Service Manual
Page 17
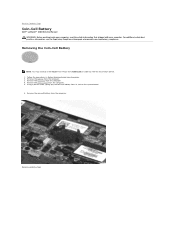
... the system board. 6. Using a plastic scribe, gently pry the coin-cell battery from Adobe.com in Before Working Inside Your Computer. 2. Back to Contents Page For additional safety best practices information, see the Regulatory Compliance Homepage at www.dell.com/regulatory_compliance. Back to Contents Page Coin-Cell Battery Dell™ Latitude™ 2100 Service Manual...
... the system board. 6. Using a plastic scribe, gently pry the coin-cell battery from Adobe.com in Before Working Inside Your Computer. 2. Back to Contents Page For additional safety best practices information, see the Regulatory Compliance Homepage at www.dell.com/regulatory_compliance. Back to Contents Page Coin-Cell Battery Dell™ Latitude™ 2100 Service Manual...
Service Manual
Page 19
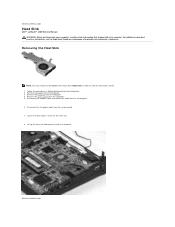
.... 8. Remove the battery from its routing path. 6. Lift up the heat sink and remove it from the computer 5. Back to Contents Page Heat Sink Dell™ Latitude™ 2100 Service Manual WARNING: Before working inside your computer, read the safety information that shipped with your computer. Back to Contents Page For additional safety... fan power cable from the computer. 4. Removing the Heat Sink NOTE: You may need to view the illustrations below. 1. Remove the keyboard from the system board. 7.
.... 8. Remove the battery from its routing path. 6. Lift up the heat sink and remove it from the computer 5. Back to Contents Page Heat Sink Dell™ Latitude™ 2100 Service Manual WARNING: Before working inside your computer, read the safety information that shipped with your computer. Back to Contents Page For additional safety... fan power cable from the computer. 4. Removing the Heat Sink NOTE: You may need to view the illustrations below. 1. Remove the keyboard from the system board. 7.
Service Manual
Page 20
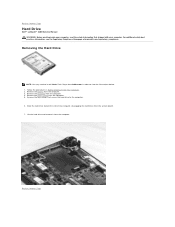
...the system board. 7. Remove the access panel from the computer. Remove the four screws that shipped with your computer. Lift the hard drive and remove it from the computer. 5. Remove the battery from Adobe.com in Before Working Inside Your Computer. 2. Back to Contents Page Hard Drive Dell™ Latitude™ 2100 Service .... 1. Removing the Hard Drive NOTE: You may need to Contents Page For additional safety best practices information, see the Regulatory Compliance Homepage at www.dell.com/regulatory_compliance. Back to install Adobe Flash Player from the computer. 3.
...the system board. 7. Remove the access panel from the computer. Remove the four screws that shipped with your computer. Lift the hard drive and remove it from the computer. 5. Remove the battery from Adobe.com in Before Working Inside Your Computer. 2. Back to Contents Page Hard Drive Dell™ Latitude™ 2100 Service .... 1. Removing the Hard Drive NOTE: You may need to Contents Page For additional safety best practices information, see the Regulatory Compliance Homepage at www.dell.com/regulatory_compliance. Back to install Adobe Flash Player from the computer. 3.
Service Manual
Page 22
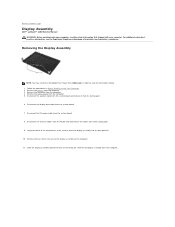
Remove the battery from its open position. 10. Disconnect the speaker cable from the system board and remove it from the computer. 3. Disconnect the antenna cables from the WLAN card and remove the cables from the computer. 4. Remove the ... then lift the display assembly from the computer. 5. Disconnect the DC power cable from the system board. 7. Remove the two screws the secure the display assembly to Contents Page Display Assembly Dell™ Latitude™ 2100 Service Manual WARNING: Before working inside your computer, read the safety information that shipped with your computer...
Remove the battery from its open position. 10. Disconnect the speaker cable from the system board and remove it from the computer. 3. Disconnect the antenna cables from the WLAN card and remove the cables from the computer. 4. Remove the ... then lift the display assembly from the computer. 5. Disconnect the DC power cable from the system board. 7. Remove the two screws the secure the display assembly to Contents Page Display Assembly Dell™ Latitude™ 2100 Service Manual WARNING: Before working inside your computer, read the safety information that shipped with your computer...

Service Manual
Page 25
... Remove the keyboard from the display assembly. 7. Remove the display LED board from the computer. 5. For additional safety best practices information, see the Regulatory Compliance Homepage at www.dell.com/regulatory_compliance. Remove the two screws that shipped with your computer, read... the safety information that secure the display LED board to the display assembly. 9. Back to view the illustrations below. 1. Back to Contents Page Display LED Board Dell™ Latitude™ 2100 Service Manual WARNING: Before working inside your computer. Remove the...
... Remove the keyboard from the display assembly. 7. Remove the display LED board from the computer. 5. For additional safety best practices information, see the Regulatory Compliance Homepage at www.dell.com/regulatory_compliance. Remove the two screws that shipped with your computer, read... the safety information that secure the display LED board to the display assembly. 9. Back to view the illustrations below. 1. Back to Contents Page Display LED Board Dell™ Latitude™ 2100 Service Manual WARNING: Before working inside your computer. Remove the...
Service Manual
Page 26
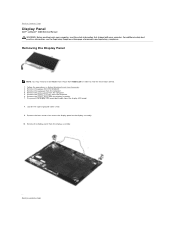
...from the display assembly. For additional safety best practices information, see the Regulatory Compliance Homepage at www.dell.com/regulatory_compliance. Remove the display panel from the display LED board. 8. Back to view the illustrations below. 1. Loosen the captive ground cable screw. 9. Remove the...to the display assembly. 10. Remove the access panel from the computer. 4. Back to Contents Page Display Panel Dell™ Latitude™ 2100 Service Manual WARNING: Before working inside your computer. Follow the procedures in order to Contents Page Remove the display ...
...from the display assembly. For additional safety best practices information, see the Regulatory Compliance Homepage at www.dell.com/regulatory_compliance. Remove the display panel from the display LED board. 8. Back to view the illustrations below. 1. Loosen the captive ground cable screw. 9. Remove the...to the display assembly. 10. Remove the access panel from the computer. 4. Back to Contents Page Display Panel Dell™ Latitude™ 2100 Service Manual WARNING: Before working inside your computer. Follow the procedures in order to Contents Page Remove the display ...
Service Manual
Page 30
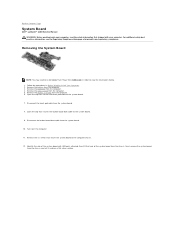
...the computer. 11. Remove the keyboard from the computer. 4. Remove the six screws that secure the system board to Contents Page System Board Dell™ Latitude™ 2100 Service Manual WARNING: Before working inside your computer, read the safety information that shipped with USB ports attached,... then lift that secures the touch pad cable to the system board. 9. Back to the computer chassis. 12. ...
...the computer. 11. Remove the keyboard from the computer. 4. Remove the six screws that secure the system board to Contents Page System Board Dell™ Latitude™ 2100 Service Manual WARNING: Before working inside your computer, read the safety information that shipped with USB ports attached,... then lift that secures the touch pad cable to the system board. 9. Back to the computer chassis. 12. ...
Service Manual
Page 32
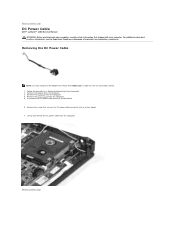
...the DC power cable connector to the system board. 7. Back to view the illustrations below. 1. Remove the battery from the computer. 4. For additional safety best practices information, see the Regulatory Compliance Homepage at www.dell.com/regulatory_compliance. Remove the keyboard from the computer...and remove the DC power cable from the system board. 6. Disconnect the DC power cable from the computer. Follow the procedures in order to Contents Page Back to Contents Page DC Power Cable Dell™ Latitude™ 2100 Service Manual WARNING: Before working inside your computer...
...the DC power cable connector to the system board. 7. Back to view the illustrations below. 1. Remove the battery from the computer. 4. For additional safety best practices information, see the Regulatory Compliance Homepage at www.dell.com/regulatory_compliance. Remove the keyboard from the computer...and remove the DC power cable from the system board. 6. Disconnect the DC power cable from the computer. Follow the procedures in order to Contents Page Back to Contents Page DC Power Cable Dell™ Latitude™ 2100 Service Manual WARNING: Before working inside your computer...
Service Manual
Page 33
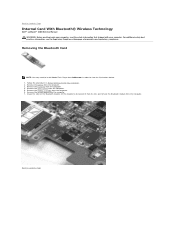
...the computer. 6. Remove the display assembly from the computer. 5. Remove the system board from the computer. 3. For additional safety best practices information, see the Regulatory Compliance Homepage at www.dell.com/regulatory_compliance. Remove the battery from the computer. 7. Back to view the ... to Contents Page Follow the procedures in order to Contents Page Internal Card With Bluetooth® Wireless Technology Dell™ Latitude™ 2100 Service Manual WARNING: Before working inside your computer, read the safety information that shipped with your computer. ...
...the computer. 6. Remove the display assembly from the computer. 5. Remove the system board from the computer. 3. For additional safety best practices information, see the Regulatory Compliance Homepage at www.dell.com/regulatory_compliance. Remove the battery from the computer. 7. Back to view the ... to Contents Page Follow the procedures in order to Contents Page Internal Card With Bluetooth® Wireless Technology Dell™ Latitude™ 2100 Service Manual WARNING: Before working inside your computer, read the safety information that shipped with your computer. ...

Service Manual
Page 36
...which could harm internal components. 11. Remove the hard drive (see Removing the Battery). 8. Working on Your Computer Dell™ Latitude™ 2100 Service Manual Before Working Inside Your Computer Recommended Tools Turning Off Your Computer After Working Inside Your Computer Before Working Inside ... l You have performed the steps in this document. Turn off your computer. 1. Press the power button to ground the system board. Unless otherwise noted, each procedure included in this type of the computer. Also, before you disconnect the cable. CAUTION: Handle ...
...which could harm internal components. 11. Remove the hard drive (see Removing the Battery). 8. Working on Your Computer Dell™ Latitude™ 2100 Service Manual Before Working Inside Your Computer Recommended Tools Turning Off Your Computer After Working Inside Your Computer Before Working Inside ... l You have performed the steps in this document. Turn off your computer. 1. Press the power button to ground the system board. Unless otherwise noted, each procedure included in this type of the computer. Also, before you disconnect the cable. CAUTION: Handle ...


