Setup Guide
Page 5
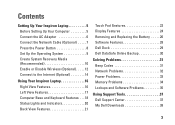
...Press the Power Button 8 Set Up the Operating System 9 Create System Recovery Media (Recommended 10 Enable or Disable Wireless (Optional 12 Connect to the Internet (Optional 14 Using Your Inspiron Laptop 16 Right View Features 16 Left View Features 17 Computer Base and Keyboard Features 18 ...Status Lights and Indicators 20 Back View Features 21 Touch Pad Gestures 22 Display Features 24 Removing and Replacing the Battery 26 Software Features 28 Dell Dock 29 Dell DataSafe...
...Press the Power Button 8 Set Up the Operating System 9 Create System Recovery Media (Recommended 10 Enable or Disable Wireless (Optional 12 Connect to the Internet (Optional 14 Using Your Inspiron Laptop 16 Right View Features 16 Left View Features 17 Computer Base and Keyboard Features 18 ...Status Lights and Indicators 20 Back View Features 21 Touch Pad Gestures 22 Display Features 24 Removing and Replacing the Battery 26 Software Features 28 Dell Dock 29 Dell DataSafe...
Setup Guide
Page 21
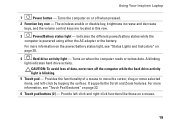
...-click by tapping the surface. Provides the functionality of data, never turn off when pressed. 2 Function key row - Indicates the different power/battery states while the computer is blinking. 5 Touch pad - For more information, see "Status Lights and Indicators" on page 22. 6 Touch ... (2) - A blinking light indicates hard drive activity. For more information on the power/battery status light, see "Touch Pad Gestures" on page 20. 4 Hard drive activity light - Using Your Inspiron Laptop 1 Power button - It supports the Scroll and Zoom features. Turns the computer ...
...-click by tapping the surface. Provides the functionality of data, never turn off when pressed. 2 Function key row - Indicates the different power/battery states while the computer is blinking. 5 Touch pad - For more information, see "Status Lights and Indicators" on page 22. 6 Touch ... (2) - A blinking light indicates hard drive activity. For more information on the power/battery status light, see "Touch Pad Gestures" on page 20. 4 Hard drive activity light - Using Your Inspiron Laptop 1 Power button - It supports the Scroll and Zoom features. Turns the computer ...
Setup Guide
Page 22
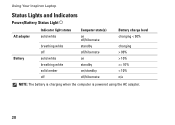
Using Your Inspiron Laptop Status Lights and Indicators Power/Battery Status Light AC adapter Battery Indicator light status solid white breathing white off solid white breathing white solid amber off Computer state(s) on off/hibernate standby off/hibernate on standby on/standby off/hibernate Battery charge level charging < 90% charging > 90% > 10% >= 10% < 10% n/a NOTE: The battery is charging when the computer is powered using the AC adapter. 20
Using Your Inspiron Laptop Status Lights and Indicators Power/Battery Status Light AC adapter Battery Indicator light status solid white breathing white off solid white breathing white solid amber off Computer state(s) on off/hibernate standby off/hibernate on standby on/standby off/hibernate Battery charge level charging < 90% charging > 90% > 10% >= 10% < 10% n/a NOTE: The battery is charging when the computer is powered using the AC adapter. 20
Setup Guide
Page 23
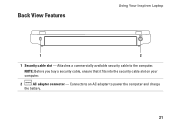
NOTE: Before you buy a security cable, ensure that it fits into the security cable slot on your computer. 2 AC adapter connector - Connects to an AC adapter to the computer. Attaches a commercially available security cable to power the computer and charge the battery. 21 Back View Features Using Your Inspiron Laptop 1 2 1 Security cable slot -
NOTE: Before you buy a security cable, ensure that it fits into the security cable slot on your computer. 2 AC adapter connector - Connects to an AC adapter to the computer. Attaches a commercially available security cable to power the computer and charge the battery. 21 Back View Features Using Your Inspiron Laptop 1 2 1 Security cable slot -

Setup Guide
Page 28
... the computer and turn it clicks into place. 26 Slide the battery release latches to the unlock position. 3. This computer should only use batteries from Dell. WARNING: Before removing the battery, shut down until it over. 2. Using Your Inspiron Laptop Removing and Replacing the Battery WARNING: Before you begin any of the procedures in this section...
... the computer and turn it clicks into place. 26 Slide the battery release latches to the unlock position. 3. This computer should only use batteries from Dell. WARNING: Before removing the battery, shut down until it over. 2. Using Your Inspiron Laptop Removing and Replacing the Battery WARNING: Before you begin any of the procedures in this section...
Setup Guide
Page 41
...battery (see the Service Manual at support.dell.com/manuals) or contact Dell (see "Contacting Dell" on page 61). 39 Possible harddisk drive failure during POST. No boot device available - Contact Dell (see "Contacting Dell" on page 61). For help in resolving this problem, please note this system have failed at booting this checkpoint and contact Dell...Enter system setup and ensure that the boot sequence information is correct (see the Service Manual at support.dell.com/manuals). The computer failed to complete the boot routine three consecutive times for the same error. ...
...battery (see the Service Manual at support.dell.com/manuals) or contact Dell (see "Contacting Dell" on page 61). 39 Possible harddisk drive failure during POST. No boot device available - Contact Dell (see "Contacting Dell" on page 61). For help in resolving this problem, please note this system have failed at booting this checkpoint and contact Dell...Enter system setup and ensure that the boot sequence information is correct (see the Service Manual at support.dell.com/manuals). The computer failed to complete the boot routine three consecutive times for the same error. ...
Setup Guide
Page 69
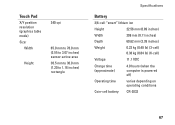
Touch Pad X/Y position resolution (graphics table mode) Size: Width Height 240 cpi 65.0 mm to 78.0 mm (2.55 to 3.07 inches) sensor-active area 30.5 mm to 30.0 mm (1.20 to 1.18 inches) rectangle Specifications Battery 3/6-cell "smart" lithium ion Height 22.56 mm (0.89 inches) Width 206 mm (8.11 inches) Depth 60.62 mm (2.39 inches) Weight 0.22 kg (0.48 lb) (3-cell) 0.38 kg (0.84 lb) (6-cell) Voltage 11.1 VDC Charge time (approximate) 4.0 hours (when the computer is powered off) Operating time varies depending on operating conditions Coin-cell battery CR-2032 67
Touch Pad X/Y position resolution (graphics table mode) Size: Width Height 240 cpi 65.0 mm to 78.0 mm (2.55 to 3.07 inches) sensor-active area 30.5 mm to 30.0 mm (1.20 to 1.18 inches) rectangle Specifications Battery 3/6-cell "smart" lithium ion Height 22.56 mm (0.89 inches) Width 206 mm (8.11 inches) Depth 60.62 mm (2.39 inches) Weight 0.22 kg (0.48 lb) (3-cell) 0.38 kg (0.84 lb) (6-cell) Voltage 11.1 VDC Charge time (approximate) 4.0 hours (when the computer is powered off) Operating time varies depending on operating conditions Coin-cell battery CR-2032 67
Setup Guide
Page 70
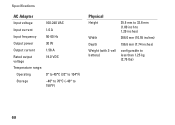
Specifications AC Adapter Input voltage 100-240 VAC Input current 1.0 A Input frequency 50-60 Hz Output power 30 W Output current 1.58 A Rated output voltage 19.0 VDC Temperature range: Operating 0° to 40°C (32° to 104°F) Storage -40° to 70°C (-40° to 158°F) Physical Height Width Depth Weight (with 3-cell battery) 25.5 mm to 32.8 mm (1.00 inch to 1.29 inches) 268.0 mm (10.55 inches) 196.6 mm (7.74 inches) configurable to less than 1.25 kg (2.75 lbs) 68
Specifications AC Adapter Input voltage 100-240 VAC Input current 1.0 A Input frequency 50-60 Hz Output power 30 W Output current 1.58 A Rated output voltage 19.0 VDC Temperature range: Operating 0° to 40°C (32° to 104°F) Storage -40° to 70°C (-40° to 158°F) Physical Height Width Depth Weight (with 3-cell battery) 25.5 mm to 32.8 mm (1.00 inch to 1.29 inches) 268.0 mm (10.55 inches) 196.6 mm (7.74 inches) configurable to less than 1.25 kg (2.75 lbs) 68


