
Setup Guide
Page 5
...Inspiron Laptop 18 Right View Features 18 Left View Features 20 Front View Features 22 Status Lights and Indicators 24 Computer Base Features 26 Touch Pad Gestures 28 Multimedia Control Keys 30 Using the Optical Drive 32 Display Features 34 Removing and Replacing the Battery 36 Software Features 38 Dell... DataSafe Online Backup 39 Dell Dock 40 Solving Problems 41 Beep Codes 41 Network Problems 42 Power Problems 43 Memory ...
...Inspiron Laptop 18 Right View Features 18 Left View Features 20 Front View Features 22 Status Lights and Indicators 24 Computer Base Features 26 Touch Pad Gestures 28 Multimedia Control Keys 30 Using the Optical Drive 32 Display Features 34 Removing and Replacing the Battery 36 Software Features 38 Dell... DataSafe Online Backup 39 Dell Dock 40 Solving Problems 41 Beep Codes 41 Network Problems 42 Power Problems 43 Memory ...
Setup Guide
Page 38
...place. 3. Align the tabs on the battery bay. 2. Slide the battery into the battery bay until it over. 2. This computer should only use batteries from Dell. To remove the battery: 1. To replace the battery: 1. WARNING: Before removing the battery, shut down the computer, and remove ...use a battery purchased from other computers. WARNING: Using an incompatible battery may increase the risk of the battery bay. Slide the battery release latch and the battery lock latch to the lock position. 36 Using Your Inspiron Laptop Removing and Replacing the Battery WARNING: Before...
...place. 3. Align the tabs on the battery bay. 2. Slide the battery into the battery bay until it over. 2. This computer should only use batteries from Dell. To remove the battery: 1. To replace the battery: 1. WARNING: Before removing the battery, shut down the computer, and remove ...use a battery purchased from other computers. WARNING: Using an incompatible battery may increase the risk of the battery bay. Slide the battery release latch and the battery lock latch to the lock position. 36 Using Your Inspiron Laptop Removing and Replacing the Battery WARNING: Before...
Setup Guide
Page 51
... System Messages If your hard drive or at support.dell.com/manuals) or contact Dell (see "Contacting Dell" on page 71). The computer failed to resolve the issue. Contact Dell (see "Contacting Dell" on page 71). Replace the battery (see the Service Manual at support.dell.com/manuals or contact Dell (see the documentation for the same error. Keyboard...
... System Messages If your hard drive or at support.dell.com/manuals) or contact Dell (see "Contacting Dell" on page 71). The computer failed to resolve the issue. Contact Dell (see "Contacting Dell" on page 71). Replace the battery (see the Service Manual at support.dell.com/manuals or contact Dell (see the documentation for the same error. Keyboard...

Service Guide
Page 5
...is already installed. Removing the Bluetooth Module 1. Remove the keyboard (see Removing the Battery). 3. Lift the Bluetooth module away from the system board. 1 Bluetooth module 2 screw Replacing the Bluetooth Module 1. Damage due to the connector on your computer). If you ... battery (see Removing the Battery) before working inside your computer, read the safety information that secures the Bluetooth module to Contents Page Internal Module With Bluetooth® Wireless Technology Dell™ Inspiron™ N5020/M5030/N5030 Service Manual Removing the Bluetooth Module Replacing ...
...is already installed. Removing the Bluetooth Module 1. Remove the keyboard (see Removing the Battery). 3. Lift the Bluetooth module away from the system board. 1 Bluetooth module 2 screw Replacing the Bluetooth Module 1. Damage due to the connector on your computer). If you ... battery (see Removing the Battery) before working inside your computer, read the safety information that secures the Bluetooth module to Contents Page Internal Module With Bluetooth® Wireless Technology Dell™ Inspiron™ N5020/M5030/N5030 Service Manual Removing the Bluetooth Module Replacing ...

Service Guide
Page 6
4. Back to the computer. Replace the keyboard (see Replacing the Battery). CAUTION: Before turning on the computer, replace all screws and ensure that no stray screws remain inside the computer. Replace the battery (see Replacing the Keyboard). 6. Failure to do so may result in damage to Contents Page Replace the palm rest (see Replacing the Palm Rest). 5.
4. Back to the computer. Replace the keyboard (see Replacing the Battery). CAUTION: Before turning on the computer, replace all screws and ensure that no stray screws remain inside the computer. Replace the battery (see Replacing the Keyboard). 6. Failure to do so may result in damage to Contents Page Replace the palm rest (see Replacing the Palm Rest). 5.

Service Guide
Page 7
... module under the latches until it to the system board, remove the main battery (see Removing the Battery) before working inside the computer. Back to Contents Page Camera Module Dell™ Inspiron™ N5020/M5030/N5030 Service Manual Removing the Camera Module Replacing the Camera Module WARNING: Before working inside your computer, read the safety information...
... module under the latches until it to the system board, remove the main battery (see Removing the Battery) before working inside the computer. Back to Contents Page Camera Module Dell™ Inspiron™ N5020/M5030/N5030 Service Manual Removing the Camera Module Replacing the Camera Module WARNING: Before working inside your computer, read the safety information...

Service Guide
Page 8
CAUTION: Before turning on the computer, replace all screws and ensure that no stray screws remain inside the computer. Replace the battery (see Replacing the Keyboard). 7. Back to the computer. Replace the keyboard (see Replacing the Battery). 5. Replace the palm rest (see Replacing the Palm Rest). 6. Failure to do so may result in damage to Contents Page
CAUTION: Before turning on the computer, replace all screws and ensure that no stray screws remain inside the computer. Replace the battery (see Replacing the Keyboard). 7. Back to the computer. Replace the keyboard (see Replacing the Battery). 5. Replace the palm rest (see Replacing the Palm Rest). 6. Failure to do so may result in damage to Contents Page
Service Guide
Page 9
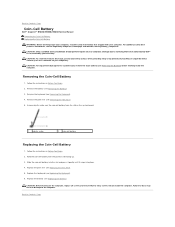
... board. 1 plastic scribe 2 coin-cell battery Replacing the Coin-Cell Battery 1. Follow the instructions in Before You Begin. 2. Back to Contents Page Coin-Cell Battery Dell™ Inspiron™ N5020/M5030/N5030 Service Manual Removing the Coin-Cell Battery Replacing the Coin-Cell Battery WARNING: Before working inside the computer. Replace the keyboard (see Removing the Battery). 3. For additional safety best practices...
... board. 1 plastic scribe 2 coin-cell battery Replacing the Coin-Cell Battery 1. Follow the instructions in Before You Begin. 2. Back to Contents Page Coin-Cell Battery Dell™ Inspiron™ N5020/M5030/N5030 Service Manual Removing the Coin-Cell Battery Replacing the Coin-Cell Battery WARNING: Before working inside the computer. Replace the keyboard (see Removing the Battery). 3. For additional safety best practices...

Service Guide
Page 10
...Battery) before working inside the computer. Be careful not to bend the pins on your skin can reduce the heat transfer capability of the processor while turning the cam screw. Back to Contents Page Processor Module Dell™ Inspiron™ N5020/M5030/N5030 Service Manual Removing the Processor Module Replacing... Palm Rest). 5. Remove the processor heat sink (see Removing the Battery). 3. CAUTION: To prevent intermittent contact between the ZIF-socket cam screw and the processor when removing or replacing the processor, press to apply slight pressure to the processor when turning...
...Battery) before working inside the computer. Be careful not to bend the pins on your skin can reduce the heat transfer capability of the processor while turning the cam screw. Back to Contents Page Processor Module Dell™ Inspiron™ N5020/M5030/N5030 Service Manual Removing the Processor Module Replacing... Palm Rest). 5. Remove the processor heat sink (see Removing the Battery). 3. CAUTION: To prevent intermittent contact between the ZIF-socket cam screw and the processor when removing or replacing the processor, press to apply slight pressure to the processor when turning...
Service Guide
Page 11
...you will receive a new thermal pad along with the pin-1 corner of the ZIF socket, then insert the processor module. Replace the battery (see Replacing the Palm Rest). 6. When the processor module is not seated properly. CAUTION: To avoid damage to the processor module, ... Page 7. If one or more corners of the processor module with documentation to illustrate proper installation. 1. Replace the palm rest (see Replacing the Battery). Replace the processor heat sink (see Replacing the Keyboard). 7. CAUTION: Before turning on the pin-1 corner of the processor module has a triangle...
...you will receive a new thermal pad along with the pin-1 corner of the ZIF socket, then insert the processor module. Replace the battery (see Replacing the Palm Rest). 6. When the processor module is not seated properly. CAUTION: To avoid damage to the processor module, ... Page 7. If one or more corners of the processor module with documentation to illustrate proper installation. 1. Replace the palm rest (see Replacing the Battery). Replace the processor heat sink (see Replacing the Keyboard). 7. CAUTION: Before turning on the pin-1 corner of the processor module has a triangle...
Service Guide
Page 12
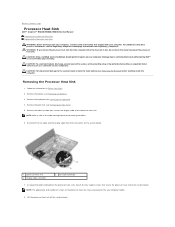
... board, remove the main battery (see Removing the Battery) before disconnecting the cables. 6. Lift the processor heat sink off the system board. Follow the instructions in Before You Begin. 2. Back to Contents Page Processor Heat Sink Dell™ Inspiron™ N5020/M5030/N5030 Service Manual Removing the Processor Heat Sink Replacing the Processor Heat Sink WARNING...
... board, remove the main battery (see Removing the Battery) before disconnecting the cables. 6. Lift the processor heat sink off the system board. Follow the instructions in Before You Begin. 2. Back to Contents Page Processor Heat Sink Dell™ Inspiron™ N5020/M5030/N5030 Service Manual Removing the Processor Heat Sink Replacing the Processor Heat Sink WARNING...
Service Guide
Page 13
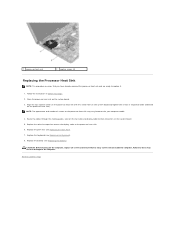
...to the computer. 1 processor heat sink 2 captive screws (4) Replacing the Processor Heat Sink NOTE: This procedure assumes that no stray screws remain inside the computer. Replace the palm rest (see Replacing the Battery). CAUTION: Before turning on the processor heat sink). Back to... the processor heat sink. 6. Replace the battery (see Replacing the Palm Rest). 7. Place the processor heat sink on ...
...to the computer. 1 processor heat sink 2 captive screws (4) Replacing the Processor Heat Sink NOTE: This procedure assumes that no stray screws remain inside the computer. Replace the palm rest (see Replacing the Battery). CAUTION: Before turning on the processor heat sink). Back to... the processor heat sink. 6. Replace the battery (see Replacing the Palm Rest). 7. Place the processor heat sink on ...

Service Guide
Page 15
... Mini-Card antenna cable into the routing guide and connect the display cable to the connector on the system board. 4. Replace the keyboard (see Replacing the Battery). Display Bezel Removing the Display Bezel CAUTION: The display bezel is extremely fragile. Route the display cable into the routing ...guide and connect the Mini-Card antenna cable to the computer base. 3. Replace the battery (see Replacing the Keyboard). 8. Failure to do so may result in position and replace the two screws (one on the Mini-Card. 5. Follow the instructions in Before You Begin. ...
... Mini-Card antenna cable into the routing guide and connect the display cable to the connector on the system board. 4. Replace the keyboard (see Replacing the Battery). Display Bezel Removing the Display Bezel CAUTION: The display bezel is extremely fragile. Route the display cable into the routing ...guide and connect the Mini-Card antenna cable to the computer base. 3. Replace the battery (see Replacing the Keyboard). 8. Failure to do so may result in position and replace the two screws (one on the Mini-Card. 5. Follow the instructions in Before You Begin. ...
Service Guide
Page 19
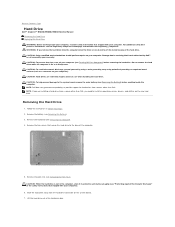
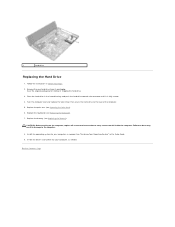
... your computer. Lift the hard drive out of the computer. 5. Back to Contents Page Hard Drive Dell™ Inspiron™ N5020/M5030/N5030 Service Manual Removing the Hard Drive Replacing the Hard Drive WARNING: Before working inside your computer, read the safety information that shipped with your ... the computer. WARNING: If you remove the hard drive from a source other than Dell, you are extremely fragile. CAUTION: To prevent data loss, turn off your computer (see Removing the Battery) before removing the hard drive. CAUTION: When the hard drive is hot, do ...
... your computer. Lift the hard drive out of the computer. 5. Back to Contents Page Hard Drive Dell™ Inspiron™ N5020/M5030/N5030 Service Manual Removing the Hard Drive Replacing the Hard Drive WARNING: Before working inside your computer, read the safety information that shipped with your ... the computer. WARNING: If you remove the hard drive from a source other than Dell, you are extremely fragile. CAUTION: To prevent data loss, turn off your computer (see Removing the Battery) before removing the hard drive. CAUTION: When the hard drive is hot, do ...
Service Guide
Page 20
... the computer. 8. See "Restoring Your Operating System" in damage to do so may result in the Setup Guide. 9. Back to the base of the computer. 5. Replace the battery (see Replacing the Battery). Install the operating system for storing or shipping the hard drive. 3.
... the computer. 8. See "Restoring Your Operating System" in damage to do so may result in the Setup Guide. 9. Back to the base of the computer. 5. Replace the battery (see Replacing the Battery). Install the operating system for storing or shipping the hard drive. 3.

Service Guide
Page 21
... best practices information, see Removing the Battery). 3. Remove the battery (see the Regulatory Compliance Homepage at www.dell.com/regulatory_compliance. Slide the power button module under the latch. 1 screw 3 power button module 2 power button cable 4 latch Replacing the Power Button Module 1. Follow the.... 2. Turn the palm rest over. 6. Back to Contents Page Power Button Module Dell™ Inspiron™ N5020/M5030/N5030 Service Manual Removing the Power Button Module Replacing the Power Button Module WARNING: Before working inside your computer, read the safety information ...
... best practices information, see Removing the Battery). 3. Remove the battery (see the Regulatory Compliance Homepage at www.dell.com/regulatory_compliance. Slide the power button module under the latch. 1 screw 3 power button module 2 power button cable 4 latch Replacing the Power Button Module 1. Follow the.... 2. Turn the palm rest over. 6. Back to Contents Page Power Button Module Dell™ Inspiron™ N5020/M5030/N5030 Service Manual Removing the Power Button Module Replacing the Power Button Module WARNING: Before working inside your computer, read the safety information ...

Service Guide
Page 22
Replace the battery (see Replacing the Palm Rest). 6. Back to the palm rest. 4. 3. CAUTION: Before turning on the computer, replace all screws and ensure that secures the power button module to Contents Page Replace the palm rest (see Replacing the Battery). Replace the keyboard (see Replacing the Keyboard). 7. Replace the screw that no stray screws remain inside the computer. Failure to do so may result in damage to the palm rest. 5. Adhere the power button cable to the computer.
Replace the battery (see Replacing the Palm Rest). 6. Back to the palm rest. 4. 3. CAUTION: Before turning on the computer, replace all screws and ensure that secures the power button module to Contents Page Replace the palm rest (see Replacing the Battery). Replace the keyboard (see Replacing the Keyboard). 7. Replace the screw that no stray screws remain inside the computer. Failure to do so may result in damage to the palm rest. 5. Adhere the power button cable to the computer.
Service Guide
Page 23
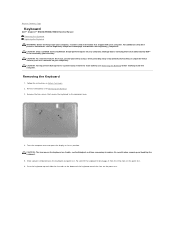
...with your computer. Back to Contents Page Keyboard Dell™ Inspiron™ N5020/M5030/N5030 Service Manual Removing the Keyboard Replacing the Keyboard WARNING: Before working inside your computer, read the safety information that is not authorized by Dell™ is not covered by periodically touching an...should perform repairs on the keyboard are fragile, easily dislodged, and time-consuming to the system board, remove the main battery (see Removing the Battery). 3. Remove the two screws that secure the keyboard to disengage it from the three tabs on the palm rest. ...
...with your computer. Back to Contents Page Keyboard Dell™ Inspiron™ N5020/M5030/N5030 Service Manual Removing the Keyboard Replacing the Keyboard WARNING: Before working inside your computer, read the safety information that is not authorized by Dell™ is not covered by periodically touching an...should perform repairs on the keyboard are fragile, easily dislodged, and time-consuming to the system board, remove the main battery (see Removing the Battery). 3. Remove the two screws that secure the keyboard to disengage it from the three tabs on the palm rest. ...
Service Guide
Page 24
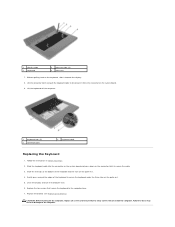
... the keyboard off the computer. 1 keyboard tabs (5) 3 connector latch 2 keyboard cable Replacing the Keyboard 1. Replace the two screws that no stray screws remain inside the computer. Replace the battery (see Replacing the Battery). Lift the connector latch and pull the keyboard cable to disconnect it towards the display... Before You Begin. 2. Close the display and turn the computer over. 6. Slide the keyboard cable into the slots on the computer, replace all screws and ensure that secure the keyboard to secure the cable. 3. 1 plastic scribe 3 keyboard 2 palm rest tabs (3) 4 ...
... the keyboard off the computer. 1 keyboard tabs (5) 3 connector latch 2 keyboard cable Replacing the Keyboard 1. Replace the two screws that no stray screws remain inside the computer. Replace the battery (see Replacing the Battery). Lift the connector latch and pull the keyboard cable to disconnect it towards the display... Before You Begin. 2. Close the display and turn the computer over. 6. Slide the keyboard cable into the slots on the computer, replace all screws and ensure that secure the keyboard to secure the cable. 3. 1 plastic scribe 3 keyboard 2 palm rest tabs (3) 4 ...
Service Guide
Page 26
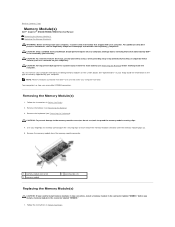
... supported by your warranty. Follow the instructions in Before You Begin. Remove the keyboard (see Removing the Battery). 3. Back to Contents Page Memory Module(s) Dell™ Inspiron™ N5020/M5030/N5030 Service Manual Removing the Memory Module(s) Replacing the Memory Module(s) WARNING: Before working inside your computer, read the safety information that is not authorized...
... supported by your warranty. Follow the instructions in Before You Begin. Remove the keyboard (see Removing the Battery). 3. Back to Contents Page Memory Module(s) Dell™ Inspiron™ N5020/M5030/N5030 Service Manual Removing the Memory Module(s) Replacing the Memory Module(s) WARNING: Before working inside your computer, read the safety information that is not authorized...


