
Setup Guide
Page 5
... Your Computer 5 Connect the AC Adapter 6 Connect the Network Cable (Optional 7 Press the Power Button 8 Set Up the Operating System 9 Create System Recovery Media (Recommended 10 Enable or Disable Wireless (Optional 12 Connect to the Internet (Optional 14 Using Your Inspiron Laptop 18 Right View Features ...Control Keys 30 Using the Optical Drive 32 Display Features 34 Removing and Replacing the Battery 36 Software Features 38 Dell DataSafe Online Backup 39 Dell Dock 40 Solving Problems 41 Beep Codes 41 Network Problems 42 Power Problems 43 Memory Problems 44 Lockups and ...
... Your Computer 5 Connect the AC Adapter 6 Connect the Network Cable (Optional 7 Press the Power Button 8 Set Up the Operating System 9 Create System Recovery Media (Recommended 10 Enable or Disable Wireless (Optional 12 Connect to the Internet (Optional 14 Using Your Inspiron Laptop 18 Right View Features ...Control Keys 30 Using the Optical Drive 32 Display Features 34 Removing and Replacing the Battery 36 Software Features 38 Dell DataSafe Online Backup 39 Dell Dock 40 Solving Problems 41 Beep Codes 41 Network Problems 42 Power Problems 43 Memory Problems 44 Lockups and ...
Setup Guide
Page 8
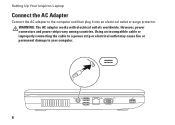
Using an incompatible cable or improperly connecting the cable to a power strip or electrical outlet may cause fire or permanent damage to the computer and then plug it into an electrical outlet or surge protector. WARNING: The AC adapter works with electrical outlets worldwide. However, power connectors and power strips vary among countries. Setting Up Your Inspiron Laptop Connect the AC Adapter Connect the AC adapter to your computer. 6
Using an incompatible cable or improperly connecting the cable to a power strip or electrical outlet may cause fire or permanent damage to the computer and then plug it into an electrical outlet or surge protector. WARNING: The AC adapter works with electrical outlets worldwide. However, power connectors and power strips vary among countries. Setting Up Your Inspiron Laptop Connect the AC Adapter Connect the AC adapter to your computer. 6
Setup Guide
Page 13
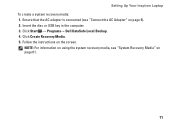
Ensure that the AC adapter is connected (see "System Recovery Media" on page 61. 11 Click Start → Programs→ Dell DataSafe Local Backup. 4. Insert the disc or USB key in the computer. 3. NOTE: For information on using the system recovery media, see "Connect the AC Adapter" on the screen. Setting Up Your Inspiron Laptop To create a system recovery media: 1. Click Create Recovery Media. 5. Follow the instructions on page 6). 2.
Ensure that the AC adapter is connected (see "System Recovery Media" on page 61. 11 Click Start → Programs→ Dell DataSafe Local Backup. 4. Insert the disc or USB key in the computer. 3. NOTE: For information on using the system recovery media, see "Connect the AC Adapter" on the screen. Setting Up Your Inspiron Laptop To create a system recovery media: 1. Click Create Recovery Media. 5. Follow the instructions on page 6). 2.
Setup Guide
Page 23
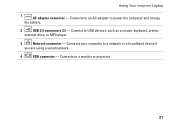
Connects to a network or a broadband device if you are using a wired network. 4 VGA connector - Using Your Inspiron Laptop 1 AC adapter connector - Connects your computer to a monitor or projector. 21 Connects to an AC adapter to USB devices, such as a mouse, keyboard, printer, external drive, or MP3 player. 3 Network connector - Connect to power the computer and charge the battery. 2 USB 2.0 connectors (3) -
Connects to a network or a broadband device if you are using a wired network. 4 VGA connector - Using Your Inspiron Laptop 1 AC adapter connector - Connects your computer to a monitor or projector. 21 Connects to an AC adapter to USB devices, such as a mouse, keyboard, printer, external drive, or MP3 player. 3 Network connector - Connect to power the computer and charge the battery. 2 USB 2.0 connectors (3) -

Setup Guide
Page 25
... microphone - Using Your Inspiron Laptop 1 Power status light - Blinks to view and share digital photos, music, videos, and documents stored on the memory card. Save the blank for use with a plastic blank installed in the slot; Provides quality sound for use when no media card is powered using the AC adapter. 4 3-in /Microphone...
... microphone - Using Your Inspiron Laptop 1 Power status light - Blinks to view and share digital photos, music, videos, and documents stored on the memory card. Save the blank for use with a plastic blank installed in the slot; Provides quality sound for use when no media card is powered using the AC adapter. 4 3-in /Microphone...
Setup Guide
Page 26
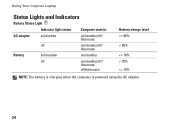
Using Your Inspiron Laptop Status Lights and Indicators Battery Status Light Indicator light status Computer state(s) AC adapter solid white on/standby/off/ hibernate off on/standby/off/ hibernate Battery solid amber on/standby off on/standby/off/ hibernate off/hibernate Battery charge level 98% 10%
Using Your Inspiron Laptop Status Lights and Indicators Battery Status Light Indicator light status Computer state(s) AC adapter solid white on/standby/off/ hibernate off on/standby/off/ hibernate Battery solid amber on/standby off on/standby/off/ hibernate off/hibernate Battery charge level 98% 10%
Setup Guide
Page 38
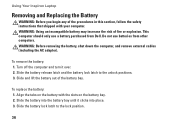
... use batteries from Dell. To replace the battery: 1. Slide the battery lock latch to the unlock positions. 3. Slide and lift the battery out of fire or explosion. WARNING: Before removing the battery, shut down the computer, and remove external cables (including the AC adapter). To remove the battery: 1. Using Your Inspiron Laptop Removing and...
... use batteries from Dell. To replace the battery: 1. Slide the battery lock latch to the unlock positions. 3. Slide and lift the battery out of fire or explosion. WARNING: Before removing the battery, shut down the computer, and remove external cables (including the AC adapter). To remove the battery: 1. Using Your Inspiron Laptop Removing and...

Setup Guide
Page 45
...it with another device, such as a lamp. • Check the AC adapter cable connections. The computer is in hibernate state, or is working by testing it back on. • If the problem persists, contact Dell (see "Contacting Dell" on . The computer resumes normal operation if it is off - ...If the AC adapter has a light, ensure that the power strip is turned on the AC adapter is not responding - Solving Problems Power Problems If the power...
...it with another device, such as a lamp. • Check the AC adapter cable connections. The computer is in hibernate state, or is working by testing it back on. • If the problem persists, contact Dell (see "Contacting Dell" on . The computer resumes normal operation if it is off - ...If the AC adapter has a light, ensure that the power strip is turned on the AC adapter is not responding - Solving Problems Power Problems If the power...

Setup Guide
Page 47
... outlet. Follow the instructions on the screen. If a program stops responding - Windows® 7 1. End the program: 1. The Program Compatibility Wizard configures a program so that the AC adapter cable is no longer responding 4. Ensure that it runs in its documentation or on the screen. 45 Click Applications. 3.
... outlet. Follow the instructions on the screen. If a program stops responding - Windows® 7 1. End the program: 1. The Program Compatibility Wizard configures a program so that the AC adapter cable is no longer responding 4. Ensure that it runs in its documentation or on the screen. 45 Click Applications. 3.
Setup Guide
Page 61
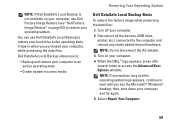
...your operating system. NOTE: Do not disconnect the AC adapter. 3. Dell DataSafe Local Backup allows you to: • Backup and restore your computer. 2. Turn off your computer to an earlier operating state • Create system recovery media Dell DataSafe Local Backup Basic To restore the factory image...the Advanced Boot Options window. NOTE: If you wait too long and the operating system logo appears, continue to wait until you see "Dell Factory Image Restore" on your computer and try again. 5. then, shut down your computer. 4. Select Repair Your Computer. 59 Restoring...
...your operating system. NOTE: Do not disconnect the AC adapter. 3. Dell DataSafe Local Backup allows you to: • Backup and restore your computer. 2. Turn off your computer to an earlier operating state • Create system recovery media Dell DataSafe Local Backup Basic To restore the factory image...the Advanced Boot Options window. NOTE: If you wait too long and the operating system logo appears, continue to wait until you see "Dell Factory Image Restore" on your computer and try again. 5. then, shut down your computer. 4. Select Repair Your Computer. 59 Restoring...
Setup Guide
Page 81
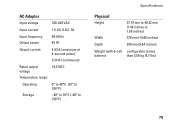
AC Adapter Input voltage 100-240 VAC Input current 1.5 A/1.6 A/1.7A Input frequency 50-60 Hz Output power 65 W Output current 4.43 A (maximum at 4-second pulse) 3.34 A (continuous) Rated output voltage 19.5 VDC Temperature range: Operating 0° to 40°C (32° to 104°F) Storage -40° to 70°C (-40° to 158°F) Specifications Physical Height Width Depth Weight (with 6-cell battery) 37.74 mm to 40.22 mm (1.48 inches to 1.58 inches) 378 mm (14.88 inches) 245 mm (9.64 inches) configurable to less than 2.58 kg (5.7 lbs) 79
AC Adapter Input voltage 100-240 VAC Input current 1.5 A/1.6 A/1.7A Input frequency 50-60 Hz Output power 65 W Output current 4.43 A (maximum at 4-second pulse) 3.34 A (continuous) Rated output voltage 19.5 VDC Temperature range: Operating 0° to 40°C (32° to 104°F) Storage -40° to 70°C (-40° to 158°F) Specifications Physical Height Width Depth Weight (with 6-cell battery) 37.74 mm to 40.22 mm (1.48 inches to 1.58 inches) 378 mm (14.88 inches) 245 mm (9.64 inches) configurable to less than 2.58 kg (5.7 lbs) 79

Service Guide
Page 41
Navigate to the security tab and enter the service tag in and that the AC adapter is installed properly. 2. Ensure that the main battery is plugged in the Set Service Tag field. Press during POST to Contents Page Entering the Service Tag in the BIOS 1. Turn on the computer. 3. Back to enter the system setup program. 4.
Navigate to the security tab and enter the service tag in and that the AC adapter is installed properly. 2. Ensure that the main battery is plugged in the Set Service Tag field. Press during POST to Contents Page Entering the Service Tag in the BIOS 1. Turn on the computer. 3. Back to enter the system setup program. 4.


