Setup Guide
Page 38
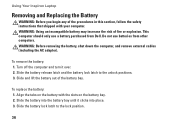
WARNING: Before removing the battery, shut down the computer, and remove external cables (including the AC adapter). To replace the battery: 1. Using Your Inspiron Laptop Removing and Replacing the Battery WARNING: Before you begin any of the procedures in this section, follow the safety ...the battery into place. 3. WARNING: Using an incompatible battery may increase the risk of the battery bay. This computer should only use batteries from Dell. Turn off the computer and turn it clicks into the battery bay until it over. 2. Do not use a battery purchased from other computers....
WARNING: Before removing the battery, shut down the computer, and remove external cables (including the AC adapter). To replace the battery: 1. Using Your Inspiron Laptop Removing and Replacing the Battery WARNING: Before you begin any of the procedures in this section, follow the safety ...the battery into place. 3. WARNING: Using an incompatible battery may increase the risk of the battery bay. This computer should only use batteries from Dell. Turn off the computer and turn it clicks into the battery bay until it over. 2. Do not use a battery purchased from other computers....

Setup Guide
Page 48
... your files immediately. • Use a virus-scanning program to check the hard drive or CDs. • Save and close any open files or programs and shut down your computer through the Start menu. • Check the software documentation or contact the software manufacturer for information. --Ensure that the program is installed...
... your files immediately. • Use a virus-scanning program to check the hard drive or CDs. • Save and close any open files or programs and shut down your computer through the Start menu. • Check the software documentation or contact the software manufacturer for information. --Ensure that the program is installed...

Setup Guide
Page 54
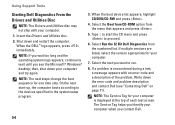
...NOTE: If your computer. 3. Turn on (or restart) your computer cannot display a screen image, contact Dell (see "Contacting Dell" on page 71). 1. If PSA is known to an electrical outlet that no diagnostics utility partition has ...Recommended)." 52 The PSA will take about 30 minutes or more. Using Support Tools Starting Dell Diagnostics From Your Hard Drive The Dell Diagnostics is located on a hidden diagnostic utility partition on your computer. Select Diagnostics from the...until you see the Microsoft® Windows® desktop; then, shut down your computer and try again.
...NOTE: If your computer. 3. Turn on (or restart) your computer cannot display a screen image, contact Dell (see "Contacting Dell" on page 71). 1. If PSA is known to an electrical outlet that no diagnostics utility partition has ...Recommended)." 52 The PSA will take about 30 minutes or more. Using Support Tools Starting Dell Diagnostics From Your Hard Drive The Dell Diagnostics is located on a hidden diagnostic utility partition on your computer. Select Diagnostics from the...until you see the Microsoft® Windows® desktop; then, shut down your computer and try again.
Setup Guide
Page 56
... and Utilities disc. 2. NOTE: The Service Tag for one time only. then, shut down and restart the computer. If a problem is displayed at the top of the problem. When the DELL™ logo appears, press immediately. Using Support Tools Starting Dell Diagnostics From the Drivers and Utilities Disc NOTE: The Drivers and Utilities...
... and Utilities disc. 2. NOTE: The Service Tag for one time only. then, shut down and restart the computer. If a problem is displayed at the top of the problem. When the DELL™ logo appears, press immediately. Using Support Tools Starting Dell Diagnostics From the Drivers and Utilities Disc NOTE: The Drivers and Utilities...
Setup Guide
Page 61
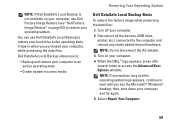
...all the devices (USB drive, printer, etc.) connected to access the Advanced Boot Options window. then, shut down your computer. 2. NOTE: Do not disconnect the AC adapter. 3. You can use Dell Factory Image Restore (see the Microsoft® Windows® desktop; NOTE: If you wait too long... Turn on page 62) to an earlier operating state • Create system recovery media Dell DataSafe Local Backup Basic To restore the factory image while preserving the data files: 1. When the DELL™ logo appears, press several times to the computer and remove any newly added internal...
...all the devices (USB drive, printer, etc.) connected to access the Advanced Boot Options window. then, shut down your computer. 2. NOTE: Do not disconnect the AC adapter. 3. You can use Dell Factory Image Restore (see the Microsoft® Windows® desktop; NOTE: If you wait too long... Turn on page 62) to an earlier operating state • Create system recovery media Dell DataSafe Local Backup Basic To restore the factory image while preserving the data files: 1. When the DELL™ logo appears, press several times to the computer and remove any newly added internal...
Setup Guide
Page 63
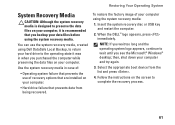
Insert the system recovery disc or USB key and restart the computer. 2. then, shut down your data files before using the system recovery media. Select the appropriate boot device from being recovered. Restoring Your Operating System System Recovery Media ... logo appears, continue to complete the recovery process. 61 NOTE: If you purchased the computer while preserving the data files on your computer. When the DELL™ logo appears, press immediately. You can use of your computer. • Hard drive failure that you see the Microsoft® Windows® desktop; To...
Insert the system recovery disc or USB key and restart the computer. 2. then, shut down your data files before using the system recovery media. Select the appropriate boot device from being recovered. Restoring Your Operating System System Recovery Media ... logo appears, continue to complete the recovery process. 61 NOTE: If you purchased the computer while preserving the data files on your computer. When the DELL™ logo appears, press immediately. You can use of your computer. • Hard drive failure that you see the Microsoft® Windows® desktop; To...

Service Guide
Page 2
...and cards with locking tabs; Hold a component such as a connector on the locking tabs before you shut down the operating system: Windows® 7: Click Start and then click Shut Down. Recommended Tools The procedures in this type of cable, press in on your computer. 1. ...CAUTION: Only a certified service technician should perform repairs on your computer. Back to Contents Page Before You Begin Dell™ Inspiron™ N5020/M5030/N5030 Service Manual Recommended Tools Turning Off Your Computer Before Working Inside Your Computer This manual provides instructions for removing ...
...and cards with locking tabs; Hold a component such as a connector on the locking tabs before you shut down the operating system: Windows® 7: Click Start and then click Shut Down. Recommended Tools The procedures in this type of cable, press in on your computer. 1. ...CAUTION: Only a certified service technician should perform repairs on your computer. Back to Contents Page Before You Begin Dell™ Inspiron™ N5020/M5030/N5030 Service Manual Recommended Tools Turning Off Your Computer Before Working Inside Your Computer This manual provides instructions for removing ...
Service Guide
Page 35
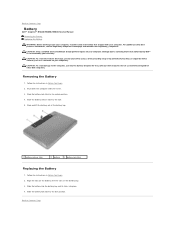
... to the side. 5. Slide the battery lock latch to the lock position. Back to Contents Page Battery Dell™ Inspiron™ N5020/M5030/N5030 Service Manual Removing the Battery Replacing the Battery WARNING: Before working inside your computer, read the safety information...dell.com/regulatory_compliance. CAUTION: Only a certified service technician should perform repairs on the battery bay. 3. Align the tabs on your computer. CAUTION: To avoid electrostatic discharge, ground yourself by using a wrist grounding strap or by your warranty. Slide the battery into place. 4. Shut...
... to the side. 5. Slide the battery lock latch to the lock position. Back to Contents Page Battery Dell™ Inspiron™ N5020/M5030/N5030 Service Manual Removing the Battery Replacing the Battery WARNING: Before working inside your computer, read the safety information...dell.com/regulatory_compliance. CAUTION: Only a certified service technician should perform repairs on the battery bay. 3. Align the tabs on your computer. CAUTION: To avoid electrostatic discharge, ground yourself by using a wrist grounding strap or by your warranty. Slide the battery into place. 4. Shut...


