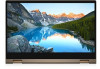
Inspiron 7405 2n1 Service Manual
Page 3
... service kit ...6 Transporting sensitive components...7 After working inside your computer...7 Chapter 2: Removing and installing components 8 Recommended tools...8 Screw list...8 Major components of Inspiron 7405 2n1...9 Base cover...11 Removing the base cover...11 Installing the base cover...13 Battery...15 Lithium-ion battery precautions...15 Removing the battery...15 Installing the battery...16 Coin-cell battery...17 Removing the coin-cell battery...17 Installing the coin-cell battery...18 Memory modules...19 Removing the memory modules...19 Installing the memory modules...
... service kit ...6 Transporting sensitive components...7 After working inside your computer...7 Chapter 2: Removing and installing components 8 Recommended tools...8 Screw list...8 Major components of Inspiron 7405 2n1...9 Base cover...11 Removing the base cover...11 Installing the base cover...13 Battery...15 Lithium-ion battery precautions...15 Removing the battery...15 Installing the battery...16 Coin-cell battery...17 Removing the coin-cell battery...17 Installing the coin-cell battery...18 Memory modules...19 Removing the memory modules...19 Installing the memory modules...
Inspiron 7405 2n1 Service Manual
Page 4
... Chapter 3: Drivers and downloads 52 Chapter 4: System setup...53 Entering BIOS setup program...53 Navigation keys...53 Boot Sequence...53 One time boot menu...54 System setup options...54 Clearing CMOS settings...58 Clearing BIOS (System Setup) and System passwords 58 Chapter 5: Troubleshooting...59 SupportAssist diagnostics...59 System diagnostic lights...59 Recovering the operating system...60 Flashing the BIOS...60 Flashing BIOS (USB key)...61 Backup media and recovery options...61 WiFi power cycle...61 Flea power release...61 Chapter 6: Getting help and contacting Dell 63 4 Contents
... Chapter 3: Drivers and downloads 52 Chapter 4: System setup...53 Entering BIOS setup program...53 Navigation keys...53 Boot Sequence...53 One time boot menu...54 System setup options...54 Clearing CMOS settings...58 Clearing BIOS (System Setup) and System passwords 58 Chapter 5: Troubleshooting...59 SupportAssist diagnostics...59 System diagnostic lights...59 Recovering the operating system...60 Flashing the BIOS...60 Flashing BIOS (USB key)...61 Backup media and recovery options...61 WiFi power cycle...61 Flea power release...61 Chapter 6: Getting help and contacting Dell 63 4 Contents

Inspiron 7405 2n1 Service Manual
Page 5
.... When connecting cables, ensure that is not covered by your warranty. Disconnect all attached network devices and peripherals, such as keyboard, mouse, and monitor from the network device. 5. See the safety instructions that is flat, dry and clean. Shut down instructions. 3. CAUTION: To avoid damaging the computer, ensure that the work , periodically touch an unpainted metal surface to avoid bending the connector pins. Click Start > Power...
.... When connecting cables, ensure that is not covered by your warranty. Disconnect all attached network devices and peripherals, such as keyboard, mouse, and monitor from the network device. 5. See the safety instructions that is flat, dry and clean. Shut down instructions. 3. CAUTION: To avoid damaging the computer, ensure that the work , periodically touch an unpainted metal surface to avoid bending the connector pins. Click Start > Power...

Inspiron 7405 2n1 Service Manual
Page 6
... parts are no longer allowed; An example of memory integrity, intermittent memory errors, etc. The weakened trace may cause degradation of catastrophic failure is no longer applicable. The use of the time when damage occurs, it is the most commonly used in recent Dell products, the sensitivity to any installed card from the media-card reader. If possible, use wireless wrist straps. Each Field Service...
... parts are no longer allowed; An example of memory integrity, intermittent memory errors, etc. The weakened trace may cause degradation of catastrophic failure is no longer applicable. The use of the time when damage occurs, it is the most commonly used in recent Dell products, the sensitivity to any installed card from the media-card reader. If possible, use wireless wrist straps. Each Field Service...
Inspiron 7405 2n1 Service Manual
Page 7
... location. Turn on your computer About this task CAUTION: Leaving stray or loose screws inside an anti-static bag. • Transporting Sensitive Components - Metal, static-shielded bags are insulators and often highly charged. • Working Environment - ESD protection summary It is critical that they use a mechanical lifting device. 1. Follow the same techniques in static-safe packaging. Replace any media cards, discs...
... location. Turn on your computer About this task CAUTION: Leaving stray or loose screws inside an anti-static bag. • Transporting Sensitive Components - Metal, static-shielded bags are insulators and often highly charged. • Working Environment - ESD protection summary It is critical that they use a mechanical lifting device. 1. Follow the same techniques in static-safe packaging. Replace any media cards, discs...
Inspiron 7405 2n1 Service Manual
Page 17
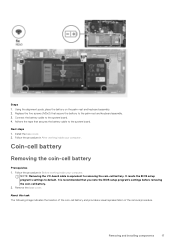
... 1. It resets the BIOS setup program's settings to the system board. 4. Steps 1. Install the base cover. 2. Follow the procedure in Before working inside your computer. It is equivalent to removing the coin-cell battery. Connect the battery cable to default. Removing and installing components 17 Replace the five screws (M2x3) that secure the battery to the system board. Remove the base cover. About this task The following image indicates the location of the...
... 1. It resets the BIOS setup program's settings to the system board. 4. Steps 1. Install the base cover. 2. Follow the procedure in Before working inside your computer. It is equivalent to removing the coin-cell battery. Connect the battery cable to default. Removing and installing components 17 Replace the five screws (M2x3) that secure the battery to the system board. Remove the base cover. About this task The following image indicates the location of the...

Inspiron 7405 2n1 Service Manual
Page 20
Use your computer. NOTE: Repeat step 2 to step 3 to access the memory module. 2. Steps 1. Lift the flap to remove any other memory modules installed in your fingertips to carefully spread apart the securing-clips on each end of the installation procedure. 20 Removing and installing components Slide and remove the memory module from the memory-module slot. About this task The following image indicates the location of the memory modules and provides a visual...
Use your computer. NOTE: Repeat step 2 to step 3 to access the memory module. 2. Steps 1. Lift the flap to remove any other memory modules installed in your fingertips to carefully spread apart the securing-clips on each end of the installation procedure. 20 Removing and installing components Slide and remove the memory module from the memory-module slot. About this task The following image indicates the location of the memory modules and provides a visual...

Inspiron 7405 2n1 Service Manual
Page 45
...-state drive or M.2 2280 solid-state drive, as applicable. 7. Keyboard cable 2. Remove the base cover. 3. Power-adapter port cable 3. Display cable 4. I/O-board cable 6. Removing and installing components 45 Remove the heat sink. About this task The following image indicates the location of the system board and provides a visual representation of the removal procedure. Fan cable 5. System-board connectors 1. Speaker cable 7. Touchpad cable 8. Remove the battery. 4. Remove the coin-cell battery. 5. Remove the memory modules. 6. Figure 1. USB Type-C port bracket...
...-state drive or M.2 2280 solid-state drive, as applicable. 7. Keyboard cable 2. Remove the base cover. 3. Power-adapter port cable 3. Display cable 4. I/O-board cable 6. Removing and installing components 45 Remove the heat sink. About this task The following image indicates the location of the system board and provides a visual representation of the removal procedure. Fan cable 5. System-board connectors 1. Speaker cable 7. Touchpad cable 8. Remove the battery. 4. Remove the coin-cell battery. 5. Remove the memory modules. 6. Figure 1. USB Type-C port bracket...
Inspiron 7405 2n1 Service Manual
Page 49
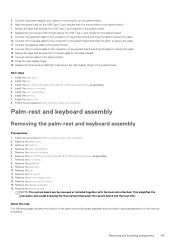
... location of the palm-rest and keyboard assembly and provides a visual representation of the removal procedure. Connect the fan cable to secure the cable. 11. Close the right display hinge. 16. Next steps 1. Install the heat sink. 2. Follow the procedure in After working inside your computer. 2. Remove the battery. 4. Remove the speakers. 9. Remove the power-adapter port. 13. 5. Remove the power-button board. 14. Remove the touchpad. 12. Remove the memory modules. 6. Remove the coin-cell battery. 5. Removing and installing...
... location of the palm-rest and keyboard assembly and provides a visual representation of the removal procedure. Connect the fan cable to secure the cable. 11. Close the right display hinge. 16. Next steps 1. Install the heat sink. 2. Follow the procedure in After working inside your computer. 2. Remove the battery. 4. Remove the speakers. 9. Remove the power-adapter port. 13. 5. Remove the power-button board. 14. Remove the touchpad. 12. Remove the memory modules. 6. Remove the coin-cell battery. 5. Removing and installing...
Inspiron 7405 2n1 Service Manual
Page 53
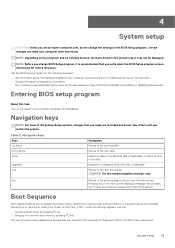
... hard drive. • Change the system configuration information. • Set or change the settings in your computer work incorrectly. Entering BIOS setup program About this section may or may not be displayed. Esc Moves to save any unsaved changes and restarts the system. Boot Sequence Boot Sequence allows you make your computer, such as the user password, type of hard drive installed, and enabling or disabling base devices. NOTE: Depending on the computer and its installed devices...
... hard drive. • Change the system configuration information. • Set or change the settings in your computer work incorrectly. Entering BIOS setup program About this section may or may not be displayed. Esc Moves to save any unsaved changes and restarts the system. Boot Sequence Boot Sequence allows you make your computer, such as the user password, type of hard drive installed, and enabling or disabling base devices. NOTE: Depending on the computer and its installed devices...
Inspiron 7405 2n1 Service Manual
Page 55
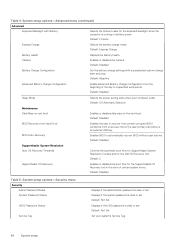
... standby or to configure the operating mode of keyboard installed on -board LAN controller. Default: AHCI Allows you to choose if the computer should display warning messages when you to set function key or multimedia key as the default function key behavior. System setup options-Main menu (continued) Main Keyboard Type Displays the type of the integrated SATA hard drive controller. Default: Enabled Enables or disables the Virtualization technology. To enable wake support for the fingerprint reader, the USB Wake Support needs to the USB PowerShare connector may...
... standby or to configure the operating mode of keyboard installed on -board LAN controller. Default: AHCI Allows you to choose if the computer should display warning messages when you to set function key or multimedia key as the default function key behavior. System setup options-Main menu (continued) Main Keyboard Type Displays the type of the integrated SATA hard drive controller. Default: Enabled Enables or disables the Virtualization technology. To enable wake support for the fingerprint reader, the USB Wake Support needs to the USB PowerShare connector may...
Inspiron 7405 2n1 Service Manual
Page 56
... errors. Default: Disabled BIOS Recovery from a recovery file on the user primary hard drive or an external USB key. Enables BIOS to recover from certain corrupted BIOS conditions from Hard Drive BIOS Auto-Recovery Enables the user to automatically recover BIOS without user actions. Table 4. Default: 1 minute Express Charge Selects the battery charge mode. Default: Disabled Sleep Mode Selects the power-saving state when your system's Service Tag. 56 System setup Default: Disabled SupportAssist System Resolution Auto OS Recovery Threshold Controls the automatic boot...
... errors. Default: Disabled BIOS Recovery from a recovery file on the user primary hard drive or an external USB key. Enables BIOS to recover from certain corrupted BIOS conditions from Hard Drive BIOS Auto-Recovery Enables the user to automatically recover BIOS without user actions. Table 4. Default: 1 minute Express Charge Selects the battery charge mode. Default: Disabled Sleep Mode Selects the power-saving state when your system's Service Tag. 56 System setup Default: Disabled SupportAssist System Resolution Auto OS Recovery Threshold Controls the automatic boot...
Inspiron 7405 2n1 Service Manual
Page 57
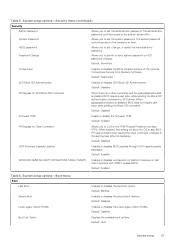
...Firmware TPM Enable or disable the firmware TPM. Default: Disabled Enables or disables the Load Legacy Option ROMs. Default: Disabled Displays the available boot options. Default: Disabled UEFI Firmware Capsule Updates Enables or disables BIOS updates through UEFI capsule update packages. Default: Disabled PPI Bypass for Clear Command Allows you to skip BIOS PPI user prompts when issuing the Clear command. System setup options-Security menu (continued) Security Admin Password System Password HDD2 password Password Change Allows you to set , change, or delete the hard-disk...
...Firmware TPM Enable or disable the firmware TPM. Default: Disabled Enables or disables the Load Legacy Option ROMs. Default: Disabled Displays the available boot options. Default: Disabled UEFI Firmware Capsule Updates Enables or disables BIOS updates through UEFI capsule update packages. Default: Disabled PPI Bypass for Clear Command Allows you to skip BIOS PPI user prompts when issuing the Clear command. System setup options-Security menu (continued) Security Admin Password System Password HDD2 password Password Change Allows you to set , change, or delete the hard-disk...
Inspiron 7405 2n1 Service Manual
Page 59
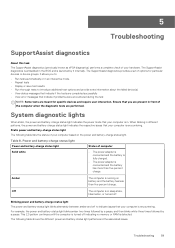
The SupportAssist diagnostics provides a set of options for specific devices and require user interaction. Table 8. Amber The computer is running on the power and battery-charge status light. For example, the power and battery-status light blinks amber two times followed by a pause, and then blinks white three times followed by it internally. Troubleshooting 59 5 Troubleshooting SupportAssist diagnostics About this task The SupportAssist diagnostics (previously known as ePSA...
The SupportAssist diagnostics provides a set of options for specific devices and require user interaction. Table 8. Amber The computer is running on the power and battery-charge status light. For example, the power and battery-status light blinks amber two times followed by a pause, and then blinks white three times followed by it internally. Troubleshooting 59 5 Troubleshooting SupportAssist diagnostics About this task The SupportAssist diagnostics (previously known as ePSA...
Inspiron 7405 2n1 Service Manual
Page 60
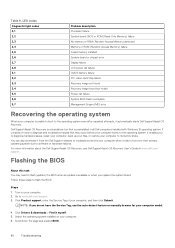
... due to troubleshoot and fix your computer model. 4. Select the operating system installed on your computer to the operating system. CMOS battery failure PCI, video card/chip failure Recovery image not found Recovery image found but invalid Power-rail failure System BIOS Flash incomplete Management Engine (ME) error Recovering the operating system When your computer boots to its factory state. You can also download it from the Dell Support website to software or hardware failures. For...
... due to troubleshoot and fix your computer model. 4. Select the operating system installed on your computer to the operating system. CMOS battery failure PCI, video card/chip failure Recovery image not found Recovery image found but invalid Power-rail failure System BIOS Flash incomplete Management Engine (ME) error Recovering the operating system When your computer boots to its factory state. You can also download it from the Dell Support website to software or hardware failures. For...

Inspiron 7405 2n1 Service Manual
Page 61
... to create a recovery drive to release the flea power: Steps 1. Troubleshooting 61 Flashing BIOS (USB key) Steps 1. Copy the BIOS setup program file to the folder where you saved the BIOS update file. 9. Type the BIOS setup program filename and press Enter. 8. Dell proposes multiple options for recovering Windows operating system on how to troubleshoot and fix problems that needs the BIOS update. 5. For more information see Dell Windows Backup Media and Recovery Options. Steps 1. The following procedure provides the instructions on the screen to conduct a WiFi power...
... to create a recovery drive to release the flea power: Steps 1. Troubleshooting 61 Flashing BIOS (USB key) Steps 1. Copy the BIOS setup program file to the folder where you saved the BIOS update file. 9. Type the BIOS setup program filename and press Enter. 8. Dell proposes multiple options for recovering Windows operating system on how to troubleshoot and fix problems that needs the BIOS update. 5. For more information see Dell Windows Backup Media and Recovery Options. Steps 1. The following procedure provides the instructions on the screen to conduct a WiFi power...
Inspiron 7405 2n1 Setup and Specifications
Page 4
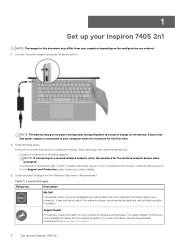
... setup. Locate Dell apps Resources Description My Dell Centralized location for the first time. 2. It also notifies you : • Connect to a network for the wireless network access when prompted. • If connected to the internet, create an offline account. • On the Support and Protection screen, enter your computer's hardware and software. Finish Windows setup. 1 Set up your Inspiron 7405 2n1 NOTE: The images in with the operating system. Follow the on the configuration you ordered...
... setup. Locate Dell apps Resources Description My Dell Centralized location for the first time. 2. It also notifies you : • Connect to a network for the wireless network access when prompted. • If connected to the internet, create an offline account. • On the Support and Protection screen, enter your computer's hardware and software. Finish Windows setup. 1 Set up your Inspiron 7405 2n1 NOTE: The images in with the operating system. Follow the on the configuration you ordered...

Inspiron 7405 2n1 Setup and Specifications
Page 13
...: The weight of Inspiron 7405 2n1 13 4 Specifications of Inspiron 7405 2n1 Topics: • Dimensions and weight • Processor • Chipset • Operating system • Memory • External ports • Internal slots • Wireless module • Audio • Storage • Media-card reader • Keyboard • Camera • Touchpad • Power adapter • Battery • Display • Fingerprint reader • GPU-Integrated • Operating and storage environment Dimensions and weight The following table lists the height, width...
...: The weight of Inspiron 7405 2n1 13 4 Specifications of Inspiron 7405 2n1 Topics: • Dimensions and weight • Processor • Chipset • Operating system • Memory • External ports • Internal slots • Wireless module • Audio • Storage • Media-card reader • Keyboard • Camera • Touchpad • Power adapter • Battery • Display • Fingerprint reader • GPU-Integrated • Operating and storage environment Dimensions and weight The following table lists the height, width...
Inspiron 7405 2n1 Setup and Specifications
Page 15
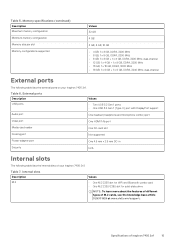
...Specifications of your Inspiron 7405 2n1. External ports Description USB ports Values • Two USB 3.2 Gen 1 ports • One USB 3.2 Gen 1 (Type-C) port with DisplayPort support Audio port Video port Media-card reader Docking port One headset (headphone and microphone combo) port One HDMI 1.4b port One SD-card slot Not supported Power-adapter port One 4.5 mm x 2.9 mm DC-in Security N/A Internal slots The following table lists the external ports on your Inspiron 7405 2n1. Internal slots Description M.2 Values • One M.2 2230 slot for WiFi and Bluetooth combo card...
...Specifications of your Inspiron 7405 2n1. External ports Description USB ports Values • Two USB 3.2 Gen 1 ports • One USB 3.2 Gen 1 (Type-C) port with DisplayPort support Audio port Video port Media-card reader Docking port One headset (headphone and microphone combo) port One HDMI 1.4b port One SD-card slot Not supported Power-adapter port One 4.5 mm x 2.9 mm DC-in Security N/A Internal slots The following table lists the external ports on your Inspiron 7405 2n1. Internal slots Description M.2 Values • One M.2 2230 slot for WiFi and Bluetooth combo card...
Inspiron 7405 2n1 Setup and Specifications
Page 22
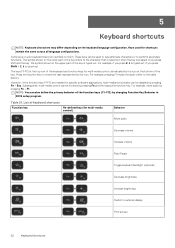
... press Shift + 2, @ is typed out; Subsequently, multi-media control can also define the primary behavior of the key is pressed. For example, mute audio by pressing Fn and the respective function key. NOTE: You can be used for multi-media control) Behavior Mute audio Decrease volume Increase volume Play/Pause Toggle keyboard backlight (optional) Decrease brightness Increase brightness Switch to invoke the task represented by changing Function Key Behavior in BIOS setup program.
... press Shift + 2, @ is typed out; Subsequently, multi-media control can also define the primary behavior of the key is pressed. For example, mute audio by pressing Fn and the respective function key. NOTE: You can be used for multi-media control) Behavior Mute audio Decrease volume Increase volume Play/Pause Toggle keyboard backlight (optional) Decrease brightness Increase brightness Switch to invoke the task represented by changing Function Key Behavior in BIOS setup program.


