Owners Manual
Page 6
16 Processor 73 Removing the Processor 73 Replacing the Processor 75 17 Coin-Cell Battery 77 Removing the Coin-Cell Battery 77 Replacing the Coin-Cell Battery 79 18 Power Supply 81 Removing the Power Supply 81 Replacing the Power Supply 83 19 System Board 85 Removing the System Board 85 Replacing the System Board 87 Entering the Service Tag in the BIOS 88 20 System Setup 91 Overview 91 Entering System Setup 91 Clearing Forgotten Passwords 102 Clearing CMOS Passwords 104 6 Contents
16 Processor 73 Removing the Processor 73 Replacing the Processor 75 17 Coin-Cell Battery 77 Removing the Coin-Cell Battery 77 Replacing the Coin-Cell Battery 79 18 Power Supply 81 Removing the Power Supply 81 Replacing the Power Supply 83 19 System Board 85 Removing the System Board 85 Replacing the System Board 87 Entering the Service Tag in the BIOS 88 20 System Setup 91 Overview 91 Entering System Setup 91 Clearing Forgotten Passwords 102 Clearing CMOS Passwords 104 6 Contents
Owners Manual
Page 13
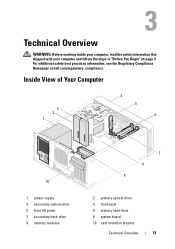
For additional safety best practices information, see the Regulatory Compliance Homepage at dell.com/regulatory_compliance. Inside View of Your Computer 3 2 1 4 5 6 10 1 power supply 3 secondary optical-drive 5 front I/O panel 7 secondary hard-drive 9 memory modules 7 8 9 2 primary optical-drive 4 front bezel 6 primary hard-drive 8 system board 10 card retention bracket Technical Overview 13 Technical Overview WARNING: Before working inside your computer, read the safety information that shipped with your computer and follow the steps in "Before You Begin" on page 9.
For additional safety best practices information, see the Regulatory Compliance Homepage at dell.com/regulatory_compliance. Inside View of Your Computer 3 2 1 4 5 6 10 1 power supply 3 secondary optical-drive 5 front I/O panel 7 secondary hard-drive 9 memory modules 7 8 9 2 primary optical-drive 4 front bezel 6 primary hard-drive 8 system board 10 card retention bracket Technical Overview 13 Technical Overview WARNING: Before working inside your computer, read the safety information that shipped with your computer and follow the steps in "Before You Begin" on page 9.
Owners Manual
Page 81
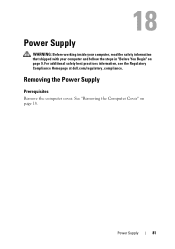
Removing the Power Supply Prerequisites Remove the computer cover. For additional safety best practices information, see the Regulatory Compliance Homepage at dell.com/regulatory_compliance. See "Removing the Computer Cover" on page 9. Power Supply WARNING: Before working inside your computer, read the safety information that shipped with your computer and follow the steps in "Before You Begin" on page 18. Power Supply 81
Removing the Power Supply Prerequisites Remove the computer cover. For additional safety best practices information, see the Regulatory Compliance Homepage at dell.com/regulatory_compliance. See "Removing the Computer Cover" on page 9. Power Supply WARNING: Before working inside your computer, read the safety information that shipped with your computer and follow the steps in "Before You Begin" on page 18. Power Supply 81
Owners Manual
Page 82
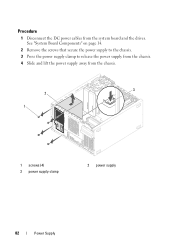
Procedure 1 Disconnect the DC power cables from the chassis. 3 2 1 1 screws (4) 3 power supply clamp 2 power supply 82 Power Supply See "System Board Components" on page 14. 2 Remove the screws that secure the power supply to the chassis. 3 Press the power supply clamp to release the power supply from the chassis. 4 Slide and lift the power supply away from the system board and the drives.
Procedure 1 Disconnect the DC power cables from the chassis. 3 2 1 1 screws (4) 3 power supply clamp 2 power supply 82 Power Supply See "System Board Components" on page 14. 2 Remove the screws that secure the power supply to the chassis. 3 Press the power supply clamp to release the power supply from the chassis. 4 Slide and lift the power supply away from the system board and the drives.
Owners Manual
Page 83
See "Replacing the Computer Cover" on page 19. 2 Follow the instructions in "After Working Inside Your Computer" on page 14. Postrequisites 1 Replace the computer cover. See "System Board Components" on page 11. Power Supply 83 Replacing the Power Supply Procedure 1 Slide the power supply towards the back of the chassis. 2 Align the screw holes on the power supply with the screw holes on the chassis. 3 Replace the screws that secure the power supply to the chassis. 4 Connect the DC power cables to the system board and drives.
See "Replacing the Computer Cover" on page 19. 2 Follow the instructions in "After Working Inside Your Computer" on page 14. Postrequisites 1 Replace the computer cover. See "System Board Components" on page 11. Power Supply 83 Replacing the Power Supply Procedure 1 Slide the power supply towards the back of the chassis. 2 Align the screw holes on the power supply with the screw holes on the chassis. 3 Replace the screws that secure the power supply to the chassis. 4 Connect the DC power cables to the system board and drives.


