Dell™ Technology Guide
Page 6
... Windows® XP 72 Setting up Printers 73 Adding a Printer 73 Setting the Default Printer 74 Sharing Printers on a Network 74 Installing a Printer Driver 75 6 Drives and Media 77 Freeing up Hard Drive Space 77 6 Contents
... Windows® XP 72 Setting up Printers 73 Adding a Printer 73 Setting the Default Printer 74 Sharing Printers on a Network 74 Installing a Printer Driver 75 6 Drives and Media 77 Freeing up Hard Drive Space 77 6 Contents
Dell™ Technology Guide
Page 7
Shadow Storage 77 Reducing Hard Drive Space Used by Shadow Storage 78 Solid-State Drive (SSD 78 Installing Drivers for Media Drives 79 Determining Whether a Device Driver is the Source of a Device Problem 79 Replacing a Driver With a Previous Version of the Driver... 79 Using the Drivers and Utilities Media to Reinstall a Driver 80 Manually Reinstalling a Driver 80 Drive Problems 81 Optical Drive Problems 82 Hard Drive Problems 82 Working with RAID 83 RAID Level 0 83 RAID Level 1 84 RAID Level 0+1 Configuration 86 RAID Level 5 Configuration 87...
Shadow Storage 77 Reducing Hard Drive Space Used by Shadow Storage 78 Solid-State Drive (SSD 78 Installing Drivers for Media Drives 79 Determining Whether a Device Driver is the Source of a Device Problem 79 Replacing a Driver With a Previous Version of the Driver... 79 Using the Drivers and Utilities Media to Reinstall a Driver 80 Manually Reinstalling a Driver 80 Drive Problems 81 Optical Drive Problems 82 Hard Drive Problems 82 Working with RAID 83 RAID Level 0 83 RAID Level 1 84 RAID Level 0+1 Configuration 86 RAID Level 5 Configuration 87...
Dell™ Technology Guide
Page 10
...; XP 128 Performance Tuning 129 System Setup Based Performance Tuning . . . . 129 Software Based Performance Tuning 129 NVIDIA Performance 129 NVIDIA Monitor 130 Cleaning Up Your Hard Drive 131 Defragmenting Your Hard Drive 132 Detecting and Repairing Disk Errors 133 Scanning for Viruses and Spyware 133 10 Contents
...; XP 128 Performance Tuning 129 System Setup Based Performance Tuning . . . . 129 Software Based Performance Tuning 129 NVIDIA Performance 129 NVIDIA Monitor 130 Cleaning Up Your Hard Drive 131 Defragmenting Your Hard Drive 132 Detecting and Repairing Disk Errors 133 Scanning for Viruses and Spyware 133 10 Contents
Dell™ Technology Guide
Page 45
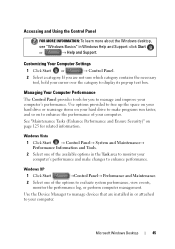
... not sure which category contains the necessary tool, hold your cursor over the category to display its pop-up the space on your hard drive or rearrange items on your hard drive to make programs run faster, and so on page 125 for you are installed in Windows Help and Support: click Start or...
... not sure which category contains the necessary tool, hold your cursor over the category to display its pop-up the space on your hard drive or rearrange items on your hard drive to make programs run faster, and so on page 125 for you are installed in Windows Help and Support: click Start or...
Dell™ Technology Guide
Page 77
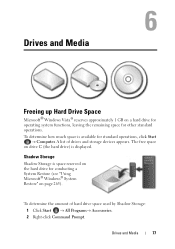
... conducting a System Restore (see "Using Microsoft® Windows® System Restore" on page 265). The free space on the hard drive for other standard operations. Shadow Storage Shadow Storage is space reserved on drive C (the hard drive) is available for standard operations, click Start → Computer. To determine how much space is displayed. A list of...
... conducting a System Restore (see "Using Microsoft® Windows® System Restore" on page 265). The free space on the hard drive for other standard operations. Shadow Storage Shadow Storage is space reserved on drive C (the hard drive) is available for standard operations, click Start → Computer. To determine how much space is displayed. A list of...
Dell™ Technology Guide
Page 78
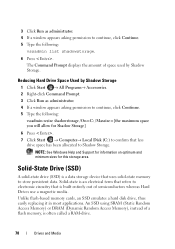
... shadowstorage /On=C: /Maxsize=[the maximum space you will allow for this storage area. The Command Prompt displays the amount of semiconductors whereas Hard Drives use a magnetic media. 3 Click Run as administrator. 4 If a window appears asking permission to continue, click Continue. 5 Type the...shadowstorage. 6 Press . Unlike flash-based memory cards, an SSD emulates a hard disk drive, thus easily replacing it in most applications. Reducing Hard Drive Space Used by Shadow Storage. Solid-State Drive (SSD) A solid-state drive (SSD) is a data storage device that is often called a RAM...
... shadowstorage /On=C: /Maxsize=[the maximum space you will allow for this storage area. The Command Prompt displays the amount of semiconductors whereas Hard Drives use a magnetic media. 3 Click Run as administrator. 4 If a window appears asking permission to continue, click Continue. 5 Type the...shadowstorage. 6 Press . Unlike flash-based memory cards, an SSD emulates a hard disk drive, thus easily replacing it in most applications. Reducing Hard Drive Space Used by Shadow Storage. Solid-State Drive (SSD) A solid-state drive (SSD) is a data storage device that is often called a RAM...
Dell™ Technology Guide
Page 80
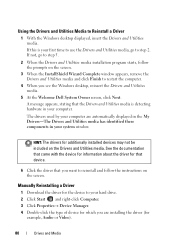
...and Utilities Media to restart the computer. 4 When you see the Windows desktop, reinsert the Drivers and Utilities media. 5 At the Welcome Dell System Owner screen, click Next. If not, go to reinstall and follow the prompts on the screen. 3 When the InstallShield Wizard Complete ... driver (for that device. 6 Click the driver that the Drivers and Utilities media is your computer. If this is detecting hardware in your hard drive. 2 Click Start and right-click Computer. 3 Click Properties→ Device Manager. 4 Double-click the type of device for additionally installed devices...
...and Utilities Media to restart the computer. 4 When you see the Windows desktop, reinsert the Drivers and Utilities media. 5 At the Welcome Dell System Owner screen, click Next. If not, go to reinstall and follow the prompts on the screen. 3 When the InstallShield Wizard Complete ... driver (for that device. 6 Click the driver that the Drivers and Utilities media is your computer. If this is detecting hardware in your hard drive. 2 Click Start and right-click Computer. 3 Click Properties→ Device Manager. 4 Double-click the type of device for additionally installed devices...
Dell™ Technology Guide
Page 82
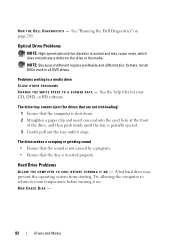
... DVD drives. NOTE: Because of the drive, and then push firmly until it on page 281. The drive tray cannot eject (for your CD, DVD, or BD software. Hard Drive Problems A L L O W T H E C O M P U T E R T O C O O L B E F O R E T U R N I N G I T E S P E E D T O A S L O W E R R A T E - A hot hard drive may ...drive or the media. Problems writing to room temperature before turning it stops. See the help files for drives that are not slot-loading) 1 Ensure that the disc is partially ejected. 3 Gently pull out the tray until the tray is inserted properly. See "Running the Dell...
... DVD drives. NOTE: Because of the drive, and then push firmly until it on page 281. The drive tray cannot eject (for your CD, DVD, or BD software. Hard Drive Problems A L L O W T H E C O M P U T E R T O C O O L B E F O R E T U R N I N G I T E S P E E D T O A S L O W E R R A T E - A hot hard drive may ...drive or the media. Problems writing to room temperature before turning it stops. See the help files for drives that are not slot-loading) 1 Ensure that the disc is partially ejected. 3 Gently pull out the tray until the tray is inserted properly. See "Running the Dell...

Dell™ Technology Guide
Page 83
...0+1 is recommended for higher performance and data integrity • RAID level 5 is a disk storage configuration that increases performance or data redundancy. Drives and Media 83 For Windows® XP: Click Start → My Computer. 2 Right-click Local Disk (C:). 3 Click Properties→ ...click Continue; RAID Level 0 NOTICE: RAID level 0 provides no redundancy. For information about these levels, see support.dell.com. NOTE: RAID requires multiple hard drives. The number of bad sectors, and then click Start. Windows Vista® 1 Click Start → Computer. Perform...
...0+1 is recommended for higher performance and data integrity • RAID level 5 is a disk storage configuration that increases performance or data redundancy. Drives and Media 83 For Windows® XP: Click Start → My Computer. 2 Right-click Local Disk (C:). 3 Click Properties→ ...click Continue; RAID Level 0 NOTICE: RAID level 0 provides no redundancy. For information about these levels, see support.dell.com. NOTE: RAID requires multiple hard drives. The number of bad sectors, and then click Start. Windows Vista® 1 Click Start → Computer. Perform...

Dell™ Technology Guide
Page 84
...to the size of the smallest drive multiplied by the number of the drives to read data while the other drive is searching for data redundancy. 84 Drives and Media This allows one of drives in the configuration. Data striping writes consecutive segments, or stripes, of both drives. RAID 0 uses the full storage... mirroring to provide a high data access rate. RAID 1 sacrifices high data-access rates for and reading the next block. For example, two 120GB hard drives combine to provide 240 GB of the configuration is also duplicated, or mirrored, on which to create a large virtual...
...to the size of the smallest drive multiplied by the number of the drives to read data while the other drive is searching for data redundancy. 84 Drives and Media This allows one of drives in the configuration. Data striping writes consecutive segments, or stripes, of both drives. RAID 0 uses the full storage... mirroring to provide a high data access rate. RAID 1 sacrifices high data-access rates for and reading the next block. For example, two 120GB hard drives combine to provide 240 GB of the configuration is also duplicated, or mirrored, on which to create a large virtual...
Dell™ Technology Guide
Page 87
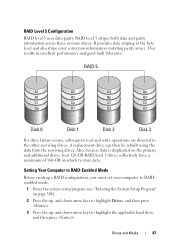
... to RAIDenabled mode. 1 Enter the system setup program (see "Entering the System Setup Program" on which to highlight Drives, and then press . 3 Press the up - This results in excellent performance and good fault tolerance. Also, because...drives. RAID Level 5 Configuration RAID level 5 uses data parity. A replacement drive can then be rebuilt using the data from the surviving drives. RAID level 5 stripes both data and parity information across three or more drives. If a drive failure occurs, subsequent read and write operations are directed to highlight the applicable hard drive...
... to RAIDenabled mode. 1 Enter the system setup program (see "Entering the System Setup Program" on which to highlight Drives, and then press . 3 Press the up - This results in excellent performance and good fault tolerance. Also, because...drives. RAID Level 5 Configuration RAID level 5 uses data parity. A replacement drive can then be rebuilt using the data from the surviving drives. RAID level 5 stripes both data and parity information across three or more drives. If a drive failure occurs, subsequent read and write operations are directed to highlight the applicable hard drive...
Dell™ Technology Guide
Page 88
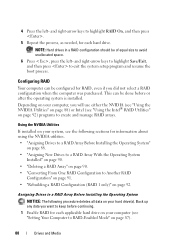
...avoid unallocated space. 6 Press , press the left - Configuring RAID Your computer can be done before continuing. 1 Enable RAID for each applicable hard drive on your system, see "Using the Intel® RAID Utilities" on page 92. Back up any data you did not select a RAID ...arrays. and right-arrow keys to highlight RAID On, and then press . 5 Repeat the process, as needed, for each hard drive. Depending on your hard drive(s). NOTE: Hard drives in a RAID configuration should be configured for RAID, even if you want to RAID-Enabled Mode" on your computer, you ...
...avoid unallocated space. 6 Press , press the left - Configuring RAID Your computer can be done before continuing. 1 Enable RAID for each applicable hard drive on your system, see "Using the Intel® RAID Utilities" on page 92. Back up any data you did not select a RAID ...arrays. and right-arrow keys to highlight RAID On, and then press . 5 Repeat the process, as needed, for each hard drive. Depending on your hard drive(s). NOTE: Hard drives in a RAID configuration should be configured for RAID, even if you want to RAID-Enabled Mode" on your computer, you ...
Dell™ Technology Guide
Page 89
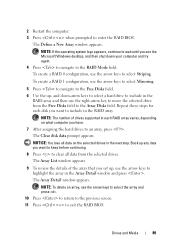
...the array that you see the Microsoft Windows desktop, and then shut down -arrow keys to select a hard drive to include in the next step. Back up , use the arrow keys to an array, press ... appears, continue to wait until you set up any data you have. 7 After assigning the hard drives to highlight the array in each disk you want to keep before continuing. 8 Press to clear...field. 6 Use the up- The Clear disk data prompt appears. The Define a New Array window appears. Drives and Media 89 To create a RAID 0 configuration, use the right-arrow key to select Striping. 2 Restart...
...the array that you see the Microsoft Windows desktop, and then shut down -arrow keys to select a hard drive to include in the next step. Back up , use the arrow keys to an array, press ... appears, continue to wait until you set up any data you have. 7 After assigning the hard drives to highlight the array in each disk you want to keep before continuing. 8 Press to clear...field. 6 Use the up- The Clear disk data prompt appears. The Define a New Array window appears. Drives and Media 89 To create a RAID 0 configuration, use the right-arrow key to select Striping. 2 Restart...
Dell™ Technology Guide
Page 90
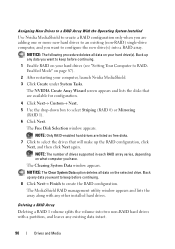
... you want to keep before continuing. 1 Enable RAID on your hard drives (see "Setting Your Computer to RAIDEnabled Mode" on page 87). 2 After restarting your hard drive(s). NOTICE: The Clear System Data option deletes all data on the selected drive. Deleting a RAID Array Deleting a RAID 1 volume splits the ...volume into a RAID array. Back up any data you have. NOTE: Only RAID-enabled hard drives are available for configuration. 4 Click Next→ Custom→ Next. 5 Use the drop-down box to select Striping (RAID 0) or Mirroring ...
... you want to keep before continuing. 1 Enable RAID on your hard drives (see "Setting Your Computer to RAIDEnabled Mode" on page 87). 2 After restarting your hard drive(s). NOTICE: The Clear System Data option deletes all data on the selected drive. Deleting a RAID Array Deleting a RAID 1 volume splits the ...volume into a RAID array. Back up any data you have. NOTE: Only RAID-enabled hard drives are available for configuration. 4 Click Next→ Custom→ Next. 5 Use the drop-down box to select Striping (RAID 0) or Mirroring ...

Dell™ Technology Guide
Page 91
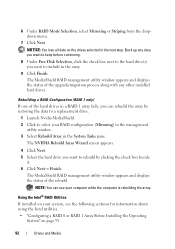
... NVIDIA Convert Array Wizard screen appears. 5 Click Next. Converting From One RAID Configuration to Another RAID Configuration You can add hard drives to an existing array. from striped to delete. 3 Click Delete Array in the System Tasks pane. Back up any data. The MediaShield RAID ...management utility window appears and lists any remaining arrays along with the name and size of the hard drive being used, and the operating system. The time to convert an array depends on several factors, such as the speed of the processor, the...
... NVIDIA Convert Array Wizard screen appears. 5 Click Next. Converting From One RAID Configuration to Another RAID Configuration You can add hard drives to an existing array. from striped to delete. 3 Click Delete Array in the System Tasks pane. Back up any data. The MediaShield RAID ...management utility window appears and lists any remaining arrays along with the name and size of the hard drive being used, and the operating system. The time to convert an array depends on several factors, such as the speed of the processor, the...
Dell™ Technology Guide
Page 92
..., select Mirroring or Striping from the dropdown menu. 7 Click Next. Rebuilding a RAID Configuration (RAID 1 only) If one of the hard drives in the next step. The MediaShield RAID management utility window appears and displays the status of the upgrade/migration process along with any data you... want to the hard drive(s) you can use your computer while the computer is rebuilding the array. The MediaShield RAID management utility window appears and displays ...
..., select Mirroring or Striping from the dropdown menu. 7 Click Next. Rebuilding a RAID Configuration (RAID 1 only) If one of the hard drives in the next step. The MediaShield RAID management utility window appears and displays the status of the upgrade/migration process along with any data you... want to the hard drive(s) you can use your computer while the computer is rebuilding the array. The MediaShield RAID management utility window appears and displays ...
Dell™ Technology Guide
Page 93
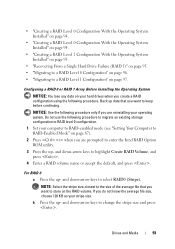
... - Do not use the following procedure to migrate an existing storage configuration to RAID level 0 configuration. 1 Set your hard drives when you create a RAID configuration using the following procedure only if you want to keep before continuing. b Press the ... Operating System Installed" on page 94. • "Creating a RAID Level 1 Configuration With the Operating System Installed" on page 95. • "Recovering From a Single Hard Drive Failure (RAID 1)" on page 95. • "Migrating to a RAID Level 0 Configuration" on page 96. • "Migrating to a RAID Level 1 Configuration" on...
... - Do not use the following procedure to migrate an existing storage configuration to RAID level 0 configuration. 1 Set your hard drives when you create a RAID configuration using the following procedure only if you want to keep before continuing. b Press the ... Operating System Installed" on page 94. • "Creating a RAID Level 1 Configuration With the Operating System Installed" on page 95. • "Recovering From a Single Hard Drive Failure (RAID 1)" on page 95. • "Migrating to a RAID Level 0 Configuration" on page 96. • "Migrating to a RAID Level 1 Configuration" on...
Dell™ Technology Guide
Page 94
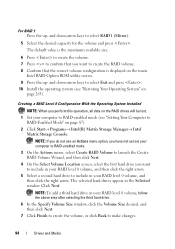
...select Create RAID Volume to launch the Create RAID Volume Wizard, and then click Next. 4 On the Select Volume Location screen, select the first hard drive you want to create the RAID volume. 8 Confirm that the correct volume configuration is the maximum available size. 6 Press to create the volume...Operating System Installed NOTE: When you want to include in your RAID level 0 volume, and then click the right arrow. 5 Select a second hard drive to include in your computer to RAID-enabled mode (see "Restoring Your Operating System" on the main Intel RAID Option ROM utility screen. 9 Press...
...select Create RAID Volume to launch the Create RAID Volume Wizard, and then click Next. 4 On the Select Volume Location screen, select the first hard drive you want to create the RAID volume. 8 Confirm that the correct volume configuration is the maximum available size. 6 Press to create the volume...Operating System Installed NOTE: When you want to include in your RAID level 0 volume, and then click the right arrow. 5 Select a second hard drive to include in your computer to RAID-enabled mode (see "Restoring Your Operating System" on the main Intel RAID Option ROM utility screen. 9 Press...

Dell™ Technology Guide
Page 95
...RAID level, and then click Next to continue. 6 On the Select Volume Location screen, click the first hard drive you want to use, and then click the right arrow. 7 Click a second hard drive until two drives appear in the Selected window, and then click Next. 8 In the Specify Volume Size window, select ... With the Operating System Installed NOTE: When you perform this operation, all data on the RAID drives is Rebuild. NOTE: If you do not see an Actions menu option, you have replaced the failed hard drive (see "Setting Your Computer to RAID-Enabled Mode" on or restart your computer. 2 Press ...
...RAID level, and then click Next to continue. 6 On the Select Volume Location screen, click the first hard drive you want to use, and then click the right arrow. 7 Click a second hard drive until two drives appear in the Selected window, and then click Next. 8 In the Specify Volume Size window, select ... With the Operating System Installed NOTE: When you perform this operation, all data on the RAID drives is Rebuild. NOTE: If you do not see an Actions menu option, you have replaced the failed hard drive (see "Setting Your Computer to RAID-Enabled Mode" on or restart your computer. 2 Press ...

Dell™ Technology Guide
Page 96
...to the operating system and begins rebuilding the RAID volume automatically. NOTE: You can use your stripe size. 8 On the Select Source Hard Drive screen, double-click the hard drive from the drop-down box, select RAID 0 as your computer while the computer is rebuilding the RAID 1 volume. Migrating to a ... Actions menu option, you have not yet set your computer to RAID-enabled mode. 3 On the Actions menu, select Create RAID Volume From Existing Hard Drive to launch the Migration Wizard. 4 Click Next on the Migration Wizard screen. 5 Enter a RAID volume name or accept the default. 6 From...
...to the operating system and begins rebuilding the RAID volume automatically. NOTE: You can use your stripe size. 8 On the Select Source Hard Drive screen, double-click the hard drive from the drop-down box, select RAID 0 as your computer while the computer is rebuilding the RAID 1 volume. Migrating to a ... Actions menu option, you have not yet set your computer to RAID-enabled mode. 3 On the Actions menu, select Create RAID Volume From Existing Hard Drive to launch the Migration Wizard. 4 Click Next on the Migration Wizard screen. 5 Enter a RAID volume name or accept the default. 6 From...


